Transcription
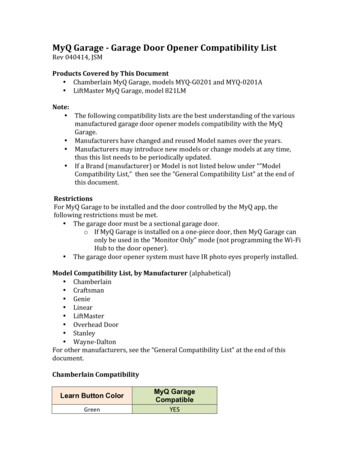
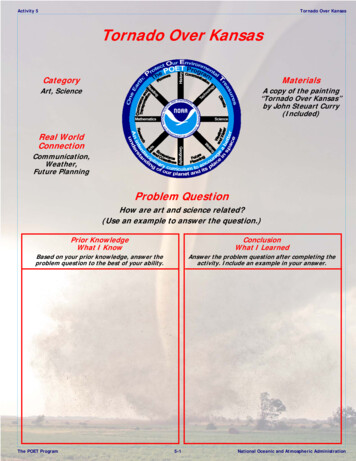
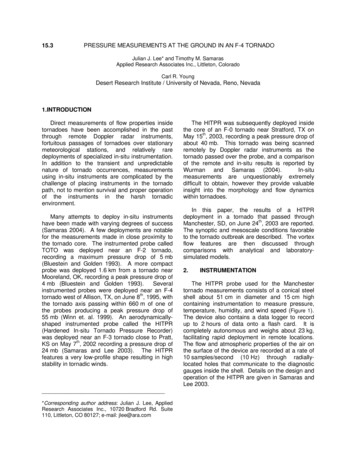
FEMA Tornado Frame and Door Installation InstructionsPAGE 1 OF 12Overview: Installation instructionsThese installation instructions are only guidelines.Errors and Omissions statement from Tech Data p.6applies to this document. Applicable building codes,standards and accepted practices apply. Follow typicalFrame installation and ICC500-2014 requirements. TheAuthority Having Jurisdiction is the final authority inissues related to the installation and use of any buildingproducts. Typical installation details are supported by avideo collaboration with the Steel Door Institute (SDI).See “Prep and Installation Videos” of SDI Videos.A. FEMA FRAME AND DOOR ORDERING:1. For ordering the correct undercut and installingcorrectly, reference Tech data notes on DoorUndercuts under Door, Standard Specifications.Verify correct frame size and undercut. Thedoor gap is a max 1/8” from bottom of door totop of lip on a WS 304L cup strike (1/4” tobottom of lip) (FIG. 1) or 1/8”-1/4” to the top ofan LM9300 strike plate (FIG. 2). Manufacturestrike must always be used and must beanchored or grouted into slab as directed byhardware instructions.2. Installations must follow hardwaremanufacturer guidance and installationinstructions. Follow links for Von Duprin andSchlage tornado approved hardware, or go tohttp://us.allegion.com and search in theDocument Library for these and other Allegionhardware or accessory catalogs, tech data, andinstallation instructions. For installation intoconcrete foundations and shelter walls, followICC500-2014 industry code which includesreferences to other industry codes such as ACI318 for structural concrete and ACI 530 formasonry structures. Verify any requirementswith your local AHJ (Authority HavingJurisdiction), the final authority in issues relatedto the installation and use of any buildingproducts.3. As with all Tornado Doors and Frames, orderframes and doors based on opening size, whichis the horizontal dimension from rabbet to 2019 Allegionxxxxxx, Rev. 02/4/19www.allegion.com/usTABLE OF CONTENTS (links)A. FEMA FRAME AND DOOR ORDERINGB. FEMA DF Frame installationC. FEMA DF Door installationD. FEMA doors with glass lightsE. Approved Tornado Frame AnchoringF. Gasketing/Seals and WS Bottom latching detailsHELPFUL LINKS FEMA ON REPUBLICDOOR.COMo INCLUDES APPROVAL GRID AND LINK TO LISTING SDI GENERAL INSTALLATION VIDEOS ALWAYS FOLLOW HARDWARE INSTALLATIONINSTRUCTIONS ALLEGION DOCUMENT LIBRARY (link)o VON DUPRIN WS98/9927/57o SCHLAGE LM9300o ALLEGION ACCESSORY HARDWAREo SECURITECH - CONTACT SECURITECH OR SUPPORT REPUBLIC SUPPORT – – emailcontacts@republicdoor.com or call 731.352.3383FIG. 1 – WS BOTTOM GAPFIG. 2 - LM9300 strike plate
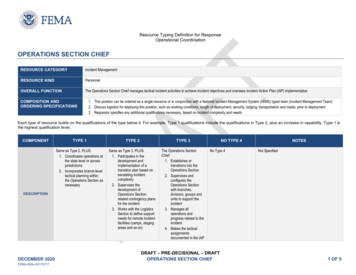
FEMA Tornado Frame and Door Installation Instructionsrabbet, and vertical dimension from bottom offrame to head rabbet. Typical door gaps are3/32” to jambs, and 1/8” to the head.Undercuts may vary, typ not greater than 3/4”undercut allowed between bottom of door andfinished floor. See Tech data for additionalinformation.4. Handing - Correctly understanding handing inordering and installing tornado products iscritical to life safety. See "Handing proceduresdiagrams" (FIG. 3) and use the followingIMPORTANT rules when considering Tornadoopenings. Ref also FEMA lights (FIG. 4).a) The Exterior, or Outside, is always theStorm side (the side of the door that faces astorm). Typically, this is the Key Side, butnot always (e.g. not typical, but if theshelter is the hallway and a connectedclassroom is outside of the shelter, theoutside of your door would face theclassroom since that is the side facing theoutside, or storm side, of the shelter).b) The Interior, or Inside, is always the Safeside (the side on the inside of your shelteror safe room). Typically, this is the non-KeySide, but not always (e.g. not typical, but ifthe shelter is the hallway and a connectedclassroom is outside of the shelter, theinside of your door would face the hall sincethat is the side facing the inside, or safeside, of the shelter).c) Note that DF doors may be inswing oroutswing when using lever trim. But DFdoors with panic exit hardware will alwaysbe outswing with the panic bar on the safeside and the door opening out towards theOutside, or Storm side.5. Shutter frames – Shutter handing. Most shutterapplications should be ordered as straighthanded.a) Straight handed shutters (FIG. 5). Shutterswith glass in a 4-sided frame are alwaysstraight handed. If the shutter opening doesnot have glass but is still installed into therabbet nearest to the inside /safe side of 2019 Allegionxxxxxx, Rev. 02/4/19www.allegion.com/usFIG 3. – GENERAL HANDING CHARTFIG. 4 – FEMA LIGHT HANDING CHARTFIG. 5 – STRAIGHT HANDED SHUTTERSFIG. 6 – REVERSE HANDED SHUTTERSPAGE 2 OF 12
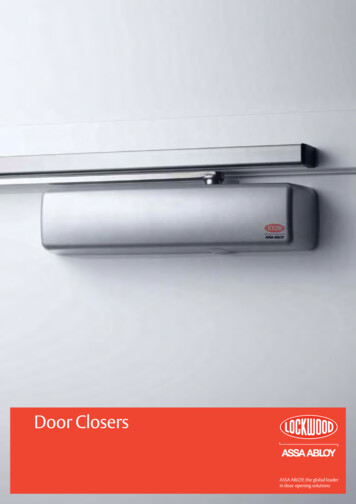
FEMA Tornado Frame and Door Installation InstructionsPAGE 3 OF 12the opening, then the shutter is still straighthanded. Non-impact resistant glass (provided byothers) can be field installed in exterior(storm side) rabbet of frame.b) Reverse handed shutters (FIG. 6): Shutterswithout glass that are installed into therabbet nearest to the storm side of theopening is reverse handed. This optionwould not have glass.B. FEMA DF Frame installation1. Follow typical installation as a guide, notingspecific differences with FEMA Frames in theinstructions below. See SDI/Allegioncollaborative video under SDI Videos SteelDoor and Frame Installation “How to InstallFrames in Masonry Construction.”2. As with any frame installation, take the time tomake certain that frames are continuallychecked for “plumb, level and square”throughout installation.3. Match frame and opening location by openingnumber or mark number (FIG. 7). Verify ICC5002014 / FEMA 361 label, as well as fire label ifapplicable. Confirm handing of frame todrawings/door schedule/hardware schedule.4. Verify correct reinforcement, hinge size, striketype, closer and other reinforcements formounting hardware.5. Determine floor finish (concrete, wood, tile,etc.). Verify correct frame size and undercut.The latch must always engage the strike whichmust be securely embedded (WS 304L, FIG. 26)or anchored (LM strike plate, FIG. 2) into theconcrete slab, regardless of threshold orfinished floor. See FIG. 29 for a typical Saddlethreshold and FIG.30 for a less commonrabbeted (bumper) threshold withWS98/9927/57 latching.6. You may need to fix uneven floors prior toframe installation to avoid problems in closure,latching and maintaining an even gap/undercut.7. Frames may be ordered KD or SUA (Welded).Refer to Tech data. An SUA frame will arrive 2019 Allegionxxxxxx, Rev. 02/4/19www.allegion.com/usFIG. 7 – MATCH OPENING LOCATION AND FRAME MARK NUMBERFIG. 8 – PROPERLY GRIND OFF SHIPPING BAR
FEMA Tornado Frame and Door Installation Instructionswith a shipping bar welded to the base of theframe to prevent collapsing and twisting intransit. Do not use this bar to set the frame.Grind it off; do not hammer it off to avoiddamage to the frame, prior to setting the frame(FIG. 8, previous page).8. KD frames are assembled using the cornertab/slots (see Tech data).9. If installing the frame first for New masonrywall construction (e.g. grout filled CMU blockwalls), set your frame first and then build groutfilled CMU block walls up evenly on both jambs.a) Lay out your frame on the floor perdrawings prior to setting the frame.b) Precisely cut an accurate/square spreaderbar to maintain proper frame spacing whilesetting the frame (FIG. 9).c) Verify the jambs are plumb, the head islevel, and the frame is in square. Installbase anchors into concrete (FIG. 10) andadjust with screws to keep the head leveland to achieve proper floor clearance. Youcan shim the frame with a flat metal washeror fender washer.d) Set your frame using back braces andspreader bars (FIG. 11).e) For openings with electrical components,now install conduit or flex cable.f) Install a piece of tie wire at about 48” fromthe f
See "Prep and Installation Videos" of SDI Videos. A. FEMA FRAME AND DOOR ORDERING: 1. For ordering the correct undercut and installing correctly, reference Tech data notes on Door Undercuts under Door, Standard Specifications. Verify correct frame size and undercut. The door gap is a max 1/8" from bottom of door to