Transcription
Annotation Pro &Annotation Pro PlusAN C5 / AN C5 PUSER MANUALMAN 264D
Annotation Pro & Annotation Pro PlusTable of ContentsSafety Warnings and Instructions. 6Maintenance and Recycling Instructions.7Overview.8Introduction . 8This Manual. 8Save, Print, and Share Images. 8Annotation. 8Features. 9General Installation. 10The Back Panel.10Connecting the Video Source and Outputs.10Connecting Devices.10Power On.11Controllers/Markers Overview.12Toolbar.13Clear All Marking.13Erase Tool.13Drawing Tools.13Line Color .13White Board.13HDMI.13USB Camera.13Record.13Save Image.13Annotation Pro Menu System.14Overview.14Using the Annotation Pro Menu System.14Menu Basics.14Menu Conventions.14Making menu selections.152
Annotation Pro & Annotation Pro PlusSystem Information.15System Info.15Scheduling Restarts.16Detecting and Assigning Devices.16Serial Port Settings.16Manual Serial Port Assignment. 17Viewing a USB Device Type.18Manually Assigning a USB Device. 20Integrating the Annotation Pro with Other Systems. 20Setting COMM Port Parameters. 20Preparing Video Sources and Outputs.21Setting Video Output.21EDID.21Video Source Options.22Default Video Source.22Picture-In-Picture (PIP) Setup.23Networking (TCP/IP, TFTP, SMB).24Network Setup.24Configure TFTP Settings.25Configure Windows Share (SMB) Settings.25Calibrating and Configuring Touch Screens. 26Calibrating Annotation Pro Touch Screen Controllers. 26Touch Screen Command Areas. 27Customizing Markers and Pointers. 29Customizing the Color Palette. 29Selecting Colors for a Presentation. 29Selecting a Brightness Level. 30Zap Icon Toggle.31Using Markers.31Overview.31Assigning Marker Colors.31Entering the Marking Mode.323
Annotation Pro & Annotation Pro PlusDrawing.32Selecting Pointers.33Creating a Pointer.34Turning the Active Pointer On/Off.34Typing Text Labels.35Displaying the Date/Time.35Clearing All Markers.35Undoing a Marker.36Erasing Markers.36Using The Chalkboard. 37Saving and Storing Images and Video. 37Overview. 37Capture Options. 37Freezing Video.38Setting the Destination for Saved Files.39Setting the Verify Option.39Saving Images.39Retrieving Images.40Printing Images.41Printer Setup.41Print an image.42Verifying Saved or Printed Images.424
Annotation Pro & Annotation Pro PlusUpdating the Annotation Pro.42Annotation Control App (AN C5 P Only).43Glossary.44Troubleshooting Guide.45Appendix. 47Quick Reference for Keyboard. 47Quick Reference for Touch Screens.48RS-232 (COMM Port) Pinout and Commands.49Outside copyright information for Software.49Specifications. 55Regulatory Statements. 55United States - FCC.55Canada IC.55Limited Warranty. 565
Annotation Pro & Annotation Pro PlusSafety Warnings and InstructionsWARNING!TO REDUCE THE RISK OF FIRE OR ELECTRIC SHOCK, DO NOT EXPOSE THIS APPLIANCE TO RAIN ORMOISTURE.CAUTION!TO REDUCE THE RISK OF ELECTRIC SHOCK, DO NOT REMOVE COVER. NO USER-SERVICEABLE PARTS INSIDE.REFER SERVICING TO QUALIFIED SERVICE PERSONNEL.POWER CORD NOTICE FOR INTERNATIONAL OPERATION - Please call Williams AV Customer Service at 800.328.6190to order the appropriate power cord for the country of use.Important Safety Instructions:1. Read these instructions2. Keep these instructions3. Heed all warnings4. Follow all instructions5. Do not use this apparatus near water.6. Clean only with dry cloth.7. Do not block any ventilation openings. Install in accordance with the manufacturer’s instructions.8. Do not install near any heat sources such as radiators, heat registers, stoves, or other apparatus (includingamplifiers) that produce heat.9. Do not defeat the safety purpose of the polarized or grounding-type plug. A polarized plug has two blades withone wider than the other. A grounding type plug has two blades and a third grounding prong. The wide blade orthe third prong is provided for your safety. If the provided plug does not fit into your outlet, consult an electricianfor replacement of the obsolete outlet.10. Protect the power cord from being walked on or pinched particularly at plugs, convenience receptacles, and thepoint where they exit from the apparatus.11. Only use attachments/accessories specified by the manufacturer.12. Unplug this apparatus during lightning storms or when unused for long periods of time.13. Refer all servicing to qualified service personnel.14. The apparatus shall not be exposed to liquids.15. Carts and Stands - The appliance should be used only with a cart or stand that is recommended by themanufacturer. An appliance and cart combination should be moved with care. Quick stops, excessive force anduneven surfaces may cause the appliance and cart combination to overturn.16. Power Sources - The appliance should be connected to a power supply only of the type described in theoperating instructions or as marked on the appliance.17. Object and Liquid Entry - Care should be taken so that objects do not fall and liquids are not spilled into theenclosure through the openings.18. Servicing - The user should not attempt to service the appliance beyond that described in the operatinginstructions. All other servicing should be referred to qualified service personnel.6
Annotation Pro & Annotation Pro PlusPrecautions:1. Power – WARNING, BEFORE TURNING ON THE POWER FOR THE FIRST TIME, READ THE FOLLOWING SECTIONCAREFULLY. The unit is designed for use only with the line cord of the region in which it will be operated.2. Voltage Label (Rear Panel) – A label located at the rear panel power connection indicates the DC power input forthe unit. The label will read 19VDC. Note: use the Williams AV TFP 060 power supply for this unit.3. Do Not Plug in the HDMI input, output, Comm 1, Comm 2, Ethernet, or USB connections while the power switch isswitched to the ON position.4. Do Not Touch any part of the Annotation Pro with wet hands. Do not handle any part of system, includingthe power cord, when your hands are wet or damp. If water or any other liquid enters the Annotation Pro orAnnotation Pro‘s location, take the device to qualified service personnel for inspection.5. Place all components of the Annotation Pro in a well ventilated location. Take special care to provide plenty ofventilation on all sides of the system components, especially when it is placed in a small location, such as a rack.If ventilation is blocked, the system may over heat and malfunction.6. Do not expose the Annotation Pro to direct sun light or heating units as the system’s internal componentstemperature may rise and shorten the life of the components. Avoid damp and dusty places.7. Care – From time to time you should wipe off the front and side panels and the cabinet with a soft cloth. Do notuse rough material, thinners, alcohol or other chemical solvents or cloths since this may damage the finish orremove the panel graphics.Maintenance and Recycling InstructionsHelp Williams AV protect the environment. Please take the time to dispose of your equipment properly.Product Recycling:Please do NOT dispose of your equipment in the household trash. Take the equipment to a electronicsrecycling center.Servicing or attempting to service this device will void the warrantyRefer servicing to qualified personnel. Servicing is required when the system has been damaged in any way: if liquidhas been spilled or objects have fallen into the unit, if the unit has been exposed to moisture, if the unit does notoperate normally, or if the unit has been dropped.Do not block any ventilation openings. Install in accordance with manufacturer’s instructions.Do not install near any heat sources such as radiators, heat registers, stoves, or other apparatus that produces heat.Use only attachments/accessories specified by the manufacturer.Unplug the transmitter during lightning storms or when unused for long periods of time.Be advised that different operating voltages require the use of different types of line cord and attachment plugs.Check the voltage in your area and use the correct type.Use only the power supply provided by Williams AV. Other power supplies may have similar specifications, butmay not be equivalent in emissions ratings, in-rush current, etc. Use of an unapproved power supply may leave thedevice partially or completely inoperable, and will void the warranty.This apparatus has been designed with class-1 construction and must be connected to a main socket outlet with aprotective ground connection (the third grounding prong).Protect the power cord from being walked on or pinched, particularly at plugs, receptacles, and near the power jackon the transmitter.The MAINS plug or an appliance coupler is used as the disconnect device, so the disconnect device should remainreadily operable.7
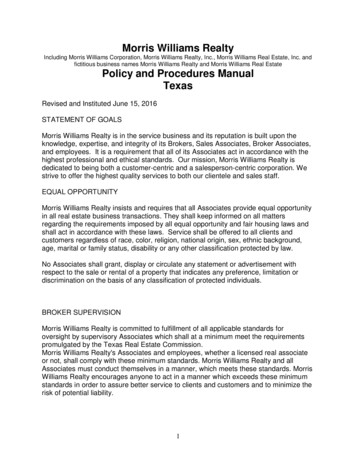
Annotation Pro & Annotation Pro PlusOverviewIntroductionThe Annotation Pro (AN C5) is a professional, hardware-based video processor, designed so that users can displaycontent from multiple video and computer sources connected directly to the Annotation Pro. Users can writeannotations and markers directly on the video content to help explain any content.Note on HDCPHDCP functions are only available on the Annotation Pro Plus (AN C5 P).This ManualThis manual provides instructions for configuring your Annotation Pro, using the built in system menu, creatingannotations, providing video sources, and connecting and using physical controllers (such as a keyboard or mouse).The Annotation Pro offers many control options to create powerful presentations with a touch screen. You can alsouse an HDMI cable to manually connect to the Annotation Pro, or a USB video input.It is also possible to control Annotation Pro with Crestron, or AMX type room control system. For instructions onconfiguring RS-232 devices to send commands to the Annotation Pro, follow the instructions in this manual forproper wiring and configuration. Once your RS-232 device is properly wired, please see the RS-232 (COMM Port)Pinout and Commands section, and reference the Programmer’s Guide. The Programmer’s Guide has a list ofdetailed commands that can be sent to the Annotation Pro.Save, Print, and Share ImagesThe Annotation Pro gives the user the ability to save, print, and share annotated images. An annotated image can besaved to a USB storage device, such as a flash drive. Users can also print annotated images to a printer. Images canbe shared over a TCP/IP network through Windows Share.AnnotationThe user has a variety of options for drawing lines and markers during a presentation. The Annotation Pro iscompatible with most touch screens, smartphones, keyboards and mouse devices.Marking example over an image of a spreadsheet8
Annotation Pro & Annotation Pro PlusVideo is annotated using several simple-to-use graphics called markers. There are two types of markers: pointers(such as an arrow) and freehand drawing. Pointers and drawings may be used in combination to annotate. Markersare easily erased either one at a time until the screen is clear, or all at once.When a keyboard is attached, text, a date/time stamp, and straight line drawing are available. With the variousmarker selections available, users can choose the best option to increase contrast over the image or videodisplayed in the monitor.Users may also display a white background on the screen and use it like a Chalkboard on which to “draw out” yourpoint.Features Two marking tools.º 2 pointers with 8 arrows of various angles, plus 2 dots and 2 cross hairs in a small or large size.º Freehand draw in 7 solid line colors, 4 different line thicknesses (with or without drop shadows). Four additional marking tools with keyboard connected.º Straight line drawing mode allows underscoring, mapping or other wise drawing a straight line.º Text can be typed on the video image in one of 6 different fonts, each available in one or more sizes. A textbackground may be added to further highlight the text on the video image.º An active date/time label (sometimes called a date/time stamp) can be placed on the video image to time anevent. This label is very useful for record keeping when saving or printing images because it is embedded inthe image. The ability to position and anchor a combination of several markers and drawings on the screen at once. Easily save, print, and share annotated images. Options for clearing lines and pointers from an overlay all at once or one at a time, beginning with the mostrecently anchored marker. Ability to assign a unique marker color (up to 7) to each marking device and switch between colors during apresentation. A drop shadow effect may be selected to further optimize the display of annotated lines over the background. Compatibility with HDMI equip ment. A solid white chalkboard can be selected for drawing when the video image is no longer needed. Sync generation allows the Annotation Pro to automatically select the sync if no live video is desired. In theevent that sync from a poor video source is lost, the Annotation Pro will automatically switch to chalkboardmode if auto-chalkboard is enabled. Keyboard control provides a quick way to select many of the Menu System options without having to go to theMenu System. Instead, function keys provide choices for pointer type, background, marker colors, brightnesslevels, video source selection, and more. Brightness adjustment gives you the opportunity to set the brightness of the Annotation Pro markers to coincidewith the brightness level of the video signal, so that the markers are displayed optimally for standard video orfor professional broadcasting. AV programmable so that AV control systems can control the Annotation Pro using programmable commands. Two RS-232 ports allow the simultaneous use of two RS-232 communications devices, such as touchscreens. Five USB 3.0 ports allow the simultaneous use USB touch screens, or other USB control devices. The use ofUSB hubs increases the device limit to more USB control devices. Record the entire presentation as an MP4 to archive or replay. Easily switch between content, sources, and presentation materials. Annotate regions of interest to focus your audience’s attention. Shows 4K video, allowing for the most eye catching images and critical details to be clearly examined.9
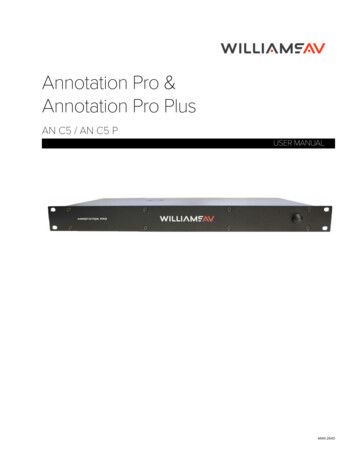
Annotation Pro & Annotation Pro PlusGeneral InstallationThe Back PanelMost wired devices will connect via one of the ports on the back panel. There are numerous ports to connect to,including USB, HDMI, COMM ports and a Phoenix-Style connector.Back PanelPWR SWAN C519VDC --- 4.7A--C BUSB 3.0HDMI InCOMM 2COMM 1HDMI OutUSB 3.0LANRoHSMade in USABack Panel DiagramConnecting the Video Source and OutputsHDMI ConnectorsTo connect HDMI video:HDMI Input into Annotation Pro: Using HDMI video cable, connect the cable to the HDMI In port on the back panelof the Annotation Pro.HDMI Output from Annotation Pro: Using HDMI video cable, connect the cable to the HDMI Out port on the back ofthe Annotation Pro to HDMI In on a HDMI display.Note on HDCP: HDCP functions are only available on the Annotation Pro Plus (AN C5 P).Connecting DevicesHere are some guidelines for setting up these devices.IMPORTANT: Be sure to power down the Annotation Pro before connecting or disconnecting any controllers. TheAnnotation Pro will automatically detect installed controllers upon turning the power on. If you change controllers oradd a new controller, you need to turn power off, install the new controller(s), then turn the power on.Connecting USB De
The Annotation Pro offers many control options to create powerful presentations with a touch screen. You can also use an HDMI cable to manually connect to the Annotation Pro, or a USB video input. It is also possible to control Annotation Pro with Crestron, or AMX type room control system. For instructions on