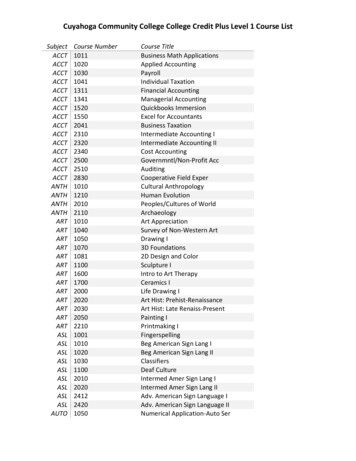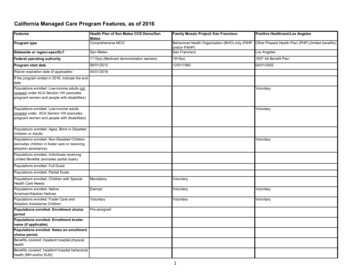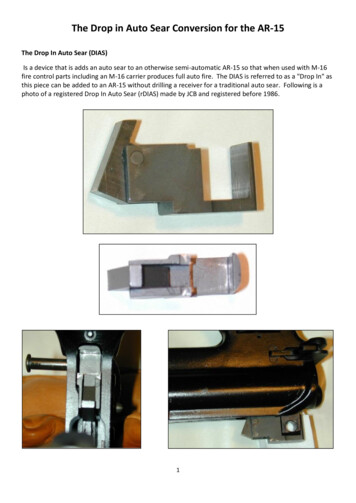
Transcription
Auto ProvisioningblankAuto ProvisioningYeastar Cloud PBXVersion: 1.9.29Date: 2021-10-29
ContentsAuto Provisioning. 1Supported IP Phone Manufactures and Phone Models. 1Steps to Auto Provision Phones. 5Auto Provision Phone Lines. 6Update Auto Provision Settings. 7Auto Provision Phonebook. 8Auto Provision Contacts. 8Auto Provision Phone Firmware.9Synchronize Phone Time with the PBX. 10Export Auto Provision Settings. 11Auto Provisioning Template. 11Search and View Default Template.11Add a Custom Auto Provisioning Template. 12Add Additional Settings in Custom Template. 12
Auto ProvisioningAuto Provisioning App helps you set up your IP phones in bulk.Using auto provisioning, you can instruct phone to retrieve its configuration from YeastarPBX. Once you provision your phones, the phones will automatically configure themselvescorrectly. In this way, you can manage your phones centrally without having to configureyour phones one by one.Supported IP Phone Manufactures and Phone ModelsYealinkModelFirmware VersionSIP-T19P E253.81.0.XX or laterSIP-T21P E252.81.0.XX or laterSIP-T23P44.81.0.XX or laterSIP-T23G44.81.0.XX or laterSIP-T27P45.81.0.XX or laterSIP-T27G69.81.0.XX or laterSIP-T29G46.81.0.XX or laterSIP-T30124.85.0.15 or laterSIP-T30P124.85.0.15 or laterSIP-T31124.85.0.15 or laterSIP-T31P124.85.0.15 or laterSIP-T31G124.85.0.15 or laterSIP-T33P124.85.0.15 or laterSIP-T33G124.85.0.15 or laterSIP-T40P54.81.0.XX or laterSIP-T40G76.81.0.XX or laterSIP-T41P36.81.0.XX or laterSIP-T41S66.81.0.XX or later
Auto Provisioning 1 - Auto Provisioning 2ModelFirmware VersionSIP-T41U108.84.0.119 or laterSIP-T42U108.84.0.119 or laterSIP-T42G29.81.0.XX or laterSIP-T42S66.81.0.XX or laterSIP-T43U108.84.0.119 or laterSIP-T46G28.81.0.XX or laterSIP-T46S66.81.0.XX or laterSIP-T46U108.84.0.119 or laterSIP-T48G35.81.0.XX or laterSIP-T48S66.81.0.XX or laterSIP-T48U108.84.0.119 or laterSIP-T52S70.81.0.XX or laterSIP-T5395.84.0.30 or laterSIP-T53W95.84.0.30 or laterSIP-T54W96.84.0.30 or laterSIP-T57W97.84.0.35 or laterSIP-T54S70.81.0.XX or laterSIP-T56A58.80.0.XX or laterSIP-T58A58.80.0.XX or laterSIP-T58V58.80.0.XX or laterW41PW60B: 77.83.0.10 or laterW53PW60B: 77.83.0.10 or laterW60PW60B: 77.83.0.10 or laterW52PBase for W52P: 25.81.0.30 or laterW56PBase for W56P: 25.81.0.30 or laterCP930W-BaseW60B: 77.83.0.20 or laterVP5991.283.0.30 or laterCP92078.84.0.80 or later
Auto Provisioning 1 - Auto Provisioning 3ModelCP960Firmware Version73.83.0.30 or laterVtechModelFirmware VersionET6058.10.1.31 or laterET6358.10.1.31 or laterET6858.10.1.25 or laterVDP6501.0.0.9 or laterVCS7521.1.6.0 or laterVCS7541.1.6.0 or laterFanvilModelFirmware VersionC40014.0.0.3.r1 or laterC60014.0.0.3.r1 or laterX12.8.0.6251 or laterX1S2.2.3 or laterX1SG2.2.3 or laterX1P2.8.0.6251 or laterX22.8.0.6251 or laterX2C2.8.0.6251 or laterX2102.2.1 or laterX210i2.2.1 or laterX3S2.8.0.6251 or laterX3G2.8.0.6251 or laterX3SG2.2.3 or laterX3U2.2.3 or laterX42.8.0.6251 or laterX4SG1.3.5 or later
Auto Provisioning 1 - Auto Provisioning 4X5U2.2.1 or laterX5G1.4.0.2016 or laterX5S1.8.0 or laterX5U2.2.1 or laterH52.8.0.6251 or laterX61.8.0 or laterX6U2.2.1 or laterX72.2.1 or laterX7A2.2.1 or laterX7A2.2.1 or laterX7C2.2.1 or laterSnomModelFirmware VersionD12010.1.42.14 or laterD30510.1.42.14 or laterD31510.1.33.33 or laterD34510.1.33.33 or laterD37510.1.42.14 or laterD38510.1.33.33 or laterD71210.1.42.14 or laterD71510.1.42.14 or laterD71710.1.42.14 or laterD72510.1.42.14 or laterD73510.1.42.14 or laterD74510.1.42.14 or laterD76510.1.42.14 or laterD78510.1.33.33 or later
Auto Provisioning 1 - Auto Provisioning 5Steps to Auto Provision PhonesImportant:For the first time to auto provision your phones on the PBX, you need to RESET all yourphones before auto provisioning, or auto provisioning may not work.1. Check your phones' basic information, including phone manufacturer, MAC address,phone model.2. On the PBX Auto Provisioning page, add devices and set your phones' manufacturer,MAC address, model.3. Set the phone lines.4. Set the phones' language and time.5. Optional: Set other phone settings.6. Save the settings and REBOOT your phones.Note:After auto provisioned successfully, each time when your phones reboot, they will getand apply configurations (phonebook, language, time, etc.) from the PBX.
Auto Provisioning 1 - Auto Provisioning 67. When the phones restart, phone users will see an authentication page on theirphones. Users need to enter the user name and password to get and apply configura tions from the PBX. User Name: The extension number that is assigned to the phone. Password: The voicemail access PIN of the extension.Related informationAuto Provision Phone LinesAuto Provision PhonebookSynchronize Phone Time with the PBXAuto Provision Phone LinesYou can auto provision your phones to make the phones register PBX extensions automati cally.Important:For the first time to auto provision your phones on the PBX, you need to RESET all yourphones before auto provisioning, or auto provisioning may not work.1. Go to Auto Provisioning Device List, click Add or click Bulk Add.Note:You can only bulk provision phones that are in the same phone model.2. On the configuration page, select the phone manufacturer, phone model, and enterphone's MAC address.3. Select a customized template.The global settings will apply to the phone(s).4. In the Account section, activate a line and assign an extension for the phone.5. Click Features, Preference, or Codec tab to configure the settings.6. Click Save and reboot the phone.When the phone restarts, the phone user needs to fill in the user name and passwordto get the configurations from PBX.
Auto Provisioning 1 - Auto Provisioning 7 User Name: Enter the extension number that is assigned to the phone. Password: Enter the extension's Voicemail Access PIN.Tip: For the phone with small screen, you need to press the down key tofind the password box. If the authentication page disappears from the phone screen, reboot thephone again to get the authentication page. You can send welcome emails that contain the voicemail access PIN tothe users, then the users can log in the phone manually. If you export thedevice settings, you can check all the extensions' voicemail access PIN.Related informationExport Auto Provision SettingsAdd a Custom Auto Provisioning TemplateUpdate Auto Provision SettingsAfter finishing the auto provision configurations, you can update auto provision settings forspecific phones or all the phones.Note:Only the phone with extension registered to the PBX can update the auto provision settings.1. Go to Auto Provisioning Device List.2. Select the desired phone(s), clickto edit the settings.3. Click Save to save your configurations.4. On the pop-up window, click Yes to reboot the phone(s) and update the configura tions.Note:If the phones do not reboot automatically, reboot the phones automatically to makethe configuration take effect.
Auto Provisioning 1 - Auto Provisioning 8Auto Provision PhonebookYou can upload a phonebook to the PBX, and auto provision the phonebook to all the users'phones.Note: After auto provisioning phonebooks to the users' phones, the existing phonebooks ontheir phones will disappear. Auto provisioning phonebook only works for the phones that were registered to thePBX via auto provisioning.1. Go to Auto Provisioning Phonebook Phonebook, click Upload Phonebook.2. On the configuration page, select the phone manufacturer, and click Browse tochoose an xml file.Note: The file name should not contain special characters. To make an xml file, contact your phone manufacturer; you can also log in thephone web interface, export an xml file to start with.3. Click Upload to upload the file to PBX.4. Reboot the phone(s) and update phonebookRelated informationAuto Provision ContactsAuto Provision ContactsYou can add contacts on the PBX, and auto provision the contacts to the users' phones.
Auto Provisioning 1 - Auto Provisioning 9Note: After auto provisioning contacts to the users' phones, the existing contacts on theirphones will disappear. Auto provisioning contacts only works for the phones that were registered to the PBXvia auto provisioning. If you have uploaded a phonebook to the PBX, the PBX will auto provision the con tacts in the phonebook, and ignore the contacts that you add in the PBX.1. Go to Auto Provisioning Phonebook Contact.2. Click Add to add a contact.3. On the configurations page, set the contact's information.4. Click Save.5. Reboot the phone(s) and update contacts.Related informationAuto Provision PhonebookAuto Provision Phone FirmwareYou can update the phone firmware by Auto Provision method.Note:Auto provisioning phone firmware only works for the phones that were registered to thePBX via auto provisioning.1. Go to Auto Provisioning Firmware Upgrade, the page displays the auto provisionedphone models.2. Click Check for New Version.3. Click the Upgrade To drop-down menu, check if the phones have new firmware versionavailable.If the phone has new firmware version, you can see the version in the drop-downmenu.4. Select a firmware version that you want to upgrade to.
Auto Provisioning 1 - Auto Provisioning 105. Reboot the phone(s) to update the firmware.Synchronize Phone Time with the PBXYou can synchronize the users' phone time with the PBX via Auto Provisioning function. Youcan also manually set the phone's NTP server as your PBX's time; the phone time will besynchronized to your PBX.Note:Only the phone that were registered to the PBX via auto provisioning can auto provision thephone time.1. Go to Auto Provisioning Device List, select the desired phone(s) and edit.2. On the configuration page, click Preferences tab.3. Set the Primary NTP Server as the domain of your PBX.4. Click Save.The following dialog box appears.5. Click Yes to reboot the phone(s) and synchronize the phone time with the PBX.
Auto Provisioning 1 - Auto Provisioning 11Export Auto Provision SettingsAfter finish the auto provision configurations, you can export the auto provisioning settingsto a CSV file.The CSV file contains phone manufacturer, phone model, phone MAC address, assigned ex tension number, voicemail access PIN for extension.1. Go to Auto Provisioning Device List.2. Select desired phones, click Export.Auto Provisioning TemplateSearch and View Default TemplateYeastar Cloud PBX has default auto provisioning templates for each phone model. You cansearch and view the default template for your phones.1. Go to Auto Provisioning Template Default Template.2. Select the manufacturer and phone model, click Search.3. Clickto view the default templates.4. To search contents in the default template, press Ctrl F on your keyboard.5. In the search field, enter the search criteria.The matched contents will be highlighted.Related informationAdd a Custom Auto Provisioning TemplateAdd Additional Settings in Custom Template
Auto Provisioning 1 - Auto Provisioning 12Add a Custom Auto Provisioning TemplateYou can configure a customized auto provisioning template and apply it to your phones. Inthe customized auto provisioning template, you can set global settings for your phones.For example, if all your phones use Chinese user interface, you can set the Language as Chi nese in the template.1. Go to Auto Provisioning Template Custom Template, click Add.2. Set a name for the template.3. Set the template settings according to your needs.4. Click Save.When you are configuring auto provisioning devices, you can select the customized tem plate.Add Additional Settings in Custom TemplateSearch your desired setting in the default templates, if the desired setting is not included inthe default template, you can add a relevant sentence or change the default value in yourcustom template.
Auto Provisioning 1 - Auto Provisioning 13Note:The values you will add in the template should be supported by the phone manufacturer.1. Go to Auto Provisioning Template Custom Template, add a template or edit a tem plate.2. On the configuration page, click Other tab.3. Enter your desired sentence(s).4. You can also change the default value in the customized template.5. Click Save and Apply.Related informationAdd a Custom Auto Provisioning TemplateSearch and View Default Template
PBX. Once you provision your phones, the phones will automatically configure themselves correctly. In this way, you can manage your phones centrally without having to configure your phones one by one. Supported IP Phone Manufactures and Phone Models Yealink Model Firmware Version SIP-T19P E2 53.81.XX or later SIP-T21P E2 52.81.XX or later