Transcription
HelpDesk Add-In(User manual)ByFor further information, visit us at www.ignatiuz.comFor support, contact us at support@ignatiuz.comVersion 1.6.0.0 Created: 7/12/2019
Table of ContentsWelcome To HelpDesk add-in2Latest upgrades and fixes3Installing and configuring the add-in3Workflow8Logging On8HelpDeskAdministratorDashboardUser RolesUsersCategoriesStatusPrioritiesTicket signed By MeHelp17171718TechnicianDashboardAssigned To MeHelp19191920
1.Welcome to HelpDesk add-inWe are pleased that you decided to try HelpDesk add-in by Ignatiuz. Ignatiuz is a leading ITsolutions provider providing custom SharePoint development solutions.HelpDesk add-in build by Ignatiuz is a place that a user of information technology can call to gethelp with a problem. Typically, the term is used for centralized help to users within an enterprise.With a quick setup process and friendly user interface, the add-in offers an easy working curvefor the users.The HelpDesk add-in runs with Office 365 and SharePoint on-premise. HelpDesk is required forany organization to organize support requests. It helps in assigning and distribute to agents.System keeps tracks of every support request within an organization.Few of the salient features of the HelpDesk add-in are: Analyzing help desk performance Converting email to ticket. Assigning to Technician. Understanding User Satisfaction. Assign and resolve support request. Keep track of all the request received.We hope that your Organization will love using HelpDesk add-in, resulting in increased returnson your technology investments.2.Latest upgrades and fixesTo offer maximum benefit out of the add-in, we keep adding new features often to it. We makesure that it adds more value to your business operations with every new release. Below is a quickoverview of the recent releases.Version: 1.6.0.0Release date: 7/12/2019
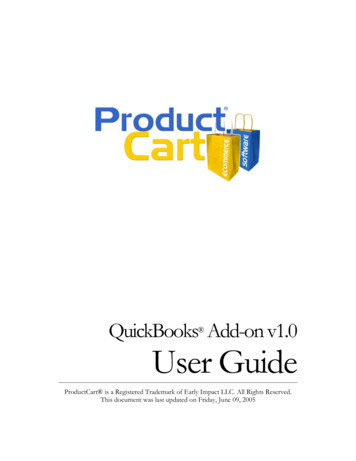
3.Installing and configuring the add-in Make sure that you are logged into Office 365 as an administrator. Click here to visitthe HelpDesk add-in page on Office Store. Click on “Get It Now” button to add the add-in.
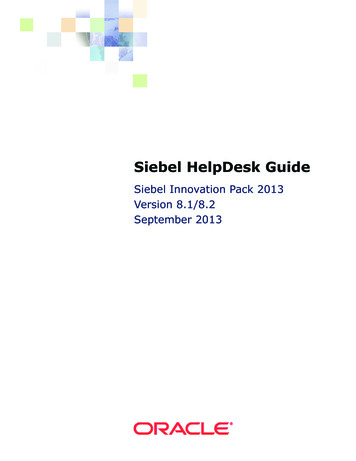
You would be prompted to select the SharePoint site on which you want to install theadd-in. Select the site on which you want to configure the add-in and click “Continue” button. On the add-in page, click on the “Add IT” button to add the add-in.
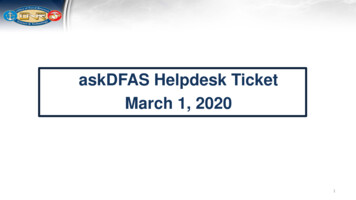
You will be prompted to a pop-up asking you for trusting the add-in Click on “Trust It” button. Your add-in will get added in the selected site of your office 365 site content.Alternatively, you can also install this add-in from the SharePoint site. You need to log in to theSharePoint site on which you want to install the add-in, navigate to Site contents, click on Newand click Add-ins in the dropdown. On the next screen, click on SharePoint store.
On the SharePoint store page, search for HelpDesk.
Open the add-in HelpDesk Click on “ADD IT” button.
Once the add-in is installed, you can locate it under Site contents. The add-in gets added on your site successfully.4.Workflow5.Logging OnOnce the user is logged in to the Office 365 environment and if add-in is already installed, it canbe opened as shown below:
6.Go on site contentOn clicking on site content, it will show all the installed add-ins.Start the add-in by clicking on it.Depending on the logged-in user, the add-in will open Administrator and Users.Logging in for the first time to the add-in will always open the Administrator portal.HelpDeskThe system menu appears on the left and it is different for Administrator and User. Seebelow for the difference and uses:1. Administrator2. UsersAdministrator1. DashboardOn welcome link there is a dashboard with a HelpDesk image.
Once the users start entering data, all the details of request can be seen here liketime of the request generated along with the date, current status of the request,priority of the request, by whom request is generated and to whom request isassigned to.Details of request can be seen at dashboard of welcome module in tabular formand will be appear blank if no such request is there.2. User RolesOn application first login, two users role that is Administrator and User arecreated by default.Through user roles admin can see current users and there active state.Below screenshot showing two users Administrator and user in active state.3. UsersAdministrator can create new user by : At dashboard under Administration “Users” option is present. Clicking on “Users” link users details page gets opened . Click on the “ Add” button to create new user.
Enter details for new user creation Enter User Name Select User Role Click on save The added record will appear on the same page in a tabular format. Admin can edit, update and delete the any user.4. CategoriesAdministrator can create new category by : At dashboard under Administration “Categories” option is present. Clicking on “Categories” link categories details page gets opened . Click on the “ Add” button to create new category. Enter details for new category creation Enter Category Name Enter User Email ID will automatically get fetched. Click on save The added record will appear on the same page in a tabular format. In added category a particular user is assigned .
Admin can edit, update and delete the created category.5. StatusAdministrator can create new status by : At dashboard under Administration “Status” option is present. Clicking on “Status ” link status details page gets opened. Click on the “ Add” button to create new status. Enter details for new status creation Enter status Name Click on save The added record will appear on the same page in a tabular format. The default status used in the application are below: Open In-Progress Resolved Closed
Admin can edit, update and delete the created category.6. PrioritiesAdministrator can create new priority : At dashboard under Administration “Priorities ” option is present. Clicking on “Priorities ” link Priorities details page gets opened. Click on the “ Add” button to create new priority. Enter details for new priority creation Enter Priority Click on save The added record will appear on the same page in a tabular format. The default priority used in the application are below : High Medium Low High Priority- Request need to be handled first on priority basis. Medium - Can be handle after no high priority ticket is pending.
Low - It’s a less important ticket but need to be handle once all high andmedium task gets completed. Admin can edit, update and delete any priorities .7. Ticket TypesAdministrator can create new Ticket by : At dashboard under Administration “Ticket Types” option is present. Clicking on “Ticket Type” link ticket type details page gets opened. Click on the “ Add” button to create new Ticket. Enter details for new Ticket Type creationEnter Ticket TypeClick on saveThe added record will appear on the same page in a tabular format.The default Ticket type used in the application are below : Request Problem Questions
Request - Ticket of request type comes under request.Problem - Ticket of problem type comes under problem.Questions -Ticket of question type comes under questions.Admin can edit, update and delete any ticket.8. LicenseTo get paid version you need to activate the license of the app. And to get that you need to navigateon license page link present on the left navigation.As you will get landed on license page, you will see two buttons,1. I have an activation key2. Buy HelpDesk Pro
Buy HelpDesk ProTo get the paid version, you have to upgrade the free version to paid version. And to get the paidversion you have to follow few steps.Click on “Buy HelpDesk Pro“to get the Pro version activation license key.On click on this button user will get directed on page in a new tab where all the package of proversion will be displayed.Here you can see different options of app activation: Download free : If user want to use the app for free then you can directly click on download freebutton to get the app for free. Buy now: If you want to buy for 1 year subscription then click on the buy now button and youwill get a new checkout page. Fill all the details in that page user will get and email withactivation key of the app.Simply follow the I have activation key steps to activate your app with the key.
I have an activation keyTo get all the features of paid app license key is required. If license key is generated, then need toactivate the license using "I have an activation key" option. Below are the steps to activate the licensefollow the below steps. Click on the button “I have an activation key”. Enter the license key, to activate the feature Click on activate button The license will get activated.Note :- You will receive the key through email once the payment is done.
Once the license gets activated user will be able to see some new links as “Advance Report”.Advance ReportOn Advance report new search features are been added that will be helpful for the user to generatecustomized reports easily. All the features of advance report can be visible only in Pro version of the app.Users can generate detailed reports according to the selected options needed.Once the add-in gets converted in Pro version each user can access advance report page in thereexisting accounts such as :- Administrator, Technician, Users and the old reports link will get replacedwith the new one.
9. HelpThis feature will provide a guide to the administrator’s that how to work with theapplication. It will also help guide the users with the working and functionality flowof the application.
User1. DashboardOn welcome link there is a dashboard with a HelpDesk image.Once the users start entering data, all the details of ticket can be seen here liketime of the ticket generated along with the date, current status of the ticket,priority of the ticket, by whom ticket is generated and to whom ticket is assignedto.Details of request can be seen at dashboard of welcome module in tabular formand will be appear blank if no such request is there.2. Assigned By MeUser can create new tickets by : At dashboard under User “Assigned By Me” option is present. Clicking on “Assigned By Me” link request details page gets opened. Click on the “ Add” button to create new request.
Date time will be fetched automatically.Select “Category”Enter the description for ticket.Select “Priority”.Select “Status”.Select “Ticket Type”Add AttachmentClick on “Save”.Ticket for the issues gets generated for particular person assigned for thatcategory. Once Ticket is solved user can change the status of the Ticket through editfeature and update the Ticket status. As the status is updated the category owner will be notified with the status ofthe ticket.
3. HelpThis feature will provide a guide to the user’s that how to work with the application.It will also help guide the users with the working and functionality flow of theapplication.Technician1. DashboardOn welcome link there is a dashboard with a HelpDesk image.Once the technician login, all the details of ticket can be seen here like time ofthe ticket generated along with the date, current status of the ticket, priority of theticket, by whom ticket is generated and to whom ticket is assigned to.
Details of request can be seen at dashboard of welcome module in tabular formand will be appear blank if no such request is there.2. Assigned To MeTechnician can view the new tickets as “Assigned To” and “Submitted By” in tabular form.
3. HelpThis feature will provide a guide to the technician’s that how to work with theapplication. It will also help guide the users with the working and functionality flowof the application.
HelpDesk add-in build by Ignatiuz is a place that a user of information technology can call to get help with a problem. Typically, the term is used for centralized help to users within an enterprise. With a quick setup process and friendly user interface, the add-in offers an easy working curve for the users. The HelpDesk add-in runs with Office 365 and SharePoint on-premise. HelpDesk is .