Transcription
Website: www.sorellefurniture.comVerona Crib and ChangerAssembly InstructionImportant Information:Read all instructions BEFORE assembling crib.KEEP INSTRUTIONS FOR FUTURE USE.Made in QHY, China
2750 Verona Crib and Changer Instruction SheetSORELLECrib Warnings:WARNING:*Infants can suffocate on soft bedding. Never add a pillow or comforter. Never place additional paddingunder an infant.*Failure to follow these warnings and the assembly instructions could result in serious injury or death.DO NOT use this crib if you cannot exactly follow the accompanying instructions.*To reduce the risk of SIDS, pediatricians recommend healthy infants be placed on their backs tosleep, unless otherwise advised by your physician.*Strangulation Hazard: STRINGS CAN CAUSE STRANGULATION! Do not place items with a stringaround a child's neck, such as hood strings or pacifier cords. Do not suspend strings over a crib orattach strings to toys.*Strangulation Hazard: To help prevent strangulation tighten all fasteners. A child can trap parts ofthe body or clothing on loose fasteners.*Strangulation Hazard: Do not place crib near window or patio door where cords from blinds ordrapes may strangle a child.*Fall Hazard: When child is able to pull to a standing position, set mattress to lowest position andremove bumper pads, large toys and other objects that could serve as steps for climbing out. This cribhas an adjustable mattress support. For the convenience of the parent when the baby is very small, themattress support may be used in the highest position.*Fall Hazard: Stop using crib when child begins to climb out or reaches a height of 35in. (89cm),whichever occurs first. The child should be placed in a youth or regular bed.*Check this product for damaged hardware, loose joints, loose bolts or other fasteners, missing parts,or sharp edges before and after assembly and frequently during use. Securely tighten loose bolts andother fasteners.Do not use crib if any parts are missing,damaged or broken.Contact C&T International/ Sorelle for replacement parts and instructional literature if needed. Do not substitute parts.*Follow warnings on all products in a crib.*If refinishing, use a non-toxic finish specified for children's products.*Never use plastic shipping bags or other plastic film as mattress covers because they can causesuffocation.*Infants can suffocate in gaps between crib sides and a mattress that is too small.*Ensure a safe environment for the child by checking regularly, before placing the child in the crib, thatevery component is properly and securely in place.*To avoid head injury, do not allow any child to play underneath the crib.*Never add an accessory such as a bassinet or changing table that extends over the sleeping area.CAUTION : ANY MATTRESS USED IN THIS CRIB SHALLBE AT LEAST 27 1/4” (69CM) x 51 5/8” (131 CM) WITHA THICKNESS NOT EXCEEDING 6” (15CM).Page 2
2750 Verona Crib and Changer Instruction SheetSORELLEToddler Bed Warnings:WARNINGINFANTS HAVE DIED IN TODDLER BEDS FROM ENTRAPMENT.Openings in and between bed parts can entrap head and neck of a small child.NEVER use bed with children younger than 15 months.ALWAYS follow assembly instructions.The maximum user weight is 50lbs (22.7kg)WARNINGSTRANGULATION HAZARDNEVER place bed near windows where cords from blinds or drapes may strangle a child.NEVER suspend strings over a bed.NEVER place items with a string, cord, or ribbon, such as hood strings or pacifier cords,around a child's neck. These items may catch on bed parts.CAUTIONENTRAPMENT HAZARDTo avoid dangerous gaps, any mattress used in this bed shall be a full-size crib mattressat least 51 5/8 in (1310mm) in length, 27 1/4 in (690mm) in width and 4 in (100mm) inthickness. The mattress thickness must not exceed 6 in (150mm).Changing Table Warnings:WARNINGFALL HAZARD - to prevent death or serious injury, always keep child within arm’s reach.Read all instructions before use of the changing table.KEEP THESE INSTRUCTIONS IN A SAFE PLACE FOR FUTURE USE.Inspect the changing table periodically. Do not use the changing table if it is damaged orbroken. Contact C&T International Inc. with any questions.Tighten all loose screws and bolts before each use.The maximum recommended weight of the child is 30lbs for the changing table.Use only the pad provided by C&T International / Sorelle or Manufacturer’sAlways secure the pad to the changing surface by inserting the strap through the hole inthe middle of the pad. See Instructions.NEVER use crib without Changing Table attachedPage 3
2750 Verona Crib and Changer Instruction SheetSORELLENOTES ON ASSEMBLY:-During the assembly process whenever using screws or bolts, check each by placing the screw/bolt onthe diagram of the item which is drawn actual size and design. Be sure to use the proper size and shapespecified in the instructions.-To assemble this unit you may be required to place the unit on it’s side and face. It is stronglyrecommended that assembly is done on a soft, non-abrasive surface to avoid damaging the finish.NOTES ON USE:Keep children and others safe by following these simple rules:- Do not allow any child to play on furniture- Do not allow climbing on any piece of furniture.- Do not allow hanging from any piece of furniture.- Always monitor your child’s activity when in the nursery.NOTES ON CARE AND MAINTENANCE:- Do not scratch or chip the finish.- Inspect the product periodically, contact C&T International / Sorelle for replacement parts or questions.- Do not store the product or any parts in extreme temperatures and conditions such as a hot attic or adamp, cold basement. These extremes can cause a loss of structural integrity.-To preserve the luster of the high quality finish on your product, it is recommended to place a doily orfelt pad under any items you place on the finish.-Clean with a damp cloth, then a dry cloth to preserve the original luster and beauty of this fine finish.-Do not use abrasive chemicals.-Do not spray cleaners directly onto furniture.-Lift slightly when moving on carpeting to prevent leg breakage.-Use of a vaporizer near furniture will cause wood to swell and finish to peel.AUBE AA THICRIB MUSTCM) WITHPage 4
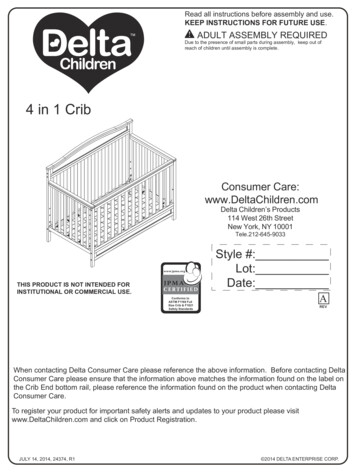
SORELLE2750 Verona Crib and Changer Instruction SheetAssembly Parts(A) Left End (x1)(A1) Middle Panel (x1)(A2) Right End (x1)(D1) Middle - Front Leg (x1)(D) Left -Front Leg (x1)(D2) Right - Front Leg (x1)(H) Front -Top Bar (x1)(F) Rear - Decorative Panel (x1)(G) Rear - Bottom Support Bar (x1)(C) Footboard (x1)(B) Headboard (x1)(H1) Front - Up Bar (x1)(H2) Front- Middle Support Bar (x2)(H3) Front- Bottom Support Bar (x1)( J ) Back Shelf (x2)( I ) Changer Top Shelfwith Support Bar (x1)(E) Right - Rear Leg (x1)(K1) Drawer Front (x3)( I2 ) Changer Middle MDF Panel (x1)( J1 ) Back Bottom Shelf (x1)(K2) Drawer Back (x3)( I3 ) Middle-Bottom Support Bar (x1)(K6) Knob (x3)(K3) Drawer Left (x3)(K4) Drawer Right (x3)(K5) Drawer Bottom (x3)Page 5( L ) Changing Pad (x1)
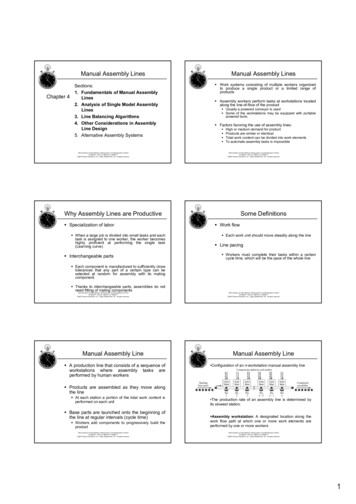
SORELLE2750 Verona Crib and Changer Instruction SheetAssembly PartsHardware listad M6*17mm bolts ( 4 pcs)hkcM6*80 mm Bolts ( x 9 )eM5*22mm bolt ( x 3 )iM6*85mm Bolt (x 3 )Bolt ( x 24 )3.5*25fln ScrewdriverWrogLock Washer(x 30)M6*55mm Bolts (x 9 )Metal Shelf Support ( x 12 )Mattress SupportPage 6M6*50mm Bolt (x 9 )jmWasher(x 30 )40mm Wooden Dowel (x 17 )Allen Key(x 1 )
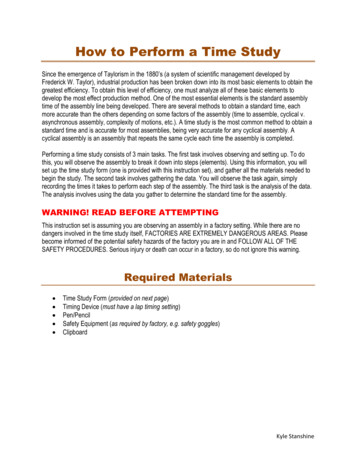
SORELLE2750 Verona Crib and Changer Instruction SheetCrib AssemblyImportant: All Washers( g ) and Lock Washers ( f ) must beinserted into bolts except (d&e) before assembly as figure.fg1. Attach the Left End (A) to the Headboard (B)by using two Bolts ( i ) and a Wooden Dowel ( j ).See Figure 1.1ifLock Washer(X2)gWasher(X2)i(B)(A)jM6*55mm Bolts (X2)ij40mm Wooden Dowel (X1)22. Attach the Middle-Front Leg (D1) to theMiddle Panel (A1) by using two(2) Bolts( c ).See Figure 2.c( A1)( D1)ccPage 7fLock Washer(X2)gWasher(X2)M6*50mm Bolt (X2 )
2750 Verona Crib and Changer Instruction SheetSORELLE3. Attach Middle Panel ( A1) to Head board ( B ) using three (3) Bolts ( i ) .Then Attach the Front-Top Bar (H) and Front-Bottom Support Bar (H3)to the Right -Front Leg(D2) by using two(2) Wooden Dowels ( j )and two(2) Bolts (a). See Figure 3.3ja(H)ii( D2 )( H3 )( A1 )aj(B)ijaM6*80 mm Bolts (X2)iM6*55mm Bolts (X3)f40mm Wooden Dowel (X2)Lock Washer(X5)gWasher(X5)4. Insert the Middle-Bottom Support Bar(I3) into hole ofMiddle Panel(A1).See Figure 4.4( A1 )( A1 )( I3 )Page 8
2750 Verona Crib and Changer Instruction SheetSORELLE5. Attach completed Mattress Support Assembly to crib using four (4) Bolts( d ). See Figure 5.NOTE: For infants, set mattress supportassembly in an upper position for greateraccessibility. As child grows and can stand,mattress support assembly must be lowered.See Warning Statements.5odd M6*17mm bolts ( X4 )66. Attach the Left-Front Leg (D) to theLeft End (A) by using three(3) Bolts(c).See Figure 7.cfLock Washer(X3)gWasher(X3)cc(A)c( D)Page 9M6*50mm Bolt (X3 )
2750 Verona Crib and Changer Instruction SheetSORELLE7. Attach Footboard (C) to Left - Front Leg( D ) and Middle-Front Post (D1)using one Bolt ( h ) & four (4) Bolts(a) & four (4) Wooden Dowel( j ).See Figure 6.7j(C)aa(D)a(C)(D)ha(C)j( D1 )fhM6*85mm Bolt (X1)Lock Washer(X5)agWasher(X5)jM6*80 mm Bolts (X4)40mm Wooden Dowel (X4)8. Attach Front -Up Bar (H1) and Front-Middle Support Bars (H2) toMiddle -Front Leg(D1) using a wooden dowel( j ) & a Bolt ( i ).See Figure 8.fLock Washer(X1)g8Washer(X1)ij( H1 )( H2 )ijM6*55mm Bolts (X1)( H2 )40mm Wooden Dowel (X1)( D1 )Page 10
SORELLE2750 Verona Crib and Changer Instruction Sheet9. Attach Right-Front Leg (D2) to Changer Front Frameusing three(3) Wooden Dowel( j ) & two Bolts( h )& Bolts( a ).See Figure 9.9jhja(D2)fjhaM6*85mm Bolt (X2)M6*80 mm Bolts (X1)Lock Washer(X3)j40mm Wooden Dowel (X3)10NOTE: Groove face towards back of unit.(I)( A1 )( I2 )( I3 )Page 11Washer(X3)h10. Insert Top Shelf ( I )with Support Bar( I1) into grooves onmiddle Panle and Front-Up Bar(H1).Then insert Changer Middle Panel (I2) into grooves on Top Shelf Bar andthe Middle Bottom Support Bar (I3). See Figure 10.( H1)g
2750 Verona Crib and Changer Instruction SheetSORELLE11. Attach Right End(A2) to Changer using two(2) Bolts ( c ) ). See Figure 11.11NOTE: Grooves face towards Shelf unit.cc(A2)fLock Washer(X2)gWasher(X2)M6*50mm Bolt (X2 )c12. Insert Four Wooden Dowels( j ) into holes on Rear-Decorative Panel(F).12and Insert two Wooden Dowels( j ) into holes on Rear-Bottom Support Bar(G).Attach Rear-Decorative Panel(F) and Rear-Bottom Support Bar (G) to Right -Rear Leg(E) using oneBolt ( c ) and one Bolt ( a ).Then attach the frame to Crib using three(3) Bolts( i ) & one Bolt ( c ) and one Bolt ( a ). See Figure 12.NOTE: Groove face towards back of unit.jcjc(F)i(E)ija(G)afLock Washer(X7)agiWasher(X7)M6*80 mm Bolts (X2)iM6*55mm Bolts (X3)Page 12cM6*50mm Bolt (X2 )j40mm Wooden Dowel (X6)
SORELLE2750 Verona Crib and Changer Instruction Sheet13. Insert Metal Shelf Support ( l ) into holes Middle Panel & Right EndSee Figure 13.13llMetal Shelf Support ( x 12 )14. Attach two Shelf (J) and a Back Bottom Shelf (J1) to changer.as figure shows.(J)(J)(J1)Page 1314
2750 Verona Crib and Changer Instruction SheetSORELLEDrawer Assembly11. Working on a paddedflat surface, attach DrawerSides (K3 &K4) to DrawerBack (K2) with Philips HeadScrew. Figure 1(K2)(k)(k)(k)(k)(K4)(K3)2. Slide DrawerBottom (K5) into drawerassembly. Figure 2.Grooves(K5)2(k)3 (k)3. Secure both sides ofDrawer Front (K1) to drawerassembly with four (4)Screws (k). Figure 3.(K1)Check all screws fortightness.(k)(k)44. Using Drawer KnobScrew (e), install one (1)Knob (k6) on Drawer.Figure 4.(e)(K6)Repeat for all drawers.Set drawers aside forlater use.n ScrewdrivereM5*22mm bolt ( 3 pcs)Page 14kBoltpcs(K6) Knob (x3)
SORELLE2750 Verona Crib and Changer Instruction SheetInsert three (3) drawers into changer.Add changing pad to top of organizer.Important : Tighten all bolts before use your Crib.Changing Pad AssemblyImportant : If changing pad and safety belt areassembled, make sure warnings are facing up and visible.If not, reassemble by following the steps below.1. Locate safety belt bolted to dresser top. Insertsafety belt through slit in changing pad fromback of pad. Figure 1.12. Pull through front of pad completely. Makesure pad is facing up and warnings are alwaysvisible. Figure 2.23. Make sure that safety belt is fastened aroundchild, and adjusted so safety belt is snug aroundchild’s mid-section. Make sure buckle is securelylatched. Figure 3.3CLICK!Page 15
SORELLE2750 Verona Crib and Changer Instruction SheetDisassembling Crib For StorageTo disassemble crib for storage, follow assembly steps in reverse.Store all parts and hardware together in a safe place. Store the instruction manual in the suppliedenvelope attached to the mattress support assembly for future reference for re-assembly.Converting to a Toddler Bed (Optional)Follow all instructions supplied with the 137# Toddler Rail System. NOTE:137# Toddler Rail Systemis not included. Please see your crib retailer, visit WWW.Sorellefurniture.com or contact C&TInternational / Sorelle for more information.Additional Parts and Hardwares ( 137# Toddler Rail System Not included, sold separately)ab(A) 137 Toddler Rail (1 pcs)M6*50mm Bolt (4pcs)Lock Washer(4pcs)cWasher(4pcs)Fullsize Bed Conversion (Optional)Additional Parts and Hardwares ( 218# Adult Rail System Not included, sold separately)(A) 218# Bed Rail (2 pcs)(B) 218# Mattress Support Bar (4 pcs)Wood Screw ( x 16 )(D3) Additional Right - Front LegFor Adult bed (x1)(D4) Additional Left -Front LegFor Changer table alone (x1)(E) Additional Left - Rear LegFor Changer table alone (x1)Follow all instructions supplied with the 218# Adult Rail System. NOTE: 218# Adult Rail Systemis not included. Please see your crib retailer, visit WWW.Sorellefurniture.com or contact C&T .International / Sorelle for more information.Page 16
Page 2 2750 Verona Crib and Changer Instruction Sheet WARNING: *Infants can suffocate on soft bedding.Never add a pillow or comforter. Never place additional padding under an infant. *Failure to follow these warnings and the assembly instructions could result in serious injury or death. DO NOT use this crib if you cannot exactly follow the accompanying instructions.