Transcription
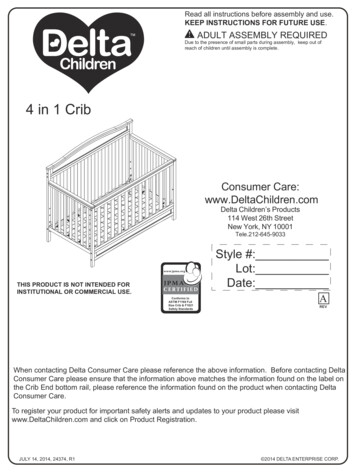
Read all instructions before assembly and use.KEEP INSTRUCTIONS FOR FUTURE USE.ADULT ASSEMBLY REQUIREDDue to the presence of small parts during assembly, keep out ofreach of children until assembly is complete.4 in 1 CribConsumer Care:www.DeltaChildren.comDelta Children’s Products114 West 26th StreetNew York, NY 10001Tele.212-645-9033Style #:Lot:Date:THIS PRODUCT IS NOT INTENDED FORINSTITUTIONAL OR COMMERCIAL USE.AConforms toASTM F1169 FullSize Crib & F1821Safety StandardsREVWhen contacting Delta Consumer Care please reference the above information. Before contacting DeltaConsumer Care please ensure that the information above matches the information found on the label onthe Crib End bottom rail, please reference the information found on the product when contacting DeltaConsumer Care.To register your product for important safety alerts and updates to your product please visitwww.DeltaChildren.com and click on Product Registration.JULY 14, 2014, 24374, R1 2014 DELTA ENTERPRISE CORP.
CAUTION:ANY MATTRESS USED IN THIS CRIB SHALLBE AT LEAST 27 1/4 BY 51 5/8 IN. WITH ATHICKNESS NOT EXCEEDING 6 IN.WARNING:*Infants can suffocate on soft bedding. Never add a pillow or comforter. Never place additional padding under aninfant.*Failure to follow these warnings and the assembly instructions could result in serious injury or death. DO NOT usethis crib if you cannot exactly follow the accompanying instructions.*To reduce the risk of SIDS, pediatricians recommend healthy infants be placed on their backs to sleep, unlessotherwise advised by your physician.*Strangulation Hazard: STRINGS CAN CAUSE STRANGULATION! Do not place items with a string around achild's neck, such as hood strings or pacifier cords. Do not suspend strings over a crib or attach strings to toys.*Strangulation Hazard: To help prevent strangulation tighten all fasteners. A child can trap parts of the body orclothing on loose fasteners.*Strangulation Hazard: Do not place crib near window or patio door where cords from blinds or drapes maystrangle a child.*Fall Hazard: When child is able to pull to a standing position, set mattress to lowest position and remove bumperpads, large toys and other objects that could serve as steps for climbing out. This crib has an adjustable mattresssupport. For the convenience of the parent when the baby is very small, the mattress support may be used in thehighest position. Important: with the mattress support and mattress in the highest position, be absolutely sure thatthe top of the front crib side is at least 3 inches higher than the top surface of the mattress. If it is not, lower themattress support and the mattress to the next highest position.*Fall Hazard: Stop using crib when child begins to climb out or reaches a height of 35in. (89cm), whichever occursfirst. The child should be placed in a youth or regular bed.*Check this product for damaged hardware, loose joints, loose bolts or other fasteners, missing parts, or sharp edgesbefore and after assembly and frequently during use. Securely tighten loose bolts and other fasteners. Do not usecrib if any parts are missing, damaged or broken. Contact Delta Children's Products for replacement parts andinstructional literature if needed. Do not substitute parts.*Follow warnings on all products in a crib.*If refinishing, use a non-toxic finish specified for children's products.*Never use plastic shipping bags or other plastic film as mattress covers because they can cause suffocation.*Infants can suffocate in gaps between crib sides and a mattress that is too small.*Ensure a safe environment for the child by checking regularly, before placing the child in the crib, that everycomponent is properly and securely in place.*To avoid head injury, do not allow any child to play underneath the crib.*Never add an accessory such as a bassinet or changing table that extends over the sleeping area.*In Canada Only - Use a crib mattress that is no thicker than 15 cm and is of such a size that, when it is pushedfirmly against any side of the crib, it does not leave a gap of more than 3 cm between the mattress and any part ofthe sides of the crib. Do not use this crib for a child who can climb out of it or who is taller than 90 cm.
TODDLER BEDWARNINGINFANTS HAVE DIED IN TODDLER BEDS FROM ENTRAPMENT.Openings in and between toddler bed parts can entrap head and neck of a small child.NEVER use toddler bed with children younger than 15 months.ALWAYS follow assembly instructions.The maximum user weight is 50lbs (22.7kg)WARNINGSTRANGULATION HAZARDNEVER place bed near windows where cords from blinds or drapes may strangle a child.NEVER suspend strings over a bed.NEVER place items with a string, cord, or ribbon, such as hood strings or pacifier cords,around a child's neck. These items may catch on bed parts.CAUTIONENTRAPMENT HAZARDTo avoid dangerous gaps, any mattress used in this bed shall be a full-size crib mattressat least 51 5/8 in (1310mm) in length, 27 1/4 in (690mm) in width and a max thickness of6 in (150 mm).NOTES ON ASSEMBLY:-During the assembly process whenever using screws or bolts, check each by placing the screw/bolt onthe diagram of the item which is drawn actual size and design. Be sure to use the proper size and shapespecified in the instructions.-To assemble this unit you may be required to place the unit on it’s side and face. It is stronglyrecommended that assembly is done on a soft, non-abrasive surface to avoid damaging the finish.NOTES ON USE:Keep children and others safe by following these simple rules:- Do not allow any child to play on furniture- Do not allow climbing on any piece of furniture.- Do not allow hanging from any piece of furniture.- Always monitor your child’s activity when in the nursery.NOTES ON CARE AND MAINTENANCE:- Do not scratch or chip the finish.- Inspect the product periodically, contact Delta Children's Products for replacement parts or questions.- Do not store the product or any parts in extreme temperatures and conditions such as a hot attic or adamp, cold basement. These extremes can cause a loss of structural integrity.-To preserve the luster of the high quality finish on your product, it is recommended to place a doily orfelt pad under any items you place on the finish.-Clean with a damp cloth, then a dry cloth to preserve the original luster and beauty of this fine finish.-Do not use abrasive chemicals.-Do not spray cleaners directly onto furniture.-Lift slightly when moving on carpeting to prevent leg breakage.-Use of a vaporizer near furniture will cause wood to swell and finish to peel.3
PARTS: MAKE SURE THAT ALL PRE-ASSEMBLED PARTS ARE TIGHT.A. Back Top Rail x 1Part # 24365B. Back Rail x 1Part # 24366G. Left Back Post x 1Part # 24371H. Right Back Post x 1Part # 24372D. Stabilizer Bar x 1Part # 24368C. Front Rail x 1Part # 24367J. Mattress Support x 1Part # 24242LEFT INSIDE BOTTOM LABELPRODUCT LABELRIGHT INSIDE BOTTOM LABELE. Left Crib Side x 1Part # 24369F. Right Crib Side x 1Part # 24370POUCH ATTACHED TO MATTRESS SUPPORT- KEEP INSTRUCTIONS IN THIS POUCHAFTER ASSEMBLY.WARNINGS RELATED TO THE SAFE USE OFTHIS CRIB ARE PRINTED ON THE POUCH.4
PARTS: HARDWARE KIT IS PART #24373-986 FOR COLOR 100 OR #24373-988 FORCOLOR 207. SEE FRONT COVER.K. M6 x 75 mm Bolt x 10Part # 5472L. M6 x 55 mm Bolt x 6Part # 5468No drills necessary.Do not use powerscrewdriver.Flat Head Screwdriver(not supplied)N. M6 x 18 mm Bolt x 4Part # 5763P. Φ4x30 mm Metal Pin x 2Part # 5493R. M6x17mm Barrel Nut x 14Part # 5479M4 Allen Wrench SuppliedPart # 11775
Section 1: Crib AssemblyStep 1Parts and tools required to complete step.H. Right Back Post x 1R. M6x17mm Barrel Nut x 4RIGHT INSIDEBOTTOM LABELM4 Allen WrenchSuppliedF. Right Crib Side x 1LEFT INSIDE BOTTOM LABELPRODUCT LABELG. Left Back Post x 1L. M6 x 55 mm Bolt x 4E. Left Crib Side x 1Attach (1) Left Back Post (Part G) to (1) Left Crib Side (Part E) using (2) M6x55 mm Bolts (Part L) and(2) M6x17 mm Barrel Nuts (Part R). Tighten with the M4 Allen Wrench. Use the Flat Head Screwdriverto hold the Barrel Nut in the proper alignment. Repeat with the Right Crib Side (Part F) and Right BackPost (Part H).LRGLEREIDINSLEFT INSIDE BOTTOM LABELPRODUCT LABELLeft Crib Side6
Section 1: Crib AssemblyStep 2Parts and tools required to complete step.K. M6 x 75 mm Bolt x 2M4 Allen WrenchSuppliedB. Back Rail x 1From Step 1R. M6x17mm Barrel Nut x 2Attach (1) Back Rail (Part B) to the assemblies from step 1 using (2) M6x75 mm Bolts (Part K) and(2) M6 x 17 mm Barrel Nuts (Part R). Tighten with the M4 Allen Wrench. Use the Flat Head Screwdriverto hold the Barrel Nut in the proper alignment.K!KCBARBRK7
Section 1: Crib AssemblyStep 3Parts and tools required to complete step.A. Back Top Rail x 1From Step 2M4 Allen WrenchSuppliedL. M6 x 55 mm Bolt x 2K. M6 x 75 mm Bolt x 2R. M6x17mm Barrel Nut x 2Attach (1) Back Top Rail (Part A) to the assembly from step 2 using (2) M6x55 mm Bolts (Part L),(2) M6x75 mm Bolts (Part K) and (2) M6 x 17 mm Barrel Nuts (Part R). Tighten with the M4 AllenWrench. Use the Flat Head Screwdriver to hold the Barrel Nut in the proper alignment.LKALKRRK!CBA8
Section 1: Crib AssemblyStep 4Parts and tools required to complete step.M4 Allen WrenchSuppliedJ. Mattress Support x 1From Step 3N. M6 x 18 mm Bolt x 4Attach the Mattress Support (Part J) in all corners using (1) M6x18 mm Bolt (Part N) in each corner.Tighten with the M4 Allen Wrench.UPThe ! Warnings printed on the pouch attached to themattress support must face up, the springs must face up.This crib has (3) adjustment positions, use the highest onlyfor new borns, move the mattress down as the child grows.!WARNING:Fall Hazard: When child is able to pull to a standing position,set mattress to lowest position and remove bumper pads,large toys and other objects that could serve as stepsfor climbing out.! WARNINGS ON POUCH MUST FACE UP.ALL CORNERSNJ9
Section 1: Crib AssemblyStep 5Parts and tools required to complete step.C. Front Rail x 1M4 Allen WrenchSuppliedR. M6x17mm Barrel Nut x 2From Step 4K. M6 x 75 mm Bolt x 2Attach (1) Front Rail (Part C) to the assembly from step 4 using (2) M6x75 mm Bolts (Part K) and (2)M6 x 17 mm Barrel Nuts (Part R). Tighten with the M4 Allen Wrench. Use the Flat Head Screwdriver tohold the Barrel Nut in the proper alignment.KRKRC10
Section 1: Crib AssemblyStep 6Parts and tools required to complete step.From Step 5M4 Allen WrenchSuppliedD. Stabilizer Bar x 1R. M6x17mm Barrel Nut x 4K. M6 x 75 mm Bolt x 4P. Φ4x30 mm Metal Pin x 2Attach (1) Stabilizer Bar (Part D) to the assembly from step 5 using (2) Φ4x30 mm Metal Pins (Part P),(4) M6x75 mm Bolts (Part K) and (4) M6 x 17 mm Barrel Nuts (Part R). Tighten with the M4 AllenWrench. Use the Flat Head Screwdriver to hold the Barrel Nut in the proper alignment.KKPRDKR11
Section 1: Crib AssemblyStep 7Parts and tools required to complete step.Read all instructions before assembly and use.KEEP INSTRUCTIONS FOR FUTURE USE.ADULT ASSEMBLY REQUIREDDue to the presence of small parts during assembly, keep out ofreach of children until assembly is complete.4 in 1 CribAssembly InstructionBookletTHIS PRODUCT IS NOT INTENDED FOR INSTITUTIONAL OR COMMERCIAL USE.Consumer Care:www.DeltaChildren.comDelta Children’s Products114 West 26th StreetNew York, NY 10001Tele.212-645-9033Style #:Lot:Date:AREVConforms toASTM F1169-10a FullSize Crib & F1821Safety StandardsFACTORYWhen contacting Delta Consumer Care please referencethe above information. Before contacting Delta ConsumerCare please ensure that the information above matches theinformation found on the label on the Crib End bottom rail,please reference the information found on the productwhen contacting Delta Consumer Care.To register your product for important safety alerts and updates to your product pleasevisit www.DeltaChildren.com and click on Product Registration.JULY 16, 2013, 24374, R0 2013 DELTA ENTERPRISE CORP.Store the assembly instruction booklet in the pouch attached to the mattress support. Store all partsand tools separately, in a safe place.Read allKEEP instructions beforeINSTRassemUCTIObly andNS FORADULTuse.FUTUASSEMBDue toRE USE.thereach of presence ofsmall partschildrenuntil assemblyduringassemblyis complete, keepout of.LY REQ4 in 1 CribTHIS PRODUCT ISNOT INTENConsumwww.Del er Care:taChildreDelta Childrn.co114 West en’s Products mDED FORNew York,26th StreetTele.21 NY 100012-645-9033INSTITUTIONAL ORCOMMUIREDERCIAStyle #:Lot:Date:L USE.AConforms toASTMF1169-10a FullSize Crib& F1821SafetyStandardsREVWhenFACTORYcontacting Deltathe aboveinformation. ConsumerCare pleaseCareBeforeinformation ensure thatcontac please referencethe inform ting Deltafound onpleaseation above Consumerthe labelrefereon thewhen contac nce the informmatchation foundCrib End bottom es theting DeltaConsumer Care. on the produ rail,ctTo registervisit www your produ.DeltaChi ct for impoldren.com rtant safetJULY 16,2013, 24374,and click y alerts andR0updaon Product Regis tes to your produtration.ct please 2013DELTAENTERPRISE CORP.AI BAGWARNING: SEE PAGE 2 FOR INFORMATION12
Section 2: Toddler Bed ConversionStep 1Parts and tools required to complete step.M4 Allen WrenchSuppliedFinished CribRemove the Front Rail and the Stabilizer Bar installed in Step 5 and 6 of Section 1 crib assembly.KRLYTENLGLPUKKKRCDYTLNGELLKPUK13
Section 2: Toddler Bed ConversionStep 2Parts and tools required to complete step.M4 Allen Wrench SuppliedD. Stabilizer Bar x 1R. M6x17mm Barrel Nut x 4From Section 2 Step 1K. M6 x 75 mm Bolt x 4Attach (1) Stabilizer Bar (Part D) to the assembly from section 2 step 1 using (4) M6x75 mm Bolts(Part K) and (4) M6x17 mm Barrel Nuts (Part R). Tighten with the M4 Allen Wrench. Use the Flat HeadScrewdriver to hold the Barrel Nut in the proper alignment.KKDRKR14
Section 2: Toddler Bed ConversionStep 3WARNING:SEE PAGE 3 FORTODDLER BED WARNINGSThe mattress support must be in the lowest position.Store all hardware safely.Read all warnings on page 3.As shown, use as a day bed or love seat sofa.Do Not use without stabilizer bar installed.Stabilizer bar must be used when convertedto a toddler bed.A toddler bed guardrail is available for thiscrib.Please see your crib retailer, visitwww.DeltaChildren.com or contact DeltaConsumer Care for more information.This crib uses Delta Style # 0080 Guardrail.15
Section 3: Full Size Bed ConversionStep 1Parts and tools required to complete step.M4 Allen WrenchSuppliedYou have the option to convert the crib to a Full Size Bed. Simply follow the steps in reverse order todisassemble the crib. Stop after removing the left and right crib sides with the M4 Allen Wrenchas shown.Store all parts and hardware in a safe place.EF16
Section 3: Full Size Bed ConversionStep 2Parts and tools required to complete step.N. M6 x 18 mm Bolt x 4From Section 3 Step 1M4 Allen WrenchSuppliedAttach Bed Frame to the Headboard (From Section 3 Step 1) using (4) M6x18mm Bolts (Part N).Follow all instructions supplied with the Bed Frame. Note: Bed Frame System is not included, seeyou furniture or mattress retailer. Contact Delta Children’s Products for information or with questions.17
Consumer Care:www.DeltaChildren.comDelta Children’s Products114 West 26th StreetNew York, NY 10001Tele.212-645-9033Warranty:This Delta Crib is warranted to be free from defects for a periodof 1 year from the date of purchase under normal use. This warranty extendsonly to the original retail purchaser and is valid only when supplied with proof ofpurchase, or if received as a gift, when the registration is on file with Delta.To register your product for important safety alerts and updates toyour product please visit www.DeltaChildren.comPlease do not return this item to the store before contactingus about missing parts or with any questions.To report a problem, please log on to www.DeltaChildren.com andclick the Consumer Care Tab, or contact us by phone at(212) 645-9033.In the event that you need to contact our customer servicedepartment please have the Style Number and Lot Number available.Use the space below to make note of those numbers. They can befound on the label on the Crib End bottom rail.STYLE No: 7380COLORAREVFTYLot No. :Pack Date:Date of Purchase: (you should also keep your receipt)
support. For the convenience of the parent when the baby is very small, the mattress support may be used in the highest position. Important: with the mattress support and mattress in the highest position, be absolutely sure that the top of the front crib side is at least 3 inches higher than