Transcription
SUBMERSIBLE PUMPINSTALLATION, OPERATION& MAINTENANCE MANUAL2605 Interstate 27 Lubbock, TX 79404 (P) 806.747.3411 (F) 806.747.3960754 E. Maley Street Willcox, AZ 85643 (P) 520.384.2273 (F) 520.384.40422726 Jones Ave Garden City, KS 67846 (P) 620.275.4107 (F) 620.275.8931simflo.com simflo.pump-flo.com2018.1
OPERATION & MAINTENANCE MANUALA. OPERATIONNormally a unit has been selected and built to operate for a specific set of conditions (head in feet and capacity in gallons) to givemaximum efficiency. Some variation, an increase or decrease of head, will not make an appreciable difference in the efficiency.However, a wide variation in head will not only show up as efficiency loss, but possibly as a horsepower, or thrust bearing overload.1.When a unit is first started, a new well may produce considerable amounts of sand, despite the fact it had been sand pumped afterdrilling. The discharge should be throttled back to where this is cut down to a minimum, then gradually opened up to full discharge as thesand disappears. This operation may last from a matter of minutes to several days. If the sand flow shows no signs of stopping, the wellmust be reworked to screen out the sand or smaller capacity unit installed. Continued sand pumping will result in increased pumpwear which in turn will show up as increased efficiency loss. Excessive wear can cause the pump bowls to be un-repairable andseriously affect motor performance and longevity.2.Some wells will always produce a small amount of sand at start-up. Therefore, depending on the operation, it may then be necessaryto bypass or trap out this first flow each time, particularly if a closed piping system is used.3.If the unit is coupled into a hydro-pneumatic pressure system, the set-up must be so designed that it will not become “water- logged” (lossof air through water absorption, without re- placement) and yet not receive too much air at each start-up.4.On any system, automatic or manual, the maximum number of starts on a motor should be controlled to six (6) per hour.5.A time delay relay must be installed when any type of automatic system is used in order to prevent starting of the motor whileit is spinning backwards due to column drain- back through the pump. A three minute time delay relay is normally adequate. Thisprovides a safety measure in the event a failure in the automatic control system creates a rapid recycle series. It also provides a timeperiod for the rotating element of pump and motor to stop, after reverse rotation due to vertical discharge column drain-back.6.A well should always be provided with means for determining the static water level, and pumping level. A good airline, with depth gauge,is generally the most simple and practical, particularly when installed with the unit.7.When a unit is known to be set near to the bottom of a well, a close check should be kept to make sure that the well does not sand-up (fillin) around the motor. This is entirely possible without any noticeable effect in pumping or motor operation. However, the motor isdependent on adequate cooling from water, and any sanding up around it would eventually create overheating, resulting in at leastshortened life, if not a burnout. There are additional pump features that can be added to cover this problem if it cannot be cured bywell work.8.A unit should not be run at closed valve for any long period of time as virtually all the energy created then dissipates in heat in the pump.This condition has been known to have practically “boiled” the water in the well and created an overheating problem for the motor.B. MAINTENANCE1.A faithful periodic check test as indicated by the test card will prove beneficial to the prolonged life and satisfactory operation of theunit. Such records will provide the information necessary to determine when preventive maintenance should be undertaken.2.If the unit has “shut-off” and the reason cannot be traced to a POSITIVE external source, DO NOT attempt to start the unit without first“megging” the motor. Shut off the power at the disconnect switch, disconnect the motor cable leads from the starter and “megg” themto ground (the well casing). This should be done whether just the overload or circuit breaker have “kicked” out, or a fuse has blown.NEVER just reset or replace fuses and attempt to start without FIRST “megging” the unit.C. INSTALLATIONI.Inspect Shipment For Damage1.2.II.A physical check of all equipment should be made against the packing list and inspect for obvious damage incurred duringshipping.Immediately report any damages to carrier and SIMFLO Dealer from whom pump was purchased.Arrange Parts For Orderly Assembly and Installation1.2.An orderly arrangement of submersible assemblies will reduce installation time.The part requiring installation first should be laid out nearest the well and others in their order of installation as follows:A. Motor w/Sub. WireB.Pump AssemblyC.Column PipeD. Discharge HeadE.Pump Panel
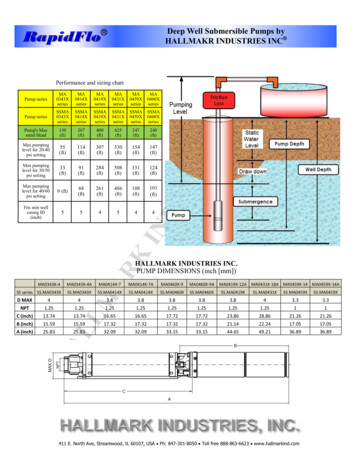
III.Location of Check Valves1.2.3.IV.With pump setting of less than 400 feet, install a check valve 20' above pump bowls; a check valve at the top of the well; and anintermediate check valve halfway between the top and bottom valves.With pump setting of 400 feet or greater, follow instructions as above using additional intermediate check valves to provide valvespacing that does not exceed 200 feet.CAUTION: Be sure that check valves are threaded in place so that the flow is going in the upward position.Installing Pump Assembly1.2.3.4.5.V.Lift motor vertically and lower into well, resting the motor on the “U” plate.Make temporary electrical connection to motor, bump starter to determine correct rotation (counter clockwise as viewed fromabove). If power is not available, DO NOT make drive shaft connections (Step 4) until power is available and correct rotation isdetermined.With the motor suspended in the well, on the “U” plate attach an elevator or clamps to pump end, lifting it vertically over themotor.Carefully align the motor coupling with the motor shaft, while lowering the pump end onto the motor.Replace all cap-screws and lock-washers furnished with the pump and bolt up tightly.Lowering Pump Assembly Into Well1.2.3.4.5.6.The submersible wire should be supported by the column pipe, steel bands should be placed at intervals of 10-12 feet, care shouldbe taken not to pinch the submersible wire.The first piece of column should be attached to the bowl assembly and then lowered into the well, placing steel bands on thesubmersible wire as indicated in Step 1.Be sure that column pipe joints are not cross threaded and are pulled up tight.Care should be taken not to let the submersible cable drag downward over the edge of the well casing.Check valves should be installed as instructed.The discharge head should then be installed after desired depth has be reached. The submersible cable should then be threadedthrough the cable hole on the discharge head, care being taken not to pinch the cable.FIELD TESTSWhen a field test of the pump’s performance is required, make the following readings: Volume, Total Head and HorsepowerMeasurements, Rotating Speed and Liquid Temperature. Compare the results of the field test with the performance curve for yourpump.All volume, total head and efficiency guarantees are based on shop test when handling clear, cold, fresh water at a temperature notexceeding 85 F. and under specified suction conditions.(1) Volume (Capacity) Measurement - Measure the rate of flow from the pump discharge in gallons per minute. The volumemeasurement may be made using any one of the following pieces of equipment: A calibrated Venturi meter, a thin-plate calibratedorifice, a calibrated pilot tube, or an accurately measured reservoir.(2) Total Head Measurement - The total pumping head consists of: distance from the water level in the sump (when pumping) to the centerof the discharge pressure gauge, plus the discharge gauge reading and the velocity head at the discharge. Convert pressure gauge readingto feet of liquid by multiplying the reading times 2.31 times the Specific Gravity of Liquid.(3) Horsepower Measurement - Measure horsepower consumption of the pump by a direct reading of a wattmeter and applying thereading to the following formula.Horsepower Formula:Where:BHPKW InputEff1 brake horsepower delivered real input power (KW) motor efficiency*The motor efficiency can be determined from dynamometer tests or as supplied by motor manufacturer.
Pump Efficiency Formula:Where:GPMTDHSgBHP gallons per minute total dynamic head specific gravity of liquid brake horsepowerSUCTION LIFT - When total suction head is below atmospheric pressure. Suction lift is determined by reading a liquid manometer orgauge in suction line (convert reading to feet of liquid) then subtracting the velocity head at point of gauge attachment.POSITIVE (TOTAL) SUCTION HEAD - When total suction head is above atmospheric pressure. Total suction head is deter- minedby reading a liquid manometer or gauge at pump suction nozzle (convert reading) then adding the velocity head at point of gaugeattachment.VELOCITY HEAD - Velocity is determined by dividing the flow (express in cubic ft. per second) by actual area of pipe cross section(express in square feet) at point of gauge attachment. Velocity head is the velocity of the liquid squared over 2g.Formula:Where:VØg velocity head velocity in pipe in ft/sec. pipe inside diameter 32.17 ft/sec2hDRAWDOWN - Is the natural drop in water level after starting pump operation. The amount of drawdown must be known to make surethe pump bowl is completely submerged below the minimum required pumping level of water in the sump.SEE FOLLOWING PAGE FOR PERIODIC TEST RECORD SHEET
#9A) Standing Water Level - Ft.B) Open CircuitA-B vLineB-C vVoltageC-A vB-C vC-A vFt.E) Pumping LevelCapacityFt.GPMA ampat Above DutyB ampG) Shut- off HeadFt.A ampB ampI) Meg. ReadingC ampHOT(Meg. 5 minutes after 30minutes run at Duty)J) TEST NOTES//Indicate when due formaintenance and/ or anychange of service.SALES ORDER NO.C ampDate of Original InstallationF) Running CurrentH) Shut-off CurrentHPPressure GaugeSIMFLO - PERIODIC TEST RECORDA-B vPump TypeD) Running VoltageMFt. tdhC) Meg. Reading COLDStage#8UNIT#7Ft.#6Depth of Well#5USER#4Ft.#3Depth to Top of Pump#2REF.#1CHECK PROCEDUREGPMACTUAL CHECK DATEDuty Capacity of PumpatNEXT CHECK DATE
3. With the motor suspended in the well, on the "U" plate attach an elevator or clamps to pump end, lifting it vertically over the motor. 4. Carefully align the motor coupling with the motor shaft, while lowering the pump end onto the motor. 5. Replace all cap-screws and lock-washers furnished with the pump and bolt up tightly.