Transcription
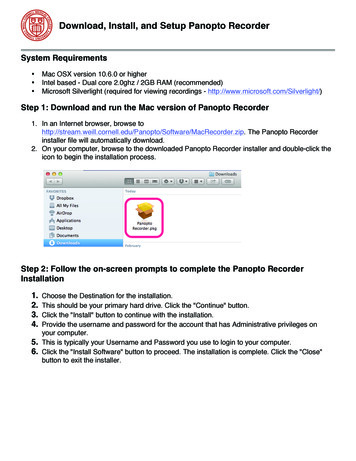
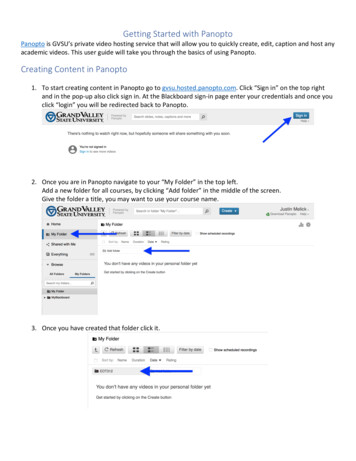
Getting Started with PanoptoPanopto is GVSU’s private video hosting service that will allow you to quickly create, edit, caption and host anyacademic videos. This user guide will take you through the basics of using Panopto.Creating Content in Panopto1. To start creating content in Panopto go to gvsu.hosted.panopto.com. Click “Sign in” on the top rightand in the pop-up also click sign in. At the Blackboard sign-in page enter your credentials and once youclick “login” you will be redirected back to Panopto.2. Once you are in Panopto navigate to your “My Folder” in the top left.Add a new folder for all courses, by clicking “Add folder” in the middle of the screen.Give the folder a title, you may want to use your course name.3. Once you have created that folder click it.
4. Once in your course folder, click create and then click “record a new session”5. If this is your first time creating content with Panopto you will first need to download and install thePanopto recorder.6. Once you open the recorder you will see the red Record button.Give your video a name in the session area.Choose if the front facing camera is to be on or not in the primary source video area, if you would liketo turn it off you can do that in the drop-down menu to the left.The secondary display you will want to be your computer screen. This should be the default setting.Once you have things set up to record click the record button on the top left, minimize the recorderand start recording!
7. Once you are done recording bring the recorder back up and click the stop button on the top left.8. Once you stop recording click the upload button9. Once you hit upload you should see this screen which will show you the status of your upload. Onceyour video is fully uploaded and processed you will receive an email from Panopto. At this point youcan close the recorder and go back to your Panopto library at gvsu.hosted.panopto.com.
Editing and Captioning your Video1. After your video has uploaded click edit, you will need to hover your mouse over your video for thisoption to appear.2. Once you are in the editing area move your cursor to the beginning of the timeline and click and dragyour mouse to the right up to the point you would like your video to start at, do the same for the endof the video. If you click in the center of the video you can also make edits in the middle of your video.Any content in the timeline that is white represents what your viewer will see. Once you are doneediting click apply at the top
3. Add captions: Back in the edit area click captions on the left hand side and the click “import captions”and select “import automatic captions”. This will import the automatic captions that Panopto hascreated for you.4. You can easily edit the automatic captions by double clicking on the caption text. Once your captionsare correct click publish on the top of the screen.
Provisioning your BlackBoard CourseTo use Panopto in your courses you will first need to provision a Panopto folder for each course eachsemester, you use Panopto.1. Go to the tools section of your Bb course.2. Click “Panopto Content”3. Click configure
4. Click “Add Course to Panopto”5. Click “Return to Course”
Sharing Your Content in BlackBoard1. Once in BlackBoard go the section you would like to add your video and go to Build Content and thenclick Panopto Video Embed.2. Select your video from the list shown. If you don’t see your video click the drop down menu at the topand find the folder where your video is located. Once you’ve selected your video click “Insert Videos”
3. Once you’ve added your video your BlackBoard page should look like this!
Once you are in Panopto navigate to your "My Folder" in the top left. Add a new folder for all courses, by clicking "Add folder" in the middle of the screen. Give the folder a title, you may want to use your course name. 3. Once you have created that folder click it. 4. Once in your course folder, click create and then click "record a .