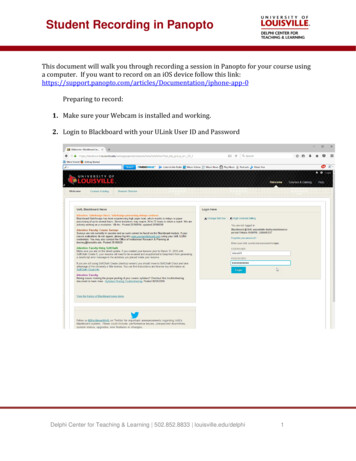
Transcription
How to Record with Panopto for WindowsOverviewThis article will teach you how to record using Panopto for Windows. Panopto for Windows allows users torecord alone (with one computer), with a videographer (using a separate computer), or to live webcast theirrecording. In this article, the recording scenario is a single user (with one computer) presenting with differentcontent (PowerPoint, Keynote, and/or screen capture) and using audio/video. To learn more about the mostrecently released version of Panopto for Windows, please visit our Recorder Client Updates Forum.Note: If you are using a Mac, please visit: How to Record with Panopto for Mac.Prerequisites:Panopto for WindowsCreator access to Panopto1. Installation and Setup1.1. To install Panopto for Windows, please refer to the complete installation instructions: How to Downloadand Install Panopto for Windows. Please note: only Windows 7, 8.1, and 10 (32 and 64 bit) NET 4.7.2 andabove are supported for Panopto versions 6.0 .1.2. Once Panopto is installed, log into your video library, select the Create button at the top of the page andthen select Record a New Session (See Fig. 1).
Figure 11.3. Select Open Panopto to launch the recorder (Fig. 2).Figure 2Note: You can also open the Recorder directly from your computer and login.2. Introductory Tour
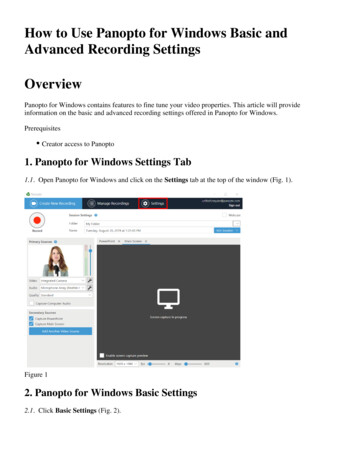
2.1. When you first log in to the recorder you will be prompted with three different tours that further explainall of the different areas of the recorder.2.2. The first tour will go over the 3 steps to recording: (Fig. 3)Step 1: Name your recordingStep 2: Choose your sourcesStep 3: Start recordingFigure 32.3. The second tour will go over the Primary source settings: (Fig. 4)Capture computer audio: Use this setting to capture audio from your PC applicationsAudio volume: The color bar shows the volume of the audio being captured. Note: a user can use theslider to adjust the volume if the audio is too quiet or loud.Figure 42.4. The third tour will go over the Secondary source settings: (Fig. 5)Video resolution: Controls the size of the video that is captured.Framerate: A higher number of frames per second (fps) captures results in a smoother motion.Bitrate: Controls the file size of the resulting video. Note: larger files are able to capture more detail.
Figure 52.5. You can skip the tours and always go back and click on the blue info buttons, located next to PrimarySources, Session Settings, and to the far right of the Resolution toolbar to get the tours again (Fig. 6).Figure 63. Recording Folder and Session Name3.1. Under Session Settings, select the drop-down arrow to select the folder where your recording will besaved (Fig. 7).Figure 7
3.2. Users can name their video here under Session Settings. If unnamed by the user, Panopto willautomatically assign the date and time the video was recorded as its name (Fig. 8).Figure 84. Primary Input4.1. Primary Audio: Under Primary Sources, select the Audio drop-down menu. Select your preferred,connected microphone. For a successful recording, a primary audio source must be selected (Fig. 9).Figure 94.2. Volume bar: After selecting your audio source, test your audio volume by talking in a normal voice. Asyou talk, a few green bars should appear. If the green bars don't appear, or if the red and yellow bars arehighlighted, adjust the volume by using the slider located to the right of the bars (Fig. 10).Figure 104.3. Primary Video Source: To record video of a presenter, select a primary video source from the Videodrop-down menu (Fig. 11). Note: select None if you only want to record a presenter's audio.
Figure 114.4. Quality Setting: There are three different quality settings available to help you record a high-qualityvideo (Fig. 12). To learn more about capture resolutions for Windows, visit Learn about Panopto forWindows Capture Resolutions.Standard Quality:Audio Only - 64 kbpsPrimary Video Resolution - Up to 640x480Primary Video and Audio - 600 kbpsPrimary Video, Audio, and Secondary Video (640x480, 10 FPS, 340 kbps) - 1240 kbpsHigh Quality:Audio Only - 96 kbpsPrimary Video Resolution - Up to 1024x600Primary Video and Audio - 1000 kbpsPrimary Video, Audio, and Secondary Video (1024x768, 15 FPS, 1000 kbps) - 3031 kbpsUltra Quality:Audio Only - 128 kbpsPrimary Video Resolution - Up to 1280x800 (typically 720p)Primary Video and Audio - 1500 kbpsSecondary Video (1920x1080, 19 FPS, 1500 kbps) - 4664 kbpsNote: Higher resolutions (1080p) are available when using the custom quality options. Enable customquality settings under Settings Advanced Settings; then, select the desired options from the qualitymenu.
Figure 124.5. Custom Quality Setting: To control your own quality settings, visit How to Specify Custom PrimaryStream Quality Settings Using Panopto for Windows.5. Screen Capture, Additional Video, and PowerPoint5.1. Screen Capture: After you have selected your video and audio inputs, you can choose to capture what isdisplayed on your screen. To preview your screen before recording, select the checkbox Enable screencapture preview (Fig. 13).Figure 13
5.2. If you have more than one camera plugged into your computer, you can add an additional video source(s)under Secondary Sources (Fig. 14).Figure 145.3. To adjust screen capture resolution, select the Resolution drop-down menu (Fig. 15). Note: If you selecta smaller resolution, items on the screen will appear larger in the final recording.Figure 155.4. You can also adjust the fps (frames per second) by dragging the sliders (Fig. 16). If there is a lot ofmovement on the screen, an fps of 15 is recommended. For showing a video during screen capture, an fps of30 is recommended. Note: a secondary video may appear choppy without a high enough fps selected.Figure 165.5. The kbps (kilobytes per second) will adjust automatically based on the settings for resolution and fps(Fig. 17).Figure 175.6. Select Apply to save changes.5.7. PowerPoint: A presenter may include a PowerPoint presentation. Note: If the PowerPoint contains anymotion on the slide, an embedded video in the slide, or someone annotating over the slide, then screencapture must be selected in order to capture that content (Fig. 18).
Figure 185.8. You can also open a presentation from the recorder. Select the PowerPoint tab in the secondary sourcesviewer, then select Open a Presentation to launch PowerPoint (Fig. 19).Figure 195.9. If you want to have the PowerPoint launch as soon as you select Record, select the checkbox Startpresenting when recording starts, located in the PowerPoint tab on the Secondary Sources viewer screen(Fig. 20). Note: In order to properly record PowerPoint presentations, after you have launched PowerPoint,
you must have it in full-screen presentation mode.Figure 206. Starting, Stopping, and Pausing6.1. You can now begin recording. Select the Record icon (Fig. 21). Once your recording has started, theRecord icon will change into Stop and Pause (Fig. 22).Figure 21Figure 226.2. When you are done recording, select Stop. You will have the option to either upload the recording ordelete it and start again.
6.3. To have a section of your recording automatically edited out, select Pause. When the recording ispaused, Panopto will continue to record, but that section will be edited out of the final version. You canalways get this content back by using the editor.6.4. Hotkeys: You can use Panopto for Windows hotkeys to record, pause and stop, so you don't need tominimize the content you're recording to select the buttons.Record: F8 KeyPause: F9 KeyStop: F10 Key7. Recording Status7.1. Once you have stopped recording, you will be taken to the Manage Recordings tab in the Recorder(Fig. 23).Figure 237.2. Offline Recordings do not have a folder selected in Panopto, so they are only stored to your computer.You can select Upload to Server to select a folder and add the video to your library.7.3. Currently Uploading Recordings will show the video that was just recorded and its upload status.7.4. Uploaded Recordings will show previous recordings and their assigned folder. If you have access tothe video in the library, you can open the video or settings using V iew, Edit, or Share. You can also continuerecording to the same session by selecting Resume.Note: if you need to make space on your computer, you can select Delete Local, as long as you no longerneed the recording to be stored on your computer. If you delete a recording that has not yet been uploaded tothe server, that recording will be lost.8. Warnings
8.1. There are two different warnings that may appear while you are recording: low audio and low diskspace. These notifications are to help you resolve the problem so you can go back to recording a high qualityvideo. For example, if your audio isn't working properly, you will see a banner at the top of the recorder (Fig.24) and a pop-up on the desktop (Fig.25).Figure 24Figure 25 2015 Panopto, Inc. All rights reserved.
1.2. Once Panopto is installed, log into your video library, select the Create button at the top of the page and then select Record a New Session (See Fig. 1). Figure 1 1.3. Select Open Panopto to launch the recorder (Fig. 2). Figure 2