Transcription
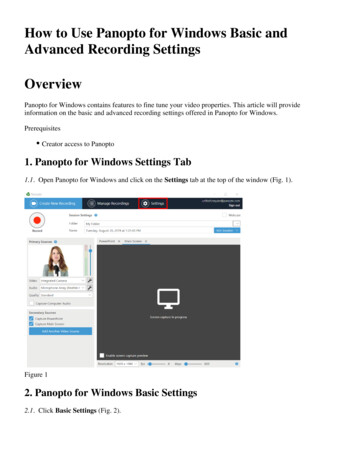
How to Use Panopto for Windows Basic andAdvanced Recording SettingsOverviewPanopto for Windows contains features to fine tune your video properties. This article will provideinformation on the basic and advanced recording settings offered in Panopto for Windows.PrerequisitesCreator access to Panopto1. Panopto for Windows Settings Tab1.1. Open Panopto for Windows and click on the Settings tab at the top of the window (Fig. 1).Figure 12. Panopto for Windows Basic Settings2.1. Click Basic Settings (Fig. 2).
Figure 22.2. Choose from the below System Settings (Fig. 3):Figure 32.2.a. Recording Directory: This sets the directory where your recordings will be stored on thecomputer.2.2.b. Upload when Panopto is closed: This allows the Panopto Upload Service to continue to uploadyour videos to your Panopto site even when Panopto is not open.2.2.c. Delete recordings once they are uploaded: When enabled, Panopto will delete your local filesfor recordings 48 hours after they have been uploaded to your Panopto site. This setting isrecommended for shared machines with limited storage space.2.3. Prefer primary capture device input resolution (Fig. 4): Only change this setting if Panopto forWindows is not displaying the primary video capture feed. Some devices output a static resolution whichrequires this setting to be changed.Figure 42.3.a. Auto: (default) Target resolution is specified by the quality setting selected in the UI.2.3.b. NTSC2.3.c. PAL
2.3.d. 720p2.3.e 1080i/p2.4. Meeting Upload Settings (Fig. 5):Figure 52.4.a. Automatically upload Skype for Business recordings on this computer: When enabled,Panopto will automatically attempt to upload your recordings made in Skype for Business to the folderdesignated by the Panopto folder meeting uploads setting.2.4.b. Automatically upload GoToMeeting recordings on this computer: When enabled, Panoptowill automatically attempt to upload your recordings made in GoToMeeting to the folder designated bythe Panopto folder meeting uploads setting.2.4.c. Panopto folder meeting uploads: This setting sets which folder Skype for Business andGoToMeeting recordings are uploaded to if the two options above were enabled.5.5. Choose from the below App Settings (Fig. 6):Figure 62.5.a. Progressively upload while recording: This allows Panopto to attempt to upload the video toyour Panopto site while it is being recorded. This helps save time waiting for the video to upload afterrecording. This is not recommended if your machine is low on resources2.5.b. Minimize when recording: When enabled, after clicking the record button Panopto willminimize while recording.
2.5.c. Notify me when a viewer post a question or comment (Fig. 6): When enabled, you will getnotifications when users post questions or comments during the webcasting session.Figure 62.5.d. Disable hot keys: When this setting is checked, Panopto will disable the hotkeys for recordingvideo. See this document for more information on Hotkeys for Windows.2.5.e. Use the default system proxy settings: When enabled, Panopto will use the default systemproxy settings.2.5.f. Highlight the mouse cursor during screen capture (Fig. 7): When enabled, your mouse will behighlighted during screen capture which allows users to better follow screen capture.Figure 72.6. Click Save (Fig. 8).Figure 8
3. Panopto for Windows Advanced Settings3.1. To continue to the other features, click on the tab entitled Advanced Settings (Fig. 9) and choose fromthe settings below:Figure 93.2. Choose from the below App Settings (Fig. 10):Figure 103.2.a. Enable "Remember me" option for sign-in: Allows the Recorder to remember your accountthe next time you launch the recorder. Enabling this is not recommended for shared computers.3.2.b. Automatically upload recording logs: When enabled, Panopto will automatically uploadmachine logs to Panopto servers. This will help Panopto Support troubleshoot any issues experiencedduring the recording.3.2.c. Allow secondary only recordings: When enabled, this allows users to record sessions without
an audio device selected. Sessions that do not have audio will fail to process but can be merged withother sessions after upload. See this document on Distributed Recording for more information.3.2.d. Allow toast notifications (Fig. 11): When enabled, this allows Panopto to utilize the built inWindows Notification system to give you different notices and help messages about your recordings.Figure 113.2.e. Enable no audio detected alerts: If enabled, Panopto will warn when no audio is comingthrough to the recorder (Fig. 12).Figure 123.2.f. Enable high CPU usage alerts: If enabled, Panopto will warn when CPU nears maximum usage(Fig. 13).Figure 133.3. Advanced Capture Settings:3.3.a. Enable advanced device configuration: Allows you to access and change the native settings ofyour input device directly in the Panopto Recorder for Windows3.3.b. Capture MP4 format: When enabled, Panopto will record all your session streams in bothPanopto's proprietary format and in MP4. The proprietary and MP4 files will both be stored in thedefault recording directory. Note: This means that your recording files will increase. This is notrecommended for any machines with low storage capacity.3.3.c. Always capture PowerPoint slides as screen images: When enabled, Panopto will alwayscapture your PowerPoint slides as screen images during recordings. Choose this setting if yourPowerPoint has a lot of animations, annotations, or if you are using custom fonts or macros.3.3.d. Enable custom quality settings: Provides a new quality setting choice in the quality drop-downmenu called "Custom." This document goes over how to setup Custom Quality Settings.3.4. Fix primary Audio/Video stream synchronization (Fig. 4): You should only change this setting fromauto if you are using separate video and audio devices in your primary feed and you are experiencingaudio/video desynchronization.
Figure 43.4.a. Auto: Sets Audio/Video streams synchronization to default settings.3.4.b. On: Turns synchronization on.3.4.c. Off: Turns synchronization off.3.5. Click Save (Fig. 5).Figure 54. Changing Advanced Device Configuration for Cameras4.1. After enabling advanced device configuration, click the Create New Recording tab (Fig. 6).Figure 64.2. Select a video source and click the wrench icon (Fig. 7).
Figure 74.3. This will open the device property menu. Select the Video Proc Amp Tab (Fig. 8).Note: Modifying these settings is only recommended for advanced users.Figure 84.4. After changing any of the settings on the slider (or checking any of the boxes in the Auto column), clickApply (Fig. 9).
Figure 94.5. Click on the Camera Control tab (Fig. 10). This tab will modify other features of your camera as it isdisplayed through the Panopto Recorder for Windows.Figure 104.6. After changing any of the settings on the slider (or checking any of the boxes in the Auto column), clickApply (Fig. 11).Figure 114.7. Click OK when you are finished to confirm the changes (Fig. 12) and return to the Create NewRecording page.Figure 12 2015 Panopto, Inc. All rights reserved.
your input device directly in the Panopto Recorder for Windows 3.3.b. Capture MP4 format: When enabled, Panopto will record all your session streams in both Panopto's proprietary format and in MP4. The proprietary and MP4 files will both be stored in the default recording directory. Note: This means that your recording files will increase .