Transcription
The differences in the two versions of QuickBooks can be seen when accessing the software,creating reports, processing invoices and more. Here are a few of the key differences:1. Initial Fee – QuickBooks Online offers a free 30 day trial, so there is no initial fee to try it out.The QuickBooks Desktop version requires the purchase of the software upfront.2. Monthly Fee – QuickBooks Pro Desktop 2015 is a one-time payment or you can getQuickBooks Pro Plus for an annual payment. On the other hand, QuickBooks Onlinerequires a monthly subscription.3. Internet Connection – Because it is cloud-based, an Internet connection is required to useQuickBooks Online. On the other hand, QuickBooks Desktop can be accessed from thecomputer it is installed on regardless of Internet connection.4. Automation Functions – With QuickBooks Desktop, transactions (invoice, receipt, reports,etc.) must be processed manually. The online version has several automation features forthings such as customer billing, email reports, downloading bank transactions and more.5. Remote Access – Since QuickBooks Online is cloud-based, users can access QuickBooksreports wherever they have Internet access and from multiple devices. The QuickBooksDesktop version is linked to the computer it is installed on and therefore can only beaccessed on-site.6. Multiple Users – QuickBooks Online allows for up to 25 simultaneous users whereasQuickBooks Desktop does not permit simultaneous access.7. Customized Features – The QuickBooks Desktop version has several customized featuresthat are not available in the online version. This includes the ability to prepare 1099s, trackmileage, and to budget and track expenses. In general, the desktop version allows morefreedom to customize forms than QuickBooks Online.8. Support – The basic QuickBooks Desktop version does not come with support although youcan pay for support by getting the Pro Plus edition. QuickBooks Online comes with freesupport.Choosing the Right QuickBooks VersionUnderstanding the many differences between the desktop and online versions allows businessowners to make an informed decision about what is right for their business. In general:QuickBooks Desktop is a good choice for: Businesses with a fixed office locationBusinesses that have a small number of people who need accessBusinesses that don’t want a recurring monthly chargeBusinesses that don’t want their books to be accessible onlineBusinesses that want to explore customized features such as the ability to track budget andspending
QuickBooks Online is a good choice for: Businesses where people need to remote access the booksBusinesses where multiple people may need to access the books at the same timeBusinesses that are comfortable with a monthly fee and may benefit from the free supportthat the monthly fee offersBusinesses that are comfortable with cloud computing where data is stored online and onlyaccessible with an internet connectionBusinesses that want to explore automation
AN INTRODUCTION TO QUICKBOOKS ONLINEGetting Started Guide
CopyrightCopyright 2015 Intuit Ltd.All rights reserved.Intuit AustraliaIntuit Australia is a company registered in Australia - ABN 28 163 072 704.Trademarks 2015 Intuit Inc. All rights reserved. Intuit the Intuit logo, Lacerte, ProAdvisor,ProSeries and QuickBooks, among others, are trademarks or registered trademarks ofIntuit Inc. in the United States and other countries. Other parties’ marks are theproperty of their respective owners.Version: 2.0Notice to ReadersThe publications distributed by Intuit, Inc. are intended to assist accountingprofessionals in their practices by providing current and accurate information. However,no assurance is given that the information is comprehensive in its coverage or that it issuitable in dealing with a client’s particular situation. Accordingly, the informationprovided should not be relied upon as a substitute for independent research. Intuit, Inc.does not render any accounting, legal, or other professional advice nor does it have anyresponsibility for updating or revising any information presented herein. Intuit, Inc.cannot warrant that the material contained herein will continue to be accurate nor that itis completely free of errors when published. Readers should verify statements beforerelying on them.
Getting Started GuideTable of ContentsTABLE OF CONTENTSIntroduction to QuickBooks Online . 3Case Study . 4Setting up QuickBooks Online . 5Navigating QuickBooks Online . 11Take the QuickBooks Online Tour . 11Take the QuickBooks Online ipad/iphone Tour. 14Company Setup . 18Company Settings . 18Manage Users . 19Multiple Currencies . 22Importing Your Data . 23Customers . 24Suppliers . 26Chart of Accounts . 26Products/Services. 26Downloading Transactions: Linking your Bank Accounts . 28Linking your Bank Accounts or Credit Cards for Automatic Bank Feeds . 29Importing your Bank Transactions . 31Setting up Bank Rules. 32Creating and managing Quotes . 34Creating Quotes . 34Creating and Sending Quotes on a ipad/iphone . 35Creating and Managing Invoices . 37Creating Invoices . 37Managing Invoices. 38Creating Invoices on a ipad/iphone . 39Customising Invoices . 401
Getting Started GuideTable of ContentsReceiving Payment . 42Accept payments with PayPal app . 44Before installing the PayPal App you need to . 44Install the PayPal App . 45Configure the PayPal App . 47Manage the PayPal App settings . 51Sending an invoice and receiving payment . 51What your Customer sees . 54Expense and Transfer entries . 56Reconciling the PayPal Bank account . 57Organise and Track Expenses . 59Expense Transactions . 59Bills . 61Other Types of Supplier Related Transactions . 61Capturing Expenses on a ipad/iphone . 62Managing Bills . 63Running Reports . 65Profit & Loss / Balance Sheet . 65Automated Reports. 65Customising Reports . 67Run reports on a ipad/iphone. 69Audit Log . 70QuickBooks Online Payroll . 71Getting Support . 81Providing Feedback . 822
Getting Started GuideCompany SetupINTRODUCTION TO QUICKBOOKS ONLINEQuickBooks Online is easy to use software designed for small business accounting. It lets yourbusiness track all of your income, expenses, and inventory. It automatically tracks your GSTand lets you manage your business payroll.QuickBooks Online Accountant offers a new way of supporting and managing your business andmay change the way that you run your consulting, bookkeeping or accounting practice.QuickBooks Online Accountant lets you easily work with and manage your business usingQuickBooks Online.QuickBooks Online is cloud-based software. Secure - hosted securely by Intuit using bank level securityAccessibility - anywhere, anytime access using an internet connection.Data entry automation – get data into QuickBooks automatically using awesomefeaturesUnlimited Accountant Access – easy to connect with your accountantMobile – businesses can access QuickBooks Online using their iOS or Android devices.No more being tied to the desktop, enter data when and where you areNo Desktop files – no desktop files are required so no backups are requiredOther training resources can be found here:Videos: Qs: http://www.intuit.com.au/quickbooks-online/faq/3
Getting Started GuideCompany SetupCASE STUDYIntroductionThis story is about a new small business called North Shore LocksmithJack Gordon, owner of North Shore Locksmith is aLocksmith by trade. Jack has been working as anapprentice contractor for 5 years and loves his job as alocksmith.He has always dreamed of starting his own business. Hismates and family have given him lots of encouragement toget out on his own and start their new business.After months of planning, Jack has decided that now is theright time to start his new business. Jack has done hisresearch and there aren’t many locksmiths providingservices in the North Shore. It is a great place to start abusiness.Jack is going to purchase a few assets like a professionalRyobi drilling machine, drill sets, padlock tools, key blanks,etc.After a reference from his bookkeeper Jack decided to sign-up to QuickBooks Online to keep ontop of his books. To keep costs low, Jack will run the company on his own until he feelscomfortable hiring his first subcontractor.To get started Jack is visiting his bookkeeper to help him get setup to manage his own books.4
Getting Started GuideCompany SetupSETTING UP QUICKBOOKS ONLINEQuickBooks Online is easy to setup and get going. It is so simple that you can have a businessfile setup in less than 20 minutes.There are several important steps to follow to make sure that you are setting up business filesefficiently and accurately.ObjectivesAfter completing this chapter you should be able to: Setup a business fileSetup basic settingsSetup basic accountsImport list informationCompany File SetupThere are several important steps to setup your company file. Getting setup correctly will alsohelp you and your Bookkeeper or Accountant stay compliant with GST and payroll taxes.The day has finally arrived for Jack to start his new business, North Shore Locksmith. There is alot to do, like setting up his business, leasing equipment and getting his systems setup tohandle his new customers.Subscribing to QuickBooks OnlineIn order to use QuickBooks Online your business or you must subscribe to the software. Yourbusiness can subscribe by visiting intuit.com.au and signing up for a free trial. Your accountantcan setup a business file from the QuickBooks Online Accountant.Setup your Business FileYou can setup QuickBooks Online for your business with the free trial.1. Visit intuit.com.au2. Click Free Trial option3. Enter your details and click Sign-up5
Getting Started GuideCompany Setup4. Enter your business information as listed below.o Enter the company information including Company Name, Address and contactinformationo Click Save and Next.6
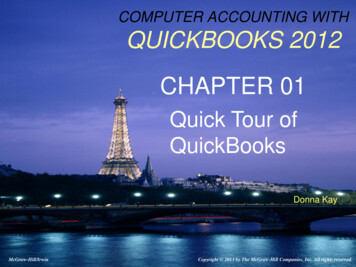
Getting Started GuideCompany Setup5. In the Set Up QuickBooks step, QuickBooks Online asks for more information about yourbusiness company. It compares your business’s business type with other companiesusing QuickBooks Online and optimizes the setup for you.Jack is a locksmith so you can enter Locksmith In the Your Industry field, enter Locksmith. A long list of industry types appearChoose Locksmith Services7
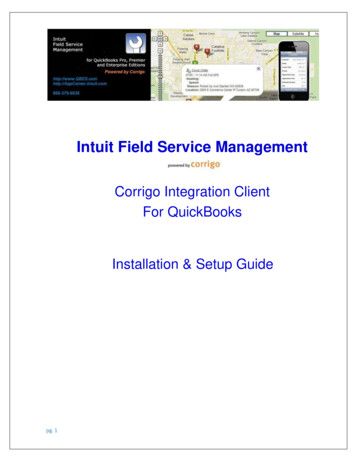
Getting Started GuideCompany Setup6. The next field lets you tell QuickBooks Online what your business sells. QuickBooksOnline can track the sale of products, services and other types of sales. Jack plans to sellproducts and services so select “products and services” option.7. The next step is to choose the Company Type. North Shore Locksmith will be setup as asole trader. This is not a required field, but you can choose the type of organization thatyou are setting up.8. The next step is a question that asks; Do you want to import from QuickBooks forWindows or MYOB? North Shore Locksmith is a start-up business so they do not need toimport data from another source.8
Getting Started GuideCompany Setup9. The last step is to tell QuickBooks Online about your business’s preferred payment methods.Select all the methods that apply. North Shore Locksmith will accept several different paymentmethods. Select Cash, Cheque, Credit card/debit card, Bank Transfer and PayPal.10. Click Save and Next.9
Getting Started GuideCompany SetupQuickBooks Online completes the basic setup of your business’s QuickBooks Online companyfile. The results of the setup are displayed in a graph. The graph displays information aboutbusinesses like yours using QuickBooks Online. In the right hand column of the Set UpQuickBooks window, you see a list of features and transactions that QuickBooks Online hasenabled for your business.North Shore Locksmith is now setup! This completes the basic setup.11. Click Save and next to complete the setup and go to the Home window.10
Getting Started GuideCompany SetupNAVIGATING QUICKBOOKS ONLINEQuickBooks Online (QBO) has been designed to be intuitive, fast and simple to use. The ‘clickand go’ navigation makes it easy for you to find what you need quickly so you spend less timedoing your books and more time doing what you love. The user interface is simple and unifiedacross all products and contains fewer secondary menus, which results in fewer clicks to findthe desired information or functions.NOTE: QuickBooks Online works best in a Chrome browser, but it also works withInternet Explorer 10, Safari 6 or Firefox. It’s useful to bookmark your login page andmemorize your login username so it’s easy to login anytime on your same computer, tabletor laptop device.TAKE THE QUICKBOOKS ONLINE TOURSign into QuickBooks Online at intuit.com.au.Enter your QuickBooks Online User ID and password and select Sign In.11
Getting Started GuideCompany SetupThe Home Page displays a summary of key information and provides links to quick tips tohelp you get the most out of QuickBooks Online.The Company setting is located in the top right corner of your QuickBooks Online screen,and is accessed by clicking on the gears icon.To access the Help function, click on the question mark next to the company menu in thetop right corner.12
Getting Started GuideCompany SetupThe Global Navigation in the center of the screen gives you quick access to: Search – Use this feature to quickly look up QuickBooks Online transactions bytransaction number, date, or dollar amount. The Advanced Search feature allows youto combine your search terms. Quick Create – Use this feature to quickly access the four key transaction types.Clicking on Show More expands the list to include all the available transactions. Recent Transactions – Use this feature to display a list of your recently recordedtransactions, each of which can be opened by clicking on the selection.13
Getting Started GuideCompany SetupThe left-hand navigation bar provides access to your lists and all primary transactions.Home – Home PageCustomers – Use this to create, import, edit and deletecustomers, Customer Money Bar shows the flow of money into thebusinessSuppliers – Use this to create, import, edit and delete Suppliers,Supplier Money Bar shows you flow of money out of the business.Employees – Use this to create, edit and delete employees. Youcan also activate payroll from hereTransactions – This is a shortcut to the following: banking, sales,expenses and Chat of AccountsReports – This menu has four options: Recommended, FrequentlyRun, My Custom Reports and All ReportsGST – From the GST Centre, you can activate your GST tracking,create new taxes and tax groups, complete a BAS, view relatedreports, tax rates and record GST paymentsApps – Access featured applications and add-ons to QuickBooksOnline from this page.TAKE THE QUICKBOOKS ONLINE IPAD/IPHONE TOURQuickBooks Online works with iPhone, iPad, and Android devices; you can have access to yourbusiness information, customers or suppliers wherever you have mobile access.MANAGE YOUR BUSINESS ANYWHERE Create and send professional invoices and quotes.Snap photos of your receipts and organise daily expenses as you go.Convert a quote to an invoice in seconds.Attach photos and notes to quotes, invoices, customers, and transactions.Receive overdue invoice notifications so you always know who owes you money.Track payments and record sales.Profit & Loss and Balance Sheet reports show how your business is doing.Customise tax rates for your business14
Getting Started GuideCompany Setup1. You can download the free QuickBooks Online mobile app (specific to iPhone, iPad, orAndroid) from the iTunes store or Google Play. You can then simply login using yourQuickBooks Online username and password.2. Use your QuickBooks Online login credentials to sign-in to the app3. The navigation on the iPad app is similar to QBO on the browser. There is a left and righthand side panel of options available by selecting the menu and plus buttons on the topleft and right hand side of the screens respectively. For the iPhone the plus sign is at thebottom of the screen.15
Getting Started GuideCompany SetupLeft hand side panel on iPad:Right hand side panel on iPad:16
Getting Started GuideLeft hand side panel on iPhoneCompany SetupRight hand side panel on iPhone17
Getting Started GuideCompany SetupCOMPANY SETUPThe Company Settings feature is designed to allow you to customize QuickBooks Online to yourspecific business requirements and uses.It’s important to define your Company Settings before you enter or upload transactions, so thatyour entries are uniform. Your settings can always be modified or changed based on your needsafter the initial setup is completed.NOTE: The features and screen captures shown here are those available in QuickBooksOnline Plus. Some features are not available in QuickBooks Online Simple Start orEssentials.COMPANY SETTINGSCompany Settings are accessed by selecting the gear icon or company name in the top rightcorner of the screen.18
Getting Started GuideCompany SetupYou can edit any of the company settings by clicking on the option and making your change.Once complete, click Done to update your information.MANAGE USERSYou can give other users access to QuickBooks Online by selecting Manage Users in the YourCompany section of the Company menu.19
Getting Started GuideCompany SetupTo set up new users, select New in the upper right side of the screen. You will be asked toenter the name and email address. When you create a new user, you can restrict or expandaccess as follows:An email invitation with a link to your company file is sent automatically to anyone who youinvite. New users must accept the invitation to gain access to your company file.20
Getting Started GuideCompany SetupQuickBooks Online users can invite up to two accounting professionals (for example, abookkeeper and an accountant) to access their QuickBooks Online data for free, in all versionsof QBO (SimpleStart, Essentials or Plus).To invite your accountant and/or bookkeeper to have access to your QBO data:Select Manage Users in the Company menu.Select Invite Accountant at the bottom of the screen.Enter the accounting professional’s name and email address. This action will generate anemail invitation, which includes a unique link to accept and gain access to your QuickBooksOnline data using QBO Accountant.21
Getting Started GuideCompany SetupMULTIPLE CURRENCIESIf you do business with foreign suppliers and/or customers, QuickBooks Online can be set up formultiple currencies. Simply select Currency Centre from the Settings section of theCompany menu.This will open the Currency Centre. If you would like to activate multi-currency, click the Set upcurrencies button. When multicurrency is enabled, any foreign-denominated transaction willtrack three values: foreign currency amount, exchange rate, and the equivalent amountdenominated in the home currency, Australian dollars.QuickBooks Online tracks fluctuating exchange rates, and it also calculates exchange gains andlosses automatically.22
Getting Started GuideCreating and Managing InvoicesIMPORTING YOUR DATAIf you are currently using QuickBooks desktop or another accounting software program, go towww.intuit.com.au for the latest information on conversion options.To import a data file:Go to the Company Gear IconUnder the Tools headingSelect Import Data.Then select the type of data you would like to import.23
Getting Started GuideCreating and Managing InvoicesCUSTOMERSTIP! To save time and insure your data is imported correctly and requires minimal cleanup, be sure to preview and reformat your data file to match the sample data file (see theDownload a sample file hyperlink).To import your customer’s data:Select Customers.Choose File and browse to select your customer .xls or .csv import file.Find and highlight the source import file, select Open or double-click on the import filename to select it.Once the import file is chosen, select Continue.Review the fields (columns from import file) to ensure they are matched correctly withQuickBooks Online fields for Customers.24
Getting Started GuideCreating and Managing InvoicesNote the green checkmark next to fields that QuickBooks Online has matched up with ormapped to the import file’s columns. If necessary, change the mapping of any field, andselect Continue.Make any desired or required (signified in red, if any) corrections to the information in thepreview screen and then select the button to Import the records.NOTE: An Import Summary confirms the number of imported customers.25
Getting Started GuideCreating and Managing InvoicesSUPPLIERSTo import your supplier data into your QuickBooks Online company file, follow the same processas above. Remember to select Suppliers when specifying the type of data and then pre-formatand select your Supplier xls or csv file accordingly.CHART OF ACCOUNTSTo import your Chart of Accounts data into your QuickBooks Online company file, follow thesame process as above. Remember to select Chart of Accounts when specifying the type ofdata and then pre-format and select your Chart of Accounts .xlsx or .csv file accordingly.NOTE: It is important to import the Chart of Accounts data before importing theProduct/Services data to insure your Product/Services data falls into the correct accounts andwill minimize the need to reclassify or reassign your data after importing.PRODUCTS/SERVICESProducts and Services are generally imported last, and as noted above, they can only beimported after the Chart of Accounts is set up. Please contact you Pro Advisor to set-up yourChart of Accounts.The procedure for importing Products and Services is similar to that of importing Customers andSuppliers.Again, match the fields and make any required changes to the mapping, click Continue.26
Getting Started GuideCreating and Managing InvoicesMake any desired or required (in red) changes and import the records.As with all imported lists, the Import Summary confirms the number of imported productsand services.27
Getting Started GuideCreating and Managing InvoicesDOWNLOADING TRANSACTIONS:LINKING YOUR BANK ACCOUNTSYou can save time and reduce errors by downloading your transactions directly from your bankand credit card accounts from a secure online connection.Once you have established a secure connection with your bank your transactions willautomatically transfer or “feed” to your QuickBooks Online Company file. Alternatively you canelect to import your bank transactions manually, by downloading the data from your bank orcredit card and then uploading the data files to your QuickBooks Online account.If you have set up automatic bank feeds, transactions are securely imported into theDownloaded Transactions feature automatically.Once these transactions have been imported, QuickBooks Online will instruct you to do thefollowing: Automatically match these imported transactions with a transaction you have alreadyrecorded Record as a new transaction by allocating it to an account and a payee’s name Recall how you managed a similar transaction previously. It will suggest to allocate it to thesame account and payee again28
Getting Started GuideCreating and Managing InvoicesLINKING YOUR BANK ACCOUNTS OR CREDIT CARDSFOR AUTOMATIC BANK FEEDS1. From the left-hand navigation bar select Transactions, then Banking.2. Locate your financial institution by selecting it from the list or by typing its name andclicking Find.3. Enter your user name and password to enable QuickBooks Online to automatically downloadyour account transactions directly into your QuickBooks Online account.NOTE: If your bank or financial institution is not listed or if you prefer not to have yourbank account linked, you may also download your transactions from your bank in a csvformat and then upload them into QuickBooks Online manually.29
Getting Started GuideCreating and Managing Invoices4. Once connected, tick the bank accounts you want to connect to QuickBooks Online thenchoose the Account type from the QuickBooks Account drop down list provided.5. Click on Connect to download the transactions6. Once your transactions are securely downloaded, click “I’m done, let’s go”.30
Getting Started GuideCreating and Managing InvoicesIMPORTING YOUR BANK TRANSACTIONSAn alternative to linking your bank accounts is to import bank transactions you havedownloaded from your online banking system.1. To do this, select Transactions then Banking and File Upload.Browse to locate the file to upload. Select Next.From the drop-down list of accounts in QuickBooks Online, select the appropriate bankaccount to which the file’s transactions are to be compared and uploaded and chooseSave.A message will appear indicating that your bank data has been saved.Click Finish.31
Getting Started GuideCreating and Managing InvoicesSETTING UP BANK RULESBank Rules allows greater control of bank transactions as they are added to the QBO Company.Bank Rules can be defined via Money In or Money Out and the bank account the transaction itrelates to (if you have more than one bank account). The transactions can be identified usingseparate conditions using Description, Bank Text, or Amount using the logic of Contains, IsExactly or Doesn’t contain. You can add up to five separate conditions allowing you to drilldown in identifying specific types of transactions.Once the Bank Rule has identified the transaction you are able to allocate the Payee, Categorizeit, apply a tax code, or apply a class and/or Location. In addition you can add a memo to thetransaction.Create a new Bank Rule1. Once in the Transaction Banking screen click on the upside down arrow next to Update.Select Man
QuickBooks Online is a good choice for: Businesses where people need to remote access the books Businesses where multiple people may need to access the books at the same time Businesses that are comfortable with a monthly fee and may benefit from the free support that the monthly fee offers Businesses that are comfortable with cloud computing where data is stored online and only