Transcription
The Secret of copying Autodesk Inventor Assemblies
The Secret of copying Autodesk Inventor AssembliesCadSetterOut.comThe Secret ofcopyingAutodeskInventorAssembliesA guide to the complex world of Inventor part and assemblyfiles and their hyperlinksPaul Munford9/1/2014http://www.cadsetterout.com/2
The Secret of copying Autodesk Inventor AssembliesThe CAD Setter Out is a blog dedicated to sharing tips and tricks forcreating technical drawings using CAD.I firmly believe that creating drawings with your CAD software should beintuitive and fun. I don't want your CAD software to negatively affect yourcreativity or productivity.The focus is on creating shop drawings for the construction industry(because that's what I do) using AutoCAD and Autodesk Inventor(because that's what I use).You are all welcome :DPaul Munford@Cadsetterout3http://www.cadsetterout.com/
The Secret of copying Autodesk Inventor AssembliesContentsThe Secret of copying Autodesk Inventor Assemblies . 2Preface . 5Introduction . 6Copying Assemblies with the Vault 'Copy Design' Tool . 7Copying Assemblies with Inventor's 'Copy Component' tool . 8Copying an Assembly with the Design Assistant. . 11Copying an Assembly with the iLogic Design Copy Tool . 14Using an Inventor iAssembly to create multiple designs . 18Using iCopy to create copies of Assemblies. 20Copying Assemblies with the ‘Copy Design’ tool from the SDK . 22Copying Assemblies with Pack n Go . 24How to copy an Autodesk Inventor Assembly – Conclusions . 32Resources . 34About the Author. 35http://www.cadsetterout.com/4
The Secret of copying Autodesk Inventor AssembliesPrefaceThis eBook arose out of the many questions I read on the AutodeskForums regarding the copying of Autodesk Inventor files.Since I wrote the original post this book is based on back in 2011 it hasbeen viewed nearly 20,000 times!http://cadso.co/CopyAssemblyI've re-packed this post as an eBook so that you can download it andprint it off. Please feel free to share this eBook with your colleagues andfriends.Don't miss the additional bonus chapter at the end on using Pack n Go tocopy assemblies.Questions or comments? Please email om/
The Secret of copying Autodesk Inventor AssembliesIntroductionIf you are new to Inventor, you can get tripped up when it comes tocopying an Assembly (IAM) file. This is because an IAM file only containsa list of links to other Assembly and part files.If you want to create a copy of an Assembly, you also need to copy all theSub Assembly and Part files (Components) that go with it.And that’s not all. If you are copying files within a Project, you will alsoneed to re-name all the components, otherwise Inventor may find thewrong version of the component that you intended to be used in the newAssembly.And that’s not all! An Assembly file contains a list of Hyperlinks to otherAssembly and part files. If you copy, move and rename all the subcomponents of an Assembly, you will also need to repair all those InternalHyperlinks.Note: Some of these techniques can also be applied to copying Drawingfiles (DWG or IDW)That sounds like a lot of work!It can be! So it’s worth considering your options before you start.There are Seven methods of copying an Assembly file (that I know of). Use the Vault’s ‘Copy Design’ tool Use Inventor’s ‘Copy Component’ tool Use the Inventor Design Assistant Use the iLogic Design Copy Tool Use an iAssemby instead Use iCopy Use the Copy Design tool from the SDKhttp://www.cadsetterout.com/6
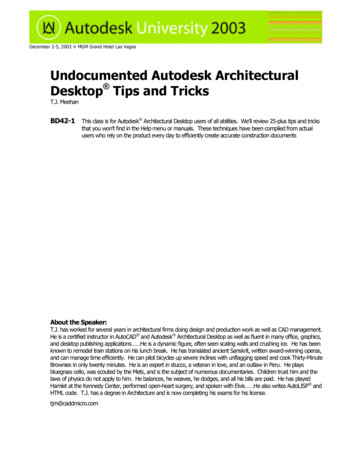
The Secret of copying Autodesk Inventor AssembliesCopying Assemblies with the Vault 'Copy Design' ToolCopying Assembly files with the Vault is very simple, This is the onlydownside of this technique.If you are lucky enough to be using the Vault to manage your Data, thanI guess you can stop reading now!Thanks very much to Steve Bedder of Autodesk for supplying this VaultScreen shot.7http://www.cadsetterout.com/
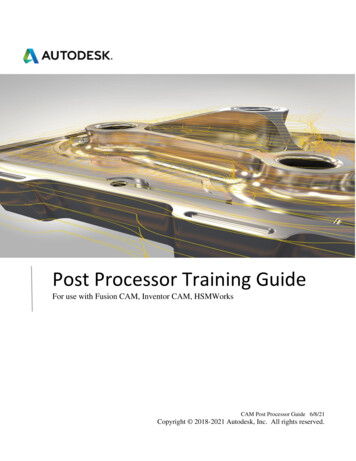
The Secret of copying Autodesk Inventor AssembliesCopying Assemblies with Inventor's 'Copy Component' toolTo copy an Assembly with the 'Copy Component' tool, you first need toopen the Assembly you wish to work with.To copy the entire Assembly navigate to the:Assemble Tab Component Panel Copyor right click on your selection of Components and choose ‘Copy’.Tip: In Inventor 2015 the Copy tool has been moved to a drop downpanelCopy ComponentsYou will be taken to the ‘CopyComponents: Status’ Dialoguebox, which allows you to chosewhether to copy or reuse thecomponents that you haveselected.You can select and de-selectcomponents from the Assemblybrowser to add them to the list.Hit ‘Next’ when you are happywith your selection.http://www.cadsetterout.com/8
The Secret of copying Autodesk Inventor AssembliesEdit File names and pathsThe next Dialogue is the ‘Copy Components: File Names’ Box. Thisdialogue gives you a lot of options to chose where you’d like to save yourcopied components and what you’d like them to be called.You can use the ‘Prefix’ and ‘Suffix’ boxes to Automatically revise your filenames, or you can edit each one by hand.Right click over a field in the ‘File Location’ column to set a new path. ’Source Path’ will save the new file in the same location as the oldfile (probably not a good idea!). ‘Workspace’ will save the new file in the root folder of yourworkspace (Again, probably not what you want!). ‘User Path’ allows you to set your own path. Copy and paste is yourfriend here.Tip: Right click over the ‘New Name’ or ‘File Location’ fields and chose‘Find and replace’ to quickly edit repeated text strings.9http://www.cadsetterout.com/
The Secret of copying Autodesk Inventor AssembliesFinally, you have the choice whether you want to place your copiedAssembly into your current assembly – or create a new file (Probablycreate a new file).Hit OK, and Inventor will create a new copy of your Assembly, includingcopies of all the assembly’s components, and handle all the Internalpaths. Very neat.Conclusions - Copy DesignInventor’s Copy Assembly tool is pretty easy to use and gives you a lot ofuseful options to re-name and path your components. Unfortunately theCopy Component tool’s major downfall is that it doesn't recognise derivedreferences in part files.So if you are using Skeletal Modelling or the Multi-body modellingtechnique, this technique is out. You may want to consider using theDesign Assistant instead.http://www.cadsetterout.com/10
The Secret of copying Autodesk Inventor AssembliesCopying an Assembly with the Design Assistant.Design Assistant is a standalone program that can be opened from insideInventor or started up separately.The Design Assistant uses the Inventor Apprentice COM server to editInventor files without having to have Inventor running.While copying Assemblies I recommend that you close Inventor down andopen Design Assistant separately.Look for Design Assistant under:Windows Programs Autodesk Autodesk Inventor Design AssistantNote: When Design Assistant starts up, it will be using the last projectthat you had open in Inventor. Check that this is correct before you start!Set your Project file.Before you start, make sure that you have the correct Project file active.Go to:File Projects And make sure that the project is active that contains the Assembly youwish to copy.11http://www.cadsetterout.com/
The Secret of copying Autodesk Inventor AssembliesOpen an Assembly to CopyClick on the ‘Manage’ button on the left, and then click on the ‘Open’button at the top to open your assembly.Note: Notice that the ‘Tree’ layout shows the relationships between thecomponents – including the references of derived parts.Set an ActionRight click over the ‘Action’ column and choose ‘Copy’ to copy acomponent. You can pick multiple components from the left hand columnbefore you pick an Action.The note in the ‘Modified’ column will change to ‘Requires Edit’ and theCells will change to an Orange colour to remind you which ones needediting.Edit the Path and File nameDouble click in the ‘Name’ cell of the component you wish to copy, browseto your new path and rename the part.You will need to do this for each and every component that is in yourAssembly file (Excluding Library parts).Notice how references of derived parts and components used in morethan one Assembly are changed everywhere they are used, all at once.Save your changesWhen you have edited the values of every part that you want to copy,check it! and then check it again! You really don’t want to miss out acomponent at this stage, it could get really confusing .When you are happy that you’ve edited all the components that you needto copy, and that the new names and file paths are correct, hit the ‘Save’button at the top.http://www.cadsetterout.com/12
The Secret of copying Autodesk Inventor AssembliesNote: Until you hit the ‘Save’ Button, none of the changes will be writtenout to disk.Inventor will create an entirely new Assembly, and will create all the newcomponents on disk while creating all the new file paths (hyperlinks)inside the Assembly file.If you browse to the folder where you are saving the copy of yourAssembly, you will see all the little parts being created.After the new Assembly has been created, Design Assistant willautomatically load the new version of the Assembly.With a really big Assembly this process can take a little while – Plenty oftime for a Cuppa.Conclusion - Design AssistantCreating all those new component names and paths for a large Assemblycan be really tedious, however If you need to copy an Assembly that hasbeen created using the Skeletal Modelling technique or Master partModelling technique, this might be the only way of copying your Assembly(Not counting the Vault).Tip: use ‘Pack and Go’ to copy the entire Assembly out to a ‘Work inprogress’ project location and then use the Design Assistant to rename,rather than copy your components.This saves time and effort, because you don’t have to browse to a new filelocation each time. When you are done, you can copy the entire set offiles back into your Project location.13http://www.cadsetterout.com/
The Secret of copying Autodesk Inventor AssembliesCopying an Assembly with the iLogic Design Copy ToolThe iLogic Design Copy tool was introduced in the Inventor 2011Subscription Bonus pack 1, and from Inventor 2012 is in the box.The iLogic Design copy tool was introduced to help copy Parts andAssemblies that contain - or reference iLogic's .ILOGICVB 'Rules', but youdon't have to be copying an iLogic Part or Assembly to take advantage ofthe tool.Starting up iLogic Design CopyThe iLogic Design Copy tool is found under the 'Tools' tab 'iLogic' panelNote: The iLogic Design Copy tool is only visible when no otherdocuments are open!Selecting Files to copyThe iLogic Copy Design tool's dialogue takes a very different approach tothe Copy Assembly tool or the Design Assistant.http://www.cadsetterout.com/14
The Secret of copying Autodesk Inventor AssembliesA series of 'Tree' browsers allow to you to pick in ever finer detail whichfiles you wish to copy. Use the Files to copy tree to pick the folders where the parts arestored (Remember to include Library folders in the search). Use the Assemblies Tree to pick the Assembly you wish to copy The Parts Tree will be automatically filled out, but you can add orremove individual files at your whim. Use the Non-Inventor files tree to add any other relevant files tothe selection set.Hit Next when you're happy with what you've selected.15http://www.cadsetterout.com/
The Secret of copying Autodesk Inventor AssembliesRe-Naming the FilesThe iLogic Design Copy tool allows you to add your own suffix or prefixonto the component names.You can't change the file names completely, but you can choose notto change a file name by un-checking the box in the 'Rename' column.Tip: You can see an excellent Video of the iLogic Design Copy Tool inAction on the Inventor Wiki Site.http://www.cadsetterout.com/16
The Secret of copying Autodesk Inventor AssembliesConclusion - iLogic copyThe iLogic Design Copy Tool is a well thought out departure from theprevious examples.The fact that the component names can't be changedin their entirety feels limiting, but I guess that if you know about this andplan for it in advance it shouldn't be a problem.Thanks very much to Mark Flayler of IMAGINiT ManufacturingSolutions for bringing this new tool to my attention.17http://www.cadsetterout.com/
The Secret of copying Autodesk Inventor AssembliesUsing an Inventor iAssembly to create multiple designsMuch like iParts, iAssemblies are table driven configurable Assemblies thatare great for when you have a limited number of variations to a designand you know what configurations you are going to need in advance.You can use an iAssembly in one ofthree ways;You could use the iAssembly on its own, as a 'Drawing Factory'. When youcreate a drawing from an iAssembly you can chose which of the iAssemblyconfigurations you want to document in the drawing.You don't need to create a new copy of the iAssambly (and it'scomponents) each time to document the different versions of the design.http://www.cadsetterout.com/18
The Secret of copying Autodesk Inventor AssembliesYou can also use an iAssembly as a sub assembly within a MasterAssembly. The iAssembly will reference the correct configuration of theparts it contains, so you don't need to c
01.09.2014 · Hit OK, and Inventor will create a new copy of your Assembly, including copies of all the assembly’s components, and handle all the Internal paths. Very neat. Conclusions - Copy Design Inventor’s Copy Assembly tool is pretty easy to use and gives you a lot of useful options to re-name and path your components. Unfortunately the