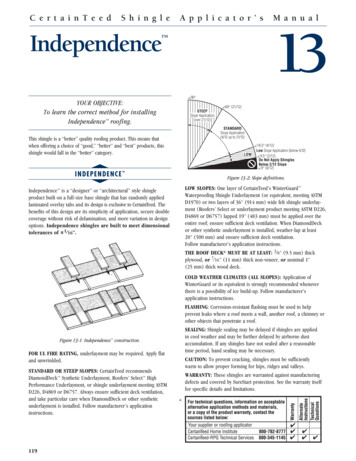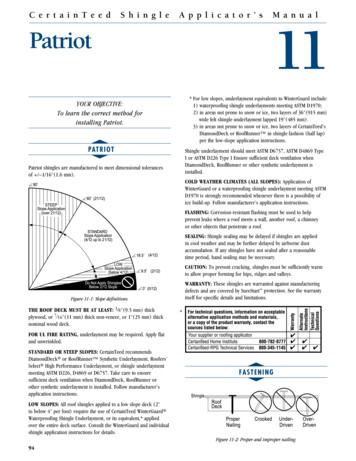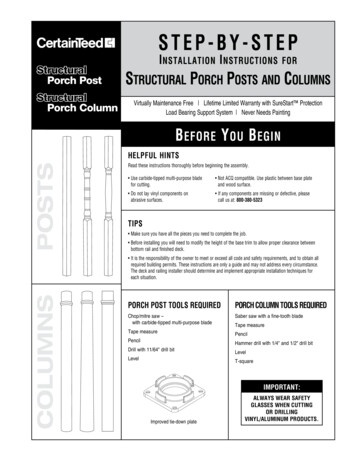
Transcription
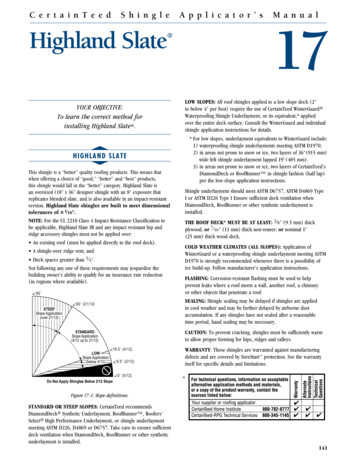
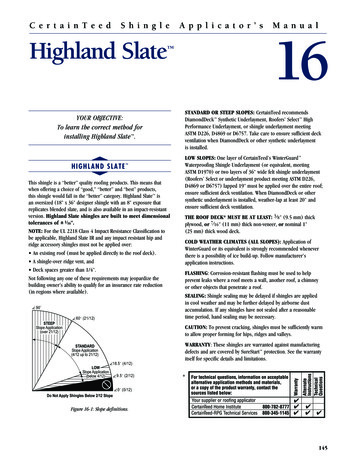
C e r t a i n T e e dS h i n g l eA p p l i c a t o r ’ sNorthGate M a n u a l1490 YOUR OBJECTIVE:To learn the correct procedure for installingNorthGate shingles.STEEPSlope Application(over 21/12)60 (21/12)STANDARDSlope Application(4/12 up to 21/12)NorthGate shingles have the installer-friendly NailTrak feature, which provides 11 2 " wide nailing area and speciallyformulated Quadra-Bond laminating adhesive (See Figure 14-3).NorthGate is impact resistant and is specially manufacturedwith SBS modified asphalt to meet UL 2218 Class 4 impact resistancerating.NOTE: NorthGate must be installed over a clean deck (no roofovers) to obtain the UL 2218 rating. It is strongly recommendedNorthGate Accessory or NorthGate Ridge impact resistant capshingles be installed on all hips and ridges. Some insurance carriersmay not consider the roof system as compliant to UL 2218 Class 4without impact resistant cap shingles.Closed-cut valleys are preferred by CertainTeed when applyingthese shingles; however, open and woven valleys are also acceptable.STANDARD OR STEEP SLOPES: CertainTeed recommendsDiamondDeck or RoofRunner synthetic Underlayment, Roofers’Select High Performance Underlayment, or shingle underlaymentmeeting ASTM D226, D4869 or D6757. Take care to ensure sufficientdeck ventilation when DiamondDeck, RoofRunner or other syntheticunderlayment is installed. Follow manufacturer’s applicationinstructions.LOW SLOPES: All roof shingles applied to a low slope deck (2"to below 4" per foot) require the use of CertainTeed WinterGuard Waterproofing Shingle Underlayment, or its equivalent,* appliedover the entire deck surface. Consult the WinterGuard and individualshingle application instructions for details.* For low slopes, underlayment equivalents to WinterGuard include:1) waterproofing shingle underlayments meeting ASTM D1970;2) in areas not prone to snow or ice, two layers of 36"(915 mm)wide felt shingle underlayment lapped 19"(485 mm).3) in areas not prone to snow or ice, two layers of CertainTeed’sDiamondDeck or RoofRunner in shingle fashion (half lap)per the low-slope application instructions.18.5 (4/12)9.5 (2/12)Do Not Apply Shingles Below 2/12 Slope0 (0/12)Figure 14-1: Slope definitions.THE ROOF DECK* MUST BE AT LEAST: 3 8 "(9.5 mm)thick plywood, or 7 16 " (11 mm) thick non-veneer, or nominal1" (25 mm) thick wood deck.COLD WEATHER CLIMATES (ALL SLOPES): Application ofWinterGuard or a waterproofing shingle underlayment meeting ASTMD1970 is strongly recommended whenever there is a possibility ofice build-up. Follow manufacturer’s application instructions.F LASHING: Corrosion-resistant flashing must be used to helpprevent leaks where a roof meets a wall, another roof, a chimneyor other objects that penetrate a roof.SEALING: Shingle sealing may be delayed if shingles are appliedin cool weather and may be further delayed by airborne dustaccumulation. If any shingles have not sealed after a reasonabletime period, hand sealing may be necessary.CAUTION: To prevent cracking, shingles must be sufficientlywarm to allow proper forming for hips, ridges and valleys.WARRANTY: These shingles are warranted against manufacturingdefects and are covered by SureStart protection. See the warrantyitself for specific details and limitations.* For technical questions, information on acceptablealternative application methods and materials,or a copy of the product warranty, contact thesources listed below:Your supplier or roofing applicatorCertainTeed Home InstituteCertainTeed-RPG Technical Services icalQuestionstLOWSlope Application(below 4/12)WarrantysNORT H GAT E Shingle underlayment should meet ASTM D6757, ASTM D4869 TypeI or ASTM D226 Type I Ensure sufficient deck ventilation whenDiamondDeck, RoofRunner or other synthetic underlayment isinstalled. 117
LOW AND STANDARD SLOPEsFAST ENINGUse four nails for every full NorthGate shingle as shown below.tShingle12''(305 mm)RoofDeck1'' (25 mm)ProperNailingCrookedUnderDriven143/4''(375 mm)Release Tape12''(305 mm)1'' (25 mm)11/2''NailableAreaOverDrivenFigure 14-2: Proper and improper nailing.IMPORTANT: For decks 3 4 " (19 mm) thick or thicker, nails mustgo at least 3 4 " (19 mm) into the deck. On thinner decks, nails mustgo at least 1 8 " (3.2 mm) through the deck.Nails must be 11- or 12-gauge roofing nails, corrosion-resistant,with at least 3 8 " (9.5 mm) heads, and at least 1" (25 mm) long.Figure 14-4: Use four nails for every full shingle.the1/2nailH IMPORTANT: When131/“six2'' nailing” a full13''shingle, follow13'' pattern1 2 ” nailable area.shown in figure (34312-5,mm)nails can be(330placedmm)in the 1 (343mm)STEEP SLOPE1'' (25 mm)1'' (25 mm)Use six nails and four spots of asphalt roofing cement** for every fullNorthGate shingle as shown below.12''(305 mm)Nail Area forLow & StandardSlopes1''(25 mm)Nail Area forSteep SlopesAvoid PlacingNails AlongThis LineNail AreaFor SteepRelease Tape143 / 4 ''(375 mm)Release Tape12''(305 mm)1''(25 mm)1''(25 mm)1''(25 mm)Roofing CementFigure 14-5: Use six nails and four spots ofasphalt roofing cement on steep slopes.FRONTNailing LinesCAUTION: E xcessive use of roofing cement can cause shingles to blister.131 / 2 ''(343 mm)BACK13''(330 mm)131 / 2 ''(343 mm)1''(25 mm)1''(25 mm)Sealant StripsUNDERSIDEOF TOPLAMINATELAYER1''(25 mm)Quadra-BondRoofing Cement1''(25 mm)Four laminating adhesive strips for a stronger bond.Figure 14-3: NailTrak features a wider nail area andextra-strong Quadra-Bond construction . 118Chapter 14C E R T A I N T E E D S H I N G L E A P P L I C A T O R’ S M A N U A L
2ND THROUGH 5TH COURSES:sTW O CL E A N - DECK AP P LICAT ION M ETHO DSF O R N ORT H GAT E SH INGLESCAUTION! Failure to follow instruction steps 1-5 below will bringjoints too close together and may cause unattractive patterns!t1. Cut 6" off the left end of the first shingle and save this piece for lateruse. Apply the 323 4 " long piece over and above the first-courseshingle. Leave the bottom 5 5 8 " tab portion of the first-course shingleexposed.F IVE-COURSE DIAGONAL METHOD (6" AND 11")FIVE-COURSE DIAGONAL METHOD (55 8 " AND 11 1 4 ")NOTE: The 6" and 11" method is shown below. The 55 8 " and111 4 " method follows the same application instructions as the6" and 11" method except the dimensions of the shingle cut-offsin the second and third courses are 55 8 " and 111 4 " respectively.2. Cut 11" off the first shingle of the third course and save thisfor later. Install the 273 4 " long piece over and above thesecond-course shingle.CAUTION: Use of other installation methods may result inan objectionable pattern.3. Apply the previously removed 11" long piece over and abovethe third-course shingle.PREPARING THE DECK:4. Apply the previously removed 6" long piece from the secondcourse over and above the fourth-course shingle.u Apply underlayment as required. CertainTeed suggests that alayer of shingle underlayment be applied. For UL fire rating,underlayment is generally required. Apply flat and unwrinkled.5. Install a full shingle against the right edge of each shingle incourses one through five.u Snap chalklines to assure shingles will be correctly aligned.Expose all shingles 5 5 8 " (143 mm).CONTINUING UP THE ROOF:1. Beginning again with a full shingle, repeat the five-course patternup the left rake.(Figure 14-8, B).STARTER COURSE:2. Fill-in courses across the roof in a stepped diagonal fashion usingfull shingles. (Fgure 14-8, A). Do not run courses straight across.Starter ShingleIMPORTANT: Do not align joints of shingles closer than 3 1 2 "from one another.7 5/8''RidgeR e m o v et h e s ep o r t i o n sckRoof DeFigure 14-6: Make starter shinglesthat are 7 5 8 " in height.1. Use CertainTeed Swiftstart Starter, or three-tabself-sealing shingles with the lower tab portions removed.Be sure that the starter shingles are at least 75 8 " in height.(Figure 14-6).Rake2. For the first starter, cut 6" from one side of the startershingle.Drip EentrlaymUndedge2" (503. Apply the remaining piece to the lower left corner of the roof.Make sure there is 1 2 " overhanging the rakes and eaves ifdrip edge is being used. If you are not using drip edge,make the overhang 3 4 ".pide Lamm) Se Lap) Sid0 mmourse" (10ourseourse 44th Cse3rd CCour2nd6" )m1st urse(152 meCo11" m)ours)mm9m7rter C(205a(7t"S/4735th C4. Use full length starter shingles for the rest of the course.21ST COURSE: Apply a full shingle at the lower left corner of theroof. Make the lower edge and left edge lie flush with the edgesof the starter course (Figure 14-7).11" )(279 mmpiecem)52 m6" (1 urse.Save in 5th Coeto us"32 3/46" )m(152 mm)(832 m5 5/8" m)(143 mouts abave aboute/er rak , orove edge .gles er drip edgeinhnd s ) ov o dripExte "(13 mm m) if n1/2 " (19 m3/4esEavFigure 14-7 : Applying the first 5 courses of NorthGate .C E R T A I N T E E D S H I N G L E A P P L I C A T O R’ S M A N U A LChapter 14 119DripeEdg
Figure 14-8: “Five-Course Diagonal Method” installation schematic36" (91Shingle 4 mm) WaterpUnderlaymen roofingtFor capping hip and ridge,apply CertainTeed NorthGateAccessory shingles of a like colorRidgeVentshTrim fluto roofpeningdeck oentrlaymUndeUnderlaymenAir Flow Through SoffitBA*Adequate attic ventilation creates a cooler atticin the summer and a drier attic in the winter. It alsohelps prevent premature failure of shingles, roof deckmovement/deterioration, and formation of ice dams.Shingle damage or failure resulting from inadequateventilation is not covered by CertainTeed's LimitedShingle Warranty. Contractors only, for furtherinformation about attic ventilation, please consultthe "CertainTeed Shingle Applicators Manual"(call 1-800-404-9880 for a copy), and/or"The Principles of Attic Ventilation" brochure(call 1-800-AIRVENT for a copy).LCLine valley with36" (914 mm) wideCertainTeed WinterGuardor equivalent.Extend shinglesacross valleyMin. 12" (305 mm).rla.) ove0 mm2" (5tEmbed each shinglein 2" (50 mm) strip ofroofing cementNo nail within 6"(152 mm) of valley C/LCut off 2" (50 mm) triangleRemoveCLCutback back 2"from (50 mvalle m)y C/LFigure 14-9: Highlight of closed-cut valley details 120Chapter 14C E R T A I N T E E D S H I N G L E A P P L I C A T O R’ S M A N U A L
ssCH IM NEY FLASH INGRO O F- O V ER METHO DSFO R N O RTHG ATE S HIN G LESttMetal Step FlashingCut old shingles back flush to rakes and eaves. Apply drip edgealong rakes and eaves, if desired.The “5-Course Diagonal Nesting”method of application described below is suggested for roofingover square-tab asphalt roofing shinglesof 55 8 " /- 1 8 "(143 mm /- 3.2 mm) exposure.7 5/8"(193 mm)2" (50 mm)Minimum3" (75 mm)MinimumSTARTER COURSE: The starter course consists of 55 8 " x 383 4 "(143 mm x 984 mm) strips formed by cutting off the top 2"(50 mm) of CertainTeed’s Swiftstart self-sealing shingles, orequivalent. Cut 6" (152 mm) off the left end of the first startershingle only. Apply the remaining 323 4 " (832 mm) piece to thelower left corner of the roof, overhanging the rakes and the eaves1/2" (13 mm) if drip edge is used, or 3 4 " (19 mm) if no dripedge is used. Continue with full lengths along eaves.Figure 14-10: Step flashing minimum dimensions.Fold downcounter flashingover step flashing2 L ap(5 0 m m )m in im u mCounterFlashingFastenFlashingTo RoofIMPORTANT: When the first course shingles are applied, ensurethat the end joints of the starter shingles and the first course shinglesare NEVER LESS THAN 31 2 " (90 mm) apart. Either plan the startershingles’ application to avoid end joints getting closer than 31 2 "(90 mm) or cut back the affected first course shingle to ensurethe minimum31 2 " (90 mm) end joint spacing.1ST COURSE: Cut 2" (50 mm) off the bottom of the full NorthGateshingle and apply remaining 111 4 " x 383 4 "(286 mm x 984 mm)pieces. For all courses, align top edge of shingle to be applied withbottom edge of old shingle in next course.Apron Flashing2ND COURSE: Cut 6" (152 mm) off the left end of a full shingleand apply remaining 323 4 " (832 mm) piece. Exposure of 1st courseonly is reduced to 35 8 " (92 mm).3RD, 4TH, 5TH AND SUCCEEDING COURSES: Apply as describedabove in “5-Course Diagonal Application Method” section.Figure 14-11: Flashing around a chimney.C E R T A I N T E E D S H I N G L E A P P L I C A T O R’ S M A N U A LChapter 14 121
sH IP S AND RIDGEStThese shingles have an accented shadow line that is designed tocomplement these shingles. Simply fold along the pre-cut lines anddetach individual cap pieces. Save valuable installation time comparedto cutting 3-tab shingles.NORTHGATE ACCESSORY SHINGLESThen apply a full 133 4 x 131 8 " (337 mm x 333 mm) piece overstarter, bending the shingle along its centerline and forming intoplace over the hip or ridge, flush with the bottom and sides of thestarter shingle. Fasten with two (2) fasteners – minimum 13 4 "(45 mm) long, see B.Continue application of NorthGate Accessory shingles up the ridgeor along the ridge, forming each shingle over the hip or ridge, andfasten as shown in Fastening. Expose NorthGate Accessory shingles55 8 " (143 mm) covering all fasteners, see C.The notches on each shingle may be used to help centerthe shingle on the ridge and to ensure the 55 8 " (143 mm)exposure.13 1/8"(333 mm)6 5/8"(168 mm)Figure 14-12: NorthGate Accessory shingles detach easily fromthree-piece units to make 72 individual cap pieces.There are 24 three-piece units in each bundle, providing 72individual caps that will cover 333 4 linear feet (10.287 linear feet,Metric) of a hip or ridge. Each dimension cap piece is 13 1 4 " by131 8 ") and features clipped corners on the bottom edge of theexposed portion.NORTHGATE ACCESSORY APPLICATION IS AS FOLLOWS:Apply primary roofing up to hip or ridge on both sides of roofand trim flush. Ensure that the NorthGate Accessory shingleswill adequately cover the top course of the shingles on both sidesof the hip and ridge. Use only CertainTeed NorthGate Accessoryshingles of a like color for caping hips and ridges, in order toassure a color match.Start by cutting off the bottom 55 8 " (143 mm) of one NorthGateAccessory shingle and applying the 75 8 " x 131 8 " (194 mm x 333 mm)piece over hip or ridge by bending this starter shingle along itscenterline and forming into place, see A. Align butt edge to the bottomof the hip or to either end of ridge, flush with the edges of the in-placeprimary shingles. Fasten with two (2) fasteners – minimum 13 4 "(45 mm) long, see A.To assist in proper alignment, snap a chalk line parallel to the hip orridge applying along the line where the side edges of the NorthGateAccessory shingles should be.ARemove this portion13 1/8"(333 mm) 122Chapter 14C E R T A I N T E E D S H I N G L E A P P L I C A T O R’ S M A N U A L
NORTHGATE RIDGE ACCESSORY SHINGLESBFigure 14-13: NorthGate Ridge Accessory shingles detach easilyfrom four-piece units to make 96 individual cap pieces.There are 24 four-piece units in each bundle, providing 96individual caps that will cover 45 linear feet (13.716 linear feet,Metric) of a hip or ridge. Each dimension cap piece is 13 1 4 " by9 27 32 " and features clipped corners on the bottom edge of theexposed portion.CNORTHGATE RIDGE ACCESSORY APPLICATIONIS AS FOLLOWS:Apply primary roofing up to hip or ridge on both sides of roofand trim flush. Ensure that the NorthGate Ridge Accessory shingleswill adequately cover the top course of the shingles on both sidesof the hip and ridge. Use only CertainTeed NorthGate Ridge Accessoryshingles of a like color for caping hips and ridges, in order toassure a color match.Starter ShingleRemove this portionStart by cutting off the bottom 55 8 " (143 mm) of one NorthGate RidgeAccessory shingle and applying the 75 8 " x 9 27 32 " (194 mm x 250mm) piece over hip or ridge by bending this starter shingle along itscenterline and forming into place, see D. Align butt edge to the bottomof the hip or to either end of ridge, flush with the edges of the in-placeprimary shingles. Fasten with two (2) fasteners – minimum 13 4 " (45mm) long, see E.Then apply a full 133 4 x 9 27 32 "" (337 mm x 250 mm) pieceover starter, bending the shingle along its centerline and forminginto place over the hip or ridge, flush with the bottom and sidesof the starter shingle. Fasten with two (2) fasteners – minimum13 4 " (45 mm) long.Continue application of NorthGate Ridge Accessory shingles up theridge or along the ridge, forming each shingle over the hip or ridge,and fasten as shown in Fastening. Expose NorthGate Ridge Accessoryshingles 55 8 " (143 mm) covering all fasteners, see F.C E R T A I N T E E D S H I N G L E A P P L I C A T O R’ S M A N U A LChapter 14 123
The notches on each shingle may be used to help center theshingle on the ridge and to ensure the 55 8 " (143 mm) exposure.ETo assist in proper alignment, snap a chalk line parallel to thehip or ridge applying along the line where the side edges of theNorthGate Ridge Accessory shingles should be.FD 124Chapter 14C E R T A I N T E E D S H I N G L E A P P L I C A T O R’ S M A N U A L
117 CertainTeed Shingle Applicator's Manual NorthGate 14 YOUR OBJECTIVE: To learn the correct procedure for installing NorthGate shingles. s NORTHGATE t NorthGate shingles have the installer-friendly NailTrak feature, which provides 11 2" wide nailing area and specially formulated Quadra-Bond laminating adhesive (See Figure 14-3).