Transcription
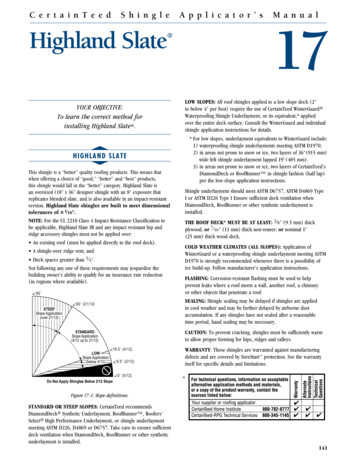
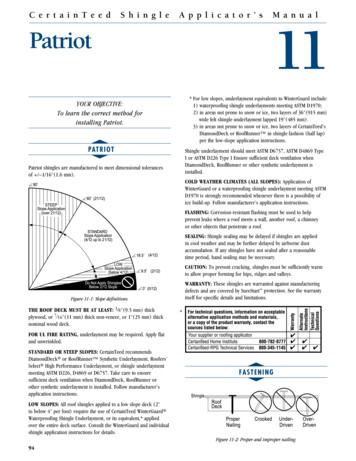
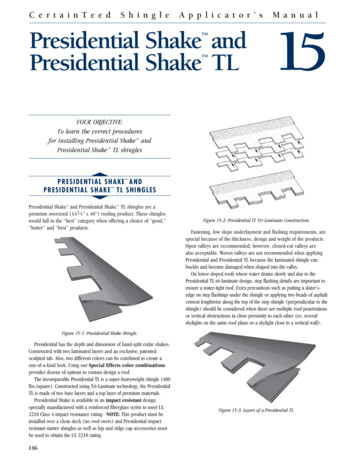
C e r t a i n T e e dS h i n g l eA p p l i c a t o r ’ sIndependence M a n u a l1390 YOUR OBJECTIVE:To learn the correct method for installingIndependence roofing.STEEPSlope Application(over 21/12)60 (21/12)STANDARDSlope Application(4/12 up to 21/12)This shingle is a “better” quality roofing product. This means thatwhen offering a choice of “good,” “better” and “best” products, thisshingle would fall in the “better” category.LOWs indep endence 18.5 (4/12)Low Slope Application (below 4/12)9.5 (2/12)Do Not Apply ShinglesBelow 2/12 Slope0 (0/12)Figure 13-2: Slope definitions.tLow slopeS: One layer of CertainTeed’s WinterGuard Waterproofing Shingle Underlayment (or equivalent, meeting ASTMD1970) or two layers of 36" (914 mm) wide felt shingle underlayment (Roofers’ Select or underlayment product meeting ASTM D226,D4869 or D6757) lapped 19" (483 mm) must be applied over theentire roof; ensure sufficient deck ventilation. When DiamondDeckor other synthetic underlayment is installed, weather-lap at least20" (500 mm) and ensure sufficient deck ventilation.Follow manufacturer’s application instructions.Independence is a “designer” or “architectural” style shingleproduct built on a full-size base shingle that has randomly appliedlaminated overlay tabs and its design is exclusive to CertainTeed. Thebenefits of this design are its simplicity of application, secure doublecoverage without risk of delamination, and more variation in designoptions. Independence shingles are built to meet dimensionaltolerances of 1 16 ".The roof deck* must be at least: 3 8 " (9.5 mm) thickplywood, or 7 16 " (11 mm) thick non-veneer, or nominal 1"(25 mm) thick wood deck.Cold Weather Climates (All Slopes): Application ofWinterGuard or its equivalent is strongly recommended wheneverthere is a possibility of ice build-up. Follow manufacturer’sapplication instructions. ashing: Corrosion-resistant flashing must be used to helpFlprevent leaks where a roof meets a wall, another roof, a chimney orother objects that penetrate a roof.Sealing: Shingle sealing may be delayed if shingles are appliedin cool weather and may be further delayed by airborne dustaccumulation. If any shingles have not sealed after a reasonabletime period, hand sealing may be necessary.Figure 13-1: Independence construction.For UL FIRE Rating, underlayment may be required. Apply flatand unwrinkled.STANDARD OR STEEP SLOPES: CertainTeed recommendsDiamondDeck Synthetic Underlayment, Roofers’ Select HighPerformance Underlayment, or shingle underlayment meeting ASTMD226, D4869 or D6757. Always ensure sufficient deck ventilation,and take particular care when DiamondDeck or other syntheticunderlayment is installed. Follow manufacturer’s applicationinstructions. 119Caution: To prevent cracking, shingles must be sufficientlywarm to allow proper forming for hips, ridges and valleys.Warranty: These shingles are warranted against manufacturingdefects and covered by SureStart protection. See the warranty itselffor specific details and limitations.*
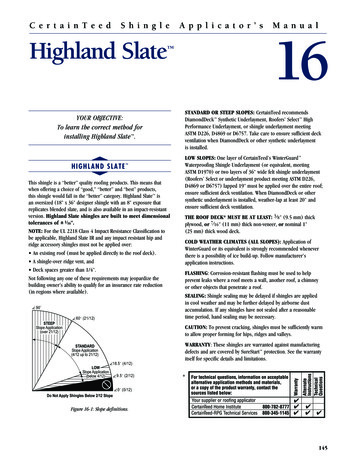
ssfast eningTwo c lean - dec k applic atio n m e t h odstt(1) Four-Course, Six-Inch, Stepped-Off Diagonal Method(“Six off, four enNote: “Six off, four up” is the preferred method for installingIndependence. Use of other installation methods such as rackingmay result in less-than-designed performance or appearance.You should start from the lower left corner of the roof; otherwise thelaminate may create an objectionable pattern.OverDrivenFigure 13-3: Proper and improper nailing.IMPORTANT: For decks 3 4 " (19 mm) thick or thicker, nails must goat least 3 4 " (19 mm) into the deck. On thinner decks, nails must go atleast 1 8 " (3.2 mm) through the deck.Nails must be 11- or 12-gauge roofing nails, corrosion-resistant,with at least 3 8 " (9.5 mm) heads, and at least 1" (25 mm) long.Low andStandard SlopeUse four nails for every full Independence shingle (Figure 13-4).12''(305 mm)1''(25 mm)12''(305 mm)12''(305 mm)1''(25 mm)1''(25 mm)PREPARING THE DECK:u Apply underlayment as required. CertainTeed suggests that alayer of shingle underlayment be applied. For UL fire rating,underlayment is generally required. Apply flat and unwrinkled.u Snap horizontal and vertical chalklines to assure shingles will becorrectly aligned. Expose all shingles 5" (125 mm).Starter Course:Note: The starter course method described here can be used with boththe standard “Four-Course, Six-Inch, Stepped-Off Diagonal Method,” andthe alternate “Five-Inch, Stepped-Off Diagonal Method,” explained later inthis chapter.5 5/8''(145 mm)Additional nails, if requiredm)50 m2'' ( LapSideFigure 13-4: Use four nails for every full shingle.Steep SlopeUse seven nails and six spots of asphalt roofing cement for every fullshingle (Figure 13-5). Asphalt roofing cement meeting ASTM D4586Type II is suggested.12''(305 mm)1''(25 mm)12''(305 mm)12''(305 mm)1''(25 mm)1''(25 mm)5 5/8''(145 mm)Roofing CementRakealMetDrip eEdgRoot elecrs' S mentefoRo erlay lentUnd quivaor e)mm le(760 r Shing''0e3 tartSirstckf dealMet dgeEDripand egrakethe drip ed orevfniof)ism mm)lehing 13 mhe s t 1/2'' ( /4'' (19tdn3Exte es abou r about s used.eav sed, o edge iis u dripFEavesFigure 13-6: Standard slope underlayment and starter drip edge details.Apply 1'' (25 mm) spots of asphalt roofing cementunder each tab corner.Figure 13-5: Use seven nails and six spots of asphalt roofingcement on steep slopes.NOTE: To prevent slippage of laminated tabs when individual shinglesare cut to meet a wall or ridge, each laminated tab at the junction mustbe fastened individually with an additional fastener. Fasteners appliedin this manner are to be horizontally centered on the laminated taband placed within 11 2 " of the upper edge of the shingle. During hotweather, using an extra fastener in each laminated tab may be necessaryto prevent slippage even at slopes below 21/12.CAUTION: Excessive use of roofing cement can cause shinglesto blister. 120Chapter 13CER T AIN T EED SHING L E APP L ICA T O R’ S MANUA L
SUCCEEDING COURSES: Repeat the “Four-Course, Six-Inch,Stepped-Off Diagonal Method” up the left rake. Complete coursesacross the roof using full-size shingles (Figure 14-10 – see B).R id g eRoof Deck(2) Five-Inch, Stepped-Off Diagonal Application Method(“five off, twelve up”)UndeM e ta lD r ipEdgerlaymentRakemm)2 '' ( 5 0 L a pS id eveR e m o e p o r ti o n sth e seours4th CrseuoC3rdrseCou2ndeours1st Cm)00 m4'' (1 urseer CoStart31" off 12th26" offSection III 8th Course30" off7th15" offSection II6th5th4th3rd10" off5'' )mm(1255" offSection I2nd5"1st Course0" off5"7" Wide StarterEavesFigure 13-9: Five Off, Twelve Up.1. The starter course is made from Swiftstart or Universal Starter, orIndependence shingles that have had the 5" tabs cut off.STARTER COURSE: Use CertainTeed Swiftstart or Universal Starter or a starter course consisting of the shingles from which the 5" tabshave been removed (Figure 13-8).36'' (915 mm)Full Lengtht h e s e9th11" off20" offFigure 13-7: Applying the first 4 courses on a standard slope.R e m o v eDeck10th16" off25" off7'' (180 mm)Starter Shingle11th21" off“Section I” shingles: “Section I” is made up of the first shinglesused to start courses one through seven.p o r t i o n s1. Start the first course with a full shingle at the lower left corner ofthe roof. Make the tabs flush with the starter course and be sureto use four fasteners in each shingle (Figure 13-9).Figure 13-8: Make starter shingles by removing the lower 5" tabs.2. Begin the second course by cutting 5" off the left end of a shingleand applying the 31" piece over the first-course shingle. Keep theshingle flush with the left edge of the first-course shingle, andexpose 5" of the course below to the weather. Fasten at the threestandard locations (over the cutouts and 1" inside the right edge,and 1 1 4 " inside the left edge).2. Cut 6" off the length of the first starter shingle and apply the 30"piece to the lower left corner of the roof (Figure 13-6).3. The starter strip should overhang the rakes and eaves 1 2 "when drip edge is used, or 3 4 " when no drip edge is used.4. Continue with full-length starter-strip shingles along the eaves.1ST COURSE: Apply a full shingle at the lower left corner of theroof. Make the tabs flush with the starter-course shingle at the eavesand rake (Figure 13-7).3. To finish “Section I” (make each course, up to and including theseventh course) start with a shingle that has been cut 5" shorterthan the first shingle of the previous course. Remember tomeasure and cut only from the left end of the shingle. Fasten atthe standard locations, plus 11 4 " inside the left edge.2nd through the 4th courses:1. Start the second course by first cutting 6" off the left end of a fullshingle, then installing the 30" piece over the first course. Leave 5"of the first course exposed, and make the left edge flush with thefirst-course shingle at the rake (Figure 13-7).“Section II” shingles: All “Section II” shingles are left uncut.These shingles are to be butted-up against the “Section I” shingles thatstarted courses one through seven. Fasten all shingles in the standardfashion (Figure 13-9).2. Start the third course by cutting 12" off a shingle. Install the 24"section over the first shingle in the second course, exposing 5"of the second course and making the left edge flush with thesecond-course shingle at the shingle rake.3. Start the fourth course by cutting 18" off the first shingle.Install the 18" piece over the first shingle on the third course.4. Install a full shingle against each of these four courses(Figure 13-10 –see A).CER T AIN T EED SHING L E APP L ICA T O R’ S MANUA L“Section III” shingles:1. Begin “Section III” in the eighth course with a shingle having 11"cut off its left end. Install the 25" piece above the seventh-courseshingles, making it flush with the left edge of the seventh-courseshingle and leaving 5" of the seventh course exposed. Fasten at thetwo standard locations, plus 11 4" in from the left edge (Figure 13-9).Chapter 13 121
Figure 13-10: “Four Up, Six Off” installation schematic.To cap hip and ridge for Independence,apply CertainTeed Accessory Shingles of a like color.RidgeVenttoingflushTrim deck openfoorUnderlayment6''(150Air FlowThroughSoffitmm)CLProvide adequateventilation underthe roof deck toprevent harmfulcondensation inwinter and heatbuild-up insummer.tmen rderlay nterGuadnUWilaps 50 mm)2 (Line valley by centering36 (915 mm) wideCertainTeed WinterGuardWaterproofing ShingleUnderlayment orequivalent directlyto deck.inwithnail ) oftoDo n(150 mm erline6 ey centvallRemoveLCLayson s hinglesmallareaer ro,and across ofvalleontoadjoyinin thegat least 1 roof ar2 (3 ea05 mm).Embe2 ( d each50shasphmalt r m) wid ingle inoofing c e strip o aement. fCutdiag 2 (50uppe onally mm)trim r corne offmedrshin ofgle.Cut2 ( shingle5bac 0 mm sk)vall fromeycenterlineFigure 13-11: Highlight of closed-cut valley details. 122Chapter 13CER T AIN T EED SHING L E APP L ICA T O R’ S MANUA L
2. The next four courses, up to and including the twelfth course, willstart with a shingle 5" shorter than the first shingle of the coursejust below it. This means that the first shingle for the ninth, tenth,eleventh and twelfth courses will be 20", 15", 10" and 5" long,respectively. Study the diagram in Figure 13-9 if you’re not surewhat to do. Remember to expose each course 5" to the weather,and fasten at the standard locations and 1 1 4 " in from each edge.Complete courses across the roof with full shingles.3. For the additional courses needed up the rake to complete theroof, repeat this “Five-Off, Twelve-Up” type installation, applyingshingles in courses across the roof as needed.sch im ney FLASHINGtstwo ro o f- o v er metho dst(1) four-course, six-inch stepped-off diagonal METHOD(“six off, four up, nesting”)Preparing the old roof:u Make the surface of the old roof as smooth as possible by replacingmissing shingles. Split and nail flat all buckled, raised tabs andcurling shingles.uIt’s a good idea to cut old shingles back flush to the rakes and eaves.uWe suggest that you apply corrosion-resistant drip edge along therakes and eaves, covering the edges of the old shingles. This willprovide a uniform and straight edge that will help prevent waterseepage under the shingle edges.Metal Step Flashing7(180 mm)2 (50 mm)Minimum3 (75 mm)MinimumFigure 13-13: Preparing an old roof for reroofing.Fold downcounter flashingover step flashing2 L ap(5 0 m m )m in im u mFastenFlashingTo RoofNote: Nesting is preferred over “bridging” methods when reroofingbecause nesting provides a smoother application, sheds water bestand looks better. Nesting, as described below, is an easy applicationprocess over square-tab asphalt strip shingles with a 5" exposure.If you are covering a different type or size shingle, you may need tocut back the old shingle tabs so that nesting is possible. To do this,simply cut off the leading edge of all old shingles when they arelapped less than 2 1 2 " by the new shingles. This permits a flat nestedapplication that avoids lifted edges and slumps.CounterFlashingOldRoofApron Flashing4th CourseCourse3rd5 (125 m2ndm)3 (7510mm)(250mm)Course1stCourse5(125mm St) arterCourseFigure 13-14: Nested Reroof.Figure 13-12: Flashing around a chimney.CER T AIN T EED SHING L E APP L ICA T O R’ S MANUA LChapter 13 123
sHere’s a Tip Independence should not be racked because a pattern, such as a “corn row,” is likely to develop.tStarter Course:1. Use 5" by 36" shingles for the starter course. To make a startershingle, cut the tabs off of an Independence, then cut off a strip 2"across the top of the same shingle.2. Cut 6" off the length of the first starter shingle and install theresulting 30" piece at the lower left corner of the roof, over thefirst course of old shingles. If you are using drip edge, let thestarter course extend out over the edge of the rakes and eaves by1 2". If no drip edge is used, let the starter course extend over therakes and eaves by 3 4" (Figure 13-14).3. Continue with full 36" lengths of these 5" high trimmed shinglesalong the eaves.1st course:1. The first course is made of 10" by 36" shingle strips made bycutting 2" off of the bottom of the tabs of regular shingles(Figure 13-14).Rake31" off 12th26" off11thOld Roof10th21" off9th16" off11" offSection III 8th Course30" off7th25" off20" off15" offSection II6th5th4th3rd10" off5" off0" offSection I2nd1st Course5"3"5" Wide StarterEavesFigure 13-15: Five Off, Twelve Up, Nested.Starter course:1. Use 5" by 36" shingles for the starter course. To make a startershingle, cut the tabs off of a standard three-tab shingle, then cutoff a strip 2" across the top of the same shingle.2. Align the top edge of the strips so they butt up against the tabsof the shingles in the old third course. Make left and bottomedges flush with the starter course.2. Cut 5" off the length of the first starter strip, and align the 31" pieceover the first course at the lower left corner of the existing roof(Figure 13-15).2nd course:1. Cut 6" off the left end of a full shingle and align the top edgeof this 12" by 30" shingle with the bottom edge of the oldshingle in the old fourth course. Make the left edge align withthe first-course left edge (Figure 13-14).3. The starter strip should overhang the rakes and eaves 1/2"when drip edge is used, or 3 4" when no drip edge is used.4. Continue with full 36" lengths of prepared starter strips along the eaves.2. Exposure of the first course (only) is 3". All succeeding courseexposures will duplicate the exposure of the existing roof(about 5").3rd, 4th and succeeding courses:1. Begin the third course by cutting a 12" piece off the left end of a fullshingle and applying this 24" piece above the new second-courseshingle (Figure 13-14). Align the top edge of the new shingle withthe bottom edge of old shingles in the course above it (the oldroof’s fifth course).1st course:1. The first course is made of 10" by 36" shingle strips madeby cutting 2" off the bottom of the tabs of regular shingles(Figure 13-15).2. Align the top edge of the strips so they butt up against the tabs ofthe shingles in the old third course. Make the left edge flush withthe starter course.2. Begin the fourth course by cutting 18" off the left end of a fullshingle and apply the right-hand piece above the new third-courseshingle. Align the top edge with the bottom edge of the old roof’ssixth-course shingles.2nd to 7th courses:1. Begin the second course by cutting 5" off the left end of a shingleand aligning the top edge with the butt edge of the shingle in theold fourth course (Figure 13-15).3. Install full shingles against these first four courses.2. Exposure of the first course (only) is 3". All succeeding courseexposures will duplicate exposure of the existing roof(approximately 5").Completing the installation: Continue up the rake, puttingnew courses over the old shingles using the same “Six-Off, Four-UpNested Method.” Begin each set of four courses with a full shingle.Complete all the courses across the roof with full shingles.(2) combining the “Nesting method” with thealternate Five-Inch, Stepped-Off Diagonal Method(“five off, twelve up, nesting”)3. Start each succeeding course, up to and including the seventhcourse, with a shingle 5" shorter (off the left end) than the firstshingle of the previous course.4. Align the top edges with butts of old shingles. Remember, exposure of each course will duplicate exposure of the existing roof.5. This completes “Section I” (Figure 13-15) – the first sevencourses of the 12-course repeating cycle.6. Install full shingles against these seven courses. 124Chapter 13CER T AIN T EED SHING L E APP L ICA T O R’ S MANUA L
12"m)(305m8th to 12th courses:1. Begin the eighth course by cutting 11" off the left end of a shingleand applying the 25" piece over the seventh-course shingle, flushwith the left edge of the seventh course (Figure 13-15).Apply OverStarter ShingleStarter Shingle7"m)(180m2. Each succeeding course, up to and including the twelfth course, startswith a shingle 5" shorter (off the left end) than the previous course.3. Align all top edges with butts of old shingles. Exposure of eachcourse will duplicate exposure of the existing roof.4. Install full shingles against all 12 courses.Remaining courses:1. Moving up the rake edge, repeat the two-part, 12-course pattern,alternating Sections “I” and “III” up the roof.2. Complete courses across the roof using full shingles, workingfrom the eaves up the roof.sHIPS AND RIDGEStInstalling Shadow Ridge Accessory Shinglesfor Independence CertainTeed Shadow Ridge accessory shingles are designed tobe used with Independence to cap hips and ridges. Simply foldaccessory shingles along the pre-cut lines and detach individualcap pieces.12"m)(305mFigure 13-17: Apply a full cap shingle over the starter piece,flush with the bottom and side edges of the starter.3. Apply a full cap shingle over the starter (Figure 13-17), and placefasteners at 5 5 8 " up from the exposed bottom edge and 1" infrom each side. Nails must not be exposed and must not cut intothe shingle surface.NOTE: Each cap has a centering notch at the top edge, and a notchon each side to indicate the 5" exposure. The side notches of the capbeing applied should be aligned with the top edge of the previouslyapplied cap.5mm)5" (12 reuExposLaying NotchFigure 13-18: Expose cap shingles 5" and cover all fasteners.Figure 13-16:Shadow Ridge accessory shingles detach easily from5mm)5" (12 three-pieceunits to make 72 individual cap pieces.osure PPExp PPThere are 24 three-piece units in each Shadow Ridge bundle,providing 72 individual caps that will cover 30 linear feet of a hip orridge. Each cap piece is 12" by 12" and features clipped corners onthe bottom edge of the exposed portion.1RWFK IRU&HQWHULQJ PPApplication is as follows:1. Apply Independence up to the hip or ridge on both sides, thentrim flush.NOTE: The last course of shingles should have an exposureof 5" or less when the shingle cap or ridge vent is fastenedin place. Otherwise, a potential water leak could occur atexposed shingle end joints.CER T AIN T EED SHING L E APP L ICA T O R’ S MANUA L1RWFKHV IRU OLJQPHQW WRWKH 7RS (GJH RI WKH 3UHYLRXV&DS IRU PP ([SRVXUH PPFigure 13-19: Each Shadow Ridge accessory shingle has a centeringnotch and two side-alignment notches to help ensure proper placement.12"m)(305mThe figures used in this section illustrate the application ofAccessory shingles over a ridge vent; application directly to theroofing is very similar. To assist in proper alignment when ridgevent is not used, snap a chalk line parallel to the hip or ridgewhere the side edges of the Accessory shingles should be.2. Install caps beginning at the bottom of a hip or at either end ofa ridge. Apply a starter piece that has the bottom 5" removed(Figure 13-17). Fasten the starter with two nails located about3" from the rake edge, and 1” in from each side edge. Makesure fasteners used to apply caps are of sufficient length topenetrate at least 3 4 " into or through the decking. PPLaying Notch5mm)5" (12 reuExposFigure 13-20: Use laying notches to center shingles on hips and ridges,and to locate the 5" exposure.Chapter 13 125
apply CertainTeed Accessory Shingles of a like color. Figure 13-10: "Four Up, Six Off" installation schematic. Figure 13-11: Highlight of closed-cut valley details. CL Cut shingles 2 (50 mm) back from valley centerline. l . e t d Line valley by centering 36 (915 mm) wide CertainTeed WinterGuard Waterproofing Shingle Underlayment or .