Transcription
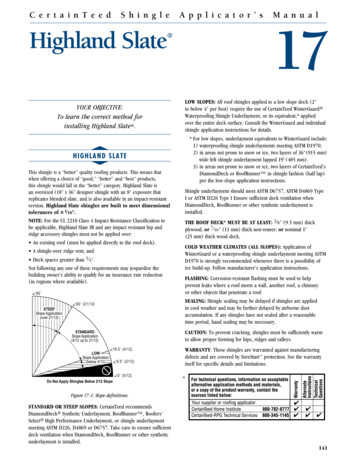
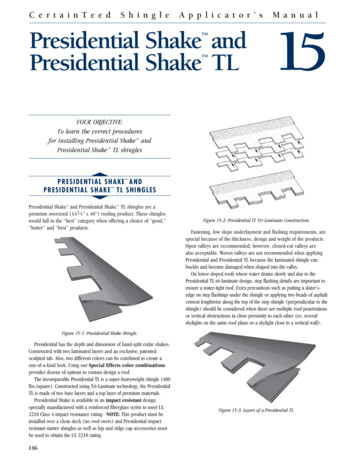
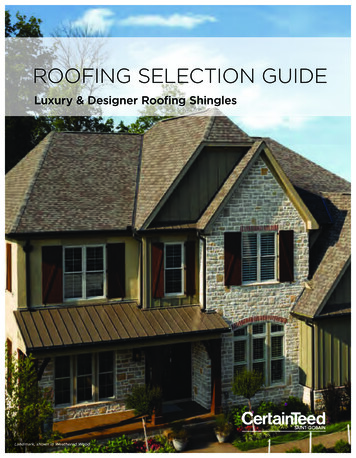
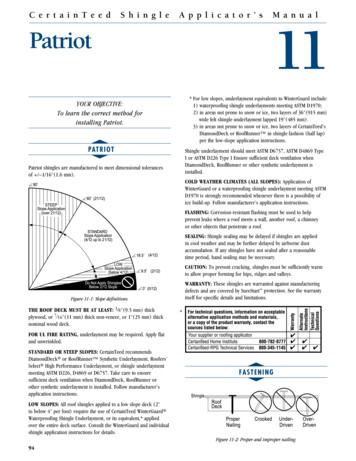
C e r t a i n T e e dS h i n g l eA p p l i c a t o r ’ sPatriotM a n u a l11* For low slopes, underlayment equivalents to WinterGuard include:1) waterproofing shingle underlayments meeting ASTM D1970;2) in areas not prone to snow or ice, two layers of 36"(915 mm)wide felt shingle underlayment lapped 19"(485 mm).3) i n areas not prone to snow or ice, two layers of CertainTeed’sDiamondDeck or RoofRunner in shingle fashion (half lap)per the low-slope application instructions.YOUR OBJECTIVE:To learn the correct method forinstalling Patriot.sPAT RIOTShingle underlayment should meet ASTM D6757, ASTM D4869 TypeI or ASTM D226 Type I Ensure sufficient deck ventilation whenDiamondDeck, RoofRunner or other synthetic underlayment isinstalled.tPatriot shingles are manufactured to meet dimensional tolerancesof /–1/16"(1.6 mm).COLD WEATHER CLIMATES (ALL SLOPES): Application ofWinterGuard or a waterproofing shingle underlayment meeting ASTMD1970 is strongly recommended whenever there is a possibility ofice build-up. Follow manufacturer’s application instructions.FLASHING: Corrosion-resistant flashing must be used to helpprevent leaks where a roof meets a wall, another roof, a chimneyor other objects that penetrate a roof.SEALING: Shingle sealing may be delayed if shingles are appliedin cool weather and may be further delayed by airborne dustaccumulation. If any shingles have not sealed after a reasonabletime period, hand sealing may be necessary.CAUTION: To prevent cracking, shingles must be sufficiently warmto allow proper forming for hips, ridges and valleys.WARRANTY: These shingles are warranted against manufacturingdefects and are covered by SureStart protection. See the warrantyitself for specific details and limitations.Figure 11-1: Slope definitions.THE ROOF DECK MUST BE AT LEAST: 3 8 "(9.5 mm) thickplywood, or 7 16 "(11 mm) thick non-veneer, or 1"(25 mm) thicknominal wood deck.*FOR UL FIRE RATING, underlayment may be required. Apply flatand unwrinkled.STANDARD OR STEEP SLOPES: CertainTeed recommendsDiamondDeck or RoofRunner Synthetic Underlayment, Roofers’Select High Performance Underlayment, or shingle underlaymentmeeting ASTM D226, D4869 or D6757. Take care to ensuresufficient deck ventilation when DiamondDeck, RoofRunner orother synthetic underlayment is installed. Follow manufacturer’sapplication instructions.sFAS TEN IN GtLOW SLOPES: All roof shingles applied to a low slope deck (2"to below 4" per foot) require the use of CertainTeed WinterGuard Waterproofing Shingle Underlayment, or its equivalent,* appliedover the entire deck surface. Consult the WinterGuard and individualshingle application instructions for details.Figure 11-2: Proper and improper nailing. 94
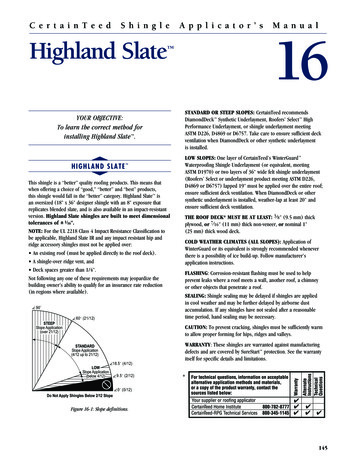
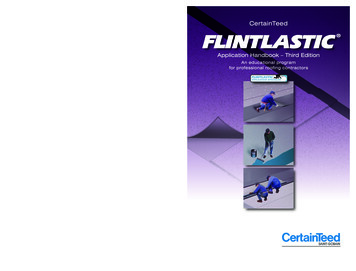
IMPORTANT: For decks 3 4 "(19 mm) thick or thicker, nails must goat least 3 4 "(19 mm) into the deck. On thinner decks, nails must go atleast 1 8 " (3.2 mm) through the deck. Nails must be 11 or 12 gaugeroofing nails, corrosion-resistant, with at least 3 8 "(9.5 mm) heads,and at least 1"(25 mm) long.LOW AND STANDARD SLOPEUse FOUR nails for every full shingle located as shown below.THE 7-COURSE, 5" STEPPED-OFF DIAGONAL METHODImportant: Do not align end joints of a given course closer than 5"(127 mm) from one another. End joints must be at least 3"(76 mm)from the nails on the underlying course.STARTER COURSE: Use CertainTeed’s SwiftStart 75 8 " x 383 4 "(194 mm x 984 mm) shingles or a starter course consisting of theshingles from which the lower 55 8 "(143 mm) has been removed (seebelow). Remember, the sealant on starter courses should lie as closeas possible to the eaves edge of the roof.Figure 11-3STEEP SLOPEUse FOUR nails and four spots of asphalt roofing cement for everyfull shingle as shown below. Asphalt roofing cement meeting ASTMD4586 Type II is suggested. Apply 1"(25 mm) spots of asphaltroofing cement as shown.CAUTION: Excessive use of roofing cement can cause shingles toblister.Figure 11-5: Make starter shingles by removing 5-5/8" below.Next, cut 5"(127 mm) off the length of the first starter course shingle.Install this shingle on the lower left corner of the roof. Make sure thereis 1 2 "(13 mm) left overhanging both rakes and eaves if drip edge isbeing used. If you are not using drip edge, make the overhang 3 4 "(19mm). Continue with full-length starter course shingles along the eaves.m)50 m2'' ( LapeSidFigure 11-4RakalMetDrip eEdgsS T E P P E D -OFF DIAGONAL M ET H ODF O R CL EAN-DECK AP P LICAT IONtPREPARING THE DECK:u A pply underlayment as required. CertainTeed suggests that alayer of shingle underlayment be applied. For UL fire rating,underlayment is generally required. Apply flat and unwrinkled.ALIGNMENT: Snap horizontal and vertical chalklines to help assureconsistent 5-5 8 "(143 mm) exposure of all shingles and to aligndiagonal offsets from course to course. Use the shingle’s “shiplap”feature to obtain 55 8 "(143 mm) exposure by aligning the shingle’s3 8 "(9.5 mm) shiplap edge with the top edge of the shingle beneath.Maintain the chosen offset consistently from course to coursethroughout the entire roof application. Fasten all shingles as shownin the “Fastening” section.C E R T A I N T E E D S H I N G L E A P P L I C A T O R’ S M A N U A LeRoo lect' Sefers ymentooaRerlentUnd quivalor eFitarrst Ster Sckf dealMet dgeEpirDhingleEavesand e isgrakethe drip ed ores ov mm) if m) if nelghin139mhe s t 1/2'' ( /4'' (1 .3nd tExte es abou r about is usedeav sed, o p edgeudriFigure 11-61ST COURSE: Cut the 3 8 " x 55 8 "(9.5 mm x 143 mm) shiplap piece(upper left corner) from a full shingle and apply the remainingshingle at lower left corner of roof, aligning left and bottom edgesflush with starter shingle.2ND COURSE: Cut 5"(127 mm) off the left side of a shingle andinstall this 343 8 "(873 mm) piece over and above the first courseshingle, in line with the left edge of the first course. Expose thebottom 55 8 " (143 mm) of the first course shingle. Align shiplapnotch with top edge of shingles below.Chapter 11 95
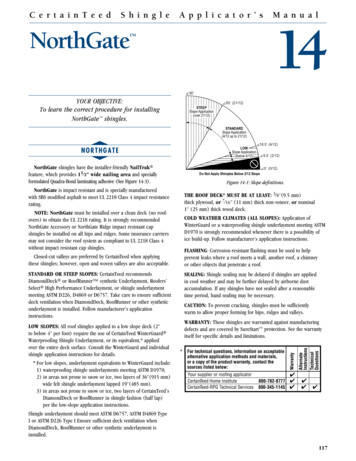
tmen uardGerlayUnd Winter )laps 50 mm2 (Line valley by centering36 (915 mm) wideCertainTeed WinterGuardWaterproofing ShingleUnderlayment orequivalent directlyto deck.Layson s hinglesmarea aller ro, acrandoss ofvoadjo nto the alleyiat le ning rooast 1f2 (3 area05 mm).Emb2 ( ed each50asphmm) shinglealt roofi wide str in ang ceme ip ofnt.Cutdiag 2 (50upp onally mm)trim er corne offmedrshin ofgle.ithinail w ofot n)Do n(150 mm rline6 ey centevallRemove&LCut2 ( shingle5bac 0 mm sk)vall fromecen yterlineFigure 11-8: Closed-cut valleysFigure 11-7: Applying the first 7 courses on a standard slope.3RD THROUGH 7TH COURSES: Cut 10"(254 mm) off the firstshingle of the third course, and install the remaining piece over andabove the second course shingle; cut 15"(381 mm) off the firstshingle of the fourth course, and install the remaining piece over andabove the third course shingle; cut 20"(508 mm) off the first shingleof the fifth course, and install the remaining piece over and abovethe fourth course shingle; cut 25"(635 mm) off the first shingle ofthe sixth course, and install the remaining piece over and above thefifth course shingle; cut 30"(762 mm) off the first shingle of theseventh course, and install the remaining piece over and above thesixth course shingle. Install full shingles flush against the sevenapplied courses.C HIMN EY FLAS HIN GtMetal Step Flashing3 (75 mm)MinimumFold downcounter flashingover step flashingSUCCEEDING COURSES: As you go up the rake, repeat the samepattern used to start the first seven courses. Finish the courses withfull shingles, working from the eaves up the roof.Note: Patriot shingles can also be applied using a 7 Course55 8 " Stepped-Off Diagonal Offset, a 6 Course,6" Stepped-Off Diagonal Offset or a 5 Course,7" Stepped-Off Diagonal Offset.7-5/8(194 mm)2 (50 mm)Minimum2 La p(5 0 m m )m in im umFastenFlashingTo RoofCounterFlashingNote: When applying Patriot shingles using a Diagonal OffsetMethod, do not start a course with a shingle piece that has a lengththat is less than the offset dimension being used (5", 6" or 7").Apron FlashingFigure 11-9: Flashing around a chimney. 96Chapter 11C E R T A I N T E E D S H I N G L E A P P L I C A T O R’ S M A N U A L
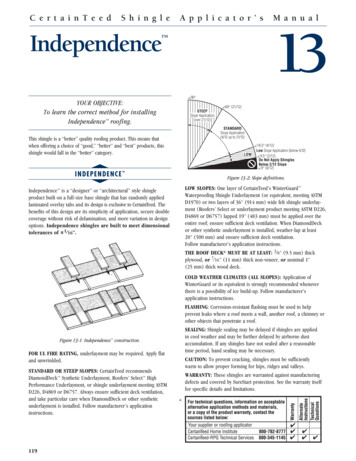
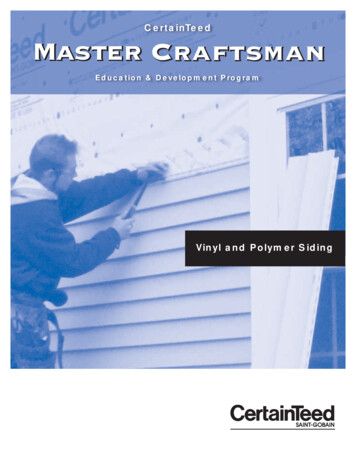
sCA P PING H IP AND RIDGEtSHADOW RIDGE ACCESSORY SHINGLES Shadow Ridge shingles have an accented shadow line that is designedto complement these shingles. Simply fold along the pre-cut lines anddetach individual cap pieces. Save valuable installation time comparedto cutting 3-tab shingles.3. A pply a full cap shingle over the starter, and place fasteners at5 5 8 " (6 1 4 " for metric) up from the exposed bottom edge and 1"in from each side. Nails must not be exposed on the finished roof.All nail heads must be driven straight and must not cut into theshingle surface.5mm)5" (12 resuopxEFigure 11-10: Shadow Ridge accessory shingles detach easily fromthree-piece units to make 72 individual cap pieces.There are 24 three-piece units in each Shadow Ridge bundle,providing 72 individual caps that will cover 30 linear feet (33 3 4linear feet, Metric) of a hip or ridge. Each English dimension cappiece is 12" by 12" (Metric caps are 13 1 4 " by 9 7 8 ") and featuresclipped corners on the bottom edge of the exposed portion.APPLICATION IS AS FOLLOWS:1. Apply shingles up to the hip or ridge on both sides, thentrim flush.Figure 11-13: Install cap shingles at their correct exposureand cover all fasteners.NOTE: Each cap has a laying/alignment notch at the top edge tocenter the piece on the ridge line, and two notches on each sideto indicate the correct exposure and shadow-line placement. Theside notches of the cap being applied should be aligned with thetop edge of the previously applied cap.12"(305mm)NOTE: The last course of shingles should have an exposure of5" (5 5 8 " for metric) or less when the shingle cap or ridge vent isfastened in place. Otherwise, a potential water leak could occur atexposed shingle end joints. The figures used in this section illustratethe application of accessory shingles over a ridge vent; applicationdirectly to the roof deck is very similar.12"m)(305m6"(150mm)6"(150mm)Notch forCenteringApply OverStarter Shingle12"(305mm)Starter ShingleNotches for Alignment to7"the Top Edge of the Previous(180mm)Cap for 5" (125mm) (125mm)(125mm)6"(150mm)ch forteringNotch forCenteringFigure 11-12: Apply a full cap shingle over the starter piece,flush with the bottom and side edges of the starter.131/4"(337mm)2. Install caps beginning at the bottom of a hip or at either end ofr Alignment toa ridge.Apply a starter piece that has the bottom 5" (5 5 8 " for7"of the Previous(180mm)5mm) Exposure metric) removed. Fasten the starter with two nails located about3" from the rake edge, and 1" in from each side edge. Make surefasteners used to apply caps penetrate at least 3 4 " into or throughthe decking.NOTE: To assist in proper alignment when ridge vent is not used,snap a chalk line parallel to the hip or ridge along the line wherethe side edges of the cap shingles should be.C E R T A I N T E E D S H I N G L E A P P L I C A T O R’ S M A N U A LNotches for Alignment to75/8"the Top Edge of the Previous(196mm)5Cap for 5 /8" (141mm) ExposureFigure 11-14: Each Shadow Ridge shingle has a centering notch andtwo side-alignment notches to help ensure proper placementChapter 11 97
12"m)(305mLaying Notch5mm)5" (12 resuopxEFigure 11-15: Use laying notches to center shingles on hips andridges, and to locate the correct exposure.sR O O F I NG OVER AN EX IST ING ROO F( ROOF -OVER)tNOTE: Nesting is preferred over “bridging” methods when reroofing because nesting sheds water best and looks better. Nesting, asdescribed below, is an easy application process over square-tabasphalt strip shingles with a 55 8 " exposure. If you are covering adifferent type or size shingle, you may need to cut back the leadingedge of all the old shingle tabs so that nesting is possible. Thispermits a flat nested application that avoids lifted edges and slumps.PREPARING THE ROOF SURFACE FOR REROOFINGuMake the surface of the old roof as smooth as possible byreplacing missing shingles. Split and nail flat all buckled, raisedtabs and curling shingles.Figure 11-17: Roof-over 7 course 5" stepped-off, nestedSTARTER COURSE: Use 55 8 " x 393 8 "(143 mm x 1000 mm)shingles for the starter course. To make a starter shingle, first cut thebottom 55 8 " (143 mm) off, then cut off a strip 2" (50 mm) acrossthe top of the same shingle.Cut 5"(127 mm) off the first shingle and install the remaining pieceover the first course of the old shingles, at the lower left corner.Remember, the sealant on this starter course must lie as close aspossible to the eaves edge of the roof. This will help hold the firstcourse shingles down and provide good protection against windblow-offs, which could start at the edge of the roof. If you are usingdrip edge, let the starter shingle extend out over the edge of the rakeand eaves by 1 2 "(13 mm). If you are not using drip edge, let thestarter shingle extend over the rake and eaves by 3 4 "(19 mm).Finishthe course using similarly prepared starter strips;however, they should be full lengths 39-3/8"(1000 mm).1ST COURSE: The first course is made of 111 4 " x 393 8 "(286 mm x 1000 mm) shingle strips made by cutting 2"(50 mm)off the bottom of the shingles. Cut the 3 8 " x 55 8 "(9.5 mm x 143mm) shiplap piece (upper left corner) from this strip and applythis strip at the lower left corner of the roof. Align left corner flushwith starter strip left corner. For this course and all subsequentcourses, align top edge of shingle to be applied with bottomedge of old shingle in next course.Figure 11-16: Preparing an old roof for reroofing.uIt’s a good idea to cut old shingles back flush to the rakesand eaves.uWe suggest that you apply corrosion-resistant drip edge along therakes and eaves, covering the edges of the old shingles. This willprovide a uniform and straight edge that will help prevent waterseepage under the shingle edges.THE 7-COURSE, 5" STEPPED-OFF DIAGONAL NESTING METHOD2ND COURSE: Cut 5"(127 mm) off the left end of a shingle andapply remaining 343 8 "(873 mm) piece. Exposure of 1st course onlyis reduced to 35 8 "(92 mm). Exposure for 2nd through7th course is 55 8 "(143 mm).3RD THROUGH 7TH AND SUCCEEDING COURSES: Apply aspreviously described in “7-Course, 5" Stepped-Off DiagonalMethod” on the left.This method of application described below is suggested for roofingover square-tab asphalt roofing shingles of 55 8 " /-1 8(143 mm /-3.2 mm) exposure. 98Chapter 11C E R T A I N T E E D S H I N G L E A P P L I C A T O R’ S M A N U A L
CERTAINTEED SHINGLE APPLICATO'RS MANUAL Chapter 11 95 IMPORTANT: For decks 3 4"(19 mm) thick or thicker, nails must go at least 3 4"(19 mm) into the deck.On thinner decks, nails must go at least 1 8" (3.2 mm) through the deck.Nails must be 11 or 12 gauge roofing nails, corrosion-resistant, with at least 3 8"(9.5 mm) heads, and at least 1"(25 mm) long.