Transcription
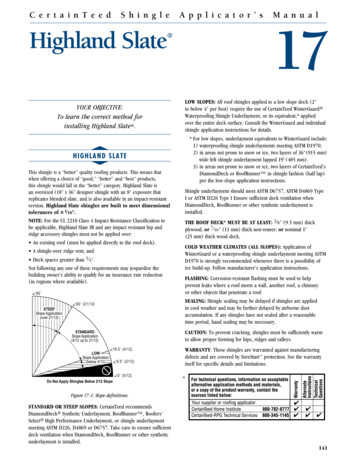
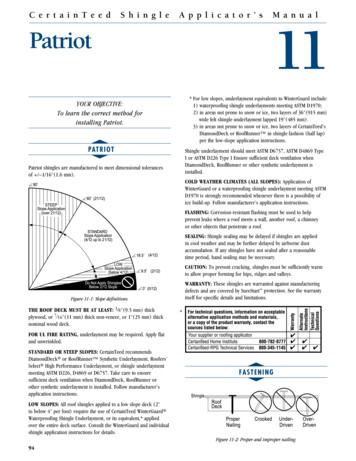
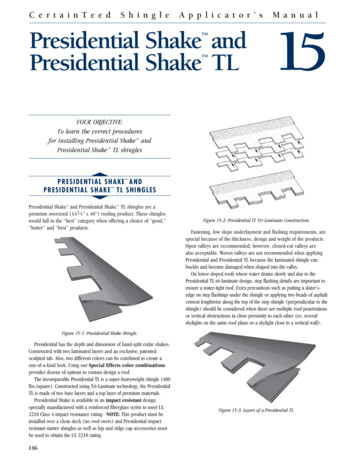
C e r t a i n T e e dS h i n g l eA p p l i c a t o r ’ sPresidential Shake andPresidential Shake TL M a n u a l15YOUR OBJECTIVE:To learn the correct proceduresfor installing Presidential Shake andPresidential Shake TL shinglessP r e s ident ial Sh ake andP r e s i d e n t ial Sh ake TL Sh inglestPresidential Shake and Presidential Shake TL shingles are a premium oversized (14 1 4 " x 40") roofing product. These shingleswould fall in the “best” category when offering a choice of “good,”“better” and “best” products. Figure 15-2: Presidential TL Tri-Laminate Construction.Fastening, low slope underlayment and flashing requirements, arespecial because of the thickness, design and weight of the products.Open valleys are recommended; however, closed-cut valleys arealso acceptable. Woven valleys are not recommended when applyingPresidential and Presidential TL because the laminated shingle canbuckle and become damaged when shaped into the valley.On lower-sloped roofs where water drains slowly and due to thePresidential TL tri-laminate design, step flashing details are important toensure a water-tight roof. Extra precautions such as putting a slater’sedge on step flashings under the shingle or applying two beads of asphaltcement lengthwise along the top of the step shingle (perpendicular to theshingle) should be considered when there are multiple roof penetrationsor vertical obstructions in close proximity to each other (ex. severalskylights on the same roof plane or a skylight close to a vertical wall).Figure 15-1: Presidential Shake Shingle.Presidential has the depth and dimension of hand-split cedar shakes.Constructed with two laminated layers and an exclusive, patentedsculpted tab. Also, two different colors can be combined to create aone-of-a-kind look. Using our Special Effects color combinationsprovides dozens of options to custom design a roof.The incomparable Presidential TL is a super-heavyweight shingle (480lbs./square). Constructed using Tri-Laminate technology, the PresidentialTL is made of two base layers and a top layer of premium materials.Presidential Shake is available in an impact resistant design;specially manufactured with a reinforced fiberglass scrim to meet UL2218 Class 4 impact resistance rating. NOTE: This product must beinstalled over a clean deck (no roof-overs) and Presidential impactresistant starter shingles as well as hip and ridge cap accessories mustbe used to obtain the UL 2218 rating. 136Figure 15-3: Layers of a Presidential TL.
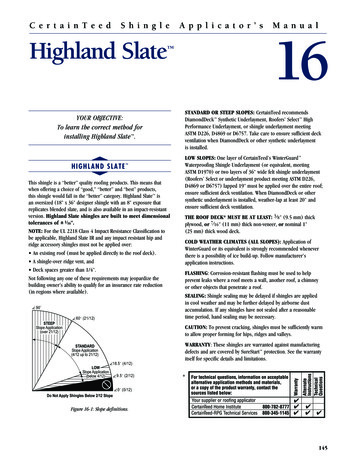
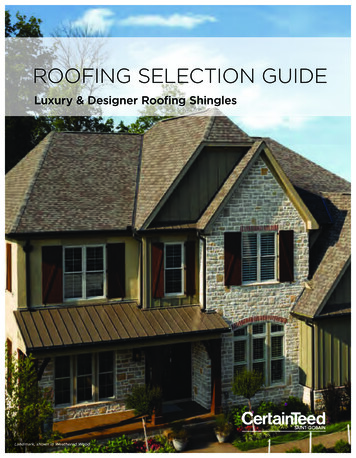
sSlope Restrictionsfas ten in g90 STEEPSlope Application(over 21/12)t60 (21/12)ShingleRoofDeckSTANDARDSlope Application(4/12 up to 21/12)LOWProperNailing18.5 (4/12)Low Slope Application (below 4/12)9.5 (2/12)Do Not Apply ShinglesBelow 2/12 Slope0 (0/12)The roof deck* must be at least: 3 8 " (9.5 mm)thick plywood, or 7 16 " (11 mm) thick non-veneer, or nominal1" (25 mm) thick wood deck.HFor UL FIRE Rating, underlayment may be required.Apply flat and unwrinkled.STANDARD OR STEEP SLOPES: CertainTeed recommendsDiamondDeck Synthetic Underlayment, Roofers’ Select HighPerformance Underlayment, or shingle underlayment meeting ASTMD226, D4869 or D6757. Always ensure sufficient deck ventilation, andtake particular care when DiamondDeck or other synthetic underlayment is installed. Follow manufacturer’s application instructions.Cold Weather Climates (All Slopes): Application ofWinterGuard or its equivalent is strongly recommended wheneverthere is a possibility of ice build-up. Follow manufacturer’sapplication instructions.UnderDrivenIMPORTANT: For decks 3 4 " (19 mm) thick or thicker, nails mustgo at least 3 4 " (19 mm) into the deck. On thinner decks, nails mustgo at least 1 8 " (3.2 mm) through the deck.Nails must be 11- or 12-gauge roofing nails, corrosion-resistant,with at least 3 8 " (9.5 mm) heads, and at least 1" (25 mm) long.NOTE: Nails are required for Presidential TL andPresidential; staples are not an acceptable fastener.Low and Standard Slope:For low and standard slopes, use five nails for each full Presidentialshingle as shown below.NailingGuide Lines40"(1016 mm)5 1/4"(133 mm)1 1/2" (38 mm)14 1/4"(362 mm)NOTE: Apply nails on painted guideline.Figure 15-6: Fastening Presidential and Presidential TLshingles on low and standard slopes.Steep Slope:For steep slopes, use nine nails for each full Presidential shingle and apply1" diameter spots of asphalt roofing cement under each shingle tab.After applying 5 nails in between the nailing guide lines, apply 4 nails 1"above tab cutouts making certain tabs of overlying shingle cover nails.SEALING: Shingle sealing may be slowed if the shingles are appliedin cool weather and may be further delayed by airborne dustaccumulation. We recommend hand-sealing when weather conditionsare likely to prevent the factory-applied sealant from activating.1"CAUTION: To prevent cracking, shingles must be warm enoughto allow proper forming for hips, ridges and valleys.FLASHING: Corrosion-resistant flashing must be used to helpprevent leaks where a roof meets a wall, another roof, a chimneyor other objects that penetrate a roof.OverDrivenFigure 15-5: Proper and improper nailing.Figure 15-4 Slope definitionsL OW SLOPE UNDERLAYMENT: One layer of WinterGuard or its equivalent must be applied over the entire roof.One layer of Roofers Select or a product meeting ASTM D4869applied over the REQUIRED WinterGuard is also recommended.IMPORTANT: Applying two layers of felt shingle underlaymentIS NOT an acceptable alternative to WinterGuard when installingPresidential TL; however, it IS acceptable for Presidential.Crooked1" diameter asphalt roofing cementFigure 15-7: Fastening Presidential and Presidential T/Lshingles on steep slopes.CAUTION: Too much roofing cement can cause shingles to blister.Warranty: These shingles are warranted against manufacturingdefects and are covered by SureStart protection. See the warrantyitself for specific details and limitations.*CER T AIN T EED SHING L E APP L ICA T O R’ S MANUA LChapter 15 137
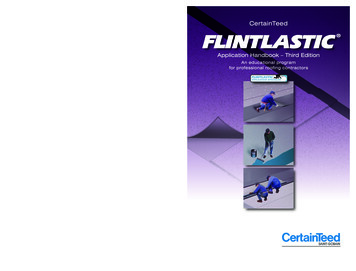
Alignment AND SHIPLAP NotchesTo maintain the correct 5" and 15" diagonal offset pattern, use theAlignment Notches at 5 1 2 " and 151 2 " from the right edge of theshingle. These notches are pre-cut into the top of each shingle and serveas a shingle placement guide for the shingles being installed in the courseabove them.Alignment Notches (from right edge)15 1/2 "5 1 /2 "1. Bottom Starter Course Layer: Cut 20" off the first bottom piece.Apply remaining 13 1 4 " x 20" piece, followed by full 13 1 4 " x 40"pieces along the eave. DO NOT REMOVE THE PERFORATED TOPSECTION. Extend the shingles over the rake and eaves about 1 2 "(13 mm) if drip edge is used, or about 3 4 " (19 mm) if nodrip edge is used.40"2"DO NOT REMOVE !Perforations131/4"Bottom Starter CourseColored granules matching the shingle blend are to be exposed at lowermost edge of roof.Figure 15-8: Use the alignment notches to ensure shinglesare applied at a 5" and 15" diagonal offset.Figure 15-9: Presidential Starter (bottom starter course.)Shiplap Notches on the left and right side of each shingle areused to ensure the proper 4" exposure is continued across shinglecourses by lining up the shiplap notches of adjacent shingles.sONE Cl ean Decka p plicat ion METHOD2. Top Starter Course Layer: Remove the 2" perforated top section.Cut 2" off the left side of the first top piece only. Install the111 4 " x 38" piece over and flush to the bottom starter course.Continue with 111 4" x 40" top course pieces over the rest of thebottom starter course.2"REMOVE THIS PORTION !tNOTE: Shingle applications are on 5" and 15" offsets with a 4"exposure. Apply shingles up the left side of the roof to establish thepattern and fill in to the right. When cutting shingles, always applythe right hand portion (cut-off the left side.) Use the pieces cut offthe left rake, hip, or valley to complete courses at the right rake.111/4"Top Starter CourseFigure 15-10: Presidential Starter (top starter course.)PREPARING THE DECK:u Apply underlayment as required. CertainTeed suggests that alayer of shingle underlayment be applied. For UL fire rating,underlayment is generally required. Apply flat and unwrinkled.u Snap horizontal and vertical chalklines to assure shingles will becorrectly aligned. Expose all shingles 4" (125 mm).importanNOTE: The exposed colored granules on the “top” starter shingles mustmatch the Presidential/Presidential TL shingle colors.t!Fasteners should be placed about 1" and 13" in from both ends ofa full length starter shingle. Fasteners for less than full 40" startershingles should be placed about 1" in from each end and evenlyspaced no more than 13" apart (2, 3 or 4 fasteners may be usedon shorter starter shingles depending on the length.)Presidential STARTER:Use TWO (2) OVERLAPPING LAYERS of CertainTeed’s“Presidential Starter” shingles, applied in the following fashion,starting at left rake/eaves corner. Starting at the right rake/eavescorner is not permitted. The staggered top edge of the starter pieceswill allow a smooth and uniform transition for applied shingles.CourseStarter1st Top 1 /4" x 38")**(11om1st Bott CourseStarter 20")x1(13 /4"ithEave were alongContinu Bottom Sta1rt x 40")e"4iz/Full-S Pieces (13Course1st Bottom Starter Course (131/4" x 20")1st Top Starter Course (111/4" x 38")**6"4"Extend the shingles over the rake **Continue along eave with 111/4" x 40"and eaves about 1/2" (13 mm) if drip Top Starter Course shingles, butted againstedge is used, or about 3/4" (19 mm)the in-place Top Starter Shingles and Flushif no drip edge is used.to the Lower Edge of the Bottom Starter.Figure 15-11: Use two (2) overlapping layers of CertainTeed’s “Presidential Starter.” 138Chapter 15CER T AIN T EED SHING L E APP L ICA T O R’ S MANUA L
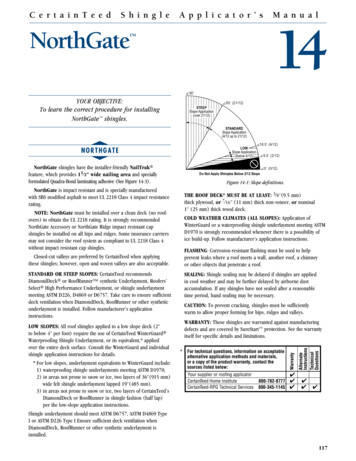
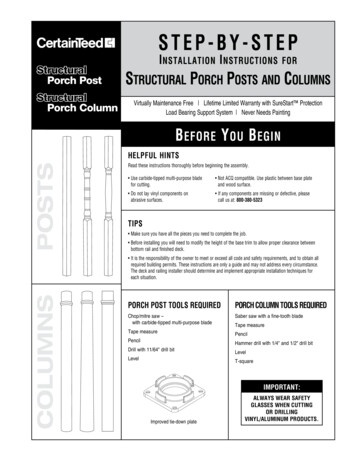
sHere’s a Tip When establishing the 4-course shingle pattern, use the proper alignment notches to determine where to cutthe shingles on the left hand side. For example, install the first course full shingle, then place a full shingle aboveit by lining up the right side edge with the 5 1/2 " alignment notch in the 1st course shingle below, then fastenand trim the 2nd course shingle along the rake edge. Likewise, use the 15 1/2 " alignment notch at the top of the2nd course shingle to place the right side edge of the 3rd course shingle.Finally, use the 5 1/2 " alignment notchat the top of the 3rd course shingle to place the 4th course shinglet5” and 15” Offset, Four-Course Diagonal Method1st Course: Start at left rake, hip or valley and apply a full shingle.Drip Edge4th Course: Cut 25" from the left edge of the first shingle. Install theremaining 15" piece by lining up the right lower edge of the shinglewith the 51 2 " alignment notch in the top of the Third Course shingle.Fu ll Sh in gl eCu t 25 "1st Cour se4thCo ur se15 "20 "35 "Fu ll Sh in gl eSt ar te r Co ur seDr ip Ed geFigure 15-12: First Course.2nd Course: Cut 5" from the left edge of the first shingle. Install theremaining 35" piece by lining up the right lower edge with the 5 1 2 "alignment notch in the top of the First Course shingle.Al ig nm en tN ot ch35 "2n d C ou rs eFu ll Sh in gl eSt ar te r Co ur seC ut 5"Figure 15-13: Second Course.3rd Course: Cut 20" from the left edge of the first shingle. Installthe remaining 20" piece by lining up the right lower edge of theshingle with the 151 2 " alignment notch in the top of the SecondCourse shingle.20 "Cu t 20 "3r d Co ur se35 "Fu ll Sh in gl eSt ar te r Co ur seFigure 15-15: Fourth Course.Succeeding COurses: Start the Fifth Course by installing a fullshingle and repeat the four-course pattern. Continue applyingshingles filling into the right of the first four courses.Another Way to View it:The 5" and 15" offset pattern is established over the 4 coursesas follows:1st course shingle 40" L (full shingle)2nd course shingle 35" L (1st course – 5")3rd course shingle 20" L (2nd course – 15")4th course shingle 15" L (3rd course – 5")An alternative to starting on the left:Follow the same application instructions specified in the 5" and 15"Offset Method above except instead of starting at the left rake, strike achalkline perpendicular to the eave, at least 10' from the rake’s edge.Install the First Course full shingle by aligning its left edge with theperpendicular chalk-line. Follow the 5" and 15" Offset Methodinstructions for the remaining courses.IMPORTANT: The designed appearance and service ofPresidential Shake Shingles requires strict adherence tothe application instructions.Figure 15-14: Third Course.sHere’s a Tip After establishing the 4 course shingle pattern, extend the 1st course by installing additional full shingles alongthe eave. Using the proper alignment notch in the shingle course below to maintain the 5" and 15" offset,build the courses up the roof by working “back and forth” across the roof deck. (Be careful to maintain thecorrect offsets!)tCER T AIN T EED SHING L E APP L ICA T O R’ S MANUA LChapter 15 139
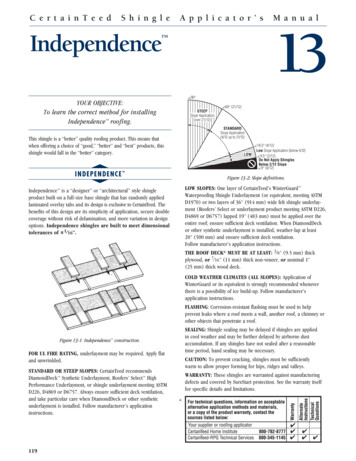
Fold downcounter flashingover step flashingFastenFlashingTo RoofMetal Step Flashing*6 (150 mm)Minimum2 (50 mm)Minimum3 (75 mm)Minimum2 La p (5m in im um 0 m m )CounterFlashingApron FlashingFor capping hip and ridge, applyCertainTeed “Presidential Accessory”shingles or Mountain Ridgeshingles of a like color.MinimValley um 18'' (455 mmMetal)RidgeVentush toTrim fl eck openingroof drlaymUndeent4'' (100mm)Lap36''Winte (915 mm)Waterp rGuardroofinShingor its gle Underlaequivaylent. mentUnderlayment15" (375mm)5" (1Air FlowThroughSoffit25 mCLm)4Edge ''(100nailLap mm)ortacleach ''3ed eEmb gle in a eidshin m) w haltm(75 of asp ent.*strip ng cemfirooNote: For clarity, nails and nail lines arenot shown in all portions of illustrations.Unlap derlay2'' (5s WintementrG0mm) uardLine18'' valleyVbove alley M y centerWin 36'' Ce etal fla ringsrteShin rGuardtainTe hingegor it le Und Waterpds eqeuiva rlaym roofinglent. entithinail w fot n m) oDo n(150 m terline6'' ey cenvallCutdia 2'' (5corn gonall 0 mm)shin er of y off ugle. trim ppemed rCLCut3'' shing(bac75 mmlesvall k from )ceneyterlineFigure 15-16: Highlight of open valley and chimney flashing details. 140Chapter 15CER T AIN T EED SHING L E APP L ICA T O R’ S MANUA L
s5. 4TH AND 5TH COURSES: Apply color “A” shingles to thefourth and fifth courses. Follow instructions for Fourth Courseand Fifth Course applications.“ SPECIAL EFFECTS ”PRESIDENTIAL SHAKE SHING LEStDUAL COLOR APPLICATION METHODSusing the 5" and 15" offsetMETHOD # 1 – ALTERNATING COLORS – SINGLE COURSES1. Select color combinations of Presidential Shake shingles for use indual color application, e.g. Slate Gray and Weathered Wood. Colordesignations “A” and “B” for two different shingle colors will beused in the following shingle application instructions.2. STARTER COURSE: Apply color “A” Starter Strip shingles tostarter course and follow instructions for Starter Courseapplication.6. All succeeding courses continue with two courses of shingles ofone color followed by two courses of shingles of the other color.To avoid confusion completely apply the two courses of samecolored shingles at the same time. Follow the appropriateinstallation instructions for Presidential Shake shingles.7. HIP & RIDGE: The hip & ridge shingle color to be used willdepend upon the color of the last two courses of Presidentialshingles. If the last two courses contain shingles of the samecolor, then the hip & ridge color will be the opposite color.For example, if the last two courses are color “A”, then thecolor “B” hip & ridge shingles are used.If the last two courses of shingles are different in color, then thecolor of hip & ridge shingles will be the same as the last course ofPresidential Shake shingle. For example, if the next to last courseis color “A” and the last (top) course is color “B”, then the Hip &Ridge color used is “B”.3. 1ST COURSE: Apply color “B” Presidential Shake shingles tothe first course. Follow instructions for First Course application.All shingles applied to the first course and all successive oddnumbers will be the same color i.e., color “B”.4. 2ND COURSE: Apply color “A” shingles to second course.Follow instructions for Second Course application. All shinglesapplied to the second course and all successive even numberswill be the same color i.e., color “A”.sCappin g the Hip an d Ridget5. Every other course of shingles will alternate between colors “A”and “B”. Complete shingle application to each course across theroof deck with the same color of shingles. To avoid confusion,completely fill in each course of shingles across the deck at thesame time. Follow the appropriate installation instructions forPresidential Shake shingles.Cedar Crest or Mountain Ridge accessory shingles can be used forcovering hips and ridges. Apply shingles up to the ridge. Fasteneach accessory with two fasteners. The fasteners must be 1 3 4 " longor longer, so they penetrate either 3 4 " into the deck or completelythrough the deck.s6. HIP & RIDGE: Apply hip & ridge cap shingles that are the opposite color as that of the last course of Presidential Shake Shingle.For example, if the last (top) course of Presidential Shake Shingleis color “A”, then hip and ridge cap shingles should be color “B”.Mo un tain Ridge High- Pro f i l eHIP AND RIDGE Ac c es s o ry s hing l e stMETHOD #2 – ALTERNATING COLORS – DOUBLE COURSES1. Select color combinations of Presidential Shake Shingles for use indual color application, e.g. Slate Gray and Weathered Wood. Colordesignations “A” and “B” for two different shingle colors will beused in the following shingle application instructions.2. STARTER COURSE: Apply color “A” Starter Strip Shingles tostarter course and follow instructions for Starter Courseapplication.3. 1ST COURSE: Apply color “A” Presidential Shake Shingles,same color as starter shingles, to the first course. Followinstructions for First Course application.4. 2ND AND 3RD COURSE: Apply color “B” shingles to thesecond and third courses. Follow instructions for Second Courseand Third Course applications.Use Mountain Ridge accessory shingles to cover hips, ridges orrake edges. One box will cover 20 linear feet. To prevent damage toshingles during application, they must be sufficiently warm to allowproper forming.FasteningIMPORTANT: Use two nails to fasten each shingle. Nails must beminimum 13 4 " (45 mm) long. For the 4" (100 mm) startershingle, place fastener 1" (25 mm) in from each side edge andabout 2" (50 mm) from the rake (or eave) edge, making sure thefastener goes 3 4 " into the deck or all the way through. For eachfull accessory shingle, place fasteners 85 8 " (219 mm) up from itsexposed butt edge and 1" (25 mm) in from each side edge.sHere’s a Tip To provide a level surface for hip and ridge caps applied over Presidential TL, a “nailer” made from 1-by boardscan be installed or a piece of metal can be formed to support the caps. Also ridge vents made from sturdymaterial can serve as a base to provide an even uniform appearance.tCER T AIN T EED SHING L E APP L ICA T O R’ S MANUA LChapter 15 141
sHip, Ridge and Rake Shingle ApplicationApply the primary field roofing up to the hip or ridge from bothsides of the roof and trim flush or lap over one side, not more thanhalf the width of an accessory shingle.Assure that the installed accessory shingles properly cover fieldshingles on both sides and along rake edges. For a rake edgeinstallation, cut the field shingles flush to the rake edge. Applyaccessory shingles ensuring they fit securely against the rake board.To assist in proper alignment, snap a chalk line parallel tothe hip, ridge or rake along the line where the side edgesof the accessory shingles should fall.Prepare a 4" Starter shingle by cutting off the lower 8" colorgranule butt portion of one accessory shingle. Apply the 4" starterpiece (with sealant nearest the outer edge) over the bottom cornerof the hip or rake, or on either end of the ridge, overhangingthe corner or end by approximately 1 2 " and bending the startershingle along its centerline to form into place (see figures below.)Install a nail on each side about 2" up from the starter shingle’sexposed butt edge and 1” in from each side edge of the shingle.The 8” piece that was cut off may be used to finish the oppositeend of hip, ridge or rake.Next, apply a full Mountain Ridge shingle over the installed startershingle, bending it along its centerline and forming into place overthe hip, ridge or rake, flush with the bottom and side edges of thestarter shingle. Install a nail on each side of the shingle 85 8 " upfrom the bottom edge and 1" in from each side edge.Continue application of the Mountain Ridge shingles along the hip,ridge or rake as shown. Expose Mountain Ridge shingles 8", coveringall fasteners.c edar c res t medium- Pro fi l eHIP AND RIDGE Ac c es s o ry s hin g l e stCedar Crest hip and ridge shingles deliver a thicker appearance toaccentuate the roof lines for a more attractive finish. Unlike otheraccessory products which have a monotone appearance, Cedar Cresthas blended colors that complement the Landmark Landmark TL ,Presidential and Presidential TL shingle colors. Cedar Crest’smulti-layer design gives additional protection at critical stress pointsand its aggressive sealant helps ensure the caps stay on the roof.Use Cedar Crest accessory shingles to cover hips and ridges.Carefully separate the three-piece units prior to application, byfirst folding along the pre-cut lines and then detatching the pieces(see Figure 15-19). No cutting is necessary. There are 30 individualshingles (10 three-piece units) in each bundle. One bundle willcover 20 linear feet. Each 12" x 12" shingle has a shadowline that isa design feature which is visible when applied properly. To preventshingle damage during application, they must be sufficiently warm toallow proper forming.Three-piece units .Shadowline1. separate to make 30 shinglesFigure 15-19: Separate to make 3 cap shingles.SealantfasteningNail/8 85Sealant32IMPORTANT: Use TWO nails to fasten each shingle. Fasteners mustbe minimum 1-3/4" (45 mm) long.For the starter shingle, place fastener 1" in from each side edge andabout 2" up from the starter shingle’s exposed butt edge, making surefastener goes 3/4" into the deck or all the way through the deck.(see Figure 15-20). For each full Cedar Crest shingle, place fasteners8-5/8" up from its exposed butt edge and 1" in from each side edge(see Figure 15-21).sureExpo 8 4 StarterPiece12" )m(305 moverApply r shinglestarteFigure 15-17: Mountain Ridge Hip and ridge application.4"m)(102 m ingler shStarteNail Location1" (25mm)2" mm)(50Figure 15-20: Apply a full cap shingle over the starter shingle.1/2 OverhangFigure 15-18: Mountain Ridge Rake edge application. 142Chapter 15CER T AIN T EED SHING L E APP L ICA T O R’ S MANUA L
Continue application of Cedar Crest shingles up the hip or alongthe ridge, forming each shingle over the hip or ridge, and fasten asshown in Fastening. Expose Cedar Crest shingles 8", covering allfasteners (see Figure 15-21).To assist in proper alignment, snap a chalk line parallel to the hip orridge applying along the line where the side edges of the Cedar Crestshingles should be.12" )m(305 m8"m)(203 mureExpos1" (25mm)"8 5/8mm)(219sMetal Step Flas hin gtMetal flashing must consist of a 5" x 6" piece, bent as shown inFigure 15-23.Place each piece of flashing 2" up the roof from where thelowermost edge of the next (overlapping) shingle will be applied.Each succeeding course of flashing must “overlap” the flashing coursebelow it a minimum of 2".Figure 15-21: Install cap shingles at an 8" exposureand fasten with one nail on each side as shown.IMPORTANT: High Wind Instructions. In order to achieve theASTM D3161 Class “F” Wind Resistance Classification each “hip andridge” shingle must be both 1) fastened with nails as shown and2) hand-sealed with two 1/4" (6 mm) wide beads of either BASF“Sonolastic NP1 Adhesive” or Henkel “PL Polyurethane Roof &Flashing Cement” applied from the middle of the shingle’s raisedoverlay on the top piece andHand-sealing adhesiveextending approximately 4"(102 mm) along the sides4"1/4"of the headlap along a line3/4"-1" (19 mm – 25 mm)3/4"in from each side edge ofthe shingle’s headlap asshown. Immediately align1"Dab of asphaltand apply the next overlycement between1"shingle layersing shingle, gently pressingtab sides into adhesive and Figure 15-22: Hand seal caps as shown.ensuring none becomesvisible. Only one side of thedouble thickness tab is laminatedtogether; to secure the other side, after folding the shingle over theridge and nailing into position, a 1" (25 mm) diameter spot of eitherNP1 or PL adhesive must be applied between the shingle layers asshown. Immediately align and apply the next overlying shingle, gentlypressing tab sides into adhesive and ensuring none becomes visible.Metal Step Flashing3’’ (75 mm)MinimumFigure 15-23: Metal step flashing.sRero o fin gt“Tear-off”CertainTeed recommends but does not require old roofing beremoved before installation of these products. Inspect the conditionof the roof to determine that the load bearing capacity is adequatefor the application of the Presidential shingles. If the old roofconsists of two or more layers of shingles, it is required to remove(tear-off) the existing roofing. After tear-off, repair the decking and /or install new decking and apply new underlayment, eaves flashing,and Presidential shingles using the recommended procedure.cedar crest applicationApply primary roofing up to hip or ridge on both sides of roof and trimflush. Ensure that the Cedar Crest shingles will adequately cover the topcourse of the shingles on both sides of the hip or ridge. Prepare a 4"“starter” shingle by cutting off the lower 8" color granule portion ofone Cedar Crest shingle. Apply the 4" starter piece with raised overlayedge over the bottom corner of the hip or to either end of the ridge,overhanging the corner or end by approximately 1/2" and bendingthe starter shingle along its centerline to form into place (see Figure15-20). Install a nail on each side about 2" up from the starter shingle’s exposed butt edge and 1" in from each side edge of the shingle.Then apply a full 12" x 12" piece over the starter, bending theshingle along its centerline and forming it into place over the hipor ridge, flush with the bottom and side edges of the starter shingle.Fasten with two nails minimum 1-3/4" long with one nail on eachside of shingle 8 5/8" up from the butt edge and 1" in from eachside edge (see Figure 15-21).CER T AIN T EED SHING L E APP L ICA T O R’ S MANUA L6’’ (150 mm)Minimum2’’ (50 mm)Minimum“Roof-Over”Over Asphalt Shingles:IMPORTANT: If Presidential shingles are applied over existingroofing shingles, special “nesting” application methods must befollowed. Applied incorrectly, raised shingle edges may result whichcan give an objectionable appearance and reduce the performanceof the roofing.If Presidential Shake Shingles are installed over existing woodshingles, replace old wood shingles along eave and rake edgeswith 1" (25 mm) x 4" (102 mm) boards. Beveled wood strips4" (102 mm) x 5" (127 mm) wide may be installed below butt ofshingles to provide a solid nailing base. Install Presidential Shakeshingles using the recommended procedures.Chapter 15 143
1" diameter spots of asphalt roofing cement under each shingle tab. After applying 5 nails in between the nailing guide lines, apply 4 nails 1" above tab cutouts making certain tabs of overlying shingle cover nails. 1" 1" diameter asphalt roofing cement Figure 15-7: Fastening Presidential and Presidential T/L shingles on steep slopes.