Transcription
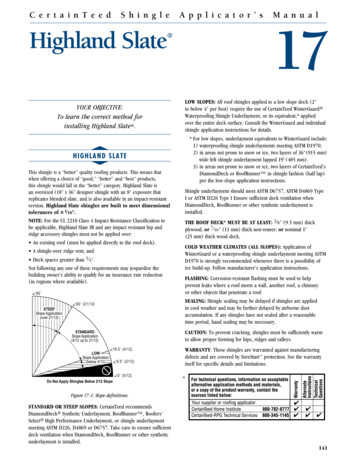
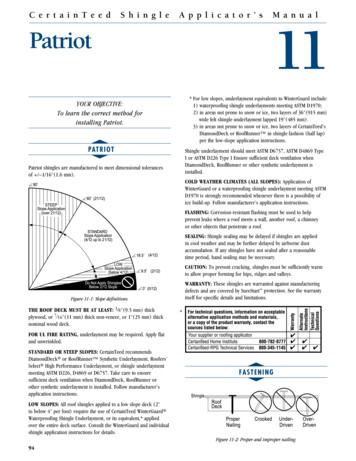
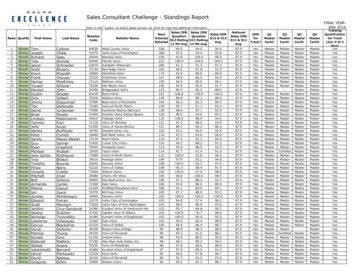
M A S T E RS H I N G L EC e r t a i n T e e dA P P L I C A T O R’ SS h i n g l eM A N U A LA p p l i c a t o r ’ sTHighlandE A R I N G SlateOFF OLDROOFING? M a n u a l316STANDARD OR STEEP SLOPES: CertainTeed recommendsDiamondDeck Synthetic Underlayment, Roofers’ Select HighPerformance Underlayment, or shingle underlayment meetingASTM D226, D4869 or D6757. Take care to ensure sufficient deckventilation when DiamondDeck or other synthetic underlaymentis installed.YOUR OBJECTIVE:To learn the correct method forinstalling Highland Slate .LOW SLOPES: One layer of CertainTeed’s WinterGuard Waterproofing Shingle Underlayment (or equivalent, meetingASTM D1970) or two layers of 36" wide felt shingle underlayment(Roofers’ Select or underlayment product meeting ASTM D226,D4869 or D6757) lapped 19" must be applied over the entire roof;ensure sufficient deck ventilation. When DiamondDeck or othersynthetic underlayment is installed, weather-lap at least 20" andensure sufficient deck ventilation.sHIGH LAND SLAT E tThis shingle is a “better” quality roofing products. This means thatwhen offering a choice of “good,” “better” and “best” products,this shingle would fall in the “better” category. Highland Slate isan oversized (18" x 36" designer shingle with an 8" exposure thatreplicates blended slate, and is also available in an impact-resistantversion. Highland Slate shingles are built to meet dimensionaltolerances of 1 16".THE ROOF DECK* MUST BE AT LEAST: 3 8 " (9.5 mm) thickplywood, or 7 16 " (11 mm) thick non-veneer, or nominal 1"(25 mm) thick wood deck.NOTE: For the UL 2218 Class 4 Impact Resistance Classification tobe applicable, Highland Slate IR and any impact resistant hip andridge accessory shingles must not be applied over: An existing roof (must be applied directly to the roof deck). A shingle-over ridge vent, and Deck spaces greater than 1/4".Not following any one of these requirements may jeopardize thebuilding owner’s ability to qualify for an insurance rate reduction(in regions where available).COLD WEATHER CLIMATES (ALL SLOPES): Application ofWinterGuard or its equivalent is strongly recommended wheneverthere is a possibility of ice build-up. Follow manufacturer’sapplication instructions.FLASHING: Corrosion-resistant flashing must be used to helpprevent leaks where a roof meets a wall, another roof, a chimneyor other objects that penetrate a roof.SEALING: Shingle sealing may be delayed if shingles are appliedin cool weather and may be further delayed by airborne dustaccumulation. If any shingles have not sealed after a reasonabletime period, hand sealing may be necessary.90 60 (21/12)STEEPSlope Application(over 21/12)CAUTION: To prevent cracking, shingles must be sufficiently warmto allow proper forming for hips, ridges and valleys.WARRANTY: These shingles are warranted against manufacturingdefects and are covered by SureStart protection. See the warrantyitself for specific details and limitations.STANDARDSlope Application(4/12 up to 21/12)LOWSlope Application(below 4/12)18.5 (4/12)9.5 (2/12)*0 (0/12)Do Not Apply Shingles Below 2/12 SlopeFigure 16-1: Slope definitions.145
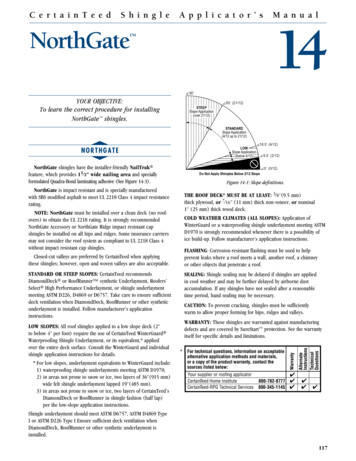
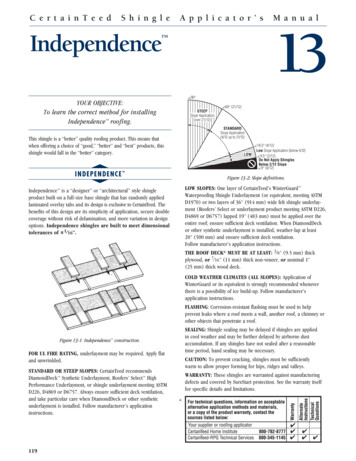
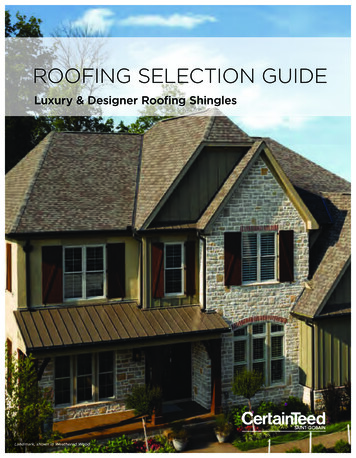
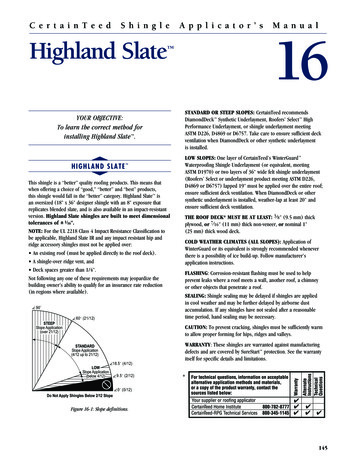
C E R T A I N T E E DS H I N G L EA P P L I C A T O R’ SM A N U A LssFAST ENINGC LEAN DEC K APPLIC ATIO N METH ODTEARING OFF OLDROOFING?ttPREPARING THE enOverDrivenINSTALL ON NEW ROOFS AND TEAR-OFFS USING THEFOLLOWING METHOD:Figure 16-2: Proper and improper nailing.u3 4 "For decks(19 mm) thick or thicker, nails must go at least(19 mm) into the deck. On thinner decks, nails must go at least1 8 " (3.2 mm) through the deck.Nails must be 11- or 12-gauge roofing nails, corrosion-resistant,with at least 3 8 " (9.5 mm) heads, and at least 11 4 " (32 mm) long.3 4 "LOW AND STANDARD SLOPE:9"(230 mm)9"(230 mm)9"(230 mm)1"(25 mm)9"(230 mm)1"(25 mm)9-3/8"(240 mm)Miami-Dade requiresSIX nails (two nailsinstalled over centercutout as shown).3Apply underlayment as required. CertainTeed suggests that alayer of shingle underlayment be applied. For UL fire rating,underlayment is generally required. Apply flat and unwrinkled.1" (25 mm)41 2 " Single Column Vertical Racking Method.ALIGNMENT: Snap horizontal and vertical chalklines to assureshingles will be correctly aligned. Expose all shingles 8".ANT!PORTMISTARTER COURSE:1. Use CertainTeed’s High-Performance Starter Shingles or removethe lower 8" tab portions from Highland Slate shingles. This is arequirement in order to be eligible for the 110 mph windwarranty. Do not rotate or “flip” full shingle. Sealant stripes must beat lower-most edge.2. Cut 4-1/2" off the LEFT end of the first starter shingle only.3. Apply the 31-1/2" remaining piece to the lower left corner of theroof. Make sure there is 1 2 " overhanging the rakes and eaves ifdrip edge is being used. If you are not using drip edge, make theoverhang 3 4 ". Install nails approximately 3" up from eave, assuringthey go into solid wood.4. Use full 36" long by 10" wide starter shingles for the rest of thecourse.Figure 16-3: Use FIVE nails for every Highland Slate shingle.For Miami-Dade, SIX nails are required (see inset).36" (920 mm)Full LengthHIGHLAND SLATEStarter ShingleSTEEP SLOPE:Use FIVE nails and EIGHT spots of asphalt roofing cement* for eachfull Highland Slate shingle. For Miami-Dade, SIX nails are required.Apply 1" diameter spots of asphalt roofing cement under each tabcorner. Asphalt roofing cement meeting ASTM D4586 Type II is suggested.10"(254 mm)R e m o v e t h i s p o r t i o nFigure 16-4: Make starter shingles by removing the lower 8" portion.9"(230 mm)9"(230 mm)9"(230 mm)1"(25 mm)Miami-Dade requiresSIX nails (two nailsinstalled over centercutout as shown).9"(230 mm)1"(25 mm)9-3/8"(240 mm)1" (25 mm)Roofing CementFigure 16-3A: Use FIVE nails and eight spots of asphaltroofing cement under each tab corner.*CAUTION: Excessive use of roofing cement can cause shinglesto blister.1461ST COURSE: (Figure 16-6). Apply a full Highland Slate shingleat the lower left corner of the roof, flush with the starter course leftcorner. Fasten with 5 nails.2ND COURSE: (Figure 16-6). Cut 4-1/2" off the left end of a fullshingle and apply remaining 31-1/2" piece over left edge of 1stcourse. Fasten with 5 nails and ensure 8" exposure.SUCCEEDING COURSES: Begin application of the 3rd course with afull shingle. Fasten with 4 nails, leaving the right end unfasteneduntil later. (Figure 16-6). Begin the 4th course using a shingle with4-1/2" cut off its left end. (Figure 16-7, A). Fasten with 5 nails. Tobegin the application of subsequent courses, alternate full shingles[36"] and cut shingles [31-1/2"] up the rake edge, fastening asdescribed above. (Figure 16-7, A).REMAINING COLUMNS AND COURSE COMPLETION:(Figure 16-7, B). Apply a full shingle against the right edge ofeach shingle in previous column. When applying a shingle against acovered shingle, carefully lift the right edge of the shingle above andslip the new shingle under it. Fasten as usual with 5 fasteners; then,fasten the loose right edge of the shingle above.Chapter 16C E R T A I N T E E D S H I N G L E A P P L I C A T O R’ S M A N U A L
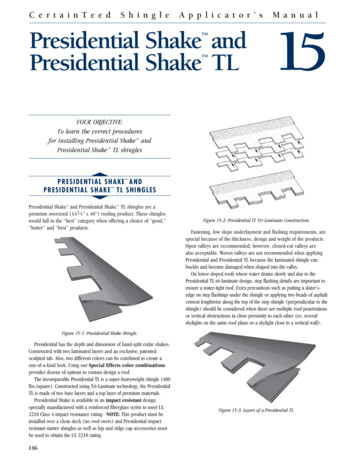
M A S T E RS H I N G L EA P P L I C A T O R’ SM A N U A L3R id g eTEARING OFF OLDROOFING?eckRoof D)0 mm2'' (5 e LapSidlMetapDri eEdgtmenfingRoo mentCeeEdgMle 31hinger SStartFirstmm)(8001/2''mm)2'' (50e LapSidm)00 m4'' (1 LapEndgleshinuntil vious .redstenot fa t to the p n applienoDbeecenadja rse hascouoveEaveoursRemes)mm(13 used.1/2''out edge isbapsave o drind e ) if nke a mme ra (19er th ut 3/4''voosbingle or ae sh sed,nd th is uExte rip edgediftkeRaDripetalforrlayUndeakelMetaDrip geEdtertaral StionOpRfortertaral StionOpeRakaymenUnderl3rd C''4 1/2 m)m(1152eours1st CFigure 16-5: Standard slope underlayment and starter drip edge details.eourster CStarrseound C8''mm)(203Figure 16-6: Applying the first three courses on a standard slope.Figure 16-7: Installation schematic.Trim flush to roof deck openingRidgeVentnt36'' (9Waterp 14 mm)roofing ShingaymeUnderlle UnderlayUndementrlaym4 1/2'' (11AAir FlowThrough Soffit*Adequate attic ventilation creates a coolerattic in the summer and a drier attic in the winter.It also helps prevent premature failure ofshingles, roof deck movement/deterioration,and formation of ice dams. Shingle damage orfailure resulting from inadequate ventilation isnot covered by CertainTeed's Limited ShingleWarranty. Contractors only, for furtherinformation about attic ventilation, please consultthe "CertainTeed Shingle Applicators Manual"(call 1-800-404-9880 for a copy), and/or"The Principles of Attic Ventilation" brochure(call 1-800-AIRVENT for a copy).BColumn 2tmenerlay ardUnd interGu mm)W0laps 2" (5ent5 mm)Line valley by centering 36" (914 mm)wide CertainTeed WinterGuardWaterproofing ShingleUnderlayment or equivalent*directly to deckLay shingles onsmaller roof area,across valley and onto theadjoining roof area at least12" (305 mm)Column 1Do not nail within6'' (152 mm) of valleycenterlineEmbed each shingle in a 2" (50 mm)wide strip of asphalt roofing cement*Cut 2'' (50mm) diagonally offupper corner of trimmed shingleLCCut shingles 2''(50mm) back fromvalley centerlineFigure 16-8: Highlight of closed-cut valley detail.C E R T A I N T E E D S H I N G L E A P P L I C A T O R’ S M A N U A LChapter 16147
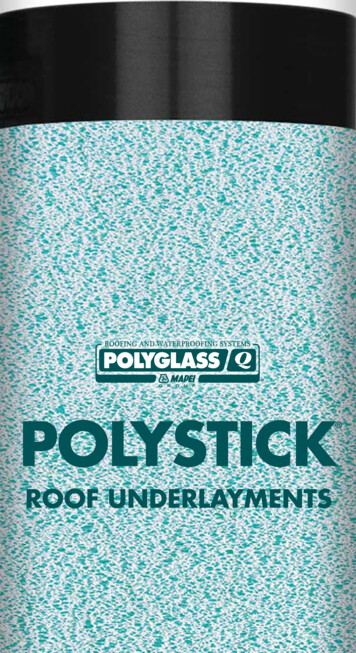
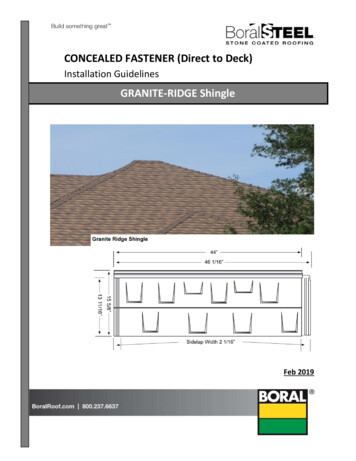
C E R T A I N T E E DS H I N G L EA P P L I C A T O R’ SM A N U A LCUTBACK/NESTING METHODTEARING OFF OLDROOFING?RakeEdgeLeave about 1/2"space betweenold & new shingles.Capping Hip & Ridge:Use CertainTeed’s Cedar Crest or Shangle Ridge hip and ridge shingles of a like color.(Cedar Crest shown)8"m)(203 murepxe os12"m)(305 m1" (253When shingles overlap old shinglesless than 3" cut back old shinglesan extra 1/2" to allow easy nesting.Old Shingles1/2''mm)3" overlap minimum"8 5/8 m)m(219Starter Strip10''8''Alternate Method: Make cap shingles cut fromHighland Slate shingles.Eaves EdgeFigure 16-10: “Cutback/Nesting Method”1) Make the surface of the old roof as smooth as possible byreplacing missing shingles. Split and nail flat all buckled, raisedor curled shingle tabs.Figure 16-9: Installation of caps along hips and ridges(See chapters 12 and 17 for application instructions forCedar Crest and Shangle Ridge respectively).2) Cut old shingles back flush to the rakes and eaves.3) Apply corrosion-resistant drip edge along the rakes and eaves,covering the edges of the old shingles.sR O O F I NG OVER AP P LICAT IONt“TEAR OFF”It is important to determine that the roof deck is in satisfactorycondition and the load-bearing capacity is adequate for applicationof these shingles. If the old roof consists of two or more layers ofshingles, or if the roof consists of wood shingles (other than sawnsquare butt style), it is required to tear off (remove) existing roofing.If the old shingles have exposure lengths other than 8" (203 mm),it is strongly recommended to tear off existing roofing, since roofingover these shingles can lead to periodic patterns which may havean objectionable appearance. After tear-off, repair decking and/or install new decking, and apply underlayment, eaves flashing andshingles according to procedure in “4-1/2" Single Column VerticalRacking Method” section.“ROOF-OVER”OVER ASPHALT SHINGLES:5) Remainder of Roof: Apply Highland Slate shingles using the 4 1 2 "single column vertical racking method. When Hatteras shinglesoverlap the old shingles less than 3", cut back old shingles to theoverlap dimension plus about 1 2 ", to allow easy nesting. This“Cutback/Nesting Method” permits the upper part of the HighlandSlate shingle to lay smoothly against the old shingles, resulting in aroof that will perform better and have a more even appearance.OVER SQUARE-BUTT WOOD SHINGLES:IMPORTANT: If Highland Slate shingles are applied over existingasphalt roofing shingles having exposure lengths other than 8"(203 mm) CertainTeed requires using the nesting method describedbelow. Never apply Highland Slate shingles over laminates orlock-type shingles. Failure to follow these directions will causeshingle “bridging” that can give an objectionable appearance andreduce the performance of the roofing.1484) Starter Course: If applying over old 5" exposure shingles, preparestarter strip according to Highland Slate application instructions.Apply starter strip with sealant near bottom edge so that the topedge of the starter strip will nest below the lower edge of the thirdcourse of old shingles. Starter shingle should overhang eaves andrake edges about 1 2 ". If applying over shingles of other than 5"exposure, apply CertainTeed High-Performance 10" starter in asimilar fashion, with the sealant near the eaves. Follow the cutback/nesting method described below if the top edge of the startershingle overlaps the old shingles less than 3".If the roof consists of square-butt sawn wood shingles, applybeveled wood strips to obtain an even base and apply underlayment,eaves flashing and shingles according to procedure in “4-1/2"Single Column Vertical Racking Method” section.Chapter 16C E R T A I N T E E D S H I N G L E A P P L I C A T O R’ S M A N U A L
M A S T E RS H I N G L EA P P L I C A T O R’ SM A N U A LsM ET AL ST EP FLASH INGTEARING OFF OLDROOFING?tFold down counterflashing over step flashingThe first course of metal flashing must be a minimum of 5" x 12"(125 mm x 305 mm), bent as shown in Figure 16-11, appliedflush with the lowermost edge of the first shingle.Succeeding courses of flashing must consist of pieces that area minimum 5" x 10" (125 mm x 250 mm ), bent as shown inFigure 16-11. Place each piece of flashing 2" (50 mm) up theroof from where the lowermost edge of the next (overlapping)shingle will be applied. Each succeeding course of flashing must“overlap” the flashing course below it a minimum of 2" (50 mm).3Fasten flashing to roofDeckSucceedflashing ing10'' (254 piecesmm)Counterflashing2'' Lap (50Metal Step Flashing*10''(254 mm)Minimum2'' (50 mm)MinimumMetal Step Flashing*:First course of metal flashing must consist of a minimum 5'' x 12''(127 mm x 305 mm) piece applied flush with the lowermost edgeof the first shingle. Succeeding courses of flashing must consist ofpieces that are a minimum 5'' x 10'' (127 mm x 254 mm) in size.Each succeeding course of flashing must “overlap” the flashingcourse beneath it a minimum of 2'' (50 mm).mm)Apron FlaFirst piec12'' (305 e of flashingmm)shing3'' (75 mm)MinimumFigure 16-11: Flashing around a chimney.C E R T A I N T E E D S H I N G L E A P P L I C A T O R’ S M A N U A LChapter 16149
CERTAINTEED SHINGLE APPLICATOR ' S MANUAL TEARING OFF OLD ROOFING? 3 146 Chapter 16 CERTAINTEED SHINGLE APPLICATOR'S MANUAL s FASTENING t Shingle Roof Deck Crooked Over-Driven Under-Driven Proper Nailing Figure 16-2: Proper and improper nailing. For decks 3 4" (19 mm) thick or thicker, nails must go at least 3 4" (19 mm) into the deck .