Transcription
PaperCut Lexmark EmbeddedTouchscreen ManualContents12Overview . 31.1Consistency . 31.2Integration . 31.3Rate of development . 31.4Vendor Neutral . 31.5Security . 3Installation . 42.1Requirements . 42.2Setup Procedure . 52.2.1PaperCut Settings . 52.2.2Locate the application flash file. 52.2.3Installing the Embedded Application . 52.2.4Setting Logout Timeout . 72.2.5Disabling “Held Jobs” . 72.2.6Security Lock-Down . 82.2.7Additional Network Security (optional). 82.3345Upgrading to a newer version . 9Post-install testing . 103.1Test Preparation . 103.2Print release test . 10Configuration . 124.1Authentication Methods . 124.2Customizing Text and Messages. 14Advanced Configuration . 155.1Config Editor . 155.1Customizing the Header Logos and Colors . 175.1.1Customized Logos . 175.2Custom Header Color . 185.3Configuring Swipe Card Readers . 19
Lexmark Embedded Print Release Manual62016-08-115.3.1Card Number Needs No Conversion. 195.3.2Regular Expression Filters. 195.3.3Card Number Format Converters . 195.3.4Standard Converters . 205.3.5Using custom JavaScript . 205.3.6Other advanced notes . 21Known Limitations and Security . 226.1Known Limitations . 226.2Security concerns . 227Future Development . 238FAQ & Troubleshooting . 24A. Appendix: Supported Authentication Card Readers. 27B. Appendix: Screenshots for User Information Sheets. 28Copyright 2010-2016 PaperCut Software International Pty. Ltd., All Rights Reserved.2 of 29
Lexmark Embedded Print Release Manual2016-08-11This manual covers the Lexmark embedded touchscreen printer setup. For general PaperCut MFdocumentation, please see the PaperCut MF manual.1 OverviewNote: Lexmark and LeSF are Trademarks of Lexmark, USA. PaperCut is solely responsible for thecontents of this publication and the performance of the PaperCut's products.This manual provides an overview of the installation, configuration and operation of PaperCut’sembedded software solutions. Today’s devices are smarter – they have touch screens and offer theability to run applications directly on the device. The goal of PaperCut Software’s embeddedsolution is to leverage these smart devices and to rich application features in the print control area.These include: Secure function access via user authentication (including integration with single sign-onenvironments)Release jobs from a hold/release queue (Secure & Find Me Printing)Group based access controlHighlights of the embedded solution include:1.1 ConsistencyThe embedded solutions are developed in-house by the PaperCut Software development team. Thisensures that the interface is consistent with the workstation print interface, meaning users onlyhave to learn one system.1.2 IntegrationPaperCut is a single integrated solution where print, internet and copier control are all managed inone system. Users have a single account and administrators have the same level of reporting andadministration for all services. The embedded solution interacts with the PaperCut server using aService Oriented Architecture (SOA) and web services based protocols.1.3 Rate of developmentPaperCut is developed under a release-often policy where new features are made available to usersas soon as they are complete. Unlike hardware based solutions, new versions can be delivered tousers regularly as software updates.1.4 Vendor NeutralPaperCut remains true to its vendor neutral stance. All embedded solutions are equal and supportall server operating systems including Windows, Linux, Mac and Novell.1.5 SecurityA large percentage of PaperCut’s user base is in education environments where security isimportant. All embedded solutions are developed with security in mind. Where security objectivescannot be satisfied, any deficiencies are fully disclosed.Copyright 2010-2016 PaperCut Software International Pty. Ltd., All Rights Reserved.3 of 29
Lexmark Embedded Print Release Manual2016-08-112 InstallationThis section covers the installation of the PaperCut embedded application for compatible Lexmarkdevices. The embedded application will serve as a release station for network prints (forinformation on just tracking network printing see the PaperCut user manual).2.1 RequirementsEnsure that the following points are checked off before getting started: The PaperCut server software is installed and running on your network. Please see the‘Installation’ section of the PaperCut user manual for assistance.Ensure that your Lexmark device supports LeSF version 2.1 or later. The Lexmark EmbeddedTouch Screen Printer solution currently only supports the Lexmark model T656dne.Have available the network name and IP address of the system running PaperCut (e.g. theprint server).Make sure the network (firewalls, routers etc.) allows TCP connections on ports 9191 and9193 from the device to the PaperCut server.Ensure that the Lexmark device is connected to the network.Copyright 2010-2016 PaperCut Software International Pty. Ltd., All Rights Reserved.4 of 29
Lexmark Embedded Print Release Manual2016-08-112.2 Setup Procedure2.2.1 PaperCut Settings1. Log in to the PaperCut administration interface using a web browser (e.g.http://papercut-server:9191/admin ).2. Navigate to ‘Options - Advanced’ and ensure the option ‘Enable external hardwareintegration’ is enabled.3. Press ‘Apply’.2.2.2 Locate the application flash fileThe PaperCut Lexmark Embedded application for touch screen printers is contained in a file named“papercut-21.fls”.This file is located under your PaperCut installation directory on the server, in the 2.2.3 Installing the Embedded ApplicationWeb installation provides a convenient way to install the embedded application. It can be doneremotely on multiple devices using just a web browser.To install the application, perform the following steps:1. On a computer, open your web browser2. Enter the URL of the Lexmark device. E.g. http:// lexmark-device-ip /3. Select the “Settings” menu option from the left (also called “Configuration” on older4.5.6.7.8.9.10.11.12.13.devices).Select “Embedded Solutions”.Click the “Install” button.Click the “Browse ” button and select the application FLS file.Click “Start Install”.A confirmation message will appear. Click “Return” to return to the Embedded Solutions list.The list should now show an item labeled “PaperCut” and the “State” column should show“Running”.Click the “PaperCut” item and click on the “Configure” button that appears.Enter a unique device name such as “Lexmark 1” or “Library Printer” that will later appear inPaperCut’s list of devices.Enter the PaperCut server’s hostname or IP address under “Server Hostname”.Leave all other settings at their defaults and click “Apply”.Copyright 2010-2016 PaperCut Software International Pty. Ltd., All Rights Reserved.5 of 29
Lexmark Embedded Print Release Manual2016-08-1114. The device will now show the PaperCut login screen.15. The Lexmark device will appear in the PaperCut administration interface under the “Devices”tab with the name you provided in the steps above.Before continuing with the device configuration, the Lexmark printer has to be configured to holdprints in a hold/release queue:16. In PaperCut, select the “Printers” tab.17. Select the print queue (i.e. not the ‘device’) for the Lexmark printer that will be used fortesting.18. Enable the “Hold/release queue” option.19. Press OK/Apply to save the changes. All printing to this queue will now be held untilreleased by a user.The device can now be configured to release prints from this print queue:20. Select the “Devices” tab.21. Select the Lexmark device.22. Select the print queue that was enabled for hold/release above. The Lexmark device willallow jobs on the selected queues to be released.Copyright 2010-2016 PaperCut Software International Pty. Ltd., All Rights Reserved.6 of 29
Lexmark Embedded Print Release Manual2016-08-1123. Press “OK” to save.24. The embedded application is now successfully installed. To release prints, the users mustlogin to the application, and select the “Print Release” button on the screen. This isdiscussed in detail in the next chapter.2.2.4 Setting Logout TimeoutAfter logging into a device the device will show the “home screen” that presents the functionsavailable. This screen will also show after the completion of each function. By default, Lexmarkdevices will return to the login screen after a timeout of typically 5 seconds, requiring the user to gothrough the login procedure again. We recommend setting this timeout to 10 seconds, respectingthe following considerations: On one hand, the timeout should be long enough to provide the user with time tocontemplate whether to continue using the device and which function to use next.On the other hand, the timeout should be short enough to prevent “tailgating”, i.e. after auser walks away from the device another user should not be able to walking up to it andcontinue using it with the previous user’s login credentials.To set the timeout to a different value: Access the Lexmark web admin interface under http:// lexmark-device-ip /Select “Settings” on the left-hand menu barSelect “Security” under “Other Settings”Select “Miscellaneous Security Settings”Select “Login Restrictions”Enter a new value such as “10” under “Panel Login Timeout” and click “Submit”.2.2.5 Disabling “Held Jobs”Lexmark devices themselves provide a functionality called “Held Jobs” that overlaps with PaperCut’shold/release queues. “Held Jobs” should be deactivated in order to avoid confusion with PaperCut’sprint release functions.To do so: Access the Lexmark web admin interface under http:// lexmark-device-ip /Select “Settings” on the left-hand menu barSelect “General Settings”Select “Home Screen Customization”Uncheck “Search Held Jobs” and “Held Jobs” and click “Submit”Copyright 2010-2016 PaperCut Software International Pty. Ltd., All Rights Reserved.7 of 29
Lexmark Embedded Print Release Manual2016-08-112.2.6 Security Lock-DownIn order to prevent unauthorized users from modifying essential device settings a simple securityconfiguration is recommended.To do so: Access the Lexmark web admin interface under http:// lexmark-device-ip /Select “Settings” on the left-hand menu barSelect “Security” under “Other Settings”Select “Edit Security Setups”Select “Password”Select “Add a Password”Enter “Admin” for the “Setup Name” and enter some password twice, also check the“Admin Password” checkbox, then click “Submit”Select “Return to Edit Security Setups”Select “Security Templates”Select “Add a Security Template”Enter “Admin” for the “Security Template Name”, choose “Admin” from the “AuthenticationSetup” and click “Save Template”Click “Return to Edit Security Setups”Select “Access Controls”Set all options to “Admin”, or if “Admin” is not available, to “Disabled”. Exceptions:o Set “Operator Panel Lock” to “Disabled”o Set “Use Profiles” to “No Security”This will deny users access to any functions other than print release. You may on a case bycase basis revisit this setup later and re-enable other functions. In case of doubt, refuseaccess by setting to “Admin” or “Disabled”.Click “Submit”2.2.7 Additional Network Security (optional)The MFP communicates with the PaperCut server over the network (e.g. to authenticate users orrelease print jobs). To provide an additional level of security, PaperCut may be configured to onlyallow device connections from a restricted range of network addresses. This ensures that onlyapproved devices are connected to the PaperCut server.By default PaperCut will allow device connections from any network address. To restrict this to asubset of IP addresses or subnets:1. Logon to the PaperCut administration web interface at http:// papercutserver :9191/admin2. Go to the Options Advanced tab and find the “Security” section.3. In the “Allowed device IP addresses” field enter a comma-separated list of device IPaddresses or subnets (in the format ip-address / subnet-mask ).4. Press the “Apply” button.5. Test the devices to ensure they can continue to contact the PaperCut server.Copyright 2010-2016 PaperCut Software International Pty. Ltd., All Rights Reserved.8 of 29
Lexmark Embedded Print Release Manual2016-08-112.3 Upgrading to a newer versionThe procedure for upgrading an existing embedded application to a newer version is similar to theinitial installation (see section 2.2). Please note that only the device-level installation needs to beperformed, and you shouldn't have to perform any additional configuration within the PaperCutadministrator interface.After upgrading, it's worth quickly checking the Embedded Application's version number nowmatches the expected value.Copyright 2010-2016 PaperCut Software International Pty. Ltd., All Rights Reserved.9 of 29
Lexmark Embedded Print Release Manual2016-08-113 Post-install testingAfter completing installation and basic configuration it is recommended to perform some testing ofthe print release scenario. This important for two reasons:1. To ensure that the embedded application is working as expected.2. To familiarize yourself with the features and functionality of PaperCut and the embeddedapplication.3.1 Test PreparationTo complete the test it is recommended you use a test user called ‘testuser’ to perform the printrelease test.To setup this user in PaperCut:1.2.3.4.Create the ‘testuser’ user in your Active Directory or LDAP directory.Login to the PaperCut’s admin web interfaceGo to the “Options- User/Group sync” page and press “Synchronize Now”.Once the sync is complete, the user will be added to PaperCut.The next step is to configure the user. To configure ‘testuser’:1. In PaperCut, select the “Users” tab2. Select the ‘testuser’ user.3. Set the user’s balance to 50.00 and verify the account is set to “Restricted”.4. Press the “OK” button to save.3.2 Print release testThe embedded application is used for print release. For full description of PaperCut hold/releasequeues and release stations, please read the PaperCut manual.1. Login to a computer workstation as ‘testusersimple’.2. Print a few jobs to the print queue that was configured above. The jobs will be held in thehold/release queue.3. Confirm that the jobs are held, by checking that the jobs are listed in the “Printers - JobsPending Release” page of the PaperCut administration interface.4. Confirm that the username is ‘testuser’.At the device:5.6.7.8.At the “Login” screen, press “Start”.Enter the ‘testuser’ username and password.The device will show the home screen with a choice of functions including “Print Release”.Press the “Print Release” button.Copyright 2010-2016 PaperCut Software International Pty. Ltd., All Rights Reserved.10 of 29
Lexmark Embedded Print Release Manual2016-08-119. The list of held print jobs is displayed.10.11.12.13.14.Select the job to release by pressing the arrow next to the job.Confirm the release of the print job by pressing the “Print Job” button.The job will then print.Try canceling a job by selecting it and then selecting the “Cancel Job” button.The job will be canceled, and will not print.Copyright 2010-2016 PaperCut Software International Pty. Ltd., All Rights Reserved.11 of 29
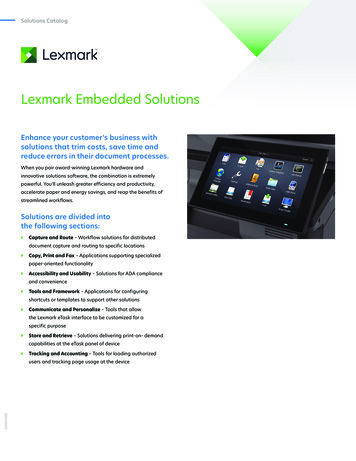
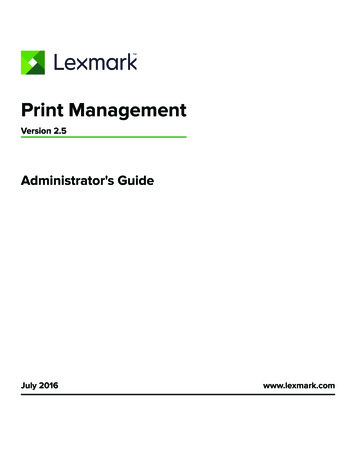
Lexmark Embedded Print Release Manual2016-08-114 ConfigurationAfter completing the Installation section and registering the device with PaperCut, it will have beenconfigured with reasonable default settings that are suitable for most environments. This sectioncovers how to change the default settings. All the following settings are available via the device’s‘Summary’ tab in the PaperCut administration interface.4.1 Authentication MethodsPaperCut supports a number of different ways to authenticate users who walk-up to the devices torelease prints. The default authentication method is username and password authentication(usually backed by a directory service such as Active Directory or LDAP).The available authentication methods can be modified in the ‘External Device Settings - Authentication methods’ section.Authentication methods available for a deviceEach authentication method is discussed in the following table.AuthenticationMethodDescriptionUsername and passwordThe user may use their domain/network username and password to loginto the device.Identity numberThe user may log in with their identity number. Identity numbers areconvenient when usernames are long or cumbersome to enter. Forexample, rather than entering a username like ‘john.smith.001’, it maybe more convenient to enter an employee ID of ‘1234’. See thePaperCut user manual for information about user identity numbers,including importing identity numbers from an external source.Identity number - Require PINWhen a user logs in with their identity number, they must also providetheir associated PIN. This provides additional security for identitynumber logins.Swipe cardThe user may log in by swiping a card (e.g. magnetic strip, smart card,RFID). See the PaperCut user manual for information about user cardnumbers, including importing card numbers from an external source.Please see Appendix A below for a list of supported card readers.Swipe card - RequirePINWhen a user logs in by swiping a card, they must also provide theirassociated PIN. This provides additional security for swipe card logins.Swipe card - Enable self-Users can swipe cards previously not used or registered at the deviceCopyright 2010-2016 PaperCut Software International Pty. Ltd., All Rights Reserved.12 of 29
Lexmark Embedded Print Release Manual2016-08-11association with existinguser accountswith PaperCut and will be prompted for their username and password.The swipe card can then be used at subsequent logins. See chapter 5.1for advanced configuration of this function.Automatically login asuserSpecifies that this device should always automatically log in as the givenuser. This option overrides all other authentication methodsDescription of authentication methodsCopyright 2010-2016 PaperCut Software International Pty. Ltd., All Rights Reserved.13 of 29
Lexmark Embedded Print Release Manual2016-08-114.2 Customizing Text and MessagesPaperCut allows some text that appears in the device to be customized. The custom text mightinclude instructions or terminology that is more appropriate for the site. An example of text that iscustomizable is the “Welcome text” that displays before the user logs in to the device.The text can be customized by editing the device configuration from the PaperCut administrationinterface. For more details see the following Advanced Configuration section.Copyright 2010-2016 PaperCut Software International Pty. Ltd., All Rights Reserved.14 of 29
Lexmark Embedded Print Release Manual2016-08-115 Advanced Configuration5.1 Config EditorThe common configuration options for a device in PaperCut are available on the device’s ‘Summary’tab, and are discussed in more detail in the Configuration section. This section covers the moreadvanced or less common configuration options which are available via the ‘Advanced Config’ tab inthe device details screen.Config nameDescriptionext-device-msg.welcomeThe text displayed on the welcome screen. Thistext can be used to provide specific informationabout logging in to the device. Use “\n” to create anew line. Default: DEFAULT (uses the defaultapplication text).ext-device-msg.card-associationMessage to display when users are requested toassociate their swipe card with an existing useraccount. See chapter 4.1 for details. Specify“DEFAULT” for the default Specify a regular expression that limits which cardnumbers are accepted for associating swipe cardswith user accounts. See chapter 4.1 for details.Contact your reseller or Authorized Solution Centerfor help with regular expressions. You can find theircontact information in your PaperCut Admininterface on the About page. Defaults to “.*” (dotstar) which includes all card ary-card-numberSelect whether user self-association should occupythe primary or secondary card number. It overridesthe global setting unless the keyword "GLOBAL" isspecified. This is useful when there is a mix ofdifferent non-configurable card readers that readdifferent numbers from an ID card.Set to "Y" to use the secondary card number, "N" touse the primary card number. Default: "GLOBAL" todefer to the global configuration option.ext-device.lexmark.header.colorSee chapter 0.ext-device.lexmark.header.textcolorSee chapter 0.ext-device.release-all-on-loginSet to yes to have a user’s documents that arepending release automatically released on login.Copyright 2010-2016 PaperCut Software International Pty. Ltd., All Rights Reserved.15 of 29
Lexmark Embedded Print Release Manual2016-08-11The user will not have to select the “Print Release”function on the device. This is particularlyconvenient in conjunction with swipe cardauthentication, allowing print release without anyscreen interaction.ext-device.lexmark.release.showbusySet to yes to show a warning message when usersare releasing documents while the device is stillbusy printing. (Only on LeSF outWhen above option is enabled then jobs that havebeen paused (paper jam, out of paper) for this timeare considered not to be keeping the printer busy.ext-device-msg.busy-on-releaseMessage to display when above option is enabled.Specify “DEFAULT” for the default text.ext-device.inactivity-timeout-secsDefines how long to allow a user between keypresses before they are automatically logged out.Default: 60ext-device.card-no-regexSee chapter 0.Copyright 2010-2016 PaperCut Software International Pty. Ltd., All Rights Reserved.16 of 29
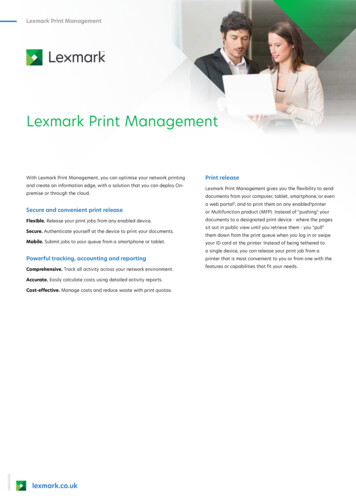
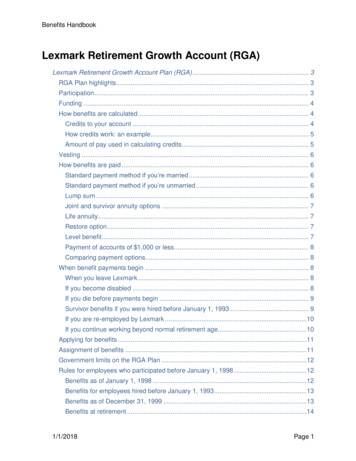
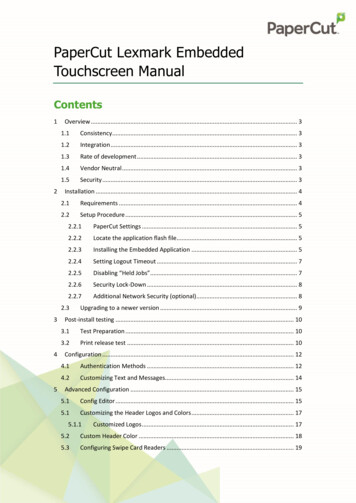
Lexmark Embedded Print Release Manual2016-08-115.1 Customizing the Header Logos and ColorsThe embedded application has a header at the top of all screens. This header defaults to thePaperCut logo and green color. The header can be customized to match your organization’s colorscheme and logos.5.1.1 Customized LogosThe embedded application header has two header logos (as shown below). These logos can bereplaced with your organization’s logo.This shows the two logos outlined in red. The images are must be saved as GIF files with thefollowing filenames and sizes: Icon logo: icon-logo.gif – 64 x 64 pixelsText logo: text-logo.gif – 150 x 38 pixelsThese images should be saved on the PaperCut application server in the PaperCut applicationdirectory under the subdirectory server\custom\web\device\lexmark. Create thesubdirectory if necessary. The embedded application will fetch the images from the server to displaythem on the device screen.Minor deviations from the recommended horizontal pixel size are possible for the text logo (wider ornarrower) – verify the correct layout on the device screen after producing the image.Copyright 2010-2016 PaperCut Software International Pty. Ltd., All Rights Reserved.17 of 29
Lexmark Embedded Print Release Manual2016-08-115.2 Custom Header ColorThe header colors are defined in the “Advanced Config” tab in the device details screen, see chapter5.1. The options to change are: ext-device.lexmark.header.color – the background color (type DEFAULT for the defaultsetting of dark green)ext-device.lexmark.header.textcolor – the text color (type DEFAULT for the default setting ofwhite)The colors are specified using the hexadecimal web/HTML notation (#RRGGBB) where “RR” is thered component, “GG” is the green component and “BB” is the blue component.Copyright 2010-2016 PaperCut Software International Pty. Ltd., All Rights Reserved.18 of 29
Lexmark Embedded Print Release Manual2016-08-115.3 Configuring Swipe Card ReadersSwipe cards contain numbers used to identify users according to the card number configured in theUser Details screen under “Card/Identity” number. Some readers report information in addition tothe number encoded on the card, such as checksums. PaperCut can treat these cases in three ways:5.3.1 Card Number Needs No Conversion A typical case is the checksum being reported after the card number, separated by an equalssign, such as in 5235092385 8. PaperCut can handle this case by default; it will extractthe number before the equal sign as the card number: 5235092385.5.3.2 Regular Expression Filters For some cases, a “regular expression” may be required that will filter the card number fromthe complete string of characters reported by the card reader. Documentation on regularexpressions can be found on the Internet, e.g. at www.regular-expressions.info.o The regular expression must be fashioned so that the card number is returned as thefirst match group.o Usually one regular expression will be used for all the devices managed by PaperCut;this must be entered in the “Config editor (advanced)” which you will find on theOptions tab under Actions. The key is called “ext-device.card-no-regex”.o The global setting however can be overridden on a per-device basis: The key “extdevice.card-no-regex” can also be found on the “ Advanced Config tab in the devicedetails screen. This setting will override the global setting unless the keyword“GLOBAL” is specified.o PaperCut developers will gladly assist in producing a regular expression whensupplied with a few sample outputs from your card reader. Contact your reseller orAuthorized Solution Center for help with regular expressions. You can find theircontact information in your PaperCut Admin interface on the About page.o If you would like to write your own regular expressions, here are some examples: Use the first 10 characters (any character): (.{10}) Use the first 19 digits: (\d{19}) Extract the digits from between the two “ ” characters in“123453 292929 1221”: \d* (\d*) \d*5.3.3 Card Number Format ConvertersIn addition to extracting parts of the card numbers using regular expressions, converting numbersfrom one format to another is a common requirement. For example a card reader may report inhexadecimal format, while the number stored in the source (e.g. Active Directory) is in a decimalfo
embedded software solutions. Todays devices are smarter - they have touch screens and offer the ability to run applications directly on the device. The goal of Paperut Softwares embedded solution is to leverage these smart devices and to rich application features in the print control area. These include: