Transcription
WARRANTYThis LIMITED WARRANTY covers defects in workmanship andmaterials for a period of two years from date of first retailpurchase. During the warranty period, GMG Products LLC(dba Green Mountain Grills) will replace or repair, at its soleoption, any defective Green Mountain grill returned to us, or toone of our dealers, by its original purchaser.This warranty does not cover problems that result from abuse,accident, misuse, or problems with electrical power. It does notcover uses not in accordance with the instruction manual. Itdoes not cover commercial use of the product. It specificallyexcludes products for which Green Mountain Grills has notreceived payment.THIS WARRANTY GIVES YOU SPECIFIC LEGAL RIGHTSWHICH MAY VARY FROM STATE TO STATE (PROVINCE TOPROVINCE IN CANADA). GREEN MOUNTAIN GRILL’SRESPONSIBILITY FOR DEFECTS IN MATERIAL AND WORKMANSHIP SHALL BE LIMITED TO REPAIR AND/ORREPLACEMENT AS SET FORTH IN THIS WARRANTY. ALLEXPRESS AND IMPLIED WARRANTIES, INCLUDING, BUT NOTLIMITED TO, ANY IMPLIED WARRANTIES ANDWARRANTIES OF MERCHANTABILITY OR FITNESS FOR APARTICULAR PURPOSE ARE DISCLAIMED.WE DO NOT ACCEPT LIABILITY FOR INCIDENTAL ORCONSEQUENTIAL DAMAGES, OR FOR ANY THIRD-PARTYCLAIMS FOR DAMAGES AGAINST THE RETAIL PURCHASEROF THIS PRODUCT. SOME STATES (PROVINCES IN CANADA)DO NOT ALLOW THE EXCLUSION OR LIMITATION OFINCIDENTAL OR CONSEQUENTIAL DAMAGES, SO THIS MAYNOT APPLY TO YOU.To exercise your rights under this warranty, contact the dealerfrom whom you purchased it, or call us at 530-347-9167. 2016 GMG Products LLC - All Rights ReservedHARDWOOD PELLET GRILLSJim Bowie ASSEMBLY OPERATION APP GUIDEDaniel BooneDavy CrockettEXPERIENCEGREEN MOUNTAINGRILLING SAFETY INFORecipes GRILLING BASICSAccessories TROUBLESHOOTINGHardwood PelletsRubs & Sauces
Welcome to theNationIf you have questions about cooking, please see the section entitled“Pellet Grilling Basics” later on in this manual, or visit our website:Thank you for purchasing a Green Mountain Pellet Grill! We hopethat it will provide you with many years of trouble-free service andallow you to cook extraordinary food that will enhance yourenjoyment of eating.Your new grill can roast, bake, smoke, slow-cook, simmer, grill,barbecue, and sear at the touch of a button. This manual will helpyou get the most out of your pellet grill, so please read it thoroughly.Should an unforeseen problem occur, please check the“Troubleshooting Guide” in this book, or visit our website atgreenmountaingrills.com. After exhausting those possibilities,please feel free to call us at 530-347-9167 and select“Technical Support.”greenmountaingrills.comRemember that your new pellet grill is extremely versatile.While you can grill steaks, hamburgers and all the other traditional“barbecue” fare, you can also prepare a pot roast, smoke fish, bakecookies or bread, slow-cook a brisket or pork butt, roast vegetables,and much more. About the only limit is your imagination.So get creative!FOLLOW THE GMG NATION
CONTENTSImportant Safety InformationREAD THIS FIRST5How GMG Works9Daniel Boone & Jim Bowie- Assembly- Quick Start- Operation11121720Davy Crockett- Assembly- Operation303133Pellet Grilling Basics- Food Temperature Guide3641Troubleshooting43WiFi App GuideIndex47Accessories85Premium Pellets87GMG Flavors89RecipesIndex91Welcome to the new age of grilling.
IMPORTANT SAFETY INFOWARNING - PLEASE READ CAREFULLYGENERAL WARNINGS NEVER USE LAVA ROCK, NON-PELLETIZED WOOD, OR CHARCOAL IN THE GRILL. FOR OUTDOOR USE ONLY. DO NOT USE ANY GASOLINE, LANTERN FUEL, WHITE GAS, DIESEL FUEL, PETROL, LIGHTERFLUID, CHARCOAL LIGHTER, ALCOHOL GEL OR ANY OTHER FUEL OR ACCELERANTS FORLIGHTING, OR RE-LIGHTING THE GRILL. DO NOT USE IN ANY ENCLOSED AREA OR ANY AREA WITHOUT ADEQUATE VENTILATION. DO NOT USE THE GRILL IN RAIN OR AROUND ANY WATER SOURCE. DO NOT STORE OR USE COMBUSTIBLE MATERIALS NEAR THIS GRILL. KEEP THE ENTIRE GRILL A MINIMUM OF 24", FROM ALL COMBUSTIBLES. DO NOT PUT A BARBEQUE COVER OR ANYTHING FLAMMABLE ON, OR UNDER THE GRILL.OPERATING PRECAUTIONS THIS GRILL MUST NOT BE USED BY PERSONS WITH REDUCED PHYSICAL, SENSORY OR MENTALCAPABILITIES, OR LACK OF EXPERIENCE AND KNOWLEDGE, UNLESS THEY HAVE BEEN GIVENSUPERVISION OR INSTRUCTION CONCERNING THE USE OF THE APPLIANCE BY A PERSONRESPONSIBLE FOR THEIR SAFETY, AND ARE BEING SUPERVISED BY A RESPONSIBLE ADULT. IF THE GRILL IS STORED OUTSIDE DURING THE RAINY SEASONS OR SEASONS OF HIGH HUMIDITY,CARE SHOULD BE TAKEN TO ENSURE THAT WATER DOES NOT GET INTO THE PELLET HOPPER ASWOOD PELLETS, WHEN WET OR EXPOSED TO HIGH HUMIDITY, EXPAND GREATLY, BREAK APART,AND COULD JAM THE FEED SYSTEM. CHILDREN SHOULD NEVER USE THE GRILL. AFTER A PERIOD OF STORAGE OR NON-USE, THE GRILL SHOULD BE CHECKED FOR AUGER ANDBURN POT OBSTRUCTIONS, FOREIGN OBJECTS BOTH INSIDE THE GRILL AND THE HOPPER, ANDAIR BLOCKAGE, BEFORE USE, IN ACCORDANCE WITH THE CORRECT PROCEDURES SET FORTH INTHIS MANUAL. NEVER LEAN OVER AN OPEN GRILL, OR PLACE HANDS OR FINGERS ON THE FRONT EDGE OFTHE GRILL, OR IN THE PELLET HOPPER. YOU MUST CONTACT YOUR LOCAL HOMEOWNER'S ASSOCIATION, BUILDING, FIRE OFFICIALS, OROTHER AUTHORITY HAVING JURISDICTION, TO OBTAIN THE NECESSARY PERMITS, PERMISSIONOR INFORMATION ON ANY INSTALLATION RESTRICTIONS, SUCH AS ANY GRILL BEING INSTALLEDON A COMBUSTIBLE SURFACE, INSPECTION REQUIREMENTS, OR EVEN THE ABILITY TO OWN ANDOPERATE SUCH A GRILL IN YOUR AREA. USE HEAT RESISTANT BARBEQUE MITTS OR GLOVES WHILE OPERATING THE GRILL.PELLET AND OTHER FUEL RESTRICTIONS THIS GRILL IS DESIGNED FOR USE OF ALL PELLETIZED, ALL NATURAL, HARDWOOD FUEL ONLYDESIGNED FOR BURNING IN GRILLS, AND NO OTHER PELLETS OR FUELS SHOULD BE USED WITHTHE GRILL. DO NOT USE ANY PELLETS LABELED AS HAVING ADDITIVES, OR DESIGNED FOR USE IN HOMEHEATING SYSTEMS. GREEN MOUNTAIN GRILLS' PELLETS ARE SPECIFICALLY DESIGNED FOR USE IN GREEN MOUNTAINGRILLS, AND ALTHOUGH OTHER BRANDS OF PELLETS MAY BE USED IN GREEN MOUNTAINGRILLS, THERE IS NO GUARANTEE THAT OTHER BRANDS OF PELLETS ARE SUITABLE FOR USEIN GREEN MOUNTAIN GRILLS. GREEN MOUNTAIN GRILLS HAS NO CONTROL OVER THE QUALITYOF ANY PELLETS OTHER THAN THOSE PRODUCED BY GREEN MOUNTAIN GRILLS, AND ASSUMESNO LIABILITY FOR ANY LOSS, DAMAGE OR INJURY CAUSED BY THE USE OF ANY OTHER BRAND OFPELLETS.5Important Safety Instructions ACCESSIBLE PARTS OF THE GRILL WILL BE VERY HOT, AND YOUNG CHILDREN AND PETS MUSTBE KEPT AWAY FROM THE GRILL WHILE IT IS IN USE. DO NOT USE ACCESSORIES NOT DESIGNED FOR USE WITH THIS GRILL. DO NOT TRANSPORT THE GRILL WHILE OPERATING, OR WHILE THE GRILL IS HOT. MAKE SURETHAT THE FIRE IS COMPLETELY OUT AND THE GRILL IS COMPLETELY COOL TO THE TOUCHBEFORE MOVING. ASHES SHOULD BE PLACED IN A METAL CONTAINER WITH A TIGHT FITTING LID, AND THECONTAINER MUST BE PLACED ON A NON-COMBUSTIBLE FLOOR OR ON THE GROUND, WELLAWAY FROM ALL COMBUSTIBLE MATERIALS. ASHES SHOULD BE RETAINED IN THE CONTAINERUNTIL ALL CINDERS HAVE THOROUGHLY COOLED BEFORE FURTHER DISPOSAL.WARNINGS RELATING TO USE OF THE REMOTE CONTROL REMOTE APPFOR CELL PHONES IF USING A REMOTE CONTROL, OR THE REMOTE CELL PHONE APPLICATION TO TO CONTROLTHE OPERATION OF THE GRILL, ONE MUST FIRST MAKE SURE THAT ALL SAFETY PRECAUTIONSOTHERWISE APPLICABLE TO THE OPERATION OF THE GRILL HAVE BEEN OBSERVED PRIOR TOSTARTING THE GRILL, AND THAT A RESPONSIBLE ADULT FAMILIAR WITH THE OPERATION OFTHE GRILL IS AT ALL TIMES ABLE TO VIEW THE GRILL, AND IS CLOSE ENOUGH PROXIMITY TO THEGRILL TO BE ABLE TO ADDRESS ANY EMERGENCY CONDITIONS, BEFORE OPERATING THE GRILLREMOTELY.6
IMPORTANT SAFETY INFOWARNING - PLEASE READ CAREFULLYMAINTENANCE ISSUESCARBON MONOXIDE WARNING THE GRILL MUST BE CLEANED AND MAINTAINED ON A REGULAR BASISIN ACCORDANCE WITH THE INSTRUCTIONS SET FORTH IN THIS MANUAL. THE GRILL MUST BE OPERATED AT ALL TIMES IN ACCORDANCE WITH THESE GUIDELINES TOPREVENT CARBON MONOXIDE FROM POISONING YOU, YOUR FAMILY, OR OTHERS. DO NOT MODIFY OR REMOVE ANY OF THE PARTS OF THE GRILL. CARBON MONOXIDE IS COLORLESS, AND ODORLESS, SO IT IS IMPORTANT TO OPERATE THEGRILL IN STRICT ACCORDANCE WITH THIS OPERATING MANUAL, AND THESE WARNINGS. ALWAYS UNPLUG THE GRILL BEFORE PERFORMING ANY SERVICE OR MAINTENANCE. NEVER ADD PELLETS BY HAND TO THE FIRE POT. IF THE GRILL RUNS OUT OF PELLETS DURINGCOOKING, LET THE GRILL COMPLETELY COOL AND START AGAIN FOLLOWING THE INITIALSTART-UP INSTRUCTIONS. THE HEAT SHIELD MUST BE PROPERLY INSTALLED IN THE GRILL, OTHERWISE THE POTENTIALFOR A GREASE FIRE IS GREATLY INCREASED. GREASE FIRES ARE OFTEN CAUSED BY FAILING TO PROPERLY MAINTAIN THE GRILL BYCLEANING THE GREASE PAN, AND THE GREASE DRAIN ON A CONSISTENT BASIS. IN THE EVENTOF A GREASE FIRE, TURN THE CONTROL UNIT TO "OFF", LEAVE THE LID CLOSED UNTIL THE FIREIS OUT. DO NOT UNPLUG THE POWER CORD. IF AN UNCONTROLLED FIRE DOES OCCUR,IMMEDIATELY CALL THE LOCAL FIRE DEPARTMENT. NEVER PUT WATER ON THE FIRE. WHEN REMOVING UNBURNED PELLETS AND ASH FROM INSIDE AND AROUND THE FIRE POT,MAKE SURE THAT THE GRILL, FIRE POT, AND ASHES ARE COLD TO PREVENT A FIRE FROM THEHOT ASH. THE GRILL MUST BE AT ALL TIMES BE OPERATED OUTSIDE, IN A WELL VENTILATED AREA, ANDIN STRICT ACCORDANCE WITH ALL OTHER INSTRUCTIONS IN THIS MANUAL IN ORDER TOAVOID CARBON MONOXIDE POISONING. THE SYMPTOMS OF CARBON MONOXIDE POISONING INCLUDE HEADACHES, DIZZINESS,WEAKNESS, NAUSEA, VOMITING, SLEEPINESS, AND CONFUSION. CARBON MONOXIDE REDUCESTHE BLOOD'S ABILITY TO CARRY OXYGEN, AND LOW BLOOD OXYGEN LEVELS CAN RESULT INLOSS OF CONSCIOUSNESS AND DEATH. ALCOHOL CONSUMPTION AND DRUG USE INCREASE THE EFFECTS OF CARBON MONOXIDEPOISONING. CARBON MONOXIDE IS ESPECIALLY TOXIC TO MOTHERS AND CHILDREN DURING PREGNANCY,INFANTS, THE ELDERLY, SMOKERS, AND PEOPLE WITH BLOOD OR CIRCULATORY SYSTEMPROBLEMS, SUCH AS ANEMIA OR HEART DISEASE. YOU MUST SEE A DOCTOR IF YOU EITHER DEVELOP COLD OR FLU-LIKE SYMPTOMS WHILECOOKING IN THE VICINITY OF THE GRILL, AS CARBON MONOXIDE POISONING CAN EASILY BEMISTAKEN FOR A COLD OR FLU, AND IS OFTEN DETECTED TOO LATE.CREOSOTE SOOT OR CREOSOTE MAY FORM WITHIN THE GRILL PRODUCING A TAR-LIKE SUBSTANCE OVERTIME. WHEN IGNITED, CREOSOTE MAKES AN EXTREMELY HOT AND OUT-OF-CONTROL FIRE,SIMILAR TO A GREASE FIRE. YOU SHOULD NOT OPERATE THE GRILL IF THE FLAME BECOMES DARK AND SOOTY. IFCREOSOTE HAS FORMED WITHIN THE GRILL, ALLOW THE GRILL TO WARM UP AT LOWTEMPERATURE, THEN TURN THE GRILL OFF, AND WIPE OUT ANY CRESOTE FROM THE GRILLWITH A HAND TOWEL. USE CAUTION AS THE HOT CREOSOTE MAY CAUSE BURNS IF NOTPROPERLY HANDLED. SHOULD A CREOSOTE FIRE OCCUR, TURN THE CONTROL UNIT TO "OFF", AND LEAVE THE LIDCLOSED UNTIL THE FIRE IS OUT. DO NOT UNPLUG THE POWER CORD. DO NOT TRY TO REMOVETHE GRILL, TRY TO SMOTHER THE FIRE, OR PUT WATER ON THE FIRE. IF AN UNCONTROLLEDFIRE DOES OCCUR, IMMEDIATELY CALL THE FIRE DEPARTMENT.7Important Safety Instructions8
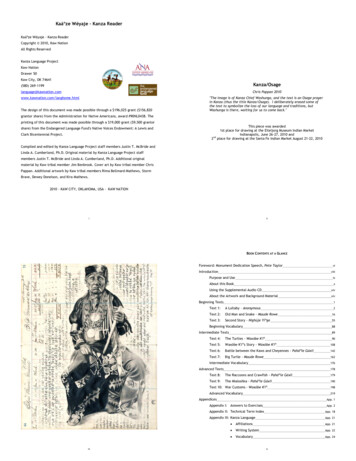
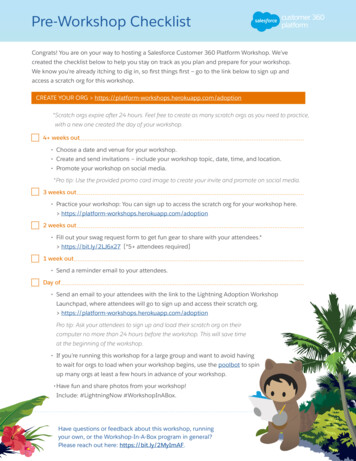
WARNING - PLEASE READ CAREFULLYHow it WorksPellet HopperThermal SensorAuger SystemFire BoxEver wonder how a pellet grill really works?The real beauty lies within.9How it WorksA motor turns an auger which feeds pellets into a firebox. There,a hot rod automatically ignites the pellets, and a combustion fankeeps them burning. A fan inside the hopper maintains positivepressure which prevents burn-back in the auger tube. A sensormounted inside the grill sends data to the on-board computer tentimes every second, and the controller adjusts the air and pelletflow to maintain the temperature you set.10
InstructionsDaniel Boone & Jim BowieDaniel&BooneJim BowieMany of our dealers pre-assemble the grills, so thissection will not apply to you in that case.If you bought your grill unassembled, then you mayuse this manual to help you put your grill together.Or, if you prefer, you may watch the enclosed DVDwhich will explain how to assemble your grill.AssemblyTOOLS NEEDED:10 mm wrench or socketOverviewASSEMBLY&OPERATIONAssembly consists of 4 easy steps:1Install the legs2Install the chimney3Reverse the handle4Insert the Parts12
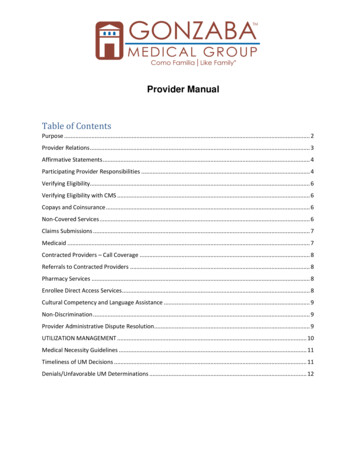
1PreparationINSTALL THE LEGSStand the box upright on a level surface.Daniel Boone & Jim BowieFind the 4 legs.Remove the two bolts from each leg.Note the numbers on the legs.Insert so numbers match as in Figure 1.2Cut and remove the straps.Cut the packing tape.Remove the Styrofoam.3Your results should look like this.Please note that the nuts on the legs shouldbe opposite the hole on the frame. Insert thebolts through the frame holes and tighten.Open the lid on the grill.Remove all pieces inside the cooking cavity.Unwrap each piece.Turn the grill right side up and removethe box.Replace the styrofoam.Close the cardboard flaps.2Cut the tape and open the flaps.Remove the Styrofoam.Having fun yet?Daniel Boone & Jim Bowie - AssemblyINSTALL THE CHIMNEYRemove the 3 bolts from the right side of the grill.Install the chimney using those three bolts. Makesure the gasket is between the chimney and the grill.Turn the box upside down.13AssemblyCut the right hand corner down about 12”.This will allow you to open the lid and savethe box to throw away the dunnage.Your results should look like this.Please note that the nuts on the legs should beopposite the hole on the frame. Insert the boltsthrough the frame holes and tighten. Leave a 2 fingergap opening and always keep this open.14
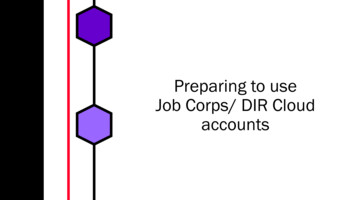
3REVERSE THE HANDLEDaniel Boone & Jim BowieRemove the two bolts from the handle andinstall it on the outside of the grill.Grease tray: Install the grease tray with thehalf-moon cutout to the left. The right leg sitsin the trough.Grates: Insert the grates as pictured.Make sure that you put a thermal isolationwasher between the stainless handle base onthe outside and the metal lid. Insert anotherone between the bolt and metal lid on theinside. This will prevent the handle frombecoming too hot.INSERT THE PARTSPellet Dump: Please make certain thatthe stainless steel pellet dump slider is inplace before filling the hopper with pellets.Important: Pour the contents of the Ziploc baginto the firebox before you install the rest of theparts. This is part of the initial starting procedure.Assembly4Side tray: Line up the bulletswith the pins on the side of thegrill and slide to the right. Lift theside tray support up underneaththe side tray and push the sidetray down to snap it into place.Important: If you purchased acover for your grill, you will needto fold the tray down to install it.Bucket: Hang the bucket from the spoutunderneath the side tray.Heat Shield: The slots go in the front and rearto match the metal strips inside the grill whichhold it in place.*DB Heat Shield only: If you are experiencing larger left to righttemperature discrepancies, the heat shield can be moved alongthe belly of the grill left or right to assist with these differences.15Daniel Boone & Jim Bowie - Assembly16
If this is the first time this grill has been started, make sureyou pour the ziploc starter bag of pellets into the fireboxas explained on Page 6 Part 4.Fill the Hopper: Fill the hopper with pellets.It will hold about 19 lbs. of Green MountainPremium hardwood grilling pellets.Setting the temperature: Do not push any buttons until thecomputer finishes the 0-1-2-3 cycles. Once it displays atemperature, you can change to the desired setting. If you donothing, the grill will automatically go to 150 F (66 C).Burn-In: The first time you use your grill, you must “burn itin” to get rid of odors and deposits inherent in the manufacturing process. Do this for about 30 minutes at 350 degrees.Time to reach temperature: It should take about 17-18minutes from the time you first turn the grill on until itachieves the temperature you set. This will be mostlyindependent of the outside air temperature or thetemperature you choose.Quick StartLow Pellet Alarm: Your hopper is equippedwith a low pellet alarm. If you do not cover thiswith pellets, it will make a sound somewhat likea backhoe in reverse.Daniel Boone & Jim BowieQuick StartWhat to Expect: When you press the UP or DOWN arrow,the grill will cycle through 4 stages (0-1-2-3). This will takeabout 4 minutes. After that, it will show the initial temperatureinside the grill.TURNING THE GRILL OFFAlways use the “FAN” mode as follows:On/Off Switch: The grill turns on when youdepress the switch to the side with the line (-)and turns off when you depress the switch to theside with the o (o).Starting the Grill: When you turn the grill on,the digital readout will display “OFF”. To startthe grill, simply push the UP or DOWN arrowbriefly. Push the DOWN button until the temperature reads 150. Release the button. Press the DOWN button once more – digital readout willdisplay “FAN.” The fans will continue to run for about 15 minutes to burn upthe excess pellets in the firebox and to blow out some of the ash. The grill will then shut itself off, and the digital readout willdisplay “OFF.” Now you may unplug your grill.* Note: Run the grill at 150 for several minutes after cookingat 400 17Daniel Boone & Jim Bowie - Quick Start18
IMPORTANT SAFETY INFODaniel Boone & Jim BowieOperating Your GrillStore your pellets in a cool, dry place. Do not allow them toget wet, as they will turn back into sawdust.DO NOT use this grill indoors or in any area withoutadequate ventilation.This is an electric appliance. Observe ALL normalsafety procedures for a high voltage apparatus.Read, understand, and follow the directions in thismanual.DO NOT operate this grill other than as specified inthis manual.Review the Quick Start section on pages 9-10 for informationon starting, controlling, and turning off your grill.ALWAYS unplug your grill before performing any operationsinvolving any of the electrical components.Quick StartDO NOT modify this grill in any manner not in accordance with manufacturer guidelines.Use a grill cover as much as possible. As stated, pellets andwater do not mix. Your hopper will, for the most part, stay dryin most weather, but a driving rain may cause adverse results.KEY COMPONENTSController: Your controller is a state-of-the-art PID(calculus-based) computer which will keep your grillat a reasonably steady temperature.Be aware of and respond to the inherent danger ofany appliance that produces flames.DO NOT use softwood pellets. The smoke containsdangerous phenols which you do not want to ingest.DO NOT use heating pellets, as they may containunsafe impurities which could harm your health oryour grill.19Daniel Boone & Jim Bowie - OperationHopper Lid: Keep the hopper lid closed at alltimes while your grill is on. Obviously, if you needto refill the hopper, you can make a briefexception. The fan inside the hopper must blowair into the auger tube to prevent burn-back fromthe firepot. If the hopper lid stays open, this airpressure just escapes into the atmosphere.20
KEY COMPONENTSIgniter: You will find the igniter in the firebox. Itshould protrude about 1.5-2” into the firebox. Youcan adjust this by loosening the set screw locatedto the left of the firebox on the igniter tube.However, this should rarely be necessary. Alsocalled a hot rod.Thermal Sensor: This device sends data to thecomputer ten times per second. The computerthen averages these readings over slightly longerperiods of time and adjusts the air and pellet flowto maintain an accurate temperature in the cavity.Grease tray: This slopes downhill from left toright and carries the drippings from your food intothe grease bucket for easy disposal. Make surethe half-moon cutout is on the left side.Chimney Cap (Rain Cap): Always leave thisopen. Your grill needs to draft. In the winter, a twofingers opening (see Assembly section) isappropriate. In the summer, crank it all the wayopen.21Daniel Boone & Jim Bowie - OperationMeat Probe: Your new Green Mountain pelletgrill has a meat probe included as standardequipment. To use this feature, just plug theconnector into the receptacle on the front ofthe control panel. Lift the stainless flap on theleft side of the grill and push the probe through the hole.Then, insert the probe into the center of the food you arecooking.When you press the “FOOD” button on the control panel, it willdisplay the temperature of whatever the probe touches, butthis process takes a minute or two to stabilize. To return tothe grill temperature display, simply press the “FOOD” buttonagain.Quick StartCombustion Fan: This fan angles up toward thefirebox (burn pot) from underneath your grill. Thespeed of this fan will vary during normal operation.Daniel Boone & Jim BowieFirebox: This sits in the bottom of the grill, andpellets arrive into it via an auger tube attached toits left side. Also called a burn pot.If you do not have the probe installed in the control panel,then your digital display will read “NO FD” (no food) when youpress the “FOOD” button.Low Pellet Alarm: Inside the hopper you willfind a low pellet alarm. When the level ofpellets falls below this sensor, an alarmsounds to let you know that you need to fill thehopper back up. Once this alarm goes off,you should add pellets to prevent fuelshortage and resultant temperature drops.Pellet Dump: Please make certain thatthe stainless steel pellet dump slider is inplace before filling the hopper with pellets.22
IMPORTANT FEATURESIf the power switch is off, push it to the ON position. When thedigital readout displays “OFF”, hold down the DOWN button forapproximately 8 seconds, or until the digital readout displays atemperature.Once your outside temperatures drop below 35 F (2 C), theTurbo mode kicks in to accelerate the volume of pellets and airso that you do not have to wait so long for the grill to heat upas you otherwise would without it.Now adjust the temperature to your desired setting. If you donothing, the grill will go to the default temperature of 150 F (66 C).If you wish to cook at a different temperature, just push thebutton underneath the up or down arrows to set your targettemp. It will change 5 each time you push it, or, if you hold itdown, it will cycle continuously up or down.Fan-Only Mode: You should use the “FAN” state each time youfinish cooking. To do this, simply hold down the “Down” buttonuntil the digital readout displays 150 F (66 C) Release it and thenpress once more – the readout will display “FAN.” The hopper fanand combustion fans will continue to blow for about fifteen minutes.This will burn up most of the pellets in the firebox and will exhaustsome of the ash into the bottom of the cooker cavity. The fans willturn off automatically. The display will read OFF. You may turn offthe switch at this time, but you do not have to. The LED’s use verylittle electricity, and they rarely burn out, so it will not hurt to leavethem on.Quick StartBecause we know that you will use the grill in a variety ofweather conditions, we tend to overshoot the initial defaulttemperature of 150 F by 20-25 degrees on warm days. Wedo this so that it does not take interminably long on a cold dayto reach its target temperature. The grill will eventually coolback down to 150 on its own, or you may speed the processby simply opening the lid to let out excess heat.Daniel Boone & Jim BowieBypass Mode for Hot Restarts: Occasionally, it will happen you have a power failure while the grill is in use, or someoneaccidentally turns the grill off, or you under-cook something andwant to resume cooking for a little longer. Use this method if youstill have some fire left in the firebox, which is usually no longerthan about 6-7 minutes later. If you have run the “FAN MODE” formore than about 3-4 minutes, this will not work.You can set the grill as low as 150 (66 C) or as high as 500 (260 C). You may change the temperature any time afterState 3 expires.The grill temperature will climb fairly rapidly. The temperature,however, falls much more slowly. This is because we mustkeep the fire going at all costs, which results in a fairly slow fallin inside temperature. Here, too, you can speed the processby opening the lid to let excess heat escape.Recommendation: when cooking at temps above 375, operatethe grill at 150 for several minutes before going into fan only mode.23Daniel Boone & Jim Bowie - Operation24
Other Important Information: PLEASE READ THISDigital Readout Displays ‘OFF’: When you switch the grill on,the digital readout displays “OFF.” This is an important safetyfeature so that the grill cannot restart on its own in the event of apower failure.Digital Display Error Codes: Daniel Boone and Jim BowieFAL - Ignition FailureCharging the Firebox: The auger tube provides a conduitfor the auger to push pellets from the hopper to the firebox.The first time you operate the grill, this tube does not haveany pellets inside. Also, if in subsequent use you run out ofpellets in the hopper, the auger tube may not contain anypellets. The computer, however, does not know that.To overcome this problem, you must “charge the firebox” thefirst time you use the grill or any time you run the tube out ofpellets.It is extremely easy when the grill is new - just pour thecontents of the Ziploc baggy that came with your new grill intothe firebox.Quick StartPlease understand that if you cook, for instance, a stand-upchicken, the temperature at the top of the cavity may besomewhat less than at the grilling surface in the winter andperhaps higher in the summer. You might have decided to cookthe chicken at 275 , but you notice that the temp on the domethermometer (If your grill has one) only reads 250 . Since most ofyour chicken is well above the cooking surface, you may want toadjust the digital temp of the grilling surface up to about 300 inorder to achieve your target cooking temperature of 275 atchicken level. Or vice-versa if the dome thermometer readshigher.Daniel Boone & Jim BowieThe temperature on the digital readout reflects the temperature atthe grilling surface on the left side of the grate where the thermalsensor protrudes into the grill cavity. You may notice differencesbetween the dome thermometer and the digital readout,depending on the quantity of cold food inside the grill or how oftenyou open and close the lid, or how much wind is present. This isnormal.But this is a little more difficult when all the parts - the heatshield, windshields, grease tray, and grates - are installed.Here you just want to switch the grill on and start it by pushing the UP button. It will begin Cycle 0. During this cycle, theauger turns, and this will push pellets into the auger tube.When the digital readout displays “1,” just switch the grill off.Now, you can switch it back on and let it go - it will start.Weather: You will likely want to keep your grill out of rain andsnow when not in use. In a heavy driving rain, water caninvade the auger tube which will then magically changepellets to sawdust, and then expand and dry into somethingakin to concrete. This makes for an unpleasant repair.Melting snow can also cause the same problem. A grill coverwill clearly help the situation, but the garage seems morefoolproof.SEN - Temperature Sensor Issue25Daniel Boone & Jim Bowie - Operation26
Be sure to check out our “How To” video section on ourwebsite for further troubleshooting and service tips and checkthe troubleshooting section in this manual.GMG “How To” -videosController Functions: In case you have an interest in thissort of thing, the chart that follows shows each ignition stateand its function.Quick StartMaintenance: You can use a wire brush to clean the stainlesssteel grate. Alternatively, you can use an old camper’s trick ofwadding a piece of aluminum foil and rubbing it lightly on the grateto clean it. Clean ash out of the firebox periodically. The best wayis with a shop-vac. You should expect to clean this out aboutevery two months of regular use. Clean the underside of thechimney cap regularly to prevent grease drip.DO NOT WORK ON THIS GRILL IF IT IS PLUGGED IN!!Always unplug any electrical appliance before you work on it.Daniel Boone & Jim BowieThermal Blanket: Tests from users haveindicated that you can reduce your pelletconsumption by 40-50% in very cold weather byusing a GMG thermal blanket. If you do not planto use your grill frequently in the wintertime, thenyou should probably save the money. But if you grill regularly incold weather, this investment will likely pay off handsomely. Donot use the thermal blanket in the summertime, as it provides nonoticeable benefit and may actually work against you on verywarm days.LEVEL GROUNDThe grill should be kept as level as possible so that the greaseflows into the trough and out into the bucket and also to insurethat the sensor reads evenly, as hot air displaced to one side orthe other will cause irregular operation.Service: Contact our technical support department at530-347-9167 opt 1 for any problems you might have. While youwill hopefully have no problems, man-made things can go bad.Fortunately, each part on the grill is modular, so either you caneasily replace one if necessary.27Daniel Boone & Jim Bowie - OperationAs you can see, the igniter stays on until the firebox temperatureexceeds the ambient temperature by more than 5 .During Cycle 0, the controller feeds only 3 oz. (85 grams) ofpellets into the firebox.28
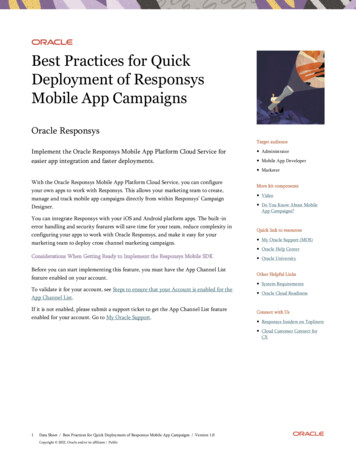
InstructionsDavy CrockettDavy CrockettMany of our dealers pre-assemble the grills, so thissection will not apply to you in that case.AssemblyIf you bought your grill unassembled, then you mayuse this manual to help you put your grill together.Or, if you prefer, you may watch the enclosed DVDwhich will explain how to assemble your grill.TOOLS NEEDED:10 mm wrench or socketOverviewASSEMBLY&OPERATIONAssembly consists of 4 easy steps:1Install the legs2Install the chimney3Reverse the handle4Insert the Parts30
1INSTALL THE LEGSINSTALL THE CHIMNEYBolt the chimney into position. Make sure therain cap is always wide open when cooking.3REVERSE THE HANDLEReverse the handle so it attaches outsidethe grill’s lid. Make sure the thermalisolation washers go between the metaltrim ring and the lid on the outside, andbetween the washer and
WiFi App Guide Index Accessories Premium Pellets GMG Flavors Recipes Index 5 9 11 12 17 20 30 31 33 36 41 43 47 85 87 89 91 CONTENTS Welcome to the new age of grilling. NEVER USE LAVA ROCK, NON-PELLETIZED WOOD, OR CHARCOAL IN THE GRILL. DO NOT USE ANY GASOLINE, LANTERN FUEL, WHITE GAS, DIESEL FUEL, PETROL, LIGHTER