Transcription
Avaya Solution & Interoperability Test LabApplication Notes for Configuring a H.323 IP Trunkbetween Avaya IP Office Release 4.0 and AvayaCommunication Manager Release 4.0 – Issue 1.0AbstractThese Application Notes describe how to configure a H.323 IP trunk between Avaya IP OfficeRelease 4.0 and Avaya Communication Manager Release 4.0. The H.323 IP trunk wasestablished between an Avaya IP Office 406V2 and an Avaya S8710 Media Server with AvayaG650 Media Gateway but is also applicable to other Avaya media servers and media gateways.DJB; Reviewed:SPOC 3/15/2007Solution & Interoperability Test Lab Application Notes 2007 Avaya Inc. All Rights Reserved.1 of 19CM-IPO-H323.doc
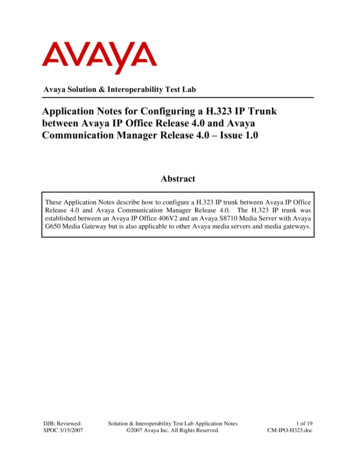
1. IntroductionThese Application Notes describe how to configure a H.323 IP trunk between Avaya IP OfficeRelease 4.0 and Avaya Communication Manager Release 4.0. The H.323 IP trunk wasestablished between an Avaya IP Office 406V2 and an Avaya S8710 Media Server with AvayaG650 Media Gateway but is also applicable to other Avaya media servers and media gateways.The network configuration diagram shown in Figure 1 was used for these Application Notes.The Headquarters consists of an Avaya S8710Media Server with Avaya G650 Media Gateway.The Avaya IP Office 406V2 is located in Retail Store 1.In general, the phrase “shuffling to direct media” refers to a process that can result in final mediapaths that flow directly between IP devices such as IP Telephones, thus allowing resources to beconserved on the Media Processor for Avaya Communication Manager or Voice CompressionModules for the Avaya IP Office. The configuration described in this document shows how toconfigure the systems to allow shuffling to occur.In addition to verifying successful inter-site bi-directional calls, the following Avaya IP Officefeatures were tested using the H.323 IP trunk: DTMF (Dual Tone Multi-Frequency)Hold/UnholdTransferConferenceCall ParkForwardingThe administration of the network infrastructure shown in Figure 1 is not the focus of theseApplication Notes and will not be covered.DJB; Reviewed:SPOC 3/15/2007Solution & Interoperability Test Lab Application Notes 2007 Avaya Inc. All Rights Reserved.2 of 19CM-IPO-H323.doc
Figure 1: Avaya Communication Manager networked to Avaya IP OfficeDJB; Reviewed:SPOC 3/15/2007Solution & Interoperability Test Lab Application Notes 2007 Avaya Inc. All Rights Reserved.3 of 19CM-IPO-H323.doc
2. Equipment and Software ValidatedEquipmentAvaya S8300 Media ServerAvaya G650 Media GatewayIPSI (TN2312BP)C-LAN(TN799DP)MEDPRO(TN2602AP)Avaya IP 406V2SoftwareAvaya Communication ManagerR4.0 (R014x.00.0.730.5)HW12 FW 036HW01 FW022HW20 FW0304.0.5Avaya 5610SW IP Telephone (H.323 firmware)Avaya 4621SW IP Telephone (H.323 firmware)2.3Avaya 4622SW IP Telephone (H.323 firmware)2.7Avaya 5420 Digital TelephoneN/AAvaya 6211 Analog TelephoneN/AAvaya 2420 Digital TelephoneN/ADJB; Reviewed:SPOC 3/15/20072.7Solution & Interoperability Test Lab Application Notes 2007 Avaya Inc. All Rights Reserved.4 of 19CM-IPO-H323.doc
3. Configure Avaya Communication ManagerThe screens in this section are accessed using Avaya Communication Manager System AccessTerminal (SAT). Log in with the appropriate credentials.1. Verify H.323 license. Use the display system-parameters customer-options commandto verify that sufficient H.323 trunk capacity exists. On Page 2, verify that the number ofH.323 trunks supported by the system is sufficient.The license file installed on the system controls the maximum permitted. If a requiredfeature is not enabled or there is insufficient capacity, contact an authorized Avaya salesrepresentative to make the appropriate changes.display system-parameters customer-optionsPageOPTIONAL FEATURESIP PORT CAPACITIESMaximum Administered H.323 Trunks: 200Maximum Concurrently Registered IP Stations: 50Maximum Administered Remote Office Trunks: 0Maximum Concurrently Registered Remote Office Stations: 0Maximum Concurrently Registered IP eCons: 0Max Concur Registered Unauthenticated H.323 Stations: 0Maximum Video Capable H.323 Stations: 0Maximum Video Capable IP Softphones: 0Maximum Administered SIP Trunks: 256Maximum Number of DS1 Boards with Echo Cancellation: 0Maximum TN2501 VAL Boards: 10Maximum Media Gateway VAL Sources: 10Maximum TN2602 Boards with 80 VoIP Channels: 128Maximum TN2602 Boards with 320 VoIP Channels: 128Maximum Number of Expanded Meet-me Conference Ports: 50(NOTE: You must logoff & login to effect the permissionDJB; Reviewed:SPOC 3/15/2007Solution & Interoperability Test Lab Application Notes 2007 Avaya Inc. All Rights Reserved.2 of11USED833600000096010100changes.)5 of 19CM-IPO-H323.doc
2. Add the IP Address information for Avaya IP Office. Use the change node-names ipcommand to assign the node name and IP address for the Avaya IP Office at the RetailSite 1. Enter a unique name in the Name field and enter the Avaya IP Office LAN1 IPAddress in the IP Address field.change node-names ipPage1 of2IP NODE NAMESNameIP 1.19hq-ses30.1.1.25procr30.1.1.1( 14 of 14administered node-names were displayed )Use 'list node-names' command to see all the administered node-namesUse 'change node-names ip xxx' to change a node-name 'xxx' or add anode-name3. Create the codec set that will be used for calls between Avaya Communication Managerand Avaya IP Office. Use the change ip-codec-set n command, where n is an availablenumber, to enter the supported audio codecs for calls routed to and from Avaya IP Office.Multiple codec can be entered in order of priority.change ip-codec-set 1Page1 of2IP Codec SetCodec Set: 1AudioSilenceCodecSuppression1: G.711MUn2: G.729an3:4:5:6:7:Media Encryption1: none2:3:DJB; Reviewed:SPOC 3/15/2007FramesPer Pkt22PacketSize(ms)2020Solution & Interoperability Test Lab Application Notes 2007 Avaya Inc. All Rights Reserved.6 of 19CM-IPO-H323.doc
4. Configure the VoIP parameters for calls between Avaya Communication Manager andAvaya IP Office. Use the change ip-network-region n command, where n is the numberof the region to be changed, to define the connectivity settings for all VoIP resources andIP endpoints within the region.Set the Inter-region IP-IP Direct Audio field to yes and the IP Audio Hairpinningfield to y to enable IP shuffling. Set the Codec Set field to the one created in Step 3. Setthe Call Control PHB Value to the SIG DSCP value on IP Office and set the AudioPHB Value to the DSCP value on IP Office (see Step 1 in Section 4). The defaultvalues for the other fields may be used.change ip-network-region 1Page1 of19IP NETWORK REGIONRegion: 1Location: 1Authoritative Domain: retail.comName: Retail HQMEDIA PARAMETERSIntra-region IP-IP Direct Audio: noCodec Set: 1Inter-region IP-IP Direct Audio: yesUDP Port Min: 5000IP Audio Hairpinning? yUDP Port Max: 5999DIFFSERV/TOS PARAMETERSRTCP Reporting Enabled? yCall Control PHB Value: 34RTCP MONITOR SERVER PARAMETERSAudio PHB Value: 46Use Default Server Parameters? yVideo PHB Value: 26802.1P/Q PARAMETERSCall Control 802.1p Priority: 6Audio 802.1p Priority: 6Video 802.1p Priority: 5AUDIO RESOURCE RESERVATIONPARAMETERSH.323 IP ENDPOINTSRSVP Enabled? nH.323 Link Bounce Recovery? yIdle Traffic Interval (sec): 20Keep-Alive Interval (sec): 5Keep-Alive Count: 5DJB; Reviewed:SPOC 3/15/2007Solution & Interoperability Test Lab Application Notes 2007 Avaya Inc. All Rights Reserved.7 of 19CM-IPO-H323.doc
5. Set up a signaling group for calls between Avaya Communication Manager and Avaya IPOffice. Use the add signaling group n command, where n is the number of an unusedsignaling group. Set the Group Type field to h.323. Specify the C-LAN (node name CLAN) and the Avaya IP Office (node name RS1-IPO) as the two ends of the signalinggroup in the Near-end Node Name and the Far-end Node Name fields, respectively.These field values are from the IP Node Names form shown in Step 2. In the Far-endNetwork Region field, enter the IP network region value assigned in the IP NetworkRegion form in Step 3. Set the Direct IP-IP Audio Connections and IP AudioHairpinning field to y. Set the Trunk Group for Channel Section to the Trunk Groupnumber created in Step 6. The default values for the other fields may be used.add signaling-group 11Page1 of1SIGNALING GROUPGroup Number: 11Group Type: h.323Remote Office? nMax number of NCA TSC:SBS? nMax number of CA TSC:IP Video? nTrunk Group for NCA TSC:Trunk Group for Channel Selection: 11TSC Supplementary Service Protocol: bNetwork Call Transfer? nT303 Timer(sec): 10Near-end Node Name: C-LANFar-end Node Name: RS1-IPONear-end Listen Port: 1720Far-end Listen Port: 1720Far-end Network Region: 1LRQ Required? nCalls Share IP Signaling Connection? nRRQ Required? n Media Encryption? nBypass If IP Threshold Exceeded? nH.235 Annex H Required? nDTMF over IP: out-of-bandDirect IP-IP Audio Connections? yLink Loss Delay Timer(sec): 90IP Audio Hairpinning? yEnable Layer 3 Test? yInterworking Message: PROGressDCP/Analog Bearer Capability: 3.1kHz6. Set up a trunk group for calls between Avaya Communication Manager and Avaya IPOffice. Use the add trunk-group n command, where n is the number of an unused trunkgroup. Enter a descriptive name in the Group Name field. Specify an available trunkaccess code (TAC) that is consistent with the existing dial plan. Set the CarrierMedium field to H.323. Set the Group Type field to isdn. The default values for theother fields may be used.add trunk-group 11Group Number: 11Group Name: To Retail-S1Direction: two-wayDial Access? yQueue Length: 0Service Type: tieDJB; Reviewed:SPOC 3/15/2007Page1 of 21TRUNK GROUPGroup Type: isdnCDR Reports: yCOR: 1TN: 1TAC: 101Outgoing Display? nCarrier Medium: H.323Busy Threshold: 255 Night Service:Auth Code? nMember Assignment Method: manualSolution & Interoperability Test Lab Application Notes 2007 Avaya Inc. All Rights Reserved.8 of 19CM-IPO-H323.doc
7. Proceed to Page 3 of the TRUNK GROUP Form. Set the Send Name and Send CallingNumber fields to y. The default values for the other fields may be used.add trunk-group 11Page3 of 21TRUNK FEATURESACA Assignment? nMeasured: noneInternal Alert? nMaintenance Tests? yData Restriction? nNCA-TSC Trunk Member: 1Send Name: ySend Calling Number: yUsed for DCS? nHop Dgt? nSend EMU Visitor CPN? ySuppress # Outpulsing? nFormat: unknownUUI IE Treatment: service-providerReplace Restricted Numbers? nReplace Unavailable Numbers? nSend Called/Busy/Connected Number: nHold/Unhold Notifications? ySend UUI IE? yModify Tandem Calling Number? nSend UCID? nSend Codeset 6/7 LAI IE? y8. Proceed to Page 5 of the TRUNK GROUP Form. Enter IP in the Port field for eachmember. This assigns each group member to Signaling Group 11. AvayaCommunication Manager will replace the initial value of “IP” for the Port field with aunique port (e.g., T00001). Enter a descriptive name in the Name field.Note: The number of trunk group members should match the number of channels definedon the Avaya IP Office in Step 2 of Section 4.add trunk-group 11Page5 of 21TRUNK GROUPAdministered Members (min/max):1/10GROUP MEMBER ASSIGNMENTSTotal Administered Members: 10PortNameNightSig Grp1: IPtrkttoip1112: IPtrkttoip2113:4:5:6:7:8:9:10:11:12:13:14:15:DJB; Reviewed:SPOC 3/15/2007Solution & Interoperability Test Lab Application Notes 2007 Avaya Inc. All Rights Reserved.9 of 19CM-IPO-H323.doc
9. Create a dialplan entry for Avaya IP Office extension numbers. Use the change dialplananalysis command, to add a dialplan entry for the Avaya IP Office extension numbers (inthis example, the extension numbers are five digits beginning with “5”). In the DialedString field, add a unique set of digits that can be used for the Avaya IP Office extensionnumbers. In the Total Length field, put in the total number of dialed digits. Use aar inthe Call Type field.change dialplan analysisDialedString45Total CallLength Type4extPage1 of 12DIAL PLAN ANALYSIS TABLEPercent Full:2DialedTotal CallDialedTotal CallStringLength TypeStringLength Type55 aar10. Create a uniform dialplan entry for Avaya IP Office extension numbers. Use the changeuniform-dialplan n command, where n is the Dialed String added in Step 9, for theAvaya IP Office extension numbers. In the Matching Pattern field, use the DialedString value from Step 9. In the Len field, put in the total number of dialed digits. Enter0 for Del and use aar in the Net field. Use default values for all other fields.change uniform-dialplan 5UNIFORM DIAL PLAN TABLEPercent Full: 0MatchingPattern5Len Del50InsertDigitsPage1 of2NodeNet Conv Numaar n11. Create an Automatic Alternate Route entry for Avaya IP Office extension numbers. Usethe change aar analysis command, to add an entry for the Avaya IP Office extensionnumbers. In the Dialed String field enter the same value that was entered in the DialedString field in Step 9. In the Total Length field, put in the total number of dialed digitsfor both Min and Max, make sure to include any prefixes. Use aar in the Call Typefield. The default values for the other fields may be used. In the Route Pattern field,enter the route pattern number added in Step 12.change aar analysis 50Page1 of2AAR DIGIT ANALYSIS TABLEPercentFull:2DialedString50DJB; Reviewed:SPOC 3/15/2007TotalMin ion & Interoperability Test Lab Application Notes 2007 Avaya Inc. All Rights Reserved.10 of 19CM-IPO-H323.doc
12. Create a route pattern that will use the trunk from Avaya Communication Manager toAvaya IP Office. Use the change route-pattern n command, where n is the number ofthe route pattern specified in Step 11. Enter a descriptive name for the Pattern Namefield. Set the Grp No field to the trunk group number created in Step 6. Set the FacilityRestriction Level (FRL) field to a level that allows access to this trunk for all users thatrequire it. The value of 0 is the least restrictive level. Use default values for all otherfields.add route-pattern 11Page1 of3Pattern Number: 12 Pattern Name: RS1-IPOSCCAN? nSecure SIP? nGrp FRL NPA Pfx Hop Toll No. InsertedDCS/ IXCNoMrk Lmt List DelQSIGDgtsIntw1: 110nuser2:nuser3:nuser4:nuser5:nuser6:nuserBCC VALUE TSC CA-TSCITC BCIE Service/Feature PARM No. Numbering LAR0 1 2 M 4 WRequestDgts FormatSubaddress1: y y y y y n nrestnone2: y y y y y n nrestnone3: y y y y y n nrestnone4: y y y y y n nrestnone5: y y y y y n nrestnone6: y y y y y n nrestnoneDJB; Reviewed:SPOC 3/15/2007Solution & Interoperability Test Lab Application Notes 2007 Avaya Inc. All Rights Reserved.11 of 19CM-IPO-H323.doc
4. Configure the Avaya IP OfficeIP Office is configured via the IP Office Manager program. Log into the IP Office Manager PCand select Start Programs IP Office Manager to launch the Manager application. Loginto the Manager application using the appropriate credentials.1. Note the Diffserv settings. Select System in the left panel. Double-click on the entry inthe right panel.Select the LAN1 tab. Within that tab, select the Gatekeeper tab and note the DSCP andSIG DSCP values. These are used in Step 4 of Section 3.DJB; Reviewed:SPOC 3/15/2007Solution & Interoperability Test Lab Application Notes 2007 Avaya Inc. All Rights Reserved.12 of 19CM-IPO-H323.doc
2. Create the IP line for Avaya Communication Manager. Select Line in the left panel.Right-click and select New IP Line.Enter a unique number in the Incoming Group ID and Outgoing Group ID fields. Usedefault values for all other fields.DJB; Reviewed:SPOC 3/15/2007Solution & Interoperability Test Lab Application Notes 2007 Avaya Inc. All Rights Reserved.13 of 19CM-IPO-H323.doc
3. Configure VoIP parameters for the line. Select the VoIP Settings tab.Enter the Avaya Communication Manager C-LAN IP Address in the Gateway IPAddress field. Check the Enable Faststart and Allow Direct Media Path boxes. Usedefault values for all other fields. Click the OK button.DJB; Reviewed:SPOC 3/15/2007Solution & Interoperability Test Lab Application Notes 2007 Avaya Inc. All Rights Reserved.14 of 19CM-IPO-H323.doc
4. Create a short code to route calls to Avaya Communication Manager. Select ShortCode in the left panel. Right-click and select New.Enter a unique code for the Code field. Select Dial for the Feature field. Enter theOutgoing Group ID created in Step 2 for the Line Group Id field. Use default values forall other fields. Click the OK button.DJB; Reviewed:SPOC 3/15/2007Solution & Interoperability Test Lab Application Notes 2007 Avaya Inc. All Rights Reserved.15 of 19CM-IPO-H323.doc
5. Verification and Troubleshooting Place a call from an extension on the Avaya IP Office to an extension on AvayaCommunication Manger. Answer the call and verify talkpath.Repeat previous case in the opposite direction.Verify that shuffling is happening on an IP-IP call. This can be done through H.323trace.Verify that calls can be transferred from an extension on Avaya IP Office to an extensionon Avaya Communication Manager.Verify that extensions on Avaya IP Office can conference in extensions on AvayaCommunication Manager.Verify that a call can be forwarded from Avaya IP Office to an extension on AvayaCommunication Manager.Verify that a call from Avaya Communication Manager to Avaya IP Office can beanswered, parked and retrieved at Avaya IP Office.Verify out-of-band DTMF5.1. Avaya Communication Manager TroubleshootingUsing the SAT, enter the list trace tac n, where n is the TAC used for the Trunk Group createdin Step 6 of Section 3. This will show call information. Below is an example of a call fromAvaya Communication Manager to Avaya IP Office.list trace tac 105Page1LIST 42:3816:42:38DJB; Reviewed:SPOC 3/15/2007datadial 50016 route:UDP AARterm trunk-group 5cid 0x39dial 50016 route:UDP AARroute-pattern 55 preference 1 cid 0x39seize trunk-group 5 member 4 cid 0x39Calling Number & Name 28000 EXT 28000Proceed trunk-group 5 member 4 cid 0x39Alert trunk-group 5 member 4 cid 0x39active trunk-group 5 member 4 cid 0x39G711MU ss:off ps:20 rn:1/1 11.1.1.1:49154 30.1.1.5:5448xoip: fax:Relay modem:off tty:US 30.1.1.5:5448 uid:0x5007aVOIP data from: 30.1.1.5:5448Jitter:0 0 0 0 0 0 0 0 0 0: Buff:8 WC:5 Avg:0Pkloss:0 0 0 0 0 0 0 0 0 0: Oofo:0 WC:0 Avg:0Solution & Interoperability Test Lab Application Notes 2007 Avaya Inc. All Rights Reserved.16 of 19CM-IPO-H323.doc
5.2. Avaya IP Office TroubleshootingIP Office can be debugged with the System Status Application. Log into the IP OfficeAdministration PC and select Start Programs IP Office System Status to launch theapplication. Log into the application using the appropriate credentials.In the left panel, double-click on the Trunks entry and select the H.323 trunk created in Step 2of Section 4. Click the Trace All button (Not Shown). The messages on the line are displayed.DJB; Reviewed:SPOC 3/15/2007Solution & Interoperability Test Lab Application Notes 2007 Avaya Inc. All Rights Reserved.17 of 19CM-IPO-H323.doc
6. ConclusionThese Application Notes describe how to configure an H.323 IP trunk for calls between AvayaIP Office and Avaya Communication Manager. Interoperability testing included verification ofsuccessful bi-directional calls among several types of endpoints with various features includingtransfer, conference and out-of-band DTMF verification. Calls using the IP Trunk can utilize“shuffling” of the media paths to direct media.7. Additional References1. Feature Description and Implementation for Avaya Communication Manager, Issue 4.0,Feb 2007, Document Number 555-245-205 can be found at:http://support.avaya.com2. IP Office documentation can be found JB; Reviewed:SPOC 3/15/2007Solution & Interoperability Test Lab Application Notes 2007 Avaya Inc. All Rights Reserved.18 of 19CM-IPO-H323.doc
2007 Avaya Inc. All Rights Reserved.Avaya and the Avaya Logo are trademarks of Avaya Inc. All trademarks identified by and are registered trademarks or trademarks, respectively, of Avaya Inc. All other trademarks are theproperty of their respective owners. The information provided in these Application Notes issubject to change without notice. The configurations, technical data, and recommendationsprovided in these Application Notes are believed to be accurate and dependable, but arepresented without express or implied warranty. Users are responsible for their application of anyproducts specified in these Application Notes.Please e-mail any questions or comments pertaining to these Application Notes along with thefull title name and filename, located in the lower right corner, directly to the Avaya Solution &Interoperability Test Lab at interoplabnotes@list.avaya.comDJB; Reviewed:SPOC 3/15/2007Solution & Interoperability Test Lab Application Notes 2007 Avaya Inc. All Rights Reserved.19 of 19CM-IPO-H323.doc
These Application Notes describe how to configure a H.323 IP trunk between Avaya IP Office Release 4.0 and Avaya Communication Manager Release 4.0. The H.323 IP trunk was established between an Avaya IP Office 406V2 and an Avaya S8710 Media Server with Avaya G650 Media Gateway but is also applicable to other Avaya media servers and media gateways.