Transcription
ManualIntroductionRP4T PrintersP4T OverviewMaintenancePrinter PreparationTroubleshootingAppendices2:26 pm, Jul 31, 2008SpecificationsUser GuideRadio RegulatoryInformationP4T/RP4T Mobile Printer SeriesConnecting thePrinterIndex ZIH Corp. 2008UMAN-P4T-001 Rev.BZebra
RP4T PrintersManualIntroductioninformation or omissions. Zebra Technologies Corporation reserves the right tocorrect any such errors and disclaims liability resulting therefrom.This manual contains proprietary information of Zebra Technologies Corporation.It is intended solely for the information and use of parties operating andmaintaining the equipment described herein. Such proprietary information maynot be used, reproduced, or disclosed to any other parties for any other purposewithout the expressed written permission of Zebra Technologies Corporation.No Liability for Consequential DamageProduct ImprovementsSince continuous product improvement is a policy of Zebra TechnologiesCorporation, all specifications and signs are subject to change without notice.P4T OverviewMaintenancePrinter PreparationTroubleshootingConnecting thePrinterSpecificationsP4T/RP4TUser GuideProprietary StatementFCC Compliance StatementAppendicesRadio RegulatoryInformationThis device complies with part 15 of the FCC Rules. Operation is subject to thefollowing two conditions: (1) This device may not cause harmful interference, and(2) this device must accept any interference received, including interference thatmay cause undesired operation.NOTE: This equipment has been tested and found to comply with the limits ora Class B digital device, pursuant to Part 15 of the FCC Rules. These limits aredesigned to provide reasonable protection against harmful interference in aresidential installation. This equipment generates, uses and can radiate radiofrequency energy and, if not installed and used in accordance with the instructions,may cause harmful interference to radio communications. However, there isno guarantee that interference will not occur in a particular installation. If thisequipment does cause harmful interference to radio or television reception, whichcan be determined by turning the equipment off and on, the user is encouraged totry to correct the interference by one or more of the following measures: Reorient or relocate the receiving antenna. Increase the separation between the equipment and receiver. Connect the equipment into an outlet or circuit different from that to whichthe receiver is connected. Consult the dealer or an experienced radio/TV technician for help.WARNING: Exposure to Radio Frequency radiation. To conform to FCC RFexposure requirements this device shall be used in accordance with the operatingconditions and instructions listed in this manual. Note that there are several radiooptions available with this printer. Additional regulatory information is containedin later sections devoted to each radio individually.NOTE: This unit was tested with shielded cables on the peripheral devices.Shielded cables must be used with the unit to insure compliance.Changes or modifications to this unit not expressly approved by ZebraTechnologies Corporation could void the user’s authority to operate thisequipment.Canadian Compliance StatementThis Class B digital apparatus complies with Canadian ICES-003.Cet appareil numérique de la classe B est conforme á la norme NMB-003 duCanada.“IC:” before the equipment certification number signifies that the Industry Canadatechnical specifications were met. It does not guarantee that the certified productwill operate to the user’s satisfaction.Agency Approvals and Regulatory InformationIndex FCC part 15 Canadian STD RSS-210 NOM-ETL (Mexico) EN60950: 2000 Safety Standard EN55022:1998 Class B European C-Tick (Australia)Electromagnetic Radiation StandardIn no event shall Zebra Technologies Corporation or anyone else involved in thecreation, production, or delivery of the accompanying product (including hardwareand software) be liable for any damages whatsoever (including, without limitation,damages for loss of business profits, business interruption, loss of businessinformation, or other pecuniary loss) arising out of the use of or the results of useof or inability to use such product, even if Zebra Technologies Corporation hasbeen advised of the possibility of such damages. Because some states do notallow the exclusion of liability for consequential or incidental damages, the abovelimitation may not apply to you.CopyrightsThe copyrights in this manual and the label print engine described therein areowned by Zebra Technologies Corporation. Unauthorized reproduction of thismanual or the software in the label print engine may result in imprisonment of upto one year and fines of up to 10,000 (17 U.S.C.506). Copyright violators may besubject to civil liability.This product may contain ZPL , ZPL II , and ZebraLink tm programs; Element EnergyEqualizer Circuit; E3 ; and AGFA fonts. Software ZIH Corp. All rights reservedworldwide.ZebraLink and all product names and numbers are trademarks, and Zebra, theZebra logo, ZPL, ZPL II, Element Energy Equalizer Circuit, and E3 Circuit areregistered trademarks of ZIH Corp. All rights reserved worldwide.Monotype , Intellifont and UFST are trademarks of Monotype Imaging, Inc.registered in the United States Patent and Trademark Office and may be registeredin certain jurisdictions.AndyTM , CG PalacioTM, CG Century SchoolbookTM, CG TriumvirateTM, CG TimesTM,Monotype KaiTM, Monotype MinchoTM and Monotype SungTM are trademarks ofMonotype Imaging, Inc. and may be registered in some jurisdictions.HY Gothic HangulTM is a trademark of Hanyang Systems, Inc.AngsanaTM is a trademark of Unity Progress Company (UPC) Limited.Andale , Arial , Book Antiqua , Corsiva , Gill Sans , Sorts and Times NewRoman are trademarks of The Monotype Corporation registered in the UnitedStates Patent and Trademark Office and may be registered in certain jurisdictions.Century Gothic , Bookman Old StyleTM and Century SchoolbookTM are trademarksof The Monotype Corporation and may be registered in certain jurisdictions.HGPGothicB is a trademark of the Ricoh company, Ltd. and may be registered insome jurisdictions.UniversTM is a trademark of Heidelberger Druckmaschinen AG, which may beregistered in certain jurisdictions, exclusively licensed through Linotype LibraryGmbH, a wholly owned subsidiary of Heidelberger Druckmaschinen AG.Futura is a trademark of Bauer Types SA registered in the United States Patentand Trademark Office and may be registered in some jurisdictions.TrueType is a trademark of Apple Computer, Inc. registered in the United StatesPatent and Trademark Office and may be registered in certain jurisdictions.All other brand names, product names, or trademarks belong to their respectiveholders. 2008 ZIH Corp.Liability DisclaimerInasmuch as every effort has been made to supply accurate information inthis manual, Zebra Technologies Corporation is not liable for any erroneousSection Continues2
RP4T PrintersManualIntroductionThe following conventions are used throughout this document to convey certain information:Caution Warns you of the potential for electrostatic discharge.Caution Warns you of a potential electric shock situation.MaintenanceP4T OverviewP4T/RP4TUser GuideDocument ConventionsCaution Warns you of a situation where excessive heat could cause a burnCaution Advises you that failure to take or avoid a specific action could result in physical harm to you.Caution Advises you that failure to take or avoid a specific action could result in physical harm to the hardware.Printer PreparationTroubleshootingConnecting thePrinterSpecificationsRadio RegulatoryInformationAppendicesImportant Advises you of information that is essential to complete a task.Note Indicates neutral or positive information that emphasizes or supplements important points of the main text.Text in this format will jump to the appropriate section in the manual.Index3
RP4T PrintersManualIntroductionMaintenanceP4T OverviewP4T/RP4TP4TUser GuideIntroduction to the P4T SeriesPrinter PreparationTroubleshootingConnecting thePrinterSpecificationsThank you for choosing one of our Zebra P4T Series Mobile Printers. The P4T Series consists of two models. The P4T can printon direct thermal or thermal transfer media. The RP4T can printon direct or thermal transfer media and also encode special RFIDmedia.Because these printers are made by Zebra Technologies, you’reassured of world-class support for all of your bar code printers,software, and supplies. This User’s Guide gives you the information you’ll need tooperate and maintain both the P4T and RP4T models. P4T Series printers use the CPCL programming language. Tocreate and print receipts and labels using the CPCL language,refer to our Label Vista label creation program or the MobilePrinting Systems CPCL Programming Manual which are bothavailable on our Web site at: www.zebra.com/manuals . P4T Series printer software also includes interpreters for theZPL II programming language (up to Version 30.8.4). Manualsfor the ZPL label design programming language are also available on our Web site. Refer to Appendix “F” of this manualfor more information on accessing and downloading manualsand other user information.Unpacking and InspectionInspect the printer for possible shipping damage: Check all exterior surfaces for damage. Open the media cover (refer to “Loading the Media” in thePrinter Preparation section) and inspect the media compartment for damage.In case return shipping is required, save the carton and all packing material.Reporting DamageIf you discover shipping damage: Immediately notify and file a damage report with the shippingcompany. Zebra Technologies Corporation is not responsiblefor any damage incurred during shipment of the printer andwill not cover the repair of this damage under its warrantypolicy. Keep the carton and all packing material for inspection. Notify your authorized Zebra re-seller.AppendicesRadio RegulatoryInformationAlways refer to the Important Safety Information data sheetshipped with each printer and the Technical Bulletin shippedwith each battery pack. These documents detail proceduresto ensure maximum reliability and safety while using thisprinter.IndexSection Continues4
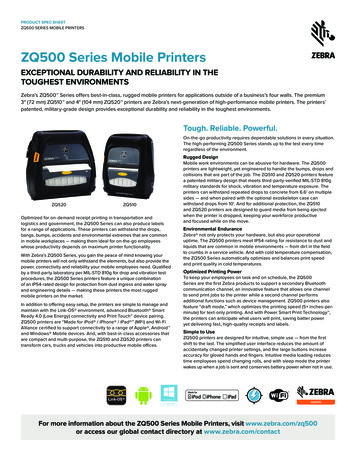
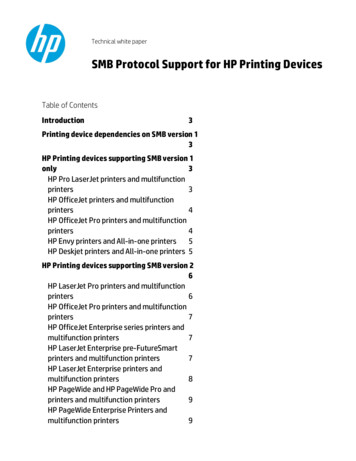
RP4T PrintersManualIntroductionFigure 1: P4T/RP4T Illustrated764P4T OverviewMaintenancePrinter PreparationTroubleshootingConnecting thePrinterSpecificationsP4T/RP4TP4TUser GuideP4T/RP4T Overview53289110Figure 1a: P4T/RP4T Bottom ViewAppendicesRadio 14.15.16.17.Platen RollerBar SensorMedia SupportPrintheadRFID Reader/Encoder (RP4T only)Ribbon Cartridge CoverControl PanelRibbon Cartridge Cover LatchMedia Cover LatchMedia Support DisksLabel PeelerMedia CoverExternal Media Access (optional)BatteryBattery Charging ReceptacleRS232 Communications PortUSB Port171116121315Index14Section Continues5
ManualIntroductionRP4T PrintersP4T OverviewMaintenancePrinter PreparationTroubleshootingConnecting thePrinterSpecificationsP4T/RP4TP4TUser GuideP4T Series TechnologyThe P4T Series introduces several new technologies to the ZebraFor ease of installation, P4T Series thermal transfer film is suppliedMobile Printer product line.as a cartridge. Typically a thermal transfer film cartridge will beable to print two rolls of media before needing replacement. ThisSmart BatteryThe P4T Series battery pack contains electronics which allow the ratio may vary considerably based on the amount of label stockprinter to monitor its operating parameters. Among these are the per roll.battery’s charge state, the number of charge cycles it has under- RFID (Radio Frequency Identification)gone, and its date of manufacture. Using these parameters, theA P4T Series printer equipped with an RFID encoder allows it toP4T Series’ software can monitor the battery’s condition and alert encode information on special label media using radio frequenthe user when to recharge, re-condition or remove the battery from cies in addition to using conventional thermal transfer technology.service.These printers are identified as RP4T printers.RFID encoded information can be retrieved using an RFID scannerUse of any battery pack other than the one manufactured by from a distance of inches to several yards from an encoded label.Zebra specifically for use with P4T Series printers will notZebra’s implementation of RFID follows accepted industry stanbe able to use the diagnostic features of the Zebra Smart dards. As an example, the RP4T verifies the information encodedBattery and will not work with the printer.on the label media after it is transmitted and voids the label if thedata is incorrect. More information concerning RFID may be foundPrinting TechnologyThe P4T Series uses two methods to print human readible text, in Zebra’s RFID Programming Manual, available for download onZebra’s Web site.graphics and barcodes: Direct Thermal, and Thermal TransferDirect ThermalDirect thermal printing uses heat to cause a chemical reaction onspecially treated media. This reaction creates a dark mark wherever a heated element on the printhead comes in contact with themedia. Since the printing elements are arranged very densely at203 d.p.i. (dots per inch) or 8 dots per mm, highly legible charactersand graphic elements may be created a row at a time as the mediais advanced past the printhead. This technology has the advantageof simplicity, as there is no requirement for consumable suppliessuch as ink or toner. However, since the media is sensitive to heat,it will gradually loose legibility over long periods of time, especiallyif exposed to environments with relatively high temperatures.AppendicesRadio RegulatoryInformationThermal TransferIndexThermal transfer printing uses the same basic technology as directthermal, except that the printhead elements react with a transferfilm which passes between the printhead and the media. The printing process fuses the thermal transfer material to the media beingprinted and creates characters and graphic images that are verydark, and more permanent than those created by direct thermalprinting. Offsetting this advantage is the extra cost of the thermaltransfer film and printing speeds slower than those required fordirect thermal printing.6
RP4T PrintersManualIntroductionMaintenanceP4T OverviewP4T/RP4TUser GuidePrinter PreparationBattery SafetyThe Battery Packs used on Zebra Mobile Printers contain a great deal of energy and can cause personal injury or start a fire if usedimproperly or carelessly. Please observe the following safety practices:Caution Avoid accidental short circuiting of any battery. Allowing battery terminals to contact conductive material willcreate a short circuit which could cause burns and other injuries or could start a fire.Caution Batteries can explode or catch fire if improperly charged or exposed to high temperatures or fire. Do not disassemble,crush or expose batteries to water.Caution Use of any charger not approved specifically by Zebra for use with its batteries could cause damage to the batterypack or the printer and will void the warranty.Read carefully and always observe the safety guidelines for Li-ion batteries provided with each Battery Pack.TroubleshootingPrinter PreparationCharger SafetyDo not place a charger in locations where liquids or metallic objects may be dropped on the charger or, in the case of theUCLI72-4 Quad Charger, into the charging bays.Use care in locating any of the approved P4T Series single chargers, the AC Adapter or the UCLI72-4 Quad Charger. Do notblock the ventilating slots on the top and bottom covers. Ensure that the Charger is plugged into a power source which won’taccidently be turned off if you will be charging batteries overnight.Connecting thePrinterSpecificationsRadio RegulatoryInformationAppendicesRequired Regulatory Text for ArgentinaOnly certified adaptors with the following electrical characteristics shall be used. The use of different adaptors could damagethe device, present hazards to the user and declare the correspondent guaranty void.LI72: Input ratings: 100-240 VAC 50/60Hz 200mA., Class 2Output ratings: 8.4 VDC, 800 mAIndexSection Continues7
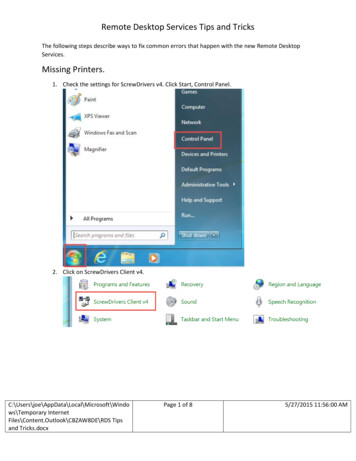
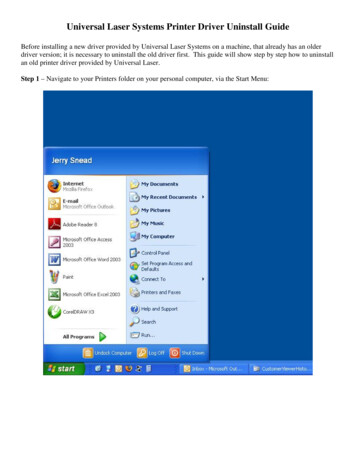
RP4T PrintersManualIntroductionThe following table lists battery chargers approved for use with the P4T Series Printer.Use of chargers not approved by Zebra specifically for use with the P4T Series will void the warranty and could cause damageto the printer or the battery pack. Zebra is not responsible for any damage to equipment caused by the improper use ofunauthorized equipment.DescriptionLI72 singlecharger)AC Adapter/USLine CordUCLI72-4 QuadChargerMaintenanceP4T OverviewP4T/RP4TUser GuideApproved ChargersPart noAT17696-xx1AK18913-002AC18177-xx1Notes.Must be used with batteryremoved from printerMust be used with batteryinstalled in printerMust be used with batteryremoved from printerTroubleshootingPrinter Preparation1. Full part number is determined by the AC mains adapter appropriate for the region of intended use. Consult your Zebrasales representative or the factory for the appropriate part number.Single Battery ChargerThe LI72 ChargerLI72 charger is a wall mounted fast charger with a universal 110 to230, 50-60 Hz. VAC input. Multiple AC plug configurations complywith most international standards. This charger is intended for usewith the P4T Series printers which are equipped with Lithium Ion(Li-ion) batteries.Full part numbers are determined by the AC mains connectors.Consult Zebra or your authorized re-seller for full part number information.The LI72 will charge a battery pack as fast as its charge level willallow, and then switch over to a maintenance charge to keep thecharge at its maximum.Figure 2: LI72 Single ChargerConnecting thePrinterSpecificationsRadio 2 ChargerAT17696-tabSection Continues8
ManualIntroductionRP4T PrintersP4T OverviewMaintenanceP4T/RP4TUser GuideFigure 3: Charging the P4T Series Battery with the LI72Battery ChargingReceptacleMains connector willvary with country ofintended use.LI72 BatteryChargerPrinter PreparationTroubleshootingConnecting thePrinterSpecificationsP4T SeriesBattery PackCharging Battery Packs with the AT17696-xx LI72 Single ChargerPlug the LI72 into the appropriate AC wall receptacle, then insert the charge cable into the battery pack charger jack.The yellow/green charge indicator LED will indicate the status of the charger as per the following table.IndicatorSteady yellow indicatorSlow (1 Hz) flashingyellow indicatorAppendicesRadio RegulatoryInformationFast (4 Hz) flashinggreen indicatorSlow (1 Hz) flashinggreen indicatorFast (4 Hz) flashingyellow indicatorSteady green indicatorSlow (1 Hz) flashingalternate yellow andgreen geMaintainErrorReadyWaitCharger StatusAC power on; no battery being chargedCharger is applying trickle charge current(5% of maximum) to bring a cold batterytemperature up to 0 C before starting afull charge cycleCharger is applying the maximum chargerate to the batteryCharger is in trickle charge mode(10% ofnominal charge value).The battery may have an internal short,or its charge monitoring circuitry may bemalfunctioning. The battery pack shouldnot be used any further.No charge is being applied to the batteryBattery temperature is too hot. Chargingwill not begin until battery temperaturereaches 45 C.IndexNotes: The battery pack must be removed from the printer when using the AT17696-xx LI72 Single Charger.Charging will cease three (3) hours after the charger has entered the “Maintain” mode.Section Continues9
ManualIntroductionRP4T PrintersP4T OverviewMaintenanceP4T/RP4TUser GuideCharging the P4T Series Battery with the AT18646-1 AC AdapterFigure 4: Charging the P4T Series Battery with the AC AdapterAC Power Cord(varies withlocation)P4T Series ACAdapterp/n AT18646-1TroubleshootingPrinter PreparationOpen theprotective coverfor access tothe chargerreceptacleSpecificationsConnecting thePrinter Open the protective cover on the P4T Series printer to expose the charger jack and the communication ports. Plug the barrel plug from the AT18646-1 AC adapter into the charger jack on the printer. Connect the appropriate AC power cord for your location to the adapter and then plug the power cord into an AC receptacle.The following table details how the AC Adapter and P4T Series printers interact:AppendicesRadio tusOffOffOnOnOffOnPrinter LCDPower Button OperationOffNormal display operationNormal display operation, plusbattery icon will cycle throughlevel bars. Charging will continueas required.Battery icon will cycle throughlevel bars. Printer turns off at endof charge cycle.Pressing turns printer OnPressing turns printer OffPressing switches printer to limitedoperation: only battery charging &LCD functionalPressing turns printer On. Printerwill run normallyIndexNote: If the battery is out of its safe charging temperature range (either too hot or too cold) the printer will display the following:“Charging will resume when battery is in the range 0-40 degrees C (32-104 degrees F)” and the battery icon will alternately flashand. Once the battery reaches a safe charging temperature, normal charging will automatically resume.Section Continues10
RP4T PrintersManualIntroductionThe UCLI72-4 Quad Charger is designed tocharge up to four battery packs simultaneously. Charging times are as follows:Figure 5- UCLI72-4 Quad ChargerBattery Status80% chargedFull chargeSlide Battery Packinto a Charger bayPower SupplyMaintenanceP4T OverviewP4T/RP4TUser GuideCharging the P4T Series Battery with the UCLI72-4 Quad ChargerTroubleshootingPrinter PreparationRock BatteryPack into placeFasFaut ChaltrgeFullChargeReadyFasFaut CharglteFullChaReargedyFasFaut ChaltrgeFullChaReargedyFasSpecificationsConnecting thePrinterFauAmberIndicatorGreenChargerIndicator Bayt ChargeltFullChargeReaPowerdyPower IndicatorCharging Time2.5 Hrs.5 Hrs. Ensure that the charger has been installedproperly per the Quad Charger instructionmanual. Ensure that the power indicator onthe front panel is on. Remove any protective shrink-wrap andlabels from all battery packs prior to first use.Plug a battery pack into any one of the fourcharging bays as shown opposite in Figure ,noting the orientation of the battery pack. Slide the battery pack into the chargingbay until it stops. Rock the battery pack back until it snapsinto place.The amber indicator directly under the battery being charged will turn on if the batteryis properly inserted.The indicators under each battery will allowyou to monitor the charging process per thetable below:AmberOnAppendicesRadio RegulatoryInformationImportant A fault condition (flashing amber indicator) is caused by a problem with the batterypack. The charger may indicate a fault because the battery is too hot or too cold to chargereliably. Try to charge the battery again when it returns to the room’s ambient temperature.If the amber indicator starts flashing on the second charging attempt, the battery shouldbe discarded. Always dispose of batteries in a proper manner. Refer to Appendix E of ry StatusCharging80% charged(O.K. to use)CompletelyChargedFaulty BatteryNotes: For more information regarding the installation and use of the UCLI72-4 Quad Charger refer to the instructions includedwith the product.The UCLI72-4 Quad Charger has a safety feature which stops charging a battery after six hours regardless of its charge state.IndexSection Continues11
RP4T PrintersManualIntroductionP4T OverviewMaintenancePrinter PreparationTroubleshootingConnecting thePrinterSpecificationsRadio RegulatoryInformationAppendicesP4T/RP4TUser GuideInstalling the P4T Series Battery PackImportant New battery packs are shippeduncharged. Remove any protective shrinkwrap and labels from a new battery packprior to use.Additional battery packs may be orderedusing Zebra p/n AK18913-001.Figure 6: Installing the P4T Series Battery PackIf you are using an LI72 single chargeror the LI72-4 Quad Charger, you mustcharge the battery prior to installing it inthe printer. .Insert the battery pack into the printer asshown in Figure 6 . Rock the battery pack into the printer asshown until it locks in place.If you are using the AC adapter, you shouldallow the battery pack to charge completelyprior to using it for the first time.When a new battery pack is first installed, theControl Panel indicators may briefly turn on andthen go off, indicating the battery is not fullycharged. Refer to the Charging the Battery andOperator Controls topics in this manual.Charger portfor use with theAT18646-1 ACAdapterInsert this side of thebattery pack into thebottom of the printer asshown.Rock the battery packuntil it clicks into place.P4T SeriesBattery PackIndexSection Continues12
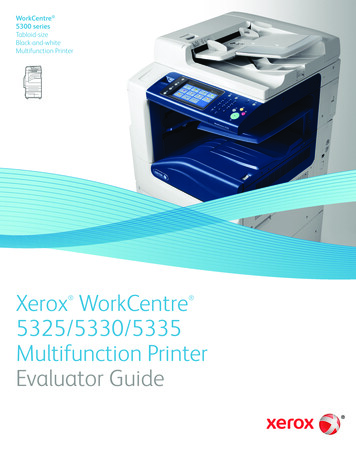
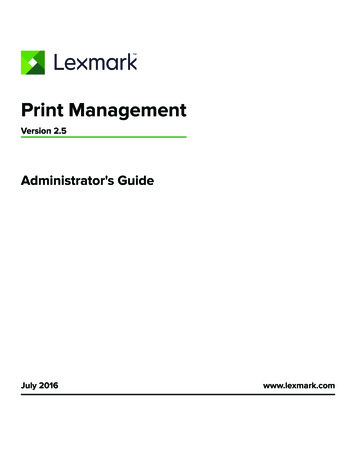
RP4T PrintersManualIntroductionP4T series printers are designed to print either continuous (journal)media or label stock.Figure 7.1 Opening the Media CoverFigure 7.2 Loading the MediaLoad Media RollMaintenancePrinter PreparationTroubleshootingNote direction mediapulls off the roll.P4T OverviewP4T/RP4TUser GuideLoad the MediaPull Media Supportsapart where shown.Press down on the MediaCover Latch LeverMedia cover opensConnecting thePrinterSpecificationsRadio RegulatoryInformationAppendices1. Open the Media CoverRefer to Figure 7.1. Press the latch release button on the side of the printer asshown at “1” below. The media cover will open automatically Rotate the Media Cover back completely as shown exposingthe media compartment and the adjustable media supports.2. Loading Media From An Internal SupplyRefer to Figure 7.2. Pull the media supports apart as shown. Insert the roll of media between them, and let the media supports close. Ensure that the media pulls off the core in thedirection shown in Figures 7.2 and 7.4. The supports will centerthe media roll within the media compartment, and the mediaroll should be able to spin freely on the supports.IndexSection Continues13
ManualIntroductionRP4T PrintersP4T OverviewMaintenancePrinter PreparationTroubleshootingP4T/RP4TUser GuideFigure 7.3- Loading Media From An External SupplyMedia SpacerSpecificationsConnecting thePrinterRear Feed SlotExternal MediaSourceAppendicesRadio RegulatoryInformationIndex3. Loading Media From An External SupplyRefer to Figure 7.3. A P4T Series printer configured with the External Mediaoption has a loading slot in the rear of the media compartment allowing you touse 4.0 in. (101.6 mm) wide fanfold or roll media from an external supply. Theexternal supply must be designed such that it does not exert excessive drag asmedia is fed through the printer, which could result in distorted printing. Pull the media supports apart, insert a Media Spacer (Zebra part numberBA16625-1) between them, and let the media supports close. Insert the media from the external supply through the rear feed slot, betweenthe media guides and up through the media compartment as shown. Makesure the side of the media you will be printing on faces the printhead.Section Continues14
RP4T PrintersManualIntroductionP4T OverviewMaintenancePrinter PreparationTroubleshootingConnecting thePrinterSpecificationsRadio RegulatoryInformationAppendicesP4T/RP4TUser GuideFigure 7.4-Close the Media CoverPull Media out of thePrinter. Use alignmentmarks on the cover toensure alignment.Figure 7.5- Insert Media into PeelerPeeler Assembly.Peeler Bar.4. Press down on PeelerAssembly where shownand slide the media until itemerges .1. Remove enoughlabels from the mediaroll to create a 4” [100mm] leader.3. Feed the leader overthe peeler bar and intothe printer if you will bepeeling labels as youprint.2. Align the edge of theleader with the index markson the top cover to ensure itwill pass through the peelerwithout wrinkling.Close MediaCover4. Close the Media Cover:Refer to Figure 7.4. Pull the media out of the printer as shown at “1.” Close the media cover as shown at “2”, ensuring that it latchessecurely into place. Turn the printer on or press the Feed button if the printer isalready on. The printer will advance a short strip of media and will thenbe ready for printing.5. Using the Label PeelerOptional Step for label stock onlyRefer to Figure 7.5.The label peeler feature allows automatic separation of the printedlabel from its backing.1.If you wish to use the label peeling feature, remove enoughlabels from the media roll to create a leader approximately 4”[100 mm.] long.2. Align the media as it emerges from the printhead with theindex marks on the top cover to ensure it will pass throughthe peeler assembly without wrinkling.2. Feed the leader you created in step 1 over the peeler bar andinto the peeler assembly.3 Push on the peeler assembly where shown in Figure 6.5.Insert the leader into the label peeler as shown and push onthe media roll until it emerges from the slot at the rear of thepeeler assembly. Turn the printer on or press the Feed button if the printer isalready on. The printer will advance a short strip of media and will thenbe ready for printing.IndexSection Continues15
without the expressed written permission of Zebra Technologies Corporation. Product Improvements Since continuous product improvement is a policy of Zebra Technologies Corporation, all specifications and signs are subject to change without notice. FCC Compliance Statement This device complies with part 15 of the FCC Rules. Operation is subject .