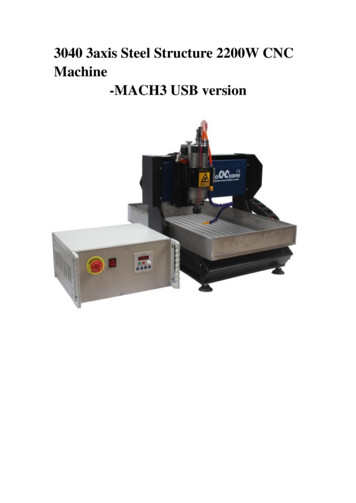
Transcription
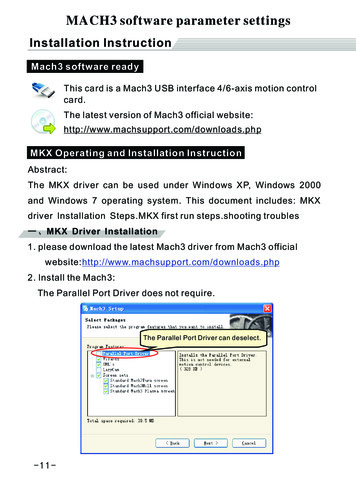
MACH3 software parameter settingsInstallation InstructionMach3 software readyThis card is a Mach3 USB interface 4/6-axis motion controlcard.The latest version of Mach3 official X Operating and Installation InstructionAbstract:The MKX driver can be used under Windows XP, Windows 2000and Windows 7 operating system. This document includes: MKXdriver Installation Steps.MKX first run steps.shooting troubles一、MKX Driver Installation1. please download the latest Mach3 driver from Mach3 officialwebsite: http://www.machsupport.com/downloads.php2. Install the Mach3:The Parallel Port Driver does not require.The Parallel Port Driver can deselect.-11-
Installation Instruction3.Prepare the USB cable4.connect the usb cable to mks usb socket and insert the other endto the PC usb port.5.the windows will automatically install the driver. Wait for thedriver installation end6.Install the mks card plug-in. copy the NCusbPod.dll to theMach3\PlugIns folder.7.copy the mach3mill.xml configure file to the mach3\directory.if you don't copy the mach3mill.xml file.you should do as next stepCopy to MACH3directory8. Open Mach3 rd”,Choose“Don't ask me this d”9. if there is a black window in mach3,please click view- loadscreen,choose 1024.set.10. press reset buttion and make it normal.don't flash.Now everything should be ok.please do what you want.If any problem please refer to shooting troubles.-12-
Installation Instruction二、MKX first run steps.When you first run mks,you should configure the motor parameter,home neg.motor move way.output and input io etc.2.1.X, Y, Z, A, B, C-axis output configurationAs shown below:(Config - Ports and Pins)Not configuredNot configuredPlay" ",select outputPlay " ",Set low outputIf motor moving way reverse,please make Dir Low Reverse.changeform to x,or change from x to .2.2.Motor parameter settingsAs shown below:(Config - Motor Tuning):Set the motoracceleration, velocity, steps perEach time you setan axisClick "SaveSettings"Maximum Speed-13-Mach3 steps per unit:Mach3 steps per unit Mach3 steps /inch or mm
Installation Instruction2.3. The Mach3 Menu - Config - Homing/LimitsHome direction, depends on the “Home Neg”.If home moveing way reverse,please make “Home Neg”Reverse.change form to x,or change from x to .2.4. Setup the input signals.(Config - Ports and Pins)The Pin number is from 0.Suggest Active Low “ ” (Set Low signal Level for Inputs)-14-
Installation Instruction2.5. Setup the Output signals(Config - Ports and Pins)The output IO is corresponding with mach3 #Output x,Suggest Active Low “ ” (Set Low signal Level for outputs).2.6.MACH3 spindle speed settingsMACH3 motion control card supports the following threekinds of Spindle speed control: PWM, pulse direction,analog voltage from 0 to 10V(Config - Ports and Pins)Spindle speed controlmode selectionPWM parameter settings-15-
Installation InstructionParameters setting:Spindle speed control mode selection::If the PWM control spindle speed, or use 0 to 10V analog voltage tocontrol the spindle speed, then select the PWM control;If using stepper direction control spindle speed, select step/direction motors。Then you should set the maximum spindle speed in config- spindlepulleys.The Max Speed should be adapted to your spindle.2.7. USB motion control card configuration :NcUsbpod plugin would display the motion control card andIO status (input and output),configuration parameter settings.Mach3 Config- Config Plugins,PlugIn Control and ActivationClick “ Config ”-16-
Installation Instructionconfiguration window:41231.Input and output status:you could see the input io changed whenyou active or deactive the input io.2.Output Test: you could set output IO form 1-8 to high or low( )when you click ResetOutput3.Homing Status: display whether the axis home switch is active.Homing mode selection:NO HOMING:no homing.just clear all machine coordinate data.SINGLE STAGE:home over when toutching the home switchDUAL STAGE:home continue when toutching the home switchand move back to fixed postion.-17-
Installation Instruction4.G code buffer time settings: Set G-code buffer time, according tothe different PC performance, adjusting this parameter, usuallydon't move it.三、Trouble shooting3.1:Mach3 makes the Rectangle work to round.3.1.1:Config- general configFirst make sure you set the “constant velocity”. .3.1.2:Please choose “stop cv on anagle 6 degress”.3.2:Mach3 could not find the usb the motion card and prompt“Is the Xpod Inserted ok?it has ceased to respond ”.3.2.1:Please make sure you have inserted the usb motion cardto usb port.3.2.2:If the spindle is on,please make sure the VFD has ground3.2.3:Please make sure the input power of VFD has electricalfilter to isolate noise.3.3:how to ref all home-18-
Installation Instruction3.3.1:first enable home io.config- ports and pins- inputsignals,enable Xhome,yhome,zhome.set the Port# to 1,Pin number :0,1,2 ,active low: .3.3.2:Open our plugin:config- config plugins.choose Ncpod .click Config.In The plugin window:choose“Single Stage/Dual stage.”3.3.3.Make sure the home switch signal is ok.3.3.4.Click the mach3 button “ref all home”3.3.5.If homeing way revers,please open mach3config- Homing/limits.make Home neg reverse.3.4:Mach3 will auto exit when inserting or pulling up the usbmotion card.Please pull up other usb devices,such as usb keyboard.then insert usb motion card again.-19-
Installation InstructionMach3 indication1.Is the Xpod Inserted ok?it has ceased to respond Usb motion card is lost.2.XHC ncusbpod connectedXhc usb motion card is conneted ok.3.Probe ignore,active at call for probeProbe signal is active,probe ignore.4.Too fast for pulley using maxThe speed of spindle has overrun the maximum speed .5.K word given for arc in xy plane.block .Mach3 don't support the file.-20-
Mach3\PlugIns folder. 7.copy the mach3mill.xml configure file to the mach3\directory. if you don't copy the mach3mill.xml file. you should do as next step Copy to MACH3 directory 8. Open Mach3 rd”,Choose“Don't ask me this again” Choose “NcusbPod-XHC-Mach3-USB-Motion-Card”