Transcription
USER GUIDE6.1.5 February 2018 3725-63715-011A Polycom RealPresence GroupSeries
Copyright 2018, Polycom, Inc. All rights reserved. No part of this document may be reproduced,translated into another language or format, or transmitted in any form or by any means, electronic ormechanical, for any purpose, without the express written permission of Polycom, Inc.6001 America Center Drive San Jose, CA 95002 USATrademarks Polycom , the Polycom logo and the names and marks associated with Polycom productsare trademarks and/or service marks of Polycom, Inc. and are registered and/or common law marks in theUnited States and various other countries.All other trademarks are property of their respective owners. No portion hereof may be reproduced ortransmitted in any form or by any means, for any purpose other than the recipient's personal use, withoutthe express written permission of Polycom.Disclaimer While Polycom uses reasonable efforts to include accurate and up-to-date information in thisdocument, Polycom makes no warranties or representations as to its accuracy. Polycom assumes noliability or responsibility for any typographical or other errors or omissions in the content of this document.Limitation of Liability Polycom and/or its respective suppliers make no representations about thesuitability of the information contained in this document for any purpose. Information is provided "as is"without warranty of any kind and is subject to change without notice. The entire risk arising out of its useremains with the recipient. In no event shall Polycom and/or its respective suppliers be liable for anydirect, consequential, incidental, special, punitive or other damages whatsoever (including withoutlimitation, damages for loss of business profits, business interruption, or loss of business information),even if Polycom has been advised of the possibility of such damages.End User License Agreement BY USING THIS PRODUCT, YOU ARE AGREEING TO THE TERMS OFTHE END USER LICENSE AGREEMENT (EULA) . IF YOU DO NOT AGREE TO THE TERMS OF THEEULA, DO NOT USE THE PRODUCT, AND YOU MAY RETURN IT IN THE ORIGINAL PACKAGING TOTHE SELLER FROM WHOM YOU PURCHASED THE PRODUCT.Patent Information The accompanying product may be protected by one or more U.S. and foreignpatents and/or pending patent applications held by Polycom, Inc.Open Source Software Used in this Product This product may contain open source software. You mayreceive the open source software from Polycom up to three (3) years after the distribution date of theapplicable product or software at a charge not greater than the cost to Polycom of shipping or distributingthe software to you. To receive software information, as well as the open source software code used inthis product, contact Polycom by email at OpenSourceVideo@polycom.com (for video products) orOpenSourceVoice@polycom.com (for voice products).Customer Feedback We are striving to improve our documentation quality and we appreciate yourfeedback. Email your opinions and comments to DocumentationFeedback@polycom.com.Polycom Support Visit the Polycom Support Center for End User License Agreements, softwaredownloads, product documents, product licenses, troubleshooting tips, service requests, and more.
ContentsBefore You Begin.3Getting Help. 3Polycom Partner and Solution Resources.3The Polycom Community. 3Getting Started with Polycom RealPresence Group Series. 4RealPresence Group System Power. 4Power On the System. 4System Health Check.4Power Off a RealPresence Group System. 5Using a Polycom RealPresence Group Series Remote Control. 6Remote Control Buttons and Descriptions. 7Recharge the Remote Control Battery. 8Wake the System. 8Contacts. 8Contact Presence States.9Browse the Directory. 9Search for Directory Contacts. 9Calling. 10Call by Entering a Name or Number. 10Call from the Contacts Screen. 10Call from the Recent Calls List. 10Call a Speed Dial .11Place an Audio-only Call.11Answer a Call.11Accept a Call during a Call. 11Ignore a Call. 11Hold a Call.12Hold a Call and Place a Call.12Switch Between Point-to-Point Calls. 12Resume a Call.12End a Call.12Conference Calls.12Joining Meetings from the Calendar with the Remote Control. 15Sharing Content. 15Content Connections on RealPresence Group Systems. 161
ContentsSupported Content Resolutions and Refresh Rates. 17Polycom People Content IP. 17Managing Content from Microsoft Clients. 18Recording Calls.19RealPresence Media Suite Recording Methods.19Record Calls on a DVD or DVR. 23Record Calls with a Laptop or Tablet.23Settings. 24Video Adjustments.24Audio Adjustments. 27Cameras.28Call Answering Settings. 31Encryption and Security. 322
Before You BeginTopics: Getting HelpThis guide is for users who want to perform basic to intermediate tasks on the Polycom RealPresence Group Series system .Please read the RealPresence Group Series documentation before you operate the system. Thefollowing related documents for RealPresence Group Series systems are available at Polycom Support: Setup sheets—includes steps on setting up the system and connecting peripherals Release notes—lists new features, any system limitations, and additional product information Regulatory Notices—describes safety and legal considerations for using the systemPolycom recommends that you record the serial number and option key of your RealPresence GroupSeries system here for future reference. The serial number for the system is printed on the unit.System Serial Number:Option Key:Getting HelpFor more information about installing, configuring, and administering Polycom products, refer toDocuments and Downloads at Polycom Support.Polycom Partner and Solution ResourcesTo find all Polycom partner solutions, see Strategic Global Partner Solutions.Polycom Implementation and Maintenance services provide support for Polycom solution componentsonly. Additional services for supported third-party Unified Communications (UC) environments integratedwith Polycom solutions are available from Polycom Global Services and its certified Partners. Theseadditional services help customers successfully design, deploy, optimize and manage Polycom visualcommunications within their UC environments.Professional Services for Microsoft Integration is mandatory for Microsoft Office Communications Server,Microsoft Lync Server 2013, Skype for Business Server 2015, or Office 365 integrations. For additionalinformation and details, refer to http://www.polycom.com/services/professional services/index.html orcontact your local Polycom representative.The Polycom CommunityThe Polycom Community gives you access to the latest developer and support information, and thecommunity enables you to participate in discussion forums to share ideas and solve problems with yourcolleagues. To register with the Polycom Community, simply create a Polycom online account. Whenlogged in, you can access Polycom support personnel and participate in developer and support forums tofind the latest information on hardware, software, and partner solutions topics.3
Getting Started with PolycomRealPresence Group SeriesTopics: RealPresence Group System PowerThis user guide is intended for beginner users, as well as intermediate and advanced users who want tolearn about video conferencing and the Polycom RealPresence Group Series system .For detailed information on the available systems and bundles, as well as the most recent featuredescriptions, refer to the Polycom RealPresence Group Series Release Notes available atsupport.polycom.com.Note: Your system administrator can configure RealPresence Group Series systems and RealPresenceTouch devices to show only those options used in your organization. Therefore, this guide mightcover options that you cannot access on your system. Check with your system administrator tofind out more about the options set for your system.RealPresence Group System PowerRealPresence Group Series systems have a power proximity sensor instead of a physical power button.Instead of pressing an actual button that moves to power on the system, you can touch the proximitysensor , or touch near it, on the front of the system.Power On the SystemBefore powering on your system, make sure you connect any essential wired devices or accessories tothe system first. After you have connected the related equipment, power on the system.Procedure» Do one of the following: On RealPresence Group 300, 310, 500, and 700 systems, touch and hold thepowersensor on the front of the system. Because the power sensor is touch sensitive, you canplace your finger on or close to the sensor. Press and holdon the remote control.When the system is powered on successfully, the LED on the front panel turns blue and thePolycom splash screen displays.System Health CheckAfter the system is powered on, the system automatically performs a system health check, which isknown as a power on self test (POST).The status of the POST sequence is shown using the LED indicator light on the front of the device, or inthe text field display on the front of the system. For more information about what the colors of theindicator lights mean, contact your administrator.4
Getting Started with Polycom RealPresence Group SeriesAll test results are logged in the system memory. When the test sequence completes with no severeerrors, the system starts normally.Power Off a RealPresence Group SystemBefore changing any connected accessories, you need to power off the RealPresence Group system.Procedure» Do one of the following: Touch and hold the power sensor on the front of the system. Press and holdon the remote control.The indicator light changes color and blinks when the system is shutting down.5
Using a Polycom RealPresence GroupSeries Remote ControlTopics: Remote Control Buttons and Descriptions Recharge the Remote Control Battery Wake the System Contacts Calling Sharing Content Recording Calls SettingsThe infrared RealPresence Group Series remote control enables you to operate a RealPresence GroupSeries system. This includes placing calls, adjusting the volume, controlling the camera, navigatingscreens, and more. RealPresence Group Series systems and Polycom EagleEye cameras and camerasystems have infrared receivers that enable you to control the system by pointing the remote controltoward the system or a connected EagleEye camera or camera system.Note: If you have an SDI camera, you might need a special cable to connect the camera to the systemto receive infrared signals from the remote control. For more information about the cable, contactPolycom support.6
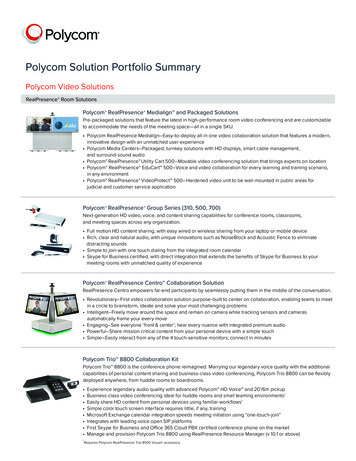
Using a Polycom RealPresence Group Series Remote ControlRemote Control Buttons and DescriptionsThe following table shows the parts of the remote control and includes descriptions for each part.Remote Control Button DescriptionsNumberDescription1LED IR emitter2Decrease speaker volume.3Increase speaker volume.4Zoom camera out.5Zoom camera in.6Press center Select button to select highlightedmenu item.7Navigate through menu items using the Up,Down, Left, and Right buttons; pan/tilt thecamera.8Delete letters or numbers or go back to aprevious screen.9Display the Menu screen.10Return to the Home screen.11Place or answer a call or power on the system.12End and reject a call or power off the system.13Enter letters or numbers.14In camera control mode, move the camera to astored preset or press and hold a number tostore a preset.15Generates an asterisk if the cursor is in a textfield or a period if the cursor is in a numericfield.16Generates dual-tone multi-frequency (DTMF)touch tones. Press #, followed by DTMF keysto send.17Mute or unmute a microphone.Parts of the Remote Control7
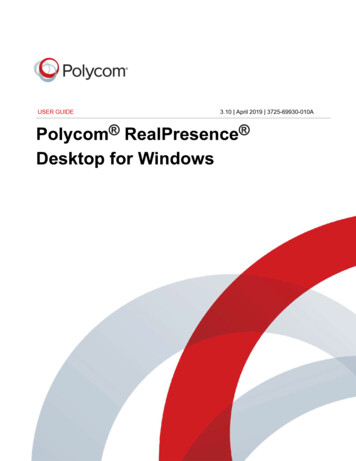
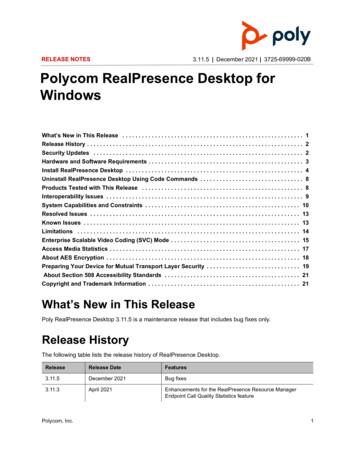
Using a Polycom RealPresence Group Series Remote ControlRecharge the Remote Control BatteryWhen the remote control battery power is at 10% or less, a notification displays on the RealPresenceGroup system Home screen.You can charge the remote control battery using the system's USB port or any other device with a USBport. The RealPresence Group 300, 310, and 500 systems have two USB 2.0 ports on the back of eachsystem, while the RealPresence Group 700 system has one USB 2.0 port on the front of the system andtwo USB 3.0 ports on the back of the system.Procedure1. Pull the battery out of the end of the remote control.2. Insert the USB plug of the battery into a USB 2.0 port on your system.3. Wait until the status light on the battery turns green before removing it from the port.Recharging the battery can take from 20 minutes up to multiple hours.4. Insert the charged battery into the remote control.Figure 1: Recharge the Battery: RealPresence Group 300, 310, 500 and 700 SystemsWake the SystemAfter a certain amount of time with no activity, the RealPresence Group Series system goes into sleepmode.Procedure» Press any button on the remote control or just pick up the remote.ContactsThe directory on your system stores contact information that you can use to quickly call contacts. Anycontacts that you add to the directory are accessible to everyone at your site who uses the system. Usersat other sites cannot access the contacts on your system.When a contact is listed in the directory of your system, the system displays the name on the screenwhen receiving an incoming call. If a contact that is not listed in the directory calls, the dialing informationfor that contact displays, and you can choose to save the information in the directory when the call ends.8
Using a Polycom RealPresence Group Series Remote ControlYour system supports up to 2,000 contacts, or an unlimited number of contacts when the system isregistered with Microsoft Lync Server 2013 or Skype for Business Server 2015. If your system isregistered with one of the supported Microsoft servers, you can search the directory, view a list ofcontacts, view contact presence states, and call contacts from the directory.For more information about this and other Microsoft and Polycom interoperability considerations, refer tothe Polycom Unified Communications for Microsoft Environments Deployment Guide.Contact Presence StatesIf your system is automatically provisioned and registered to a global directory server, your directory caninclude default LDAP group members and up to 200 global contacts stored by the presence service.Polycom systems registered to Microsoft Lync 2013 or Skype for Business Server 2015 in an integratedenvironment use the following colors to indicate presence states.ColorPresenceGreenAvailableRedBusy or Do Not DisturbBlackOffline or UnknownYellowAwayBrowse the DirectoryIf your system is registered with a Global Directory Server, you can search for information about otheractive sites that are registered with the same Global Directory Server.The global directory contains address book entries downloaded from an enabled global directory server.You can select the global directory to view a list of all global directory entries, scroll through the globaldirectory, and select contacts in the global directory to call. Global directory entries are stored on theGlobal Directory Server, and you cannot edit the entries from the room system. The global directory alsodisplays as a default Favorites group entitled Global Entry.Procedure1. On your remote control, press, then select.2. Scroll through the directory entries to locate the desired contact.Search for Directory ContactsYou can perform a directory search to find contacts to call who are not in your Favorites or Contacts list.Procedure1. With your remote control, press, then select.2. In the search field, enter your contact's last name using one of the following methods: Enter your contact's name using the onscreen keyboard. Enter the numbers on the remote control that correspond with the letters of your contact'sname.3. Select Search to search for an entry in the directory.9
Using a Polycom RealPresence Group Series Remote ControlCallingThere are several ways to initiate calls on the system. You can place a call by entering your contact’sname or number, choosing a contact in the directory, or calling a speed dial or recent contact.You can perform all of the functions that are available when making audio, video, or conference calls.Call by Entering a Name or NumberYou can place a call to contacts by entering a contact's name or number using a touch device or theremote control.Another way you can enter a contact's information is to use an USB keyboard attached to one of thesystem's USB ports. When a USB keyboard is connected to the system, you can enter only numbers withthe remote control on the Keypad or Contacts screens. To enter letters, you need to unplug the keyboardfrom the USB port and use the onscreen keyboard.Note: The onscreen keyboard icon does not display on screen if a USB keyboard is connected to thesystem. After you unplug the USB keyboard, the Keyboard icon displays.Depending on the capabilities of your system and the one you are calling, the dialing information youenter could be similar to one of the following examples:Procedure1. Presson the remote control.2. In the dialing field, enter your contact's information using the remote or onscreen keypad or selectthe onscreen keyboardto enter your contact's information.3. Enter any additional information needed for the call.The available settings depend on the type of call and your system's configuration.4. Pressto place the call.Call from the Contacts ScreenIf your system administrator has added a directory and contacts, you can view your favorites and searchfor contacts registered to the same Global Directory Server.Procedure1. Using your remote control, selectand navigate to2. Highlight an entry in the Contacts list, and presson your system screen.Call from the Recent Calls ListYou can choose a number to call from the Recent Calls list, which includes the most recent incoming andoutgoing calls.Procedure1. Using the remote control, pressand select.2. Highlight the entry you want to call.3. Press .10
Using a Polycom RealPresence Group Series Remote ControlCall a Speed DialYour administrator can save a list of contacts as speed dials, which enables you to quickly call and start ameeting with a contact.Procedure1. At the top of the Home screen, select the Speed Dial tab and select a Speed Dial entry.2. Select Call or press .Place an Audio-only CallIf enabled by your system administrator, you can place an audio-only call from the system.Procedure1. From the Home screen, select Place a Call.2. From the Place a Call screen Keypad, use the remote to navigate to the video/audio slider.3. Press the Select button to switch from videoto audio .4. Enter a telephone number then presson the remote.Answer a CallThe way a RealPresence Group Series handles incoming calls depends on how the system is set up. Thesystem either answers the call automatically, rejects the call automatically, or prompts you to answer thecall manually.If the system is not set up to answer incoming calls automatically, you are prompted to answer the callmanually.Procedure» Using your remote control, select Answer or press.Accept a Call during a CallWhen you receive an incoming call during a call, you can choose to place the current call on hold or hangup the current call and answer the incoming call.Procedure» Do one of the following: Tap Hold Accept. Tap Hang Up Accept.Ignore a CallIf the Polycom RealPresence Group Series system does not answer incoming calls automatically, you canchoose to ignore the call rather than answer it.Procedure» Using your remote control, select Ignore or press.11
Using a Polycom RealPresence Group Series Remote ControlHold a CallIn a point-to-point call, you can place a call on hold, and then answer an incoming call, make an outgoingcall, or switch between two calls.Procedure» PressHome on the remote control, then select Active Call Hold.When a call is on hold, On hold displays on the screen for 5 seconds. After 5 seconds, the holdicondisplays and remains on the screen until all calls are resumed or disconnected.Hold a Call and Place a CallYou can place your current call on hold and place a call to another contact.Procedure1. Presson the remote control.2. Place the call using your preferred method.Switch Between Point-to-Point CallsWhen you have a call on hold, you can switch between the held and active calls.Procedure1. PressHome.2. Select Manage Switch To.Resume a CallWhen you no longer want to keep a call on hold, you can resume the held call.Procedure» Use your remote control to select Resume Call.End a CallWhen your call is complete, hang up the call.Procedure» On the remote control, press.Conference CallsConference, or multipoint, calls involve at least three different endpoints or sites. All endpoints or sitescan participate in conference calls when using a bridge, such as the RealPresence Collaboration Server800s, to host the conference call. The number of sites allowed in the call is determined by the capabilitiesof the bridge hosting the call. Check with your system administrator to find out how many sites areallowed in a bridged conference call.12
Using a Polycom RealPresence Group Series Remote ControlPlace a Conference CallTo start a new conference call, you need to start with the first participant or site and then add additionalparticipants and sites.Procedure1. Call the first site.2. After the call connects, presson the remote control to open the dialing keypad.3. Place a call to the next site.4. Repeat the above steps until all sites are connected.Place a Call during a Conference CallYou can hold a call and place a new call in a video conference.Procedure1. Pressand thenon the remote control.2. Place the call using your preferred method.Answer a Call during a Conference CallWhile in a conference call, you can hold the conference call and answer an incoming call.Procedure» Use your remote control to select Hold Accept to hold the current call and answer the incomingcall.Note: Depending on the call type, you can resume the conference while an individual participantin the meeting is on hold.Switch Between Calls in a Conference CallWhen you have a call on hold, you can switch between the held and active calls.Procedure1. Use your remote control to press.2. Choose the call you want to make active.Resume a Held Call in a Conference CallWhen there is a call on hold, you can resume the held call.Procedure1. Press.2. Select Resume Call.Hang Up an Individual Call in a Conference CallDuring a conference call, you can hang up an individual call within the conference call.Procedure1. Using your remote control, press.2. Navigate to the call you want to end.3. Select Hang Up.13
Using a Polycom RealPresence Group Series Remote ControlHang Up a Held Call and Accept a CallDepending on how your system is set up, you can end the call that was on hold the longest and add anincoming call to the conference.Procedure» Select Hang Up Accept.The oldest held call is ended and the incoming call is added to the conference.Hang Up All CallsWhen you are in a conference call, you can hang up one call at a time or hang up all calls at once.Procedure1. Press.2. Select Leave Conference.Passwords for Conference CallsDepending on how a conference call is set up, you might be required to enter a meeting password to jointhe call. You can also require far-end systems to enter a meeting password to prevent unauthorizedparticipants from joining conference calls hosted by your system.Keep the following points in mind regarding meeting passwords: Audio-only endpoints are unable to participate in password-protected calls. Microsoft Office Communicator clients are unable to join password-protected conference calls. SIP endpoints are unable to dial in to password-protected conference calls.Set Up a Meeting PasswordYou can set up a meeting password to ensure only authorized participants can join the meeting.Procedure1. From the Home screen, press2. Navigate to.Settings User Settings Meetings.3. Enter a password in the Meeting Password field in one of these ways: Press the remote control number buttons. Use the on-screen keypad.4. Pressto save your changes and return to the Home screen.Enter a Meeting PasswordIf a conference call is password protected, you might be prompted to enter a meeting password beforeyou can join the call.Procedure1. If a prompt displays on the screen, use the remote control or on-screen keypad to enter thepassword.2. If you hear an audio prompt, use the remote control to generate DTMF tones. Press the # key onyour remote control, then use the number keys to enter numbers.14
Using a Polycom RealPresence Group Series Remote ControlJoining Meetings from the Calendar with the Remote ControlThe system can connect to the Microsoft Exchange Server 2013 and retrieve calendar informationassociated with a Microsoft Outlook or Microsoft Office 365 account. When the system is connected to theExchange Server, you can join scheduled meetings from the calendar and initiate Lync 2013 or Skype forBusiness 2015 conference calls.View Scheduled MeetingsIf your RealPresence Group Series is configured to connect to the Microsoft Exchange Server, you canview scheduled meetings on the Home screen.To view more information about a meeting on the calendar, select the meeting. Depending on how thesystem is configured, private meeting details might not be visible.Procedure» In the local interface, access the Home screen.Scheduled meetings are listed for the current day and for the next 6 days.Join a Scheduled Meeting from the Home ScreenIf the calendar is configured to display on the Home screen, you can select and join a scheduled meetingfrom the Home screen.Procedure1. Using the remote control, select a meeting on the Home screen.2. Select Join.Join a Scheduled Meeting from the CalendarYou can join a scheduled meeting from the calendar.Procedure1. On the remote control, press2. Select.C
descriptions, refer to the Polycom RealPresence Group Series Release Notes available at support.polycom.com . Note: Your system administrator can configure RealPresence Group Series systems and RealPresence Touch devices to show only those options used in your organization. Therefore, this guide might cover options that you cannot access on .