Transcription
[Type the document title] 4.0.0 November 2012 3725-63715-001/AUser’s Guide for the Polycom RealPresence Group SeriesPolycom Document Title1
Trademark InformationPOLYCOM and the names and marks associated with Polycom's products are trademarks and/or servicemarks of Polycom, Inc., and are registered and/or common law marks in the United States and various othercountries.All other trademarks are the property of their respective owners.Patent InformationThe accompanying product may be protected by one or more U.S. and foreign patents and/or pending patentapplications held by Polycom, Inc. 2012 Polycom, Inc. All rights reserved.Polycom, Inc.6001 America Center DriveSan Jose CA 95002USANo part of this document may be reproduced or transmitted in any form or by any means, electronic ormechanical, for any purpose, without the express written permission of Polycom, Inc. Under the law,reproducing includes translating into another language or format.As between the parties, Polycom, Inc., retains title to and ownership of all proprietary rights with respect tothe software contained within its products. The software is protected by United States copyright laws andinternational treaty provision. Therefore, you must treat the software like any other copyrighted material (e.g.,a book or sound recording).Every effort has been made to ensure that the information in this manual is accurate. Polycom, Inc., is notresponsible for printing or clerical errors. Information in this document is subject to change without notice.ii
ContentsUsing the Remote Control . . . . . . . . . . . . . . . . . . . . . . . . . . . . . . . . . . . . . . . . . 2Recharging the Remote Control Battery . . . . . . . . . . . . . . . . . . . . . . . . . . 3Powering On and Off . . . . . . . . . . . . . . . . . . . . . . . . . . . . . . . . . . . . . . . . . . . . . 4Power On Self Test (POST) . . . . . . . . . . . . . . . . . . . . . . . . . . . . . . . . . . . . . 4Navigating the Local User Interface . . . . . . . . . . . . . . . . . . . . . . . . . . . . . . . . . 5Calling and Answering . . . . . . . . . . . . . . . . . . . . . . . . . . . . . . . . . . . . . . . . . . . . 6Placing a Call . . . . . . . . . . . . . . . . . . . . . . . . . . . . . . . . . . . . . . . . . . . . . . . . .Calling by Entering a Name or Number . . . . . . . . . . . . . . . . . . . . . .Calling from the Recent Calls List . . . . . . . . . . . . . . . . . . . . . . . . . . .Calling from the Contacts Screen . . . . . . . . . . . . . . . . . . . . . . . . . . . .Calling a Speed Dial Entry . . . . . . . . . . . . . . . . . . . . . . . . . . . . . . . . . .66778Answering a Call . . . . . . . . . . . . . . . . . . . . . . . . . . . . . . . . . . . . . . . . . . . . . 8Ending a Call . . . . . . . . . . . . . . . . . . . . . . . . . . . . . . . . . . . . . . . . . . . . . . . . . 8Types of Video Calls You Can Make . . . . . . . . . . . . . . . . . . . . . . . . . . . . . 8Participating in an Encrypted Call . . . . . . . . . . . . . . . . . . . . . . . . . . . . . . . 9Controlling What You See . . . . . . . . . . . . . . . . . . . . . . . . . . . . . . . . . . . . . . . . . 9Viewing Your System’s IP Address . . . . . . . . . . . . . . . . . . . . . . . . . . . . . . 9Selecting and Adjusting a Camera or Other Video Source . . . . . . . . . 10Starting and Stopping Camera Tracking with EagleEye Director . . . 12Setting and Using Camera Presets . . . . . . . . . . . . . . . . . . . . . . . . . . . . . . 13Switching Between Full-Screen Video and the Home Screen . . . . . . . 14Controlling What You Hear . . . . . . . . . . . . . . . . . . . . . . . . . . . . . . . . . . . . . . . 14Adjusting Volume . . . . . . . . . . . . . . . . . . . . . . . . . . . . . . . . . . . . . . . . . . . 14Muting the Microphone . . . . . . . . . . . . . . . . . . . . . . . . . . . . . . . . . . . . . . . 15Enjoying Stereo Audio in Video Calls . . . . . . . . . . . . . . . . . . . . . . . . . . . 15Showing Content . . . . . . . . . . . . . . . . . . . . . . . . . . . . . . . . . . . . . . . . . . . . . . . . 16Showing Content with People Content IP . . . . . . . . . . . . . . . . . . . . . . . 16Showing Content from a Computer Connected Directly toRealPresence Group Systems . . . . . . . . . . . . . . . . . . . . . . . . . . . . . . . . . . 17Working with Directory and Contact Entries . . . . . . . . . . . . . . . . . . . . . . . . 20Searching for Directory Contacts . . . . . . . . . . . . . . . . . . . . . . . . . . . . . . . 20Including Multiple Sites in Calls . . . . . . . . . . . . . . . . . . . . . . . . . . . . . . . . . . . 21Polycom, Inc.iii
User’s Guide for Polycom RealPresence Group SeriesContentsPlacing a Multipoint Call . . . . . . . . . . . . . . . . . . . . . . . . . . . . . . . . . . . . . . 21Hanging Up a Multipoint Call . . . . . . . . . . . . . . . . . . . . . . . . . . . . . . . . . 22Passwords for Multipoint Calls . . . . . . . . . . . . . . . . . . . . . . . . . . . . . . . . 22Multipoint Viewing Layouts . . . . . . . . . . . . . . . . . . . . . . . . . . . . . . . . . . . 23Changing the Way Calls Are Answered . . . . . . . . . . . . . . . . . . . . . . . . . . . . 24Temporarily Refusing Calls . . . . . . . . . . . . . . . . . . . . . . . . . . . . . . . . . . . 24Answering Video Calls Automatically . . . . . . . . . . . . . . . . . . . . . . . . . . 24Muting Automatically Answered Video Calls . . . . . . . . . . . . . . . . . . . . 25Using a Polycom SoundStation IP 7000 ConferencePhone with a Polycom RealPresence Group System . . . . . . . . . . . . . . . . . . 25Using Microsoft Outlook Calendaring . . . . . . . . . . . . . . . . . . . . . . . . . . . . . . 27Viewing Scheduled Meetings . . . . . . . . . . . . . . . . . . . . . . . . . . . . . . . . . . 28Joining a Scheduled Meeting . . . . . . . . . . . . . . . . . . . . . . . . . . . . . . . . . . 28Managing Contacts Using Microsoft OfficeCommunications Server 2007 R2 or Microsoft LyncServer 2010 . . . . . . . . . . . . . . . . . . . . . . . . . . . . . . . . . . . . . . . . . . . . . . . . . . . . . 28Viewing Microsoft Office Communications Server orMicrosoft Lync Server 2010 Presence States . . . . . . . . . . . . . . . . . . . . . . 29Multipoint Calls Using Centralized Conferencing ControlProtocol (CCCP) . . . . . . . . . . . . . . . . . . . . . . . . . . . . . . . . . . . . . . . . . . . . . 30Muting in a CCCP Call . . . . . . . . . . . . . . . . . . . . . . . . . . . . . . . . . . . . 30Using Avaya Network Features with Video Calls . . . . . . . . . . . . . . . . . . . . 30Customizing Your Workspace . . . . . . . . . . . . . . . . . . . . . . . . . . . . . . . . . . . . . 32Allowing the Far-End System to Control Your Camera . . . . . . . . . . . . 32Adjusting for Room Lighting . . . . . . . . . . . . . . . . . . . . . . . . . . . . . . . . . . 32Allowing Video Display on the Web . . . . . . . . . . . . . . . . . . . . . . . . . . . . 33Troubleshooting . . . . . . . . . . . . . . . . . . . . . . . . . . . . . . . . . . . . . . . . . . . . . . . . . 33Placing a Test Call . . . . . . . . . . . . . . . . . . . . . . . . . . . . . . . . . . . . . . . . . . . 33Accessing System Information, Status, and Diagnostics Screens . . . .System Information . . . . . . . . . . . . . . . . . . . . . . . . . . . . . . . . . . . . . . .Status . . . . . . . . . . . . . . . . . . . . . . . . . . . . . . . . . . . . . . . . . . . . . . . . . . .System Diagnostics . . . . . . . . . . . . . . . . . . . . . . . . . . . . . . . . . . . . . . .33343436Searching Documentation . . . . . . . . . . . . . . . . . . . . . . . . . . . . . . . . . . . . . . . . 38Using the Knowledge Base . . . . . . . . . . . . . . . . . . . . . . . . . . . . . . . . . . . . . . . . 38Contacting Technical and Solution Support . . . . . . . . . . . . . . . . . . . . . . . . . 38Polycom Technical Support . . . . . . . . . . . . . . . . . . . . . . . . . . . . . . . . . . . 38Polycom Solution Support . . . . . . . . . . . . . . . . . . . . . . . . . . . . . . . . . . . . 39Regulatory Notices . . . . . . . . . . . . . . . . . . . . . . . . . . . . . . . . . . . . . . . . . . . . . . 39ivPolycom, Inc.
User’s Guide for the Polycom RealPresence GroupSeriesVersion 4.0.0This guide includes overview information that you may find helpful whenyou’re just starting to learn about video conferencing or if you need a quickrefresher. It also includes step-by-step instructions for everyday videoconferencing tasks.This guide covers the following systems: RealPresence Group 300 and RealPresence Group 500 systems RealPresence Group 700 systemPolycom RealPresence Group systems can be configured to show only thoseoptions used in your organization. Therefore, this guide may cover options thatyou cannot access on your system. To find out more about these options,please talk to your administrator.Polycom, Inc.1
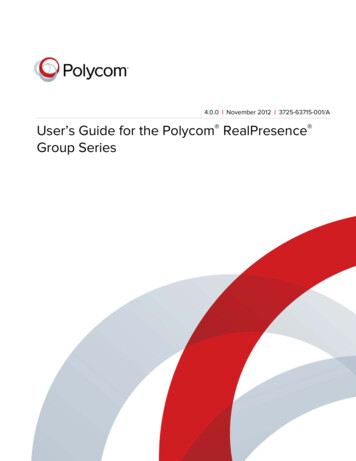
User’s Guide for the Polycom RealPresence Group SeriesUsing the Remote ControlYou use the remote control to place calls, adjust the volume, navigate screens,and select options.Decrease the speaker volumeZoom the camera outSelect button - Selecthighlighted menu itemsIncrease the speaker volumeZoom the camera inNavigate through menu itemsusing the Up, Down, Left, andRight buttons; Pan/tilt thecameraDisplay the menu screenDelete letters or numbers or goback to a previous screenReturn to the Home screenPlace or answer a callPress Menu, then Select, to turnthe last used Content source onor offEnd or reject a callEnter letters or numbersIn camera control mode, move thecamera to a stored presetIn camera control mode, press andhold a number to store a presetGenerate touch DTMF tonesMute all microphones2Polycom, Inc.
User’s Guide for the Polycom RealPresence Group SeriesRecharging the Remote Control BatteryYour system setup sheet shows how to charge the battery in the remote controlthe first time. When the remote control battery power is at 10% or less, anotification is displayed on the home screen. Although other notificationsoverride the low battery notification, the low battery notification returns afterthe other notifications are dismissed. The low battery notification is notdisplayed while the system is in a call.The following steps describe how to recharge the battery.To recharge the remote control battery:1Pull the battery out of the end of the remote control.2Insert the USB plug of the battery into a USB 2.0 port such as the one onyour system.The RealPresence Group 300 and RealPresence Group 500 systems havetwo USB 2.0 ports on the back of the system, while the RealPresenceGroup 700 has one USB 2.0 port on the front of the system and two USB3.0 ports on the back of the system.3Wait until the status light on the battery turns green before removing itfrom the port.4Insert the charged battery into the remote control.The following figure illustrates these steps.If you have a RealPresence Group 700 system, you can also recharge thebattery using the USB port on the front of the system.Polycom, Inc.3
User’s Guide for the Polycom RealPresence Group SeriesPowering On and OffConnect the power and power on the RealPresence Group System after youhave connected all of the equipment that you will use with it. Make sure thatthe system is powered off before you connect devices to it.It is important to note that Polycom RealPresence Group systems do not havewhat you may think of as a power button—they have a power proximity sensor.Instead of pressing an actual button that moves, you touch the sensor (or nearthe sensor) that indicates poweron the front of the system.To power on the RealPresence Group System, do one of the following: Press any button on the remote control or pick up the remote control towake up the system if it is asleep. Press Touch and hold thepower sensor on the front of the system. Becausethe power sensor is touch sensitive, you can touch your finger on or closeto the sensor.on the remote control.The Polycom splash screen is displayed within several seconds.To shut down the RealPresence Group System, do one of the following: Press and holdon the remote control. Touch and hold the power sensor on the front of the system. The indicatorlight changes color and blinks, indicating that the system is shuttingdown. Release the power sensor when the indicator light changes color.Power On Self Test (POST)After being powered on, the RealPresence Group systems automaticallyperform system health checks before the systems are initialized. This processis known as a power on self test, or POST. The status of the POST sequence isdisplayed with the LED indicator light on the front of the device, or in the caseof the RealPresence Group 700 system, in the text field display on the front ofthe system. All test results are logged in the system’s memory. For moreinformation about what the colors of the indicator lights mean, refer to theAdministrator’s Guide for Polycom RealPresence Group Series.When the POST sequence completes with no fatal errors, the RealPresenceGroup system starts normally.Warning errors that occur on the RealPresence Group system during POST canbe found under System Status Active Alerts. For more details, use yourremote control to select More Information.4Polycom, Inc.
User’s Guide for the Polycom RealPresence Group SeriesIf a fatal error occurs during startup, the system will not initialize. ContactPolycom technical support.Navigating the Local User InterfaceCycle through the icons at the bottom of the Home screen to access systemfeatures. To accomplish tasks, you can press buttons directly on your remotecontrol or use your remote control to navigate menus on the left side of thelocal user interface.Available icons vary based on how your administrator configured the system. Menu - Displays the Menu screen, which allows you to place a call,change cameras, show content, and more. Place a call - Displays the keypad so that you can enter numbers orletters to make a call. Content - Allows you to send content from a supported device. System - Displays the System screen, which allows you to obtainsystem information, view system status, and run diagnostic tests. User settings - Displays the User Settings screen, which allows youto change basic camera settings and to configure call and meetingpreferences. Administration - Displays the Administration screen, which allowsyou to configure location settings, specify LAN properties, and managesome user security settings.To return to the Home screen: On the remote control, press.To open the Menu screen: Using your remote control, do one of the following:— Press.— On the Home screen, selectPolycom, Inc.5
User’s Guide for the Polycom RealPresence Group SeriesCalling and AnsweringPlacing a CallYou can use your system to place a video call in any of the following ways: Entering a number or name on the Choosing a name from a recent call list or contact list: — Place a Call Recent Calls— Place a Call Contacts Place a Call Keypad screen.On the Home screen, choosing a Speed Dial entry. This option must beconfigured by your administrator.Calling by Entering a Name or NumberTo place a call by entering a name or number:1To place a call, do one of the following using your remote control:— Press.— Navigate to2 Place a Call Keypad.In the dialing field, enter the dialing information as follows:Numbers: To enter numbers, select each number on the keypad with theremote control or enter numbers on your remote control.Letters: To enter letters, use your remote control to select each letter on theonscreen keyboard. Or you can use the text-entry method commonly usedwith cell phones to select letters directly on your remote control.Backspace: To delete a number or letter, presson the remote control.Depending on the capabilities of your system and the system you arecalling, the dialing information could look like one of these examples:— 10.11.12.13 (IPv4 address—include the dots)— 2555 (E.164 extension for H.323 or SIP)— stereo.polycom.com (host name)— user@domain.com (SIP)6Polycom, Inc.
User’s Guide for the Polycom RealPresence Group Series3Enter any additional information needed for the call. The availablesettings depend on the type of call and your system’s configuration.4Presson the remote control to place the call or select Place a Call.For more information about placing calls, refer to Types of Video Calls YouCan Make on page 8.Calling from the Recent Calls ListYou can quickly choose a number to call from a list of the sites you have calledrecently. The Recent Calls screen provides details of all incoming and outgoingcalls, including the time of the calls.To place a call from the Recent Calls screen:1Go to Place a Call and select Recent Calls.2Highlight the entry and select Call or selecton your remote control.You can filter the list of all calls by selecting Missed, Received, or Placed.To see details about a call listed on the Recent Calls screen, select a call in thelist.Calling from the Contacts ScreenIf your system administrator has added a Directory and Favorite contacts, youcan see the list on the Contacts screen.To place a call from the Contacts screen:1Go to Place a Call and select Contacts.2With your remote control, highlight the entry on the RealPresence Groupsystem screen and select Call or press.To see more details about an entry, select Info.Polycom, Inc.3To search for an entry in the directory, select Search, then enter thecontact name.4Clickon the onscreen keyboard.7
User’s Guide for the Polycom RealPresence Group SeriesCalling a Speed Dial EntryIf your system administrator configured Speed Dial, you can quickly call acontact in your directory.To place a call to a speed dial entry:Using your remote control, do the following:1At the top of the Home screen, select the Speed Dial tab.2Select a Speed Dial entry to call.3To place the call, press the Select button or navigate to Call.Answering a CallThe way a RealPresence Group system handles incoming calls depends onhow it is configured. It either answers the call automatically, rejects the callautomatically, or prompts you to answer the call manually.To answer a call manually: Using your remote control, select Answer or press.For more information about answering calls, see Changing the Way Calls AreAnswered on page 24.Ending a CallTo hang up a call: On the remote control, press.If prompted, confirm that you want to hang up.Types of Video Calls You Can MakeDepending on your system configuration, you may be able to make calls usingH.323 or SIP. By dialing call networked and public sites, you may be able touse these protocols:8 SIP URI E.164 format Host name IP addressPolycom, Inc.
User’s Guide for the Polycom RealPresence Group SeriesE.164 format: If you need to dial an extension (E.164 address), enter theextension in the second entry field. If your system is not configured with asecond entry field, you can enter the extension when the gateway prompts you.You can also specify characters in the dial string as instructed by the systemadministrator.Participating in an Encrypted CallIf encryption is enabled on the system, a locked padlock iconappears onthe monitor screen when a call is encrypted. If a call is not encrypted, an openpadlock appears on the monitor screen. If you are in a point-to-point call or a multipoint call hosted by anothersystem, the padlock icon displays the state of your individual connection. If you are hosting a multipoint call, the padlock icon displays thecombined state of all connections: encrypted if all connections in the callare encrypted, unencrypted if one or more connections in the call are notencrypted.In one call, some connections may be encrypted while others are not.However, the lock icon may not accurately indicate whether the call isencrypted if the call is cascaded or includes an audio-only endpoint. Ifencryption is required on your system, the far end must support encryption orthe call will not be completed. To avoid security risks, Polycom recommendsthat all participants communicate the state of their padlock icons verbally atthe beginning of a call.Controlling What You SeeViewing Your System’s IP AddressTo view your IP address:Polycom, Inc.1Selectand navigate to System.2Select Information Network. Your IP address is listed on this screen.9
User’s Guide for the Polycom RealPresence Group SeriesSelecting and Adjusting a Camera or Other Video SourceYou can use the remote control to select and adjust the main camera or othernear-end or far-end video sources, such as document cameras or computers.You may be able to adjust other auxiliary cameras or far-end cameras thatsupport pan, tilt, and zoom movement. You can adjust the far-end camera onlyif it is configured at the far end to allow you to control it.When you are in camera control mode, you can press and hold a number tosave a preset. For more information about presets, see Setting and UsingCamera Presets on page 13.To select a near-end or far-end camera, or other video source:Out of a call: Using your remote control, go to Cameras Select Camera. Thenselect the camera or other video source you want to use from the list.In a call: Select Cameras. Then select Your Cameras for near-end control orTheir Cameras for far-end control. To switch between Your Cameras and Their Cameras without accessingthe menu, press Select on the remote control while in a call.To return to a previous screen after adjusting your or their camera settings,select.To adjust a Polycom EagleEye HD, Polycom EagleEye II, Polycom EagleEyeAcoustic, Polycom EagleEye 1080, Polycom EagleEye View, PolycomEagleEye Director or Polycom EagleEye III using the remote control:1Select either a near-end or far-end video source to control. During amultipoint call being hosted by a system in the call, you can only adjust acamera at the far end that has a current speaker.If you are using an EagleEye Director and camera tracking is on, you must turncamera tracking off before adjusting the camera.102Press the navigation buttons on the remote control to move the cameraup, down, left, or right.3On the remote control, pressto zoom out orto zoom in.Polycom, Inc.
User’s Guide for the Polycom RealPresence Group SeriesTo adjust a Polycom EagleEye View camera:1Manually swivel the camera right, left, up, or down to frame the view.2Turn the focus wheel to adjust the focus.3To select the camera, select Cameras. Then select Your Camerasfor near-end control or Their Cameras for far-end control.4Pressto zoom out orto zoom in.If you zoom in, you can pan or tilt the camera electronically by pressingthe navigation buttons.Polycom, Inc.11
User’s Guide for the Polycom RealPresence Group SeriesTo open or close the privacy shutter on the Polycom EagleEye View camera: Move the slider to the right to close the privacy shutter, or to the left toopen it. You can still make and receive calls when the shutter is closed, butthe people at the far end cannot see you.Starting and Stopping Camera Tracking with EagleEye DirectorIf EagleEye Director tracking is enabled, the camera follows the person orpeople who are speaking. This tracking action, also called automatic camerapositioning, can be manually started or stopped.In a call, you can start and stop camera tracking.To start camera tracking: Using your remote control, go toand press the Select button. Cameras Start Camera TrackingTo stop camera tracking: Using your remote control, go toand press the Select button. Cameras Stop Camera TrackingCamera tracking can also start or stop based on the following actions:12 Camera tracking starts automatically when you make a call. Camera tracking stops once you hang up a call. Camera tracking temporarily stops when you mute the RealPresenceGroup system. It resumes when you unmute the RealPresence Groupsystem.Polycom, Inc.
User’s Guide for the Polycom RealPresence Group SeriesSetting and Using Camera PresetsCamera presets are stored camera positions that you can create ahead of timeor during a call. The system uses preset 0 as the default camera position for allpreset camera positions. This default camera position is zoomed out, pannedstraight ahead with horizontal tilt.Presets allow you to: Quickly point a camera at pre-defined locations in a room. Select a video source such as a document camera or an auxiliary camera.If your system’s camera supports pan, tilt, and zoom movement, you cancreate up to 10 preset camera positions for the near-end camera. Each presetstores the following information: Camera number Camera zoom level Direction the camera pointsThese presets remain in effect until you change them.If far-end camera control is allowed, you can create 10 presets for the far-endcamera. These presets are saved only for the duration of the call. You may alsobe able to use presets that were created at the far end to control the far-endcamera.Points to note about camera control and layouts: When in a call, selecting near camera control pans and zooms the localcamera without changing the layout. When out of a call, selecting camera control changes the self-view fromPicture-In-Picture (PIP) to full screen. Incoming calls override the full-screen self-view layout.To view stored presets: Selectscreen. Cameras Presets. Icons for presets 1-10 are shown on theTo move the camera to a stored preset:Polycom, Inc.1Select Cameras Presets.2Press a number on the remote control or navigate to the snapshot andselect it.13
User’s Guide for the Polycom RealPresence Group SeriesTo store a preset:1Select Cameras Presets.2Adjust the camera angle or zoom the camera in or out to the desiredposition.3Press and hold a number to store the preset position.A snapshot is taken and replaces any existing preset stored at the numberyou entered.You cannot delete a preset. Instead, overwrite an existing preset with a newcamera position.Switching Between Full-Screen Video and the Home ScreenWhen your call connects, the system automatically shows video on the wholescreen. You can switch back to the home screen during a call if, for example,you need to adjust a user setting and your system is configured to allow youto do so.To see the Home screen: Presson the remote control.To see the full screen: Presson the remote control.Controlling What You HearAdjusting VolumeYou can raise or lower the volume of the meeting. Changing the volume affectsonly the sound you hear at your site.To adjust the volume: On the remote control, press and holdthe near-end volume.14orto increase or decreasePolycom, Inc.
User’s Guide for the Polycom RealPresence Group SeriesMuting the MicrophoneYou can mute the microphone if you do not want the far end to hearconversations at your site.To mute or unmute the microphone: Presson the remote control.If a Polycom tabletop microphone array is connected to your system, you canalso mute the call by touchingon the microphone.The indicators on the microphone are red when your audio is muted. Thisnear-endicon also appears on the monitor display.Points to note about muting the microphone: Muting the microphone does not mute audio coming from any deviceconnected to the content audio inputs. The microphone may automatically mute when the system is asleep. The red mute indicator on the front of the Polycom EagleEye View camera islit when the system is muted or when a Polycom microphone is connectedand muted. The microphone may mute when the system automatically answers anincoming call.Enjoying Stereo Audio in Video CallsIf your video conferencing room is configured to use stereo sound, the left andright microphone inputs are configured during system setup. It is importantthat you do not move the microphones as this may detract from the stereoaudio experience.Stereo audio is only available in video calls of 256 kbps or higher.Polycom, Inc.15
User’s Guide for the Polycom RealPresence Group SeriesShowing ContentTo show people and content at the same time, the RealPresence Group systemsmust be configured for content. You can show the following to the far-endsystems: Any information stored on a computer connected directly to a PolycomRealPresence Group system A paper document or object placed on a document camera A VCR or DVD player connected directly to a Polycom RealPresenceGroup system The Polycom People Content IP application installed on a computer,with any Polycom RealPresence Group systemYou can show one content source and one people video source at a time, andyou can switch to a different type of content or people video source if you needto. Participants at other sites can also show content or people video sources.Content shown is from one site at a time; another site sharing contentoverrides any content being shared.When you are showing content, a message appears on your main monitor.Whether you also see the content on your monitor or projector depends onhow your system was configured.You can show content on a RealPresence Group 300 system by using thePeople Content IP application only.Showing Content with People Content IPThe People Content IP application allows you to send content from acomputer that is not connected directly to the RealPresence Group system.To install People Content IP on a computer:161On a computer with a Microsoft Windows XP, Windows Vista, orWindows 7 operating system, open a web browser and go towww.polycom.com/ppcip.2Download and install the People Content IP software.Polycom, Inc.
User’s Guide for the Polycom RealPresence Group SeriesPoints to note about People Content IP: People Content IP provides video-only content. No audio is shared. People Content IP supports any computer desktop resolution with color set to16-bit or higher. Your computer resolution can be set to anything, but People Content IP scalesthe image to 1024x768 or 1280x720. The People Content IP application must be installed on a computer.To start showing content:1On your computer, start the Polycom Peo
refresher. It also includes step-by-step instructions for everyday video conferencing tasks. This guide covers the following systems: RealPresence Group 300 and RealPresence Group 500 systems RealPresence Group 700 system Polycom RealPresence Group systems can be configured to show only those options used in your organization.