Transcription
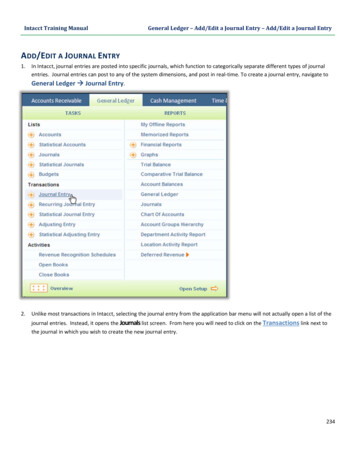
Intacct Training ManualGeneral Ledger – Add/Edit a Journal Entry – Add/Edit a Journal EntryADD/EDIT A JOURNAL ENTRY1.In Intacct, journal entries are posted into specific journals, which function to categorically separate different types of journalentries. Journal entries can post to any of the system dimensions, and post in real‐time. To create a journal entry, navigate toGeneral Ledger Journal Entry.2.Unlike most transactions in Intacct, selecting the journal entry from the application bar menu will not actually open a list of thejournal entries. Instead, it opens the Journals list screen. From here you will need to click on the Transactions link next tothe journal in which you wish to create the new journal entry.234
Intacct Training Manual3.General Ledger – Add/Edit a Journal Entry – Add/Edit a Journal EntryOpening the transactions of a journal will display a screen named [Journal Symbol] – Journal Transactions. This is the list ofjournal entries within that journal. To edit an existing journal entry, click the Edit link next to the journal entry. To add a newjournal entry, click the Add button.4.The [Journal Name] – Journal Entries screen contains the information needed to define the journal entry including the postingDATE, a DESCRIPTION, and the line item Entries section.There is no numbering sequence for Journal Entries other than a sequential numbering created by the system for theparticular journal the entry is posted in. When creating a new journal entry the system automatically generates ajournal entry number for the entry. If the journal entry should tie to an external number, the REFERENCE NUMBERfield can be used.235
Intacct Training ManualGeneral Ledger – Add/Edit a Journal Entry – Add/Edit a Journal EntryFieldTypeNoteTRANSACTION NOAuto‐fillThe transaction number is created by the system when the journal entry is firstsaved.JOURNALAuto‐fill / Drop‐down listThe journal in which the entry should post. If you navigated through the [JournalSymbol] – Journal Transactions screen in order to create the journal entry, thisfield is hidden and automatically populated with the applicable journal where theentry was added. The field only appears if you opted to use the orange addbutton shortcut associated with the Journal Entry item on the GeneralLedger drop‐down menu (as shown below). In this case, you must manuallydefine the appropriate journal for the entry using this field.236
Intacct Training ManualGeneral Ledger – Add/Edit a Journal Entry – Add/Edit a Journal EntryFieldTypeNoteDATEDateEnter the GL posting date for the journal entry.Depending on system configuration settings, journal entries can bepast and future‐dated. If a journal entry is dated in the past but thebooks are closed for that period, the system display an error andthe date will need to be changed or the books opened beforeposting.REVERSE DATEDateA journal entry may optionally be set to automatically reverse on a specified date.If you wish the journal entry to automatically reverse, select the date for thereversal here. If you do not want the journal entry to automatically reverse, leavethis field blank.The reversing entry is created immediately upon saving the originaljournal entry, but it has a future posting date. This means thatwhen running a report as of a future date, the reversal is alreadyincluded in the report. You do not have to wait for the actual dateof the reversal for the entry to be created.DESCRIPTIONTextYou must enter a description for the journal entry. Besides the sequentialtransaction number provided by the system, this is the main identifying fieldrelated to the journal entry.COMMENTTextIf you need to make a comment about the journal entry, you can enter it in thisfield. Your comment would be added to the history for this transaction.REFERENCE NUMBERTextIf you need to tie the transaction to some outside document or reference, youmay enter a reference number in this field.SOURCE ENTITYDrop‐down listIf creating a journal entry at the root level of a multi‐entity company, you candefine the source entity for the transaction.As noted on the journal entry screen, a source entity is onlyrequired if the journal entry does not balance by entity.ATTACHMENTDrop‐down listYou may attach a document of any file type as support for the journal entry. Seethe Attachments section for more details.5.In the Entries section you can define default dimensions and other data for the journal entry. Doing so ensures that all lines ofthe journal entry are associated with the same information, which can save time and reduce errors. Set default dimensions byclicking on the Show defaults button located on the left side of the Entries section of the journal entry. The defaults sectionwill display with fields for each of the dimensions, along with fields for memo, ALLOCATION and multi‐currency data (if workingin a multi‐currency environment). Select the defaults using the drop‐down list in each field as needed to associate all lines ofthe journal entry to the desired dimension, allocation, transaction currency, etc.237
Intacct Training Manual6.General Ledger – Add/Edit a Journal Entry – Add/Edit a Journal EntryOnce you have selected the dimensions that should be defaulted to all lines of the journal entry, click the Apply defaultsbutton. A warning message will appear warning you that the dimensions selected will override all line items currently coded.Click the OK button to continue.7.In the Entries section, enter the individual lines of the journal entry including the ACCOUNT, the DEBIT amount and the CREDITamount. Note that the journal entry lines may look different depending on your company configuration. Some fields may bevisible or included in the displayed line while others may be included in the Show Details area of the journal entry line. To seethe less commonly used line item fields in the Show Details section, click anywhere on the line (it doesn’t matter which field)and the Show Details tab button should appear. Click the Show Details button and the system will expand a hiddensection of the line containing additional fields, such as infrequently used dimensions.In order to see the details automatically, the user can check the EXPAND LINE DETAILS option from the My Preferencesscreen. The Entries section can be navigated using the Previous and Next buttons in order to move through theentry lines.238
Intacct Training ManualGeneral Ledger – Add/Edit a Journal Entry – Add/Edit a Journal EntryIn a multi‐currency environment there will be a number of additional fields related to the transaction currency andexchange rates of the journal entry. Additionally, some fields will have a slightly different name in a multi‐currencyenvironment. Information about the differences in a multi‐currency environment can be found in the Multi‐Currency Environment section of this document.FieldTypeNoteDOCNumberIf the lines of this journal entry correspond to some number other than asequential line number sequence you may enter that number here.ACCOUNTDrop‐down listEnter or select the account for this line of the journal entry.Some accounts may require specific dimensions be includedwhen those accounts are used. Although not displayed asrequired, you will receive an error message if you try to postthe journal entry without them.DEPARTMENTDrop‐down listYou may select a department to which the journal entry line will be codedusing this field.LOCATIONDrop‐down listYou may select a location to which the journal entry line will be coded usingthis field.This field is required if working in a multi‐base currencyenvironment.TRANSACTION DEBITNumberEnter the debit amount to be applied to the account. While entry of thisfield is not required on every line, a journal entry must balance debits andcredits in total.239
Intacct Training ManualGeneral Ledger – Add/Edit a Journal Entry – Add/Edit a Journal EntryFieldTypeNoteTRANSACTION CREDITNumberEnter the credit amount to be applied to the account. While entry of thisfield is not required on every line, a journal entry must balance debits andcredits in total.ALLOCATIONDrop‐down listYou may select an allocation for this line of the journal entry. Allocationscan be coded to any of the available dimensions in Intacct. If you select anallocation, the allocation table will appear in the Allocation Splits section ofthe Show Details area. An allocation can be overridden by manuallychanging the allocation splits AMOUNT and/or dimensions in the AllocationSplits section. For more information regarding allocations, refer to theAdd/Edit Allocation section of this document.Selecting an allocation automatically clears any of thedimension field settings made on the journal entry line.Conversely, if an allocation has been selected and youattempt to set one of the dimension fields on the journalentry line, the Allocation field and Allocation Splits section areautomatically cleared.8.MEMOTextTo post an explanation along with the line of the journal entry, include amemo in this field.PROJECTDrop‐down listYou may select a project to which the journal entry line will be coded usingthis field.CUSTOMERDrop‐down listYou may select a customer to which the journal entry line will be codedusing this field.VENDORDrop‐down listYou may select a vendor to which the journal entry line will be coded usingthis field.ITEMDrop‐down listYou may select an item to which the journal entry line will be coded usingthis field.EMPLOYEEDrop‐down listYou may select an employee to which the journal entry line will be codedusing this field.CLASSDrop‐down listYou may select a class to which the journal entry line will be coded using thisfield.When you have finished entering all lines for the journal entry, if you want to entry to post to the General Ledger on thespecified DATE, click the Post button. If you want to save your progress without posting the journal entry to the GeneralLedger, you can click the Draft button instead. Posting or drafting the journal entry returns you to the screen where youinitiated the journal entry add. If this was from the [Journal Symbol] – Journal Transactions screen, as these instructionsdescribe, the transaction number will now be visible next to the journal entry on this screen. Clicking the Post & New orDraft & New buttons does the same thing as the aforementioned Post and Draft buttons, except these buttons240
Intacct Training ManualGeneral Ledger – Add/Edit a Journal Entry – Add/Edit a Journal Entryautomatically direct you to another add journal entry screen instead of returning you to the previous location. You can alsoclick the Print link if you wish to print a hard copy of the journal entry from this screen.If you set the journal entry with a REVERSAL DATE, the reversing entry will also be created; however, as with thejournal entry itself, it will not impact the General Ledger until the date that was specified.EXPORT JOURNAL ENTRIES TO MICROSOFT EXCELYou can easily export a journal entry to Excel, where line items can be easily searched, sorted, and filtered. Theability to export to Excel applies to any journal entry in the General Ledger, navigate to General Ledger Journal Entry.9.From the General Ledger menu, select the list for the type of journal entry you're interested in.241
Intacct Training ManualGeneral Ledger – Add/Edit a Journal Entry – Add/Edit a Journal Entry10. Locate the journal that contains the entry, and click the View Transactions link next to it.11. In the transactions list for the journal, locate the journal entry and click the Excel link next it.12. You can also export to Excel while you are editing or viewing a journal entry. Simply click the Edit or View button next to theJournal Entry242
Intacct Training ManualGeneral Ledger – Add/Edit a Journal Entry – Add/Edit a Journal Entry13. Click the Excel button at the top right of the screen.243
Intacct Training Manual General Ledger - Add/Edit a Journal Entry - Add/Edit a Journal Entry 235 3. Opening the transactions of a journal will display a screen named [Journal Symbol] - Journal Transactions. This is the list of journal entries within that journal.