Transcription
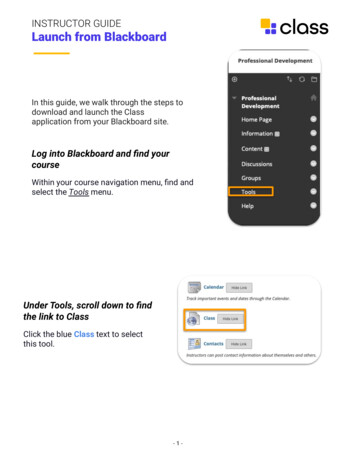
INSTRUCTOR GUIDELaunch from BlackboardIn this guide, we walk through the steps todownload and launch the Classapplication from your Blackboard site.Log into Blackboard and find yourcourseWithin your course navigation menu, find andselect the Tools menu.Under Tools, scroll down to findthe link to ClassClick the blue Class text to selectthis tool.-1-
Class Launch PadEvery time you click the Class for Zoom link in Blackboard, you will see thislanding page. This guide will walk you through creating your Class sessions,setting a schedule for those sessions, and launching the Class application fromyour Blackboard site.Step 1: Download the ClassapplicationIf this is your first time using the Classapp, you’ll have to download the latestversion.If you need help, here are the install guides: https://www.class.com/install-guides/If you need further help, please check with your organization’s Technology Support Team.-2-
Step 2: Authorize ClassBefore you can access Class from Blackboard, you need to sign in to theClass app using your Zoom credentials to authorize Class to allow access toyour Zoom account. If you don’t complete this step, you will receive an errormessage about not being logged into Zoom when accessing Class from theBlackboard course.-3-
Step 3: Edit Class DetailsAfter you’ve downloaded the application, you’ll come back to Blackboard andselect “Edit Class Details.” This will open a pop-up window where you will setyour Class schedule and settings.The Class name will pull fromthe Blackboard course, andyou’ll set the days and times foryour course schedule. Whatyou’re doing here is tellingClass what dates and timesyou’d like to take attendanceand keep engagement metrics.As you create your schedule,the dates will populate in the“Selected Dates” field shownhere. For any dates for whichyou do not want to takeattendance (eg: holidays), clickthe red X to remove that datefrom the Class schedule.“Add More Dates” allows you toadd different dates & times (eg:lab sessions) to this schedule.-4-
The Class Passcode isautomatically generated, and canbe left as-is, or you can changethis to any 10 alphanumericcharacters. Remember that thispasscode is case-sensitive.Next, you can select WaitingRoom options, and ParticipantJoin options.Finally, if you have any co-instructors, or anyone you want to be able to be the Hostin your Class session if you are not available to start Class, enter their emailaddress as an Alternative Host.Note: Alternative hosts must be already set up as an instructor in Class. Enter a Mojoticket to have an alternative host added if unable to setup an alternative host.Save your Class details when you are done.Step 4: Show All SessionsTo see your schedule on this page, select Show All Sessions as shown.-5-
Step 5: Launch Class for ZoomNow that you have created the Class schedule and edited your Class details,you will need to Launch Class for Zoom.Step 6: Welcome to ClassWhen you log into Class, you’ll see yourself on the Instructor Podium, and theClass name will populate at the top of the screen as shown below.Learners entering Class via Blackboard will be added to your Class Roster(under Class Management) with their first and last name, as well as theiremail address. Learners who enter Class via Blackboard will also beautomatically verified upon entry.For further assistance, please visit: https://www.class.com/support-6-
Launch from Blackboard In this guide, we walk through the steps to download and launch the Class application from your Blackboard site. Log into Blackboard and find your course Within your course navigation menu, find and select the Tools menu. Under Tools, scroll down to find the link to Class Click the blue Class text to select this tool. -