Transcription
Altair Monarch v2020.0MONARCH SERVERAUTOMATION EDITION - TUTORIAL
TABLE OF CONTENTSIntroduction . 1Overview of Automator Objects. 1Automator Workflow . 2Visual Process Designer . 3Overview of the Tutorial Lessons . 4Lesson 1 - Working with Project Files . 7About Project Files . 7Creating a Project File with the Project Editor . 7Specifying General Settings for a Project File . 8Assigning a Model to a Project File . 8Selecting Input Files for a Project File . 10Configuring a Project File Export. 12Lesson 2 - Working with Processes . 17About Processes . 17Creating a Process. 17Specifying General Settings . 17Specifying Advanced Settings . 19Specifying Job Log Disposition Settings . 21Specifying Monitoring Settings . 22Creating a Custodian Schedule . 25Creating Alerts . 26Lesson 3 - Running and Scheduling Processes . 28Running a Process . 28About Jobs . 28Viewing a Job's Log File. 29Viewing the Output File . 30Scheduling a Process . 30Lesson 4 - Working with Distributions . 33About Distributions . 33Adding a Global Distribution . 33Adding an RSS Global Distribution . 35Defining a Global Translate Distribution . 36
Configuring the RSS Global Distribution . 37Lesson 5 - Working with Alerts . 41About Alerts . 41Adding an Alert. 41Re-running a Failed Job . 43Lesson 6 - Working with Visual Processes . 45Creating a Process with VPD . 45Instructions for Process Work Flow Building . 46Adding and Assigning Items to the Process . 47Configuring a Process Run . 49About Process Logs . 53Verifying Workspaces . 55Working with the Hub Element . 60Working with Scripts. 69Lesson 7 - Working with Altair Knowledge Hub . 74Configuring Knowledge Hub Integration . 74Creating a Visual Process with Knowledge Hub Files . 75Additional Resources . 82Altair Engineering, Inc. All Rights Reserved. / Nasdaq:ALTR / altair.com
INTRODUCTIONAltair Monarch Server Automation Edition is designed to be used in conjunction with Altair Monarch Complete, a dataextraction and analysis tool that lets you view, analyze, extract, and print data from existing computer reports. Anystructured report that is used in your organization can be utilized by Monarch Complete. When Monarch Complete"reads" a report file, instead of producing a hard copy printout with words and numbers frozen on the page, MonarchComplete creates a soft copy of the report on screen, with live data you can work with.Features and FunctionsAutomator has the following capabilities:Automated conversion of data from TXT, PDF, ISAM, XPS, and OLE DB/ODBC sources to an ISAM, or OLEDB/ODBC (for example, SQL Server, Oracle) target by scheduled or event-driven execution via monitoredfolders.Email distribution of PDF, ISAM, and Open XML SpreadsheetsFile system and SharePoint distribution of input and export filesRSS publicationCreation of logs and alerts resulting from operationsUser creation of pre-processes and post-processes using VB.NET ScriptingScheduled administration of job logs and database entriesOVERVIEW OF AUTOMATOR OBJECTSThroughout this Tutorial, we shall be dealing with the following:ProjectA project is a key component of a process. When you create a process in Automator, one of the key steps youperform is to assign a project (or projects) to it.A project file is a special file created with the Project Editor (or with Monarch Complete) that has an XPRJ or DPRJextension and which contains all of the information necessary to execute one or more Automator operations. Aproject uses a text or database input, extracts data from the input via Monarch model files, and exports the extracteddata to various file types (e.g., XLS, PDF, MDB, TXT, HTML, XML, portable reports, etc.).ProcessA process is a set of one or more XML project files (i.e., XPRJ or DPRJ files) that are to be executed to perform adesired Automator operation. Processes utilize Monarch Complete models and project files to extract data from textor database sources and then export them to various file types (e.g., XLS, MDB, TXT, HTML, XML, portable reports,etc.).JobA job is a resulting task for one or more projects that comprise the associated process. When a process runs, itultimately spawns one or more jobs, with each job appearing as a row on the Jobs page.These are explained in detail in the succeeding lessons.Monarch Server v2020.0 Automation Edition - Tutorial1
AUTOMATOR WORKFLOWTo help you better understand of what a typical Automator session might consist, let's look at the steps you wouldlikely perform during one.NOTESThis sequence of events does not have to be followed exactly. Dependingon your needs, you may perform fewer or more steps than those listedbelow, and the order in which you perform them may differ.Create an XML Project FileBefore we can begin working with Automator, we need to create an XML project file. Automator can utilize XMLproject files created either via Monarch Complete or Project Editor. We will create the Automator Tutorial project filevia Project Editor.When creating a project file you may perform the following steps:Specify general settings - General settings include an author for the project file, its name and a description of it.Specify input file - Input settings include the input file type (text or database), the input file(s) you want to assignto the project, how multiple input files should be grouped, etc.Select a model file - You should assign a model file to the project to specify which data will be extracted fromthe input file.Specify export settings - When you specify project export settings, you also specify an export (or number ofexports) of output files and specify any distribution actions you want to apply to them.Specify prerequisite settings - When you specify prerequisite settings, you also add a file prerequisite or acommand line prerequisite to the project. Any prerequisite you add must first be met if the associated process isto run.Specify script settings - Script settings allow you to specify pre-export and post-export scripts to modify theinput and output files, respectively.Create a ProcessOnce you have created or identified the project file(s) you want to work with, you can create a process. Creating aprocess includes multiple steps, such as the following:Specify general settings - General settings include a name and description of the process, how many projectsper job setting (i.e, one per job or multiple ones per job), the project(s) to be assigned to the process, etc.Specify advanced settings - Advanced settings include a priority setting, and whether to allow parallel jobs andprocess retries.Specify job log disposition settings - These settings determine what will be done with the job log after the jobhas run, and when (i.e., under what circumstances) the specified action will carried out.Specify input file monitoring settings - These settings enable you to tell Automator to monitor a particularlocation, then trigger the running of a process when a specific input file (or any file of the specified file type)appears in that location.Run the ProcessMonarch Server v2020.0 Automation Edition - Tutorial2
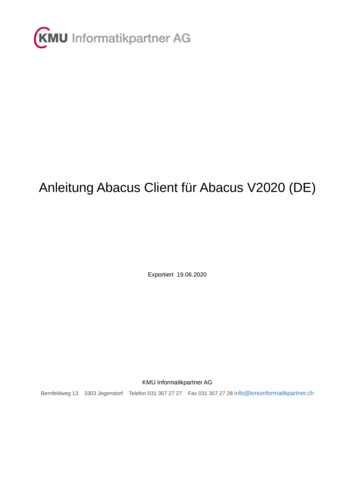
Once you have completed the process configuration, you canRun the process manually.Schedule the process to run.Configure an input file specification which will trigger the process to run when a particular input file arrives in thespecified location.VISUAL PROCESS DESIGNERAutomator has a Visual Process Designer (VPD) tool that allows you to create the process and define its work flow ina fast and convenient way.You have full set of tools for process creation that is used in standard processes but you have greater capabilities toapply these tools and therefore set up more sophisticated scenarios.Data acquisition, conversion and distribution is visualized in the Process Designer through use of graphic elementsand connectors arranged by threads.By using library of graphic elements and a workspace, you can quickly assemble different process components to setthe required process. The created process can be represented as a graph in the Process Designer window.Monarch Server v2020.0 Automation Edition - Tutorial3
OVERVIEW OF THE TUTORIALLESSONSBefore you attempt to use Automator, we encourage you to walk through this tutorial, which is designed to provideyou with a quick introduction to Automator's features and capabilities. While not exhaustive in scope, the tutorialshould enable you to begin using Automator effectively.The tutorial includes the following lessons:Lesson 1Lesson 1 focuses on project files. It explains what they are and then describes how to create them.Lesson 1 contains:Information about project filesHow to create a project file with the Project EditorHow to assign a model to the projectHow to select an input file for the projectHow to configure a project exportLesson 2Lesson 2 covers processes. It explains what they are and then describes how to create them.Lesson 2 contains:Information about processesHow to create a processHow to assign a project file to a processHow to specify general settingsHow to specify advanced settingsHow to specify job log disposition settingsHow to specify and enable a Custodian scheduleLesson 3Lesson 3 explains how to run processes, both manually and via a scheduled runtime. It also introduces us to jobs.Lesson 3 contains:How to run a process manuallyInformation about jobsHow to view a jobHow to view the job’s log fileHow to view the output fileMonarch Server v2020.0 Automation Edition - Tutorial4
How to schedule a process to runLesson 4Lesson 4 defines distributions and describes how to create them. It also explains how to re-run a job.Lesson 4 contains:Information about distributionsHow to add a global distributionHow to add an RSS global distributionHow to define a global translate distributionHow to configure an RSS global distributionLesson 5Lesson 5 defines alerts and describes how to create them. It also explains how to re-run a job.Lesson 5 contains:Information about alertsHow to add an alertHow to view the job's log file for the failed processHow to re-run a failed jobLesson 6Lesson 6 describes how to create, configure, and run processes using VPD.Lesson 6 contains:Information about creating a process with VPDInstructions for process work flow buildingInformation about adding and assigning items to the processInformation about configuring a process runningDetails about project logsSteps to view the log file of a job for a failed processLesson 7Lesson 7 introduces the integration of Automator and Knowledge Hub.Using the web helpAutomator comes with a web help that provides information not included in this tutorial. If you encounter an item ortopic you would like additional information on while going through the tutorial lessons, there is a good chance you willfind it in the web help.To access the web help, click the Help icon at the top of the page.Monarch Server v2020.0 Automation Edition - Tutorial5
NOTESCertain steps in the tutorial proper will require the use of specific files.These files are only available in the single server installation of Automator.For details, refer to Monarch Server Automation Edition Single ServerInstallation Guide.Monarch Server v2020.0 Automation Edition - Tutorial6
LESSON 1 - WORKING WITHPROJECT FILESThis lesson deals with project files. It describes what they are and what they do, then takes you through the processof creating one with the Project Editor.ABOUT PROJECT FILESA project file is a configuration file – created via Monarch Complete or the Project Editor – that has an XPRJ or DPRJextension and contains all of the information necessary to execute one or more Automator operations.A project file stores:Information about the project's data source (e.g., one or more report files, an external database, etc.)The path and filename of the model fileThe name of the active filter, sort order and summaryInformation about project exports, portable report settings, and process prerequisitesWhen you create a process in Automator, one of the key steps you perform is to assign a project file (or files) to it.Projects generated within Monarch Complete can be used "as is" in and can also be enhanced with the use of theProject Editor to add Automator-specific settings, such as process prerequisites, to them.For more information on project files, consult the Automator Help file.CREATING A PROJECT FILE WITH THEPROJECT EDITORLet’s try creating our project file via the Project Editor. To open the Project Editor, on the Navigation Tree, clickAutomator Standard Processes, and select Project Editor.When creating a new project file via the Project Editor, you may perform the following steps:Specify general settings - General settings specify an author for the project file, its name and provide adescription of it.Specify a model setting - When you specify a model setting, you assign a model to the project, and specify thedesired verification settings, if any.Specify input settings - Input settings specify the input file type (i.e., text or database), the input file(s) you wantto assign to the project, how multiple input files should be grouped, etc.Specify export settings - When you specify project export settings, you specify an export (or exports) of exportfiles and specify any distribution actions you want to apply to them.Monarch Server v2020.0 Automation Edition - Tutorial7
Specify prerequisite settings - When you specify prerequisite settings, you add a file prerequisite or a commandline prerequisite to the project. Any prerequisites you add must first be met if the associated process is to run.Specify script settings - Script settings allow you to, among other things, specify pre-export and post-exportscripts to modify the input and export files.NOTESDepending on your needs, not all of these steps may have to beperformed. Specifying general and model settings is enough to create aproject file.SPECIFYING GENERAL SETTINGS FOR APROJECT FILEWhen you specify general settings for a project, you specify an author for the project file, its name and provide adescription of it.To specify general settings for a project1.On the Navigation Tree, click Automator Standard Processes and select Project Editor. The Home tab isdisplayed.2.In the Name field, enter a project name, e.g., Automator Tutorial.3.In the Author field, type in your name, e.g., Administrator.4.In the Description field, enter a description for the project, e.g., Project file for the Automator tutorial.5.Proceed to the Model and Verifications tab to specify model settings for the project.ASSIGNING A MODEL TO A PROJECT FILENow we need to assign a model file to specify what data will be extracted from the input file. Models, which arecreated within Monarch Complete, contain all of the definitions created during a Monarch Complete session, such asdata extraction templates, field properties, filter, sort and calculated field definitions, and so on. Models save work byallowing you to apply the same settings to a periodic report each time it is generated.Monarch Server v2020.0 Automation Edition - Tutorial8
NOTESWhen selecting a model file, be sure to select a model that successfullytraps the data you want to extract from the input file.Steps1.On the Model and Verifications tab of the Project Editor, click the Browse button next to the Location field toselect the desired model.2.In the displayed window, from the data source type drop-down list, select Local.3.In the Location field, select the location type.NOTESIf the required server is not on the list, you need to create it. Forinformation about adding a new location, refer to the LocationsManagement topic in the web help.In case of a single server configuration, refer to Monarch ServerConfigurator Guide to change location settings.4.In the Path field, enter the file path of your target model, e.g., son8.dmod.5.Click OK. The model file path is displayed in the Location text field.Monarch Server v2020.0 Automation Edition - Tutorial9
NOTESModel files in compressed archive format (e.g., zip and gzip) can be usedand specified in the Project Editor.The next step in creating a project file is to specify input settings for it.SELECTING INPUT FILES FOR A PROJECT FILENow we’re ready to specify what input file we want to assign to the project. The input file is the source of the data thatwe want to extract, export, etc. For this lesson, we’ll use one of the Monarch Complete report files, ClassJan.prn,which is a list of fictitious music orders shipped in January of 2010.Steps1.On the Input tab of the Project Editor, select the Text file type.We choose the Text option in this step because we will be using a Monarch Complete report file. If our input wasa database file we would choose the Database option instead, and then select the appropriate Select a DataSource option (i.e., Local or Web File, Data Link Wizard, Data Link File).2.Click the Add button to add an input file to the project via the displayed dialog.Monarch Server v2020.0 Automation Edition - Tutorial10
Select the Local data source type from the drop-down list. In the Location field select the location type.NOTESIf the required server is not on the list, you need to create it. For theinformation about adding a new location, refer to the LocationsManagement topic in the web help.In case of a single server configuration, refer to Monarch ServerConfigurator Guide to change location settings. In the Path field, enter the file path of the report, e.g., assJan.prn.NOTESInput files in compressed archive format (e.g., zip and gzip) can be usedand specified in the Project Editor.The remaining options on the Input tab have to do with multiple input files, and since we are currently onlyworking with one input file, we can safely ignore them. If you would like more information on these options, referto the Automator web help.Monarch Server v2020.0 Automation Edition - Tutorial11
NOTESIf we wanted to, we could now specify a distribution for the project export.Distributions are actions that distribute or handle information or filesoutside of Automator. Distributions can include the sending of e-mails(with or without attachments), RSS feeds, moving, copying, or deleting offiles, and writing to the Windows Event Log. Since we shall be workingwith distributions in Lesson 4, we won’t specify one now.The next step in configuring a project file is specifying export settings.CONFIGURING A PROJECT FILE EXPORTThe next step is to configure our project export.A project export specifies the table or summary data that will be exported when the project is run, what filters or sortorders (if any) will be applied to the data, and the output file (or database) to which the data will be exported.Project exports are configured via the Export Wizard. Depending on the view you wish to export (i.e., report, table, orsummary) and the output export format (e.g. XLS, PDF, or TXT), a different set of screens will be displayed by theExport Wizard.For instance:If you export a Summary, you will be asked to select the summary, drill state, and measure.If you export a Table, you will be asked to select the table to export.If you opt to export to PDF, you will be asked to supply information about PDF security, such a password to useand permissions to apply.If you opt to export a Table to a spreadsheet (XLS), you will be asked to select fields to export and the columnsto map to.The following steps describe a simple case of exporting a table to a spreadsheet.Steps1.Select the Exports tab of the Project Editor to display it.2.On the Exports tab click the Add iconto display the Export Wizard.Monarch Server v2020.0 Automation Edition - Tutorial12
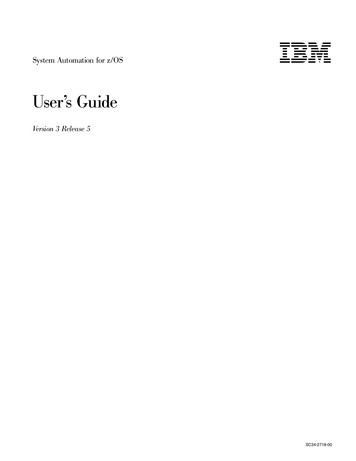
On the displayed General screen we can: Name the export Select the view to export: Report, Table, or Summary Enter a comment to annotate the export3.In the Name field, enter January Sales.4.Under View to export, leave the Table option selected as is by default. This means we want to export the tabledata. We could also select: Report, if we wanted to export the report(s) to a file Summary, if we wanted to export the data of a particular summary5.In the Comments field, enter any comment, such as Export the table data to a spreadsheet.6.Click the Next button. The Table View screen is displayed.On the displayed Table View screen we can: Select a filter to apply to the export Select a sort order to apply to the exportMonarch Server v2020.0 Automation Edition - Tutorial13
Specify an output method for the export (i.e., either file system or OleDb provider)7.Select No filter and No Sort for filtering and sorting correspondingly.8.Leave the output as File system.9.Click the Next button. The Output File screen is displayed.This dialog box allows you to: Specify where we want the table to be exported to Select a When Output Files Exist option, which tells Automator how to handle an already existing outputfile of the same name Set the format for text files, which is, either fixed length or delimited10. Click the Browse button and use the dialog box that displays to select the export location: Select the Local data source type from the drop-down list.Monarch Server v2020.0 Automation Edition - Tutorial14
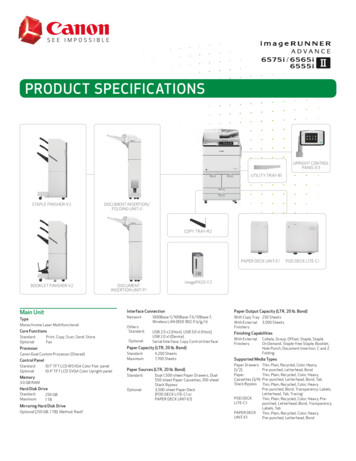
In the Local field select the location type.NOTESIf the required server is not on the list, you need to create it. For theinformation about adding a new location, refer to the LocationsManagement topic in the web help.In case of a single server configuration, refer to Monarch ServerConfigurator Guide to change location settings. In the Path field enter C:\Users\Public\Documents\Altair Monarch\Export\FirstQuarterSales2010.xls.11. Under the When output files exist option, leave the option Overwrite file selected. This tells Automator that ifthe current project file is run more than once, data from subsequent exports should overwrite any data found inthe existing output file.NOTESWe are selecting this option because, during the tutorial, we will utilize thisproject file several times.12. Under the Format for Text File(s) option, leave the option Fixed Text selected.NOTESWhen creating a new export job or modifying a non-text export job, thedefault text export format is fixed-length for "txt" extensions and delimitedfor other extensions. This assures backward compatibility with oldprojects.13. Click Next to display the Table Info screen. We’ll use this screen to name the table we want to export the data to.14. Highlight Untitled in the Table name field and then type in JanuarySales.15. Click Next. The Column Info screen is displayed.Monarch Server v2020.0 Automation Edition - Tutorial15
16. You will be asked to specify how many columns to export and map to the Excel spreadsheet. Ensure that theExport all option is selected.17. Click Next to set Excel advanced features. The Excel Advanced Features screen is displayed.18. Since we do not wish to specify any advanced options for now, click the Finish button.Automator saves the export settings and closes the Export Wizard. Note that our export, which we namedJanuary Sales, is now listed on the Project Editor’s Exports tab. On the Prerequisites and Script Editor tabs wecould specify process prerequisites and define project-specific scripts for pre-export or post-export operations.On the Login Credentials tab we could enter the credentials necessary to send the export to an FTP site orwebsite. At this point, we can save the current project settings and close the Project Editor.19. Click the Save button to save the project file and close the Project Editor.20. In the displayed Save Project to Server Library dialog box, type in any comment, such as Export the table data,unfiltered, to a file, and click the Commit button. The Automator Projects page is displayed.21. Click the Save button save the project file to the Automator database.Now that we have configured a project file to extract the January 2010 sales data from the ClassJan report andexport it to a FirstQuarterSales2010 spreadsheet,
Before you attempt to use Automator, we encourage you to walk through this tutorial, which is designed to provide you with a quick introduction to Automator's features and capabilities. While not exhaustive in scope, the tutorial should enable you to begin using Automator effectively. The tutorial includes the following lessons: Lesson 1