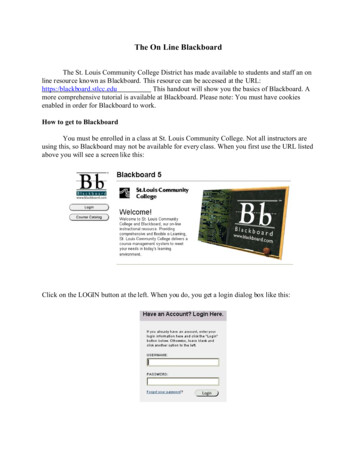
Transcription
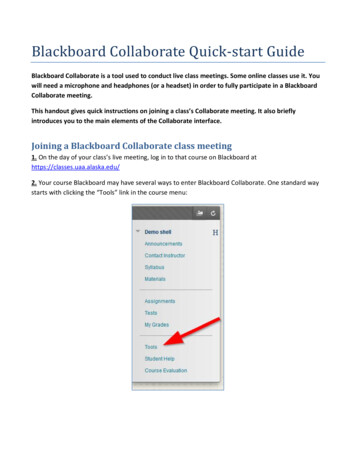
Blackboard Collaborate Quick-start GuideBlackboard Collaborate is a tool used to conduct live class meetings. Some online classes use it. Youwill need a microphone and headphones (or a headset) in order to fully participate in a BlackboardCollaborate meeting.This handout gives quick instructions on joining a class’s Collaborate meeting. It also brieflyintroduces you to the main elements of the Collaborate interface.Joining a Blackboard Collaborate class meeting1. On the day of your class’s live meeting, log in to that course on Blackboard athttps://classes.uaa.alaska.edu/2. Your course Blackboard may have several ways to enter Blackboard Collaborate. One standard waystarts with clicking the “Tools” link in the course menu:
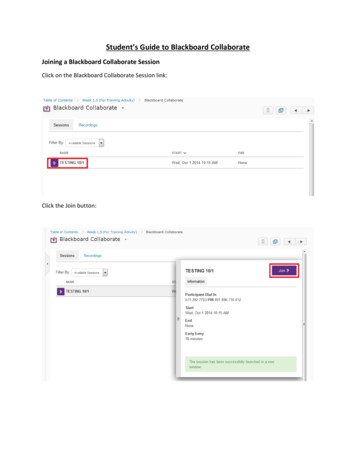
3. Within the alphabetical list of tools, click “Blackboard Collaborate”:4. You should now see a list of upcoming Blackboard Collaborate meetings for this class:Generally, you cannot join a class meeting until 15 minutes before it is scheduled to start. For any liveclass meeting that you can join, you will see a round icon in the “Available” column.To join an available class meeting, click the round icon or the title of the meeting (both highlighted inthe above screenshot).5. In the next screen, click the “Join Room” button:
6. At the next screen, you are given two options:1. “Download Launcher” downloads the Blackboard Collaborate Launcher. You must have this installedbefore you can join a Collaborate session. For help with installing this Launcher on Windows, visit thislink. For help with installing this Launcher on Mac OS X, visit this link.2. “Launch Blackboard Collaborate now” downloads a file that, when opened, will open begin theprocess of connecting you to your live class meeting. Use this link if you already installed the Launcher.Using Blackboard Collaborate1. When Blackboard Collaborate starts, you will see a dialog asking you your connection speed:“Cable/DSL” is a good choice in most cases. If you are connected with wifi, choose “Wireless.” Click“OK” once you’ve selected your connection speed.
2. You should now see the Blackboard Collaborate window which you will use participate in your classsession. The image below labels the most important components of the Blackboard interface:1. The “AUDIO & VIDEO” area contains a volume slider for your microphone and a “Talk” button youmust press each time you want to talk to your class.2. The “PARTICIPANTS” area lists the people present in the meeting.3. The “CHAT” area allows you to type text messages that your teacher and classmates can see.4. The toolbar gives you tools such as a marker or a text-entry box that you can use to interact with theWhiteboard area.5. The Whiteboard area is where your instructor will post images, text, and other material; it is alsowhere you may add such material yourself, as directed by the instructor.
3. Before your class begins, you should complete the “Audio Setup Wizard” so that you can be sureyour headphones and microphone are working. Enter the “Audio Setup Wizard” by clicking “Tools” inthe menu, then “Audio,” and finally “Audio Setup Wizard ”:Need help?If you run into technical problems, contact the UAA IT Services Call Center. Hours and contactinformation can be found with this link.
Blackboard Collaborate Quick-start Guide Blackboard Collaborate is a tool used to conduct live class meetings. Some online classes use it. You will need a microphone and headphones (or a headset) in order to fully participate in a Blackboard Collaborate meeting. This handout gives quick instructions on joining a class's Collaborate meeting.