Transcription
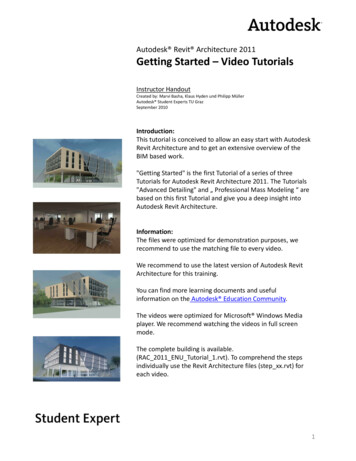
Autodesk Revit Architecture 2011Getting Started – Video TutorialsInstructor HandoutCreated by: Marvi Basha, Klaus Hyden und Philipp MüllerAutodesk Student Experts TU GrazSeptember 2010Introduction:This tutorial is conceived to allow an easy start with AutodeskRevit Architecture and to get an extensive overview of theBIM based work."Getting Started" is the first Tutorial of a series of threeTutorials for Autodesk Revit Architecture 2011. The Tutorials"Advanced Detailing" and „ Professional Mass Modeling “ arebased on this first Tutorial and give you a deep insight intoAutodesk Revit Architecture.Information:The files were optimized for demonstration purposes, werecommend to use the matching file to every video.We recommend to use the latest version of Autodesk RevitArchitecture for this training.You can find more learning documents and usefulinformation on the Autodesk Education Community.The videos were optimized for Microsoft Windows Mediaplayer. We recommend watching the videos in full screenmode.The complete building is available.(RAC 2011 ENU Tutorial 1.rvt). To comprehend the stepsindividually use the Revit Architecture files (step xx.rvt) foreach video.1
Step 02Grid & levelsGrid‐ create 5 vertical grid linesgrid line 1 (3m, distance), grid line 2‐5 (10m distance)‐ rename grid line‐ create 5 horizontal grid linesgrid A‐B & D‐E (3m distance) and B‐C & C‐D (10m distance)‐ create 4 additional levelsoffset: 3m‐ adjust the grid and the level linesFloor‐ create floor: generic 300mmstart floor structural floorlock the floor boundaries to the gridStep 03Walls, columns & floor modificationsWalls‐ draw wallstype: generic 300mmbase offset : level 1top offset: level 3lock the walls to the grid lines‐ change typeselect the wall chainelement properties type: curtain wall: standard‐ in the view: east, copy the floor in level 2 and 3Columns‐ place columnsstart column structural columnelement properties type: M Concrete‐Square‐Column 500mm x500mmoption bar height: level 3‐ place columns on the grid lines intersectionsselect grid linesEdit floor boundaries‐ extend floormodify edit boundarymove the left boundary to the grid line 1lock boundary to the grid line‐ join geometry2
Step 04Split element, match properties, attach element to topWallsopen level 3 view‐ draw wallstype: Curtain Wall: Standardtop constraint: up to level 6‐ align walls to the grid lineslock constraintPaste aligned to selected levels‐ copy floorwith Ctrl C copy the floor to the clipboard‐ paste floorpaste aligned to selected levelsselect level 3, 4 und 5Split element and match type properties‐ changing wall typeselect the walls of the north and west facadechange the element properties into type: Exterior Wall – Wood Panels‐ split the wall in the east facadeselect wall‐ match type propertiesfist select the wall of the north facade(type: Exterior Wall – Wood Panels)then the splitted wall of the south facadeAttach columns to topselect all columns‐ attach columns to the top floor3
Step 05Interior walls, trim / extend elements & doorsInterior walls‐ draw wallselement properties type: Basic Wand: Generic ‐ 300mmbase constraint: level 3top constraint: level 4‐ trim/extend wallsmodify trim/extend to corner‐ set the same distance between walls‐ dimensionsset a dimension to the interior wallsactivate the EQ‐Symbol‐ create the kitchentype: Basic Wall Interior – Blockwork 140draw a rectangle: 5 x 8.5mcreate fillet arch'sDoors‐ place doortype: M Single‐Flush 0915 x 2134 mmPlace doorchange the opening direction with the space bar‐ change doorselement properties type: Door Double Flush ‐ Variable4
Step 06Windows, stairs & shaft openingWindows‐ create windowsstart window load familyadditional fileschange the height and widthcopy and mirror the windowsStairs‐ draw stairstype: Steel Stair ‐ MPKelement properties desired number of risers: 17‐ railing ‐ type: Glas – MPKdraw the run and the landing‐ multistory stairselect stairelement properties multistory top constraint: Level 5Shaft opening‐ create a shaft openingdraw the shaft boundaries around the stairelement properties base constraint: level 1element properties top constraint: Level 45
Step 07railings & modification of curtain wallsRailings‐ create railingsdraw a railing in level 2element properties type: Glas ‐ MPKModification of curtain walls‐ create a curtain griddraw grid line‐ create a curtain gridselect curtain wallvertical grid pattern layout: fixed distance; distance: 2mhorizontal grid pattern layout: fixed distance; distance: 3m‐ edit the curtain gridcreate curtain grid: all except pickeddraw, move, copydelete grid segment‐ curtain mullionstart mullions all grid linesAdd a curtain wall element‐ add a window elementselect curtain wall elementchange element propertiestype: M Curtain Wall AwningSplit curtain grid‐ split segmentdelete mullionselect segment change into a door element6
Step 08Import Site, Building Pad & Place Site ComponentsImport site‐ import DWG‐Fileinsert import CADAdditional Files/ ISO lines.dwgCreate site‐ toposurface create from import select import instanceselect ISO‐LinesEdit site‐ edit surfaceselect siteselect points and set the height to 0.00 m‐ draw the roadmassing & site subregionsketch the roadelement properties material: Site – Tarmacadam‐ creating the river sidemassing & site split surfacedraw the river side with spline toolelement properties material: site – waterchange the render appearanceBuilding pad‐ add a building padmassing & site building padsketch the padPlace site component‐ add site componentschoose and place treeschange tree types7
Step 09Groups, rooms & room tags, color schemeGroups‐ copy furniture‐ create a groupcopy group‐ edit groupselect the furniturechange the furniture type‐ duplicate groupremove elements from the groupdelete elements from the groupRooms‐ add roomstart roomname the room‐ calculate the room volume‐ place predefined rooms‐ change the walls properties to: non room boundingRoom separation lines‐ add a separation linesketch lineplace roomColor scheme‐ create a color schemecreate a color scheme from the names‐ add legendRoom schedule‐ change the floor finish in the room schedule8
Step 10DimensionsCreate dimensions‐ place a dimensionsset a dimension between individual referenceschange references‐ diagonal dimension & radial dimension‐ measure entire wallsmeasure openings, intersecting walls and intersecting grids‐ measure between two references.Step 11Wall construction, wall wrapping, schedules, tag elements,sectionWall construction & wall joints‐ change the wall constructionselect an exterior wallinsert two layersassign material and thicknessactivate wall wrapping at inserts and at the endsTag elements‐ tag doorstag by categoryclick on a doortag alldoor tags – M Door TagSchedules/quantities‐ create scheduleview schedules schedule/quantitiescategory: doorsadd fields: type, level, mark, height, width‐ edit scheduleschedule properties sorting/groupingsort by: levelactivate header and blank line‐ changing the scheduleschange elements through the scheduleSection‐ create sectiondraw section Linedivide section lineedit the view range9
Step 12View Template, View Properties, SheetsView template and view properties‐ change view propertieschange the scale: 1:100change detail level: Fine‐ save view propertiesselect level in the project browsercreate view template from viewsave view template‐ apply the view template to the section‐ edit elevation propertiesmodify the crop region‐ hide elements/category in view‐ create a camera in level 1view 3D‐view cameraplace a cameraadapt viewSheets‐ add a new sheet‐ add views to the sheetwith drag and drop add the views to the sheet‐ align views to the guide grid‐ edit the title of the views‐ change the title block10
Step 13FreeformFreeform‐ creating a mass‐ set a work planeselect the wall on the west side‐ sketch a profile with lines‐ duplicate profile with „pick lines“set work plane: Gridline 3‐ create form‐ edit formmove surface/edges/pointsadd edge‐ create voidset work planesketch the profile‐ create a voidmove surface/edges/pointscopy the void 6 times with a distance of 7mModel by facetype: curtain wall solar protectionselect surfacecreate systemStep 14Sun path, camera & navigation wheel, render propertiesSun path‐ activate sun pathview control bar sun path activateedit daylightCreate camera & object wheel‐ create a 3D‐view‐ select object wheelzoom, orbit, pan Rendering‐ set render propertiesquality: mediumresolution: Printer 150 DPILighting: Exterior: Sun onlyBackground style: Sky: Few Clouds11
Getting Started –Video Tutorials Instructor Handout Created by: Marvi Basha, Klaus Hyden und Philipp Müller Autodesk Student Experts TU Graz September 2010 Introduction: This tutorial is conceived to allow an easy start with Autodesk Revit Architecture and to get an extensive overview of the BIM based work.


