Transcription
Microsoft Dynamics GP Single Account Plan
CopyrightCopyright 2010 Microsoft. All rights reserved.Limitation of liabilityThis document is provided “as-is”. Information and views expressed in this document, includingURL and other Internet Web site references, may change without notice. You bear the risk of usingit.Some examples depicted herein are provided for illustration only and are fictitious. No realassociation or connection is intended or should be inferred.Intellectual propertyThis document does not provide you with any legal rights to any intellectual property in anyMicrosoft product.You may copy and use this document for your internal, reference purposes.TrademarksMicrosoft and Microsoft Dynamics are trademarks of the Microsoft group of companies. FairComand c-tree Plus are trademarks of FairCom Corporation and are registered in the United Statesand other countries.All other trademarks are property of their respective owners.Warranty disclaimerMicrosoft Corporation disclaims any warranty regarding the sample code contained in thisdocumentation, including the warranties of merchantability and fitness for a particular purpose.License agreementUse of this product is covered by a license agreement provided with the software product. If youhave any questions, please call the Microsoft Dynamics GP Customer Assistance Department at800-456-0025 (in the U.S. or Canada) or 1-701-281-6500.Publication dateMay 2010
ContentsIntroduction . 1What’s in this manual.1Symbols and conventions .2Resources available from the Help menu.2Send us your documentation comments .4Chapter 1: Single Account Plan setup . 5Before using Single Account Plan.5Selecting the account segments.5Viewing the generated Single Account Plan codes.6Chapter 2: Reports . 9Adding the report templates to the shortcut bar.9Level of Accounts - overview.10Printing the Inventory and Balance book reports .10Printing the Journal book reports . 11Printing the Balance and Ledger book reports .12Glossary . 13Index . 15SINGLEACCOUNTPLANi
iiS I N G L EA C C O U N TP L A N
IntroductionSingle Account Plan is a tool that allows you to classify your company’s accountsaccording to the structure defined in the Single Account Plan for businesses. Youcan thus standardize the financial reports of the company as required by the legalauthorities.Be sure to install Crystal Reports version 10.0 on your system to successfully generate thereports.Check for current instructionsThis information was current as of May 2010. The documentation may be updatedas new information becomes available. Check the Microsoft Dynamics GP onlineWeb site (http://go.microsoft.com/fwlink/?LinkID 161199) for the most currentdocumentation.The introduction is divided into the following sections: What’s in this manualSymbols and conventionsResources available from the Help menuSend us your documentation commentsWhat’s in this manualThis manual is designed to give you an in-depth understanding of how to use thefeatures of Single Account Plan, and how it integrates with the Microsoft DynamicsGP system.To make best use of Single Account Plan, you should be familiar with systemwidefeatures described in the System User’s Guide, the System Setup Guide, and theSystem Administrator’s Guide.Some features described in the documentation are optional and can be purchasedthrough your Microsoft Dynamics GP partner.To view information about the release of Microsoft Dynamics GP that you’re usingand which modules or features you are registered to use, choose Help AboutMicrosoft Dynamics GP.This manual is divided into the following chapters: Chapter 1, “Single Account Plan setup,” explains how to install and set upSingle Account Plan for your company. Chapter 2, “Reports,” explains how to generate the financial reports for yourcompany in Crystal Reports format.SINGLEACCOUNTPLAN1
I N T R O D U C T I O NSymbols and conventionsFor definitions of unfamiliar terms, see the glossary in the manual or refer to theglossary in Help.SymbolDescriptionThe light bulb symbol indicates helpful tips, shortcuts andsuggestions.The warning symbol indicates situations you should beespecially aware of when completing tasks.This manual uses the following conventions to refer to sections, navigation andother information.ConventionDescriptionCreating a batchItalicized type indicates the name of a section or procedure.File Print or File PrintThe ( ) or ( ) symbol indicates a sequence of actions, such asselecting items from a menu or toolbar, or pressing buttons ina window. This example directs you to go to the File menu andchoose Print.TABor ENTERAll capital letters indicate a key or a key sequence.Resources available from the Help menuThe Microsoft Dynamics GP Help menu gives you access to user assistanceresources on your computer, as well as on the Web.ContentsOpens the Help file for the active Microsoft Dynamics GP component, and displaysthe main “contents” topic. To browse a more detailed table of contents, click theContents tab above the Help navigation pane. Items in the contents topic and tabare arranged by module. If the contents for the active component includes an“Additional Help files” topic, click the links to view separate Help files thatdescribe additional components.To find information in Help by using the index or full-text search, click theappropriate tab above the navigation pane, and type the keyword to find.To save the link to a topic in the Help, select a topic and then select the Favorites tab.Click Add.IndexOpens the Help file for the active Microsoft Dynamics GP component, with theIndex tab active. To find information about a window that’s not currently displayed,type the name of the window, and click Display.About this windowDisplays overview information about the current window. To view related topicsand descriptions of the fields, buttons, and menus for the window, choose theappropriate link in the topic. You also can press F1 to display Help about the currentwindow.2S I N G L EA C C O U N TP L A N
IN T RO D U C T IO NLookupOpens a lookup window, if a window that you are viewing has a lookup window.For example, if the Checkbook Maintenance window is open, you can choose thisitem to open the Checkbooks lookup window.Show Required FieldsHighlights fields that are required to have entries. Required fields must containinformation before you can save the record and close the window. You can changethe font color and style used to highlight required fields. On the MicrosoftDynamics GP menu, choose User Preferences, and then choose Display.Printable ManualsDisplays a list of manuals in Adobe Acrobat .pdf format, which you can print orview.What’s NewProvides information about enhancements that were added to Microsoft DynamicsGP since the last major release.Microsoft Dynamics GP OnlineOpens a Web page that provides links to a variety of Web-based user assistanceresources. Access to some items requires registration for a paid support plan.Current implementation and upgrade information The most recentrevisions of upgrade and implementation documentation, plus documentationfor service packs and payroll tax updates.User documentation and resources The most recent user guides, howto articles, and white papers for users.Developer documentation and resources The most recentdocumentation and updated information for developers.Product support information Information about the Microsoft DynamicsGP product support plans and options that are available, along withinformation about peer support and self-support resources.Services information Information about Microsoft Dynamics GP support,training, and consulting services.Microsoft Dynamics GP Community Access to newsgroups, where youcan ask questions or share your expertise with other Microsoft Dynamics GPusers.CustomerSource home page A wide range of resources available tocustomers who are registered for a paid support plan. Includes access toKnowledge Base articles, software downloads, self-support, and much more.Customer Feedback OptionsProvides information about how you can join the Customer ExperienceImprovement Program to improve the quality, reliability, and performance ofMicrosoft software and services.SINGLEACCOUNTPLAN3
I N T R O D U C T I O NSend us your documentation commentsWe welcome comments regarding the usefulness of the Microsoft Dynamics GPdocumentation. If you have specific suggestions or find any errors in this manual,send your comments by e-mail to the following address: bizdoc@microsoft.com.To send comments about specific topics from within Help, click the DocumentationFeedback link, which is located at the bottom of each Help topic.Note: By offering any suggestions to Microsoft, you give Microsoft full permission to usethem freely.4S I N G L EA C C O U N TP L A N
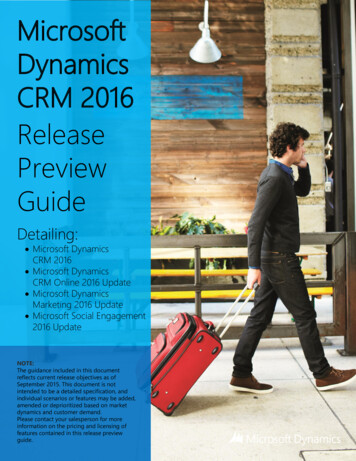
Chapter 1:Single Account Plan setupUse this information to set up Single Account Plan for your company. You canspecify the segments of your account format that will be used to generate SingleAccount Plan codes. These codes allow you to classify your company’s accountsaccording to the structure defined in the Single Account Plan for businesses. Youcan thus standardize the financial reports of the company as required by the legalauthorities.Be sure that you have copied the Reports folder available with the installation inorder to generate the required reports.When you set up Single Account Plan, you can open each setup window and enterinformation, or you can use the Setup Checklist window (Microsoft Dynamics GPmenu Tools Setup Setup Checklist) to guide you through the setupprocess. See your System Setup Guide (Help Contents select Setting up theSystem) for more information about the Setup Checklist window.This information is divided into the following sections: Before using Single Account PlanSelecting the account segmentsViewing the generated Single Account Plan codesBefore using Single Account PlanBefore you begin using the Single Account Plan, you must set up the account formatfor the Chart of Accounts in the Account Format Setup window (MicrosoftDynamics GP menu Tools Setup Company Account Format). Based onyour company’s account format setup, you can identify the account segments thatcorrespond to the Single Account Plan code structure.You must create a PUC.txt file as per the codes and account structure detailsspecified by the legal authorities. Use the Table Import tool (Microsoft Dynamics GPmenu Tools Integrate Table Import) to import the information from thePUC.txt file to the Single Account Plan account master table. Refer to the ImportUtility documentation for more information.Selecting the account segmentsUse the Select Account Segments window to select the account segments togenerate the Single Account Plan codes. These codes will be used to classifyaccounts while generating the financial reports.SINGLEACCOUNTPLAN5
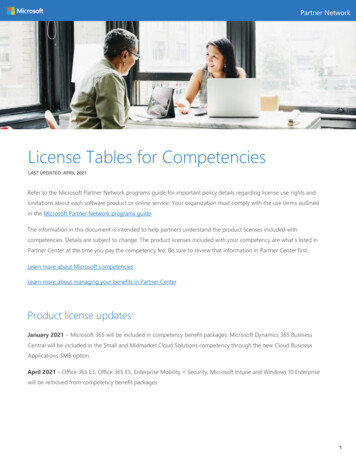
C H A P T E R1S IN G L EA C C O U N TP L A NS E T U PTo select the account segments:1.Open the Select Account Segments window.(Microsoft Dynamics GP menu Tools Setup Financial AccountSegments)The scrolling window displays the segment ID and segment name for all thesegments you set up in the Account Format Setup window.2.Mark the PUC checkbox to select the segments that will be used to generate theSingle Account Plan codes.3.Select the Year for which to assign the Single Account Plan codes to therespective accounts.4.Choose Update to open the Single Account Plan Codes window where you canview the Single Account Plan codes that are generated. Refer to Viewing thegenerated Single Account Plan codes on page 6 for more information.5.Choose Process to assign the generated Single Account Plan codes to therespective accounts.Viewing the generated Single Account Plan codesUse the Single Account Plan Codes window to view the Single Account Plan Codesthat correspond to each account that you have set up. These codes are generatedbased on the structure defined in the PUC.txt file and the account segments that youselected in the Select Account Segments window. Refer to Selecting the accountsegments on page 5 for more information.6S I N G L EA C C O U N TP L A N
C H A P T E R1S I N G L EA C C O U N TP L A NS E TU PTo view the generated Single Account Plan codes:1.Open the Single Account Plan Codes window.(Microsoft Dynamics GP menu Tools Setup Financial AccountSegments Update button)The Account Number column displays all the accounts that you have set up.The Single Account Plan Code column displays the Single Account Plan codesfor the respective accounts.2.Choose Change to return to the Select Account Segments window where youcan select a different set of account segments if required.3.Choose Save to save the codes and return to the Select Account Segmentswindow where you can complete the process of assigning the codes to therespective accounts.SINGLEACCOUNTPLAN7
8S I N G L EA C C O U N TP L A N
Chapter 2:ReportsUse this information to generate the financial reports for your company in CrystalReports format. You must have installed Crystal Reports version 10.0 to successfullygenerate the reports.Be sure to run the account reconciliation process (Microsoft Dynamics GP menu Tools Utilities Financial Reconcile) for the year before generating thereports for that year. Refer to the General Ledger documentation for moreinformation on the reconciliation process.This information is divided into the following sections: Adding the report templates to the shortcut barLevel of Accounts - overviewPrinting the Inventory and Balance book reportsPrinting the Journal book reportsPrinting the Balance and Ledger book reportsAdding the report templates to the shortcut barYou must add the Crystal Reports templates that you copied during installation tothe Microsoft Dynamics GP shortcut bar, before you can generate the financialreports. You must add the following report templates to the shortcut bar. LibInven7SQL.rptlibro diario7SQL.rptlibro diario7SQLHistory.rptlibro diario7SQLOpen.rptMayorBal7SQL.rptTo add the report templates to the shortcut bar:1.Open the Add External Shortcut window.(Shortcuts Add External Shortcut)2.Enter a name for the report in the Name field. The name can be up to 79characters long and will appear in the shortcut bar. Be sure to enter a name toeasily identify the report with.3.Choose the Browse button to locate the report to add. The Select an Applicationwindow appears.4.Select the LibInven7SQL.rpt within the Inventory and Balance folder of theReports folder that you installed. Choose Open to add its path to the CommandLine field in the Add External Shortcut window.5.Choose Add to create a shortcut to the selected report.6.Repeat steps 3 through 6 to add the libro diario7SQL.rpt, librodiario7SQLHistory.rpt, and libro diario7SQLOpen.rpt from the Journal bookfolder, and the MayorBal7SQL.rpt from the Balance and Ledger book folderrespectively to the shortcut bar.7.Choose Done to close the Add External Shortcut window.SINGLEACCOUNTPLAN9
C H A P T E R2R EP O R T SLevel of Accounts - overviewWhile generating reports, specifying the levels of accounts allows you to view thecumulative balances for groups of accounts. The levels of accounts are based on thePUC code for the account. The first digit from the left of the PUC code of an accountis the level 1 for that account. The first two digits from the left make up level 2, andso on. You can select to print the report for level 1. Subsequently you can generatereports for even levels, for example level 2, level 4, level 6, and so on, up to twentylevels of accounts.The following table displays how the account levels are determined based on thePUC codes:PUC CodesLevel 1Level 2Level 41100 00 00011111001100 01 00011111001100 02 00011111001274 00 00011212741200 00 00011212002101 00 00022121012120 00 00022121202275 00 00022222754121 00 00044141214520 01 0004454520While generating reports for the above codes, the reports will display thecumulative balances for the accounts depending on the level.Account level Cumulative balance of accountsselected1Cumulative balance for all codes starting with the digit 1Cumulative balance for all codes starting with the digit 2Cumulative balance for all codes starting with the digit 42Cumulative balance for all codes starting with the digits 11Cumulative balance for all codes starting with the digits 12Cumulative balance for all codes starting with the digits 21, and soon.4Cumulative balance for all codes starting with the digits 1100Cumulative balance for all codes starting with the digits 1274Cumulative balance for all codes starting with the digit 2101, and soon.Printing the Inventory and Balance book reportsUse this information to print the Inventory and Balance book reports for an openyear or a historical year. You must have added the report window to the Shortcutbar. Refer to Adding the report templates to the shortcut bar on page 9 for moreinformation.10S I N G L EA C C O U N TP L A N
C H A P T E R2R E P O R T STo print the Inventory and Balance book reports:1.Open the Inventory and Balance book report window.(Shortcuts Choose Inventory and Balance book)2.Choose the Refresh button in the Crystal Reports - Inventory and Balance bookreport toolbar to open the Enter Parameter Values window.3.Enter the Period for which to generate the report in the Discrete Value field.4.In the Parameter Fields, select Company. Enter the name of the company forwhich to generate the report in the Discrete Value field.5.Select Year in the Parameter Fields. Enter the year for which you have processedthe transactions in the Discrete Value field.6.Select Level of Accounts in the Parameters Fields. Enter the level of accounts forwhich to view the report in the Discrete Value field.7.Choose OK to open the Data Source Selection window and select the DataSource Name for the server you are connected to.8.Choose Next to open the Connection Information window and select thedatabase you are connected to.9.Choose Finish to print the Inventory and Balance book report.Printing the Journal book reportsUse this information to print the Journal book reports for an open year, a historicalyear, or for both open and historical years. You must have added the report windowto the Shortcut bar. Refer to Adding the report templates to the shortcut bar on page 9for more information.To print the Journal book reports:1.Open the Journal book report window.(Shortcuts Choose Journal book)(Shortcuts Choose Journal book for historical years)(Shortcuts Choose Journal book for open year)2.Choose the Refresh button in the Crystal Reports - Journal book report toolbarto open the Enter Parameter Values window.3.In the Parameter Fields, select Initial Date. Enter the starting date for which togenerate the report in the Discrete Value field.4.In the Parameter Fields, select Final Date. Enter the ending date in the DiscreteValue field.5.Select Company in the Parameter Fields. Enter the company in the DiscreteValue field for which to generate the report.6.Choose OK to open the Data Source Selection window and select the DataSource Name for the server you are connected to.SINGLEACCOUNTPLAN11
C H A P T E R2R EP O R T S7.Choose Next to open the Connection Information window and select thedatabase you are connected to.8.Choose Finish to print the Journal book report.Printing the Balance and Ledger book reportsUse this information to print the Balance and Ledger book reports for an open yearor for a historical year. You must have added the report window to the Shortcut bar.Refer to Adding the report templates to the shortcut bar on page 9 for more information.To print the Balance and Ledger book reports:12S I N G L EA C C O U N T1.Open the Balance and Ledger book report window.(Shortcuts Choose Balance and Ledger book)2.Choose the Refresh button in the Crystal Reports - Balance and Ledger bookreport toolbar to open the Enter Parameter Values window.3.Select Year in the Parameter Fields. Enter the year for which you have processedthe transactions in the Discrete Value field.4.Enter the Period for which to generate the report in the Discrete Value field.5.In the Parameter Fields, select Company. Enter the name of the company forwhich to generate the report in the Discrete Value field.6.Select Level of Accounts in the Parameters Fields. Enter the level of accounts forwhich to view the report in the Discrete Value field.7.Choose OK to open the Data Source Selection window and select the DataSource Name for the server you are connected to.8.Choose Next to open the Connection Information window and select thedatabase you are connected to.9.Choose Finish to print the Inventory and Balance book report.P L A N
GlossaryAccount segmentA portion of the account format that can beused to represent a specific aspect of abusiness. For example, accounts can bedivided into segments that representbusiness locations, divisions or profitcenters.Level of accountsAn arrangement that allows you to view thecumulative balances for a group of accountsbased on their PUC codes.Single account plan codeThe value that is generated based on theaccount segments you select. It allows you toclassify your company’s accounts accordingto the structure defined in the SingleAccount Plan for businesses.SINGLEACCOUNTPLAN13
14S I N G L EA C C O U N TP L A N
IndexAaccount segments, selecting 5Cchanges since last release, informationabout 3current upgrade information, accessing onthe Web 3Ddocumentation, symbols and conventions2Hhelp, displaying 2Help menu, described 2Iicons, used in manual 2inflation adjustment, introduction 1Llevel of accounts, overview 10lookup window, displaying 3Nnew features, information about 3Rreport templates, adding to the shortcutbar 9reports printingBalance and Ledger book 12Inventory and Balance book 10Journal book 11required fields, described 3resources, documentation 2SSelect Account Segments window,displaying 6Single Account Plan codes window,displaying 7symbols, used in manual 2Uupgrade information, accessing on theWeb 3Wwhat’s new, accessing 3SINGLEACCOUNTPLAN15
16S I N G L EA C C O U N TP L A N
The Microsoft Dynamics GP Help menu gives you access to user assistance resources on your computer, as well as on the Web. Contents Opens the Help file for the active Microsoft Dynamics GP component, and displays the main "contents" topic. To browse a more detailed table of contents, click the Contents tab above the Help navigation pane.