Transcription
Flex System Chassis Management ModuleUser's Guide(For Type 7893, 8721, and 8724 chassis only)
NoteBefore using this information and the product it supports, read the general information in Appendix B“Notices” on page 87, the Warranty Information document, and the Safety Information and the EnvironmentalNotices and User Guide documents on the Lenovo documentation CD.Seventh Edition (March 2020) Copyright Lenovo 2015, 2020.LIMITED AND RESTRICTED RIGHTS NOTICE: If data or software is delivered pursuant to a General ServicesAdministration (GSA) contract, use, reproduction, or disclosure is subject to restrictions set forth in Contract No. GS-35F05925
ContentsChapter 1. Introduction . . . . . . . . . 1Before you begin . . . . . . . . . . . .Accessibility features for the Flex SystemCMMNotices and statements in this document . . .Software requirements for the CMM webinterface. . . . . . . . . . . . . . . . . . 1. . . 2. . . 2. . . 3Chapter 2. Web interface use andreference . . . . . . . . . . . . . . . . . 5Starting the web interface . . . . . . . .Configuring the CMM using the web interfaceUsing the Initial Setup Wizard . . . .Setting the CMM power managementpolicies . . . . . . . . . . . . .Resetting the CMM to manufacturingdefaults . . . . . . . . . . . . .External authentication of certificates .Configuring chassis components . . . . .Setting the chassis air filter reminder . .Configuring a storage node . . . . .Updating the IMM firmware . . . . .User authority management . . . . . . .Monitoring CMM events . . . . . . . .Starting a remote compute node session . .Saving a CMM configuration . . . . . . .Restoring a CMM configuration. . . . . .Booting from the standby CMM . . . . .Enabling the CMM floating IP address . . . . . . 5. . . . 5. . . . 6. Copyright Lenovo 2015, and 2015, 2020,2020.Before you call . . . . . . . . . . . . . .Using the documentation . . . . . . . . . .Getting help and information from the World WideWeb . . . . . . . . . . . . . . . . . .How to send DSA data . . . . . . . . . . .Creating a personalized support web page . . .Software service and support . . . . . . . .Hardware service and support . . . . . . . .Taiwan product service . . . . . . . . . . .8384.848484858585Appendix B. Notices. . . . . . . . . . 87. . .13.15162021212225282930313333.Chapter 3. CMM web interfaceoverview . . . . . . . . . . . . . . . . 35Web interface pages and user rolesWeb interface options . . . . .System Status options . . .Monitoring multiple chassis .Event log options . . . . .Service and support options .Chassis management optionsCMM management options .Appendix A. Getting help and technicalassistance . . . . . . . . . . . . . . . 83.3538384243455169Trademarks . . . . . . . . . . . . . . . .Important notes . . . . . . . . . . . . . . .Recycling information . . . . . . . . . . . .Particulate contamination . . . . . . . . . . .Telecommunication regulatory statement . . . . .Electronic emission notices . . . . . . . . . .Federal Communications Commission (FCC)statement . . . . . . . . . . . . . . .Industry Canada Class A emission compliancestatement . . . . . . . . . . . . . . .Avis de conformité à la réglementationd'Industrie Canada . . . . . . . . . . . .Australia and New Zealand Class Astatement . . . . . . . . . . . . . . .European Union EMC Directive conformancestatement . . . . . . . . . . . . . . .Germany Class A statement . . . . . . . .Japan VCCI Class A statement . . . . . . .Korea Communications Commission (KCC)statement . . . . . . . . . . . . . . .Russia Electromagnetic Interference (EMI)Class A statement . . . . . . . . . . . .People's Republic of China Class A electronicemission statement . . . . . . . . . . .Taiwan Class A compliance statement . . . .8888888989899090909090909192929292Index . . . . . . . . . . . . . . . . . . 93i
iiFlex System Chassis Management Module User's Guide (For Type 7893, 8721, and 8724 chassis only)
Chapter 1. IntroductionUse the Chassis Management Module web interface to perform chassis management functions within a webbrowser.Note: The Flex SystemChassis Management Module is compatible with only Type 7893, 8721, and 8724chassis.The CMM web interface communicates with the management program to execute chassis managementtasks. You can use perform the following tasks and more: Access I/O modules and configure them. Initialize storage nodes Change the startup sequence in a compute node Configure security settings such as data encryption and user account security Control the chassis, compute nodes, and other components. Define login IDs and passwords Discover other chassis on the network and enable access to them Monitor the status of the compute nodes and other components Select recipients for alert notification of specific events Set the date and time. Use a remote console for the compute nodesYou can also perform management functions through the CMM SNMP management interface and thecommand-line interface (CLI). See “Using the Flex System Chassis Management Module CLI” in the FlexSystem Chassis Management Module Command-Line Interface Reference Guide for more information.Compatible browsers are listed on the initial login screen of the CMM web interface.The most recent versions of all Flex System documentation are available from ote: Do not store any sensitive information in the CMM web server directory or subdirectories. Data in thedirectories is accessible to unauthenticated users.Before you beginBefore you use the CMM web interface, you must complete some specific tasks.Complete the following tasks before you start the CMM web interface:1. The CMM must be installed in a correctly configured Flex System Enterprise Chassis. See "Installing,removing, and replacing components" in the Flex System Chassis Management Module InstallationGuide for installation instructions.2. A client computer must be connected to the CMM through a correctly configured Ethernet connection.See "Connecting to the CMM" in the Flex System Chassis Management Module Installation Guide fordetailed instructions.3. Make sure that one of the following supported web browsers is installed: Microsoft Internet Explorer version 9 or later, but earlier than 11 Mozilla Firefox versions 17 through 24 (Firefox is recommended for JAWS users) Copyright Lenovo 2015, and 2015, 2020,20201
Accessibility features for the Flex SystemCMMAccessibility features help users who have disabilities, such as restricted mobility or limited vision, to useinformation technology products successfully.Accessibility featuresAccessibility for the Flex SystemCMM interface is provided through the command-line interface. The remoteconsole video feed is not accessible to a screen reader. If you are managing your Flex System by using theoptional Flex System Manager management software, see the Flex System Manager documentation forinformation about its accessibility features.The Flex System information center is accessibility-enabled. The information center has the followingaccessibility features: Keyboard-only operation. Interfaces that are commonly used by screen readers. (The Java access bridge must be installed to makeJava applets available to the JAWS screen reader.) The attachment of alternative input and output devices.Keyboard navigationThis product uses standard Microsoft Windows navigation keys.Related accessibility informationYou can view the publications for Flex System in Adobe Portable Document Format (PDF) by using theAdobe Acrobat Reader. The PDF files are provided on a CD that is packaged with the product, or you canaccess them through the Flex System information center.Lenovo and accessibilitySee Human Ability and Accessibility Center for more information about the commitment that Lenovo has toaccessibility.Notices and statements in this documentUse this information to understand the most common documentation notices and statements and how theyare used.The caution and danger statements in this document are also in the multilingual Safety Informationdocument, which is on the Lenovo documentation CD. Each statement is numbered for reference to thecorresponding statement in the Safety Information document.The following notices and statements are used in this document: Note: These notices provide important tips, guidance, or advice. Important: These notices provide information or advice that might help you avoid inconvenient orproblem situations. Attention: These notices indicate possible damage to programs, devices, or data. An attention notice isplaced just before the instruction or situation in which damage might occur. Caution: These statements indicate situations that can be potentially hazardous to you. A cautionstatement is placed just before the description of a potentially hazardous procedure step or situation.2Flex System Chassis Management Module User's Guide (For Type 7893, 8721, and 8724 chassis only)
Danger: These statements indicate situations that can be potentially lethal or hazardous to you. A dangerstatement is placed just before the description of a potentially lethal or hazardous procedure step orsituation.Software requirements for the CMM web interfaceThe CMM web interface supports the following web browsers for remote (client) access. Microsoft Internet Explorer version 9 or later, but earlier than 11 Mozilla Firefox versions 17 through 31 (Firefox is recommended for JAWS users)The CMM web interface does not support double-byte character set (DBCS) languages. For informationabout using the compute node integrated management module (IMM) interface, see the compute node orIMM documentation.Chapter 1. Introduction3
4Flex System Chassis Management Module User's Guide (For Type 7893, 8721, and 8724 chassis only)
Chapter 2. Web interface use and referenceUse this information to help you navigate the CMM web interface and manage components in the FlexSystem Enterprise Chassis. Detailed information about the web interface is in the CMM web interface onlinehelp.Starting the web interfaceStart the CMM web interface to monitor and configure components in the chassis.You can access the CMM web interface through an Ethernet connection by establishing a session with theURL of the CMM. If you are connecting to the CMM for the first time, you might have to change the Internetprotocol properties on the client computer. See "Connecting to the CMM" in the Flex System ChassisManagement Module Installation Guide for more information.To log in to the CMM web interface, complete the following steps:1. Point your browser to the CMM web interface URL that your system administrator defined during initialconfiguration.2. Type your CMM user ID and password (assigned by a system administrator). The password is casesensitive. The user ID is not case sensitive. The default CMM user name is USERID, and the defaultpassword is PASSW0RD (note the number zero, not the letter O, in PASSW0RD).3. Click Log In.Note: The available password options depend on the password options that are configured for the FlexSystem Enterprise Chassis.Configuring the CMM using the web interfaceYou can configure the primary CMM from the CMM web interface. If a standby CMM is installed, itautomatically receives the configuration and status information from the primary CMM.The Flex System Enterprise Chassis automatically detects the modules and compute nodes that are installedand stores the vital product data (VPD). When the Flex System Enterprise Chassis is started, the CMMautomatically configures the remote management and console (Ethernet) connector of the CMM, so that youcan configure and manage Flex System components. You configure and manage Flex System componentsremotely by using the CMM web interface.When the Flex System Enterprise Chassis is started for the first time, the CMM automatically configures itsremote management port, enabling you to establish a management connection. See "Connecting to theCMM" in the Flex System Chassis Management Module Installation Guide for information.Note: Each CMM is configured with the same static IP address. You must create a unique static IPv4 or IPv6address for each CMM. If DHCP is not used, only one CMM at a time can be added onto the network fordiscovery. Adding more than one CMM to the network without a unique IP address assignment for each willresult in IP address conflicts. If you have problems connecting, see "Resolving CMM connection problems"in the Flex System Chassis Management Module Installation Guide for help with troubleshooting.If the CMM that is being installed is a replacement for the only CMM in the Flex System Enterprise Chassisand you selected the Backup Configuration to File option before you replaced the CMM, you can apply thesaved configuration file to the replacement CMM using the passphrase that you created.Important: Be sure to save your configuration file passphrase for future use. Copyright Lenovo 2015, and 2015, 2020,20205
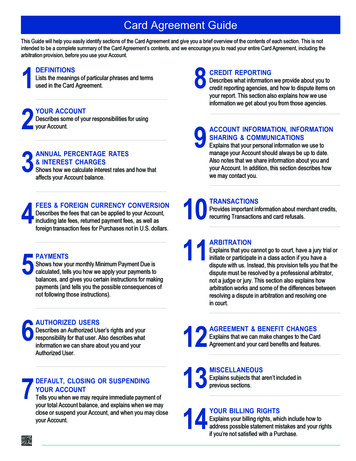
The saved configuration can be applied from the Mgt Module Management page. Use the followinginformation to restore a configuration:1. From the CMM web interface homepage, click Mgt Module Management Configuration RestoreConfiguration from File.2. Enter the passphrase.3. Click Browse for File, select the backup configuration file, and then click Open.4. Click Restore Configuration.If you do not have a backup configuration for the CMM, you can create a backup configuration file throughthe CMM web interface. See “Saving a CMM configuration” on page 30 for more information.As an alternative, you can use the CMM Initial Setup Wizard to help guide you in creating a CMM backupconfiguration file. Information about the CMM Initial setup wizard is located here: “Using the Initial SetupWizard” on page 6. The setup wizard starts automatically when you first access the web interface of a newCMM, or when you access the web interface of a CMM that has been reset to its default settings. You canalso create a backup configuration file through the CMM web interface.The following illustration shows the Manage Configuration page, which contains the CMM backup andrestore configuration options, as well as the option for the Initial Setup Wizard.Using the Initial Setup WizardThe initial setup wizard helps you to configure the CMM through a web interface. The wizard startsautomatically when you first access the web interface of a new CMM or a CMM that has been reset to itsdefault settings.You can configure the CMM by using the Initial Setup wizard. The wizard starts automatically, but it can alsobe accessed manually. Use the following information to access the initial setup wizard:1. From the CMM homepage, click Mgt Module Management Configuration.2. Click Initial Setup Wizard and follow the on-screen instructions.When you first login to the CMM you are assigned the Supervisor role. You must be assigned the Supervisorrole to use the setup wizard. The setup wizard's Getting Started section contains some steps to guide youin gathering information about the chassis for the initial setup. After you gather the information that isneeded, click the Next button, then enter the information in the wizard pages as needed. If you are importinga saved CMM configuration, the option to select the configuration file is in the Import ExistingConfiguration page of the wizard. Follow the on screen instructions, then click the Next button.6Flex System Chassis Management Module User's Guide (For Type 7893, 8721, and 8724 chassis only)
You can view and print the configuration information after the wizard has finished. A basic configuration ofthe CMM will be completed after the setup wizard has finished.Notes: If you have problems connecting, see "Resolving CMM connection problems" in the Flex System ChassisManagement Module Installation Guide for help with troubleshooting. If you are unable to connect to your CMM from all user accounts because you have forgotten the accountIDs and passwords, you must restore the CMM to the manufacturing default configuration (see "Restoringthe CMM manufacturing default configuration" in the Flex System Chassis Management ModuleInstallation Guide for information). You can also configure the CMM by using the optional Flex System Manager management software (seethe Flex System Manager Software Installation and Service Guide).When the Flex System Enterprise Chassis is started for the first time, the CMM automatically configures itsremote management port, enabling you to establish a management connection. See "Configuring the CMMfor remote access" in the Flex System Chassis Management Module Installation Guide for information.Note: When the CMM is set to Secure security mode, only the secure file transfer methods, HTTPS andSFTP, can be used for firmware updates and other tasks involving file transfers, such as transferring abackup configuration file to restore a configuration. The unsecure file transfer protocols HTTP, FTP, andTFTP are disabled when security is set to the Secure mode.The following illustrations show the Initial Setup Wizard pages. The system information that is displayed inthe wizard pages might be different from your system.Click Health status on the Inventory and Health page to view the detected components in the chassis andtheir current health status.Chapter 2. Web interface use and reference7
Click Active events on the Inventory and Health page to view the events and the severity of each.If you have saved a configuration file, the Import Existing Configuration page allows you to select the file youcreated and will automatically fill in the fields of the wizard with the appropriate values.8Flex System Chassis Management Module User's Guide (For Type 7893, 8721, and 8724 chassis only)
The General Settings page prompts you to enter some descriptive information about the chassis, includinglocation and contact person.Set the date and time for the CMM on the Date and Time page.Note: If you choose to set the date and time with an NTP server, the CMMNTP v3 Authentication key indexand NTP v3 Authentication key must match the “key ID” and “password” values set on the NTP server. Seethe documentation for your NTP server for information about setting a key ID and password.Chapter 2. Web interface use and reference9
Each CMM is configured with the same static IP address. You must create a unique static IP address foreach CMM. If DHCP is not used, only one CMM at a time can be added onto the network for discovery.Adding more than one CMM to the network without a unique IP address assignment for each will result in IPaddress conflicts.10Flex System Chassis Management Module User's Guide (For Type 7893, 8721, and 8724 chassis only)
You can view the status and configure options for the I/O modules that are connected to the CMM.Note: Typically at least two I/O modules are connected and displayed on the I/O Modules page of the InitialSetup Wizard.Choose the security policy for your CMM.Chapter 2. Web interface use and reference11
Set the appropriate DNS options for your CMM.Enter the email addresses where notifications are to be sent as CMM events occur.12Flex System Chassis Management Module User's Guide (For Type 7893, 8721, and 8724 chassis only)
Confirm all of the information that has been entered in the setup wizard.These steps complete basic configuration of the CMM. You can now perform additional setup operations, asrequired, for your specific Flex System Enterprise Chassis configuration.Setting the CMM power management policiesYou can use the CMM web interface to view the power information, based on projected power consumption,and configure power management for the Flex System Enterprise Chassis.Chapter 2. Web interface use and reference13
The CMM web interface provides options to view or configure policies related to power redundancy andpower limiting. The No Power Policy provides options for configuring power redundancy to protect yourchassis in the case of a power supply failure.The following options are available for the No Power Policy: AC Power Source Redundancy - Intended for dual AC power sources into the chassis. Maximum inputpower is limited to the capacity of half the number of installed power modules. This is the mostconservative approach and is recommended when all power modules are installed. When the chassis iscorrectly wired with dual AC power sources, one AC power source can fail without affecting computenode server operation. Note that some compute nodes may not be allowed to power on if doing so wouldexceed the policy power limit. AC Power Source Redundancy with Compute Node Throttling Allowed - Very similar to the AC PowerSource Redundancy. This policy allows higher input power, however capable compute nodes may beallowed to throttle down if one AC power source fails. Power Module Redundancy - Intended for a single AC power source into the chassis where each PowerModule is on its own dedicated circuit. Maximum input power is limited to one less than the number ofPower Modules when more than one Power Module is present. One Power Module can fail withoutaffecting compute node operation. Multiple Power Module failures can cause the chassis to power off.Note that some compute nodes may not be allowed to power on if doing so would exceed the policypower limit. Power Module Redundancy with Compute Nodes Throttling Allowed - Very similar to Power ModuleRedundancy. This policy allows higher input power; however, capable compute nodes may be allowed tothrottle down if one Power Module fails. Basic Power Management - Maximum input power is higher than other policies and is limited only by thenameplate power of all the Power Modules combined. This is the least conservative approach, since itdoes not provide any protection for AC power source or Power Module failure. If any single power supplyfails, compute node and/or chassis operation may be affected.The Power Limiting/Capping Policy provides options to limit the total amount of power that the chassis andcomponents are allowed to consume. The following options are available for the Power Limiting/CappingPolicy: No Power Limiting - Maximum input power will be determined by the active Power Redundancy policy. Static Power Limiting - Sets an overall chassis limit on the maximum input power. In a situation wherepowering on a component would cause the limit to be exceeded, the component would not be permittedto power on.Use this information to help you configure the No Power Policy and Power Limiting/Capping Policy for yourchassis:1. From the CMM web interface homepage, click Chassis Management Power Modules andManagement.14Flex System Chassis Management Module User's Guide (For Type 7893, 8721, and 8724 chassis only)
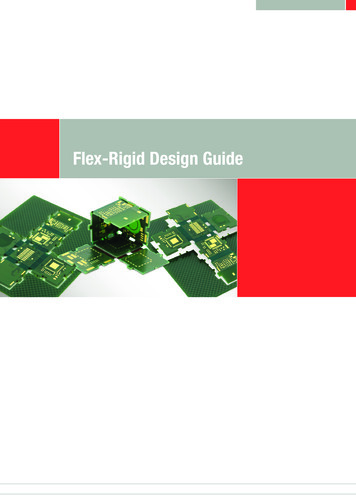
2. Click Change to view or change the No Power Policy, and click OK to save any changes that weremade.3. Click Change to view or change the Power Limiting/Capping Policy, and click OK to save any changesthat were made.Resetting the CMM to manufacturing defaultsYou can restore the primary CMM to manufacturing defaults through the CMM web or command-lineinterface.Use the following instructions to restore the primary CMM to manufacturing defaults through the CMM webinterface.Note: To restore a saved CMM configuration after resetting to the manufacturing defaults, see “Restoring aCMM configuration” on page 31.1. From the Mgt Module Management menu, click Reset to Defaults.2. Remove the check from Preserve Logs if you do not wish to save log files, and click OK in the ConfirmReset to factory defaults window.Chapter 2. Web interface use and reference15
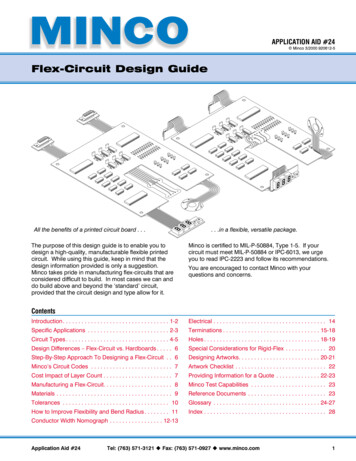
The CMM will restart after the manufacturing defaults have been restored.Note: You can also reset the CMM manufacturing defaults using the CMM command-line interface. See"clear command" in the Flex System Chassis Management Module Command-Line Interface ReferenceGuide for information.External authentication of certificatesCertificates are used to establish secure, trusted connections to the CMM and from the CMM to otherservers.For an application initiating a connection to trust the server that it is connecting to, it must have in its truststore a copy of either the server certificate or the certificate of the Certificate Authority (CA) that signed theserver certificate. The CMM has a CA that signs certificates for the LDAP, HTTPS, and CIM servers of allsystems management processors in the Flex System Enterprise Chassis. You can create trust between yourweb browser and the HTTPS servers on the management processors in the chassis by importing the CAcertificate into your web browser. Additionally, when you work with an external LDAP server, you can use theCMM web interface or CLI to configure either non-mutual (server only) or mutual certificate authentication.The CA certificate in each Flex System Enterprise Chassis is unique. You download CA certificates throughthe primary CMM in each chassis using the CMM web interface or CLI. In the CMM web interface, click Mgt Module Management Security Certificate Authority Download Certificate. Select the certificate format, and click Download. In the CLI, download the CA certificate into the CMM by using the sslcfg -dnld command (see "sslcfgcommand," in the Flex System Chassis Management Module Command-Line Interface Reference Guide,for additional information about command use).The following illustration shows the "Certificate download format" window.16Flex System Chassis Management Module User's Guide (For Type 7893, 8721, and 8724 chassis only)
After you download each CA certificate, you should import it into your web browser, so that the web browserwill trust websites that have a certificate signed by the CA. If there are multiple users who will access themanagement processors in the Flex System Enterprise Chassis, you can share the CA certificates with theother users. You can share certificates via email or through any other file sharing mechanism. Each user thatreceives a CA certificate must also import it into their web browser. If your organization has a process forpushing trusted authority certificates to users, you can also use that process.To import a CA certificate into your web browser, complete the following steps:1. Go to the area in your web browser where you configure web browser options and settings.2. Locate and select managing certificates. In some web browsers, this selection is in the Content page orin the Encryption page on the Advanced page.3. If you have old certificates that are related to this Flex System Enterprise Chassis, you should remove,delete, or distrust them, especially if you are experiencing errors relating to certificates. Check all tabs inthe certificate page and remove all certificates related to this chassis. The “Issued by” field, if displayed,will indicate the chassis ID and time that the certificate was issued, in the form “CA for chassis uuid,time stamp.” For browsers where certificates are grouped in a tree structure by organization name, youwill find the certificates in the “Generated by IBM Firmware” section.4. Import the CA certificate as a root authority certificate (not as a server certificate, intermediate authority,or other software device). Importing the CA certificate in this way might require that you are on theAuthorities page before clicking Import and that you select a particular trusted root certificate storefrom the import wizard. During the import process, when asked to select the file that you want to import,you might need to change the file type to “All Files” to see the file that you want to import. If you areasked why you want to trust the certificate, choose the option that trusts the CA for identifying websites.Select OK or Close in all the pages you opened. If you are importing the CA certificate from more thanone chassis, repeat this step for the CA certificates from each chassis.5. Close your web browser and re-open it to make sure that these changes take effect.If you change a CA certificate, you must download the new certificate and import it into your web browser,into the Certificate Trust Store of your Flex System Manager management software, into any SystemsDirector servers that might be in your network, and into any external LDAP servers that might be configuredfor mutual authentication (see "Importing an LDAP certificate with mutual authentication," in the Flex SystemChassis Management Module Command-Line Interface Reference Guide, for information and instructions).This applies for all activities that can change a CA certificate such as manual changes or resetting the CMMto defaults.Chapter 2. Web interface use and reference17
If your web browser advises you that a connection is untrusted or a security certificate is invalid, or has anyother issue that indicates a certificate exception issue relating to a certificate exception, follow the processgiven above to download and import the CA certificate, making sure to clear all old certificates from the FlexSystem Enterprise Chassis on all tabs in the certificate pages. You can also try clearing the browser cacheand follow other instructions that might be suggested by the documentation for your web browser. Sincesome certificate issues impact only certain web browsers, you might be able to correct the condition byswitching to a different web browser.Importing an LDAP certificate with non-mutual authenticationTo authenticate an LDAP server with the CMM, you must import either the certificate of the LDAP server orthe certificate of the Certificate Authority (CA) which signed the LDAP server certificate. The process forimporting either an LDAP server certificate or the certificate of the CA with non-mutual authentication is thesame.Import a certificate by using non-mutual external authentication when you only have
2 Flex System Chassis Management Module User's Guide (For Type 7893, 8721, and 8724 chassis only) Danger: These statements indicate situations that can be potentially lethal or hazardous to you. A danger statement is placed just before the description of a potentially lethal or hazardous procedure step or