Transcription
PracticeMaster Quick Start Guide
PracticeMaster Quick Start GuideCopyright 2017-2022Software Technology, LLC1621 Cushman DriveLincoln, NE 68512(402) 423-1440Tabs3.comTabs3, PracticeMaster, and the “pinwheel” symbol (Version 2022 (Wednesday, January 5, 2022)) are registered trademarks of Software Technology, LLC.
PracticeMaster Getting Started GuideCongratulations! You’ve made the decision to work with PracticeMaster. Now, let us show you how to getstarted and where to go when you need more information.Table of ContentsBefore You StartInstallationStarting PracticeMasterSetting Up PracticeMasterGetting Data into PracticeMasterStep 1 – Tabs3 Billing ClientsStep 2 – Matter ManagerIntegrating Outlook Calendar and ContactsStep 3 – Outlook Calendar EntriesStep 4 – Outlook ContactsWrapping Up Outlook IntegrationFeaturesStep 5 – CalendarStep 6 – Journaling Email MessagesStep 7 – Conflict of Interest SearchStep 9 – Convert to FeeAdvanced FeaturesAreas of PracticeDocument ManagementDocument 515151616Before You StartBefore you can get started, you need to installPracticeMaster.More Info - InstallationTraining VideoTip: If you are getting started with both PracticeMasterand Tabs3 Billing, we recommend starting with Tabs3Billing first.lThe Tabs3 Software Installation GuidelInstallationPracticeMaster OverviewTabs3.com/docsKB Article R11027 - Installing the Try Before You BuyPracticeMaster LicenseIf you have not yet installed PracticeMaster, it’s easy todo. Follow the instructions provided in the InstallationGuide. The Installation Guide can be accessed at-3-lsupport.Tabs3.com/main/R11027.htm
Tabs3.com/docs. If you have Tabs3 Billing, you have a try before you buy one-user license of PracticeMasterBasic.Once installed, you are ready to get started.Starting PracticeMaster1. From the Windows Desktop, double-click the PracticeMaster shortcut.2. The Getting Started wizard will be displayed, allowing you to configure the Tabs3 Software.Setting Up PracticeMasterThe Guided Setup will walk you throughconfiguring the Tabs3 Software after firstinstalling the Tabs3 Software or when addinglicenses of new programs.More Info - CustomizationHelp TopicsllPress F1 in the Customization windowClick the Index tab and type “Client ID”When first installing the Tabs3 Software, you will beThe Tabs3 Software Administrator Guideprompted to enter details about the firm and yourTabs3.com/support/docs.htmluser information, which will be used to configureyour login account. Depending on the softwarebeing installed, you will also be prompted todetermine the Decimal Places for your Key Type (by how many matters you have for your clients), configure bankinformation, and create a timekeeper.After completing the Guided Setup, you will automatically be logged in using the information you provided, andthe Tabs3 Software will be ready to use.You can set up users in System Configuration and customize your configuration options after the Guided Setupis complete.Getting Data into PracticeMasterLet’s start with getting your data into PracticeMaster.Step 1 – Tabs3 Billing ClientsFirst, let’s get your Tabs3 Billing clients into PracticeMaster. Assuming you’ve been using Tabs3 Billing andyou’ve just installed PracticeMaster, all you need to do is synchronize the two. When synchronizing, thefollowing data will automatically be brought over from Tabs3 Billing into PracticeMaster: clients, contacts, workin-process fees and costs, client notes, and billing files (i.e., timekeepers, transaction codes, categories, taskcodes, locations, and text macros). As an option, you can also bring over archived fees and costs. The followingprocedure needs to be done only once by one user. We recommend that your PracticeMaster administrator runthe initial synchronization of PracticeMaster and Tabs3 Billingas follows.-4-
Synchronizing Tabs3 Billing with PracticeMaster1. Start Tabs3 Billing.2. From the Utilities menu, click Data File Integrity Check. You may have an error 500, which is expected.This error indicates that PracticeMaster and Tabs3 are not synchronized. Proceed only if the check has noerrors, or only has an error 500.3. From the Maintenance menu, select Integration Synchronize Tabs3 and PracticeMaster.Tip: Synchronizing billed fees and costs is optional. If you’ve been using Tabs3 Billing for several years,you may want to clear the Convert Tabs3 archive records to PracticeMaster fee and cost recordscheck box. Although synchronizing all billed fees and costs allows them to be included in conflictchecking, it also affects the time it takes to run certain utilities such as Data File Integrity Check.4. From the Utilities menu, run a Data File Integrity Check again to verify the error 500 is no longerpresent.Now that Tabs3 Billing and PracticeMaster are synchronized, whenever you add or edit a client, contact, fee, orcost in either program, the changes will automatically mirror to the appropriate files in the other system.Adding ClientsClients are added to PracticeMaster via the Client program. When you add a client, a contact record is createdfor the individual or organization. Contact records can be used by other clients and matters.lFrom the File menu, select Open Client.Tip: When entering information for a potential client,enter the information in a Contact record. Later, whenthe contact becomes a client, in the Contact window,use the Create Client option in Quick Clicks to create anew client record.More Info – ClientsHelp TopicsllPress F1 on any tab in the Client window,Click the Index tab and type ClientsTraining VideoTip: If you are not using Tabs3, other options may beavailable for importing client information from othersoftware. Contact your PracticeMaster consultant, orTechnical Support at (402) 419-2210, to discuss otheroptions.lGetting Started with ClientsKB Article R11130 – PracticeMaster Quick Guides – Contactsl-5-support.Tabs3.com/main/R11130.htm
Step 2 – Matter ManagerThe Matter Manager is a feature that attorneys andparalegals will use often. The Matter Manager showsdetailed information for a client’s matters and lets youcustomize and launch the most commonly usedprograms. You can see all contacts and activity, converttransactions to fees, view Tabs3 billing information, andmore.More Info – Matter ManagerHelp Topics – Press F1 in the Matter Manager windowPracticeMaster Quick Guides – Matter ManagerlTabs3.com/docsKB Article R11403 – All About the PracticeMaster MatterManagerlsupport.Tabs3.com/main/R11403.htm To open the Matter Manager, do one of the following:lllFrom the All Actions section of the Home page, click the Matter Manager icon.From the File menu, select Matter Manager.Press Ctrl M.Integrating Outlook Calendar and ContactsSteps 3 and 4 of this document walk you through synchronizing calendar entries and contacts between Outlookand PracticeMaster. Before proceeding, however, it is important to plan how you want to implement theintegration. For example, if you have three attorneys who all want to synchronize their smartphones withPracticeMaster via Outlook, you will need to carefully consider how to implement this. Otherwise, you could endup having three or four different records for each contact in PracticeMaster, making it time consuming to clean-6-
up. It is much easier to implement synchronization for one attorney at a time, and clean up contact informationbefore synchronizing the next attorney’s information.We strongly recommend reviewing the Outlook Integration Guide before synchronizing the first time.Specifically, the “Getting Started” and “Best Practices” sections of the Outlook Integration Guide includenumerous guidelines to consider when planning the implementation of Outlook synchronization. Because eachfirm’s situation and requirements are different, it is important to plan for this implementation. For example,some of the questions you will want to ask include:lllllDo you want calendarentries to synchronize onlyfrom PracticeMaster toOutlook (i.e., one-wayintegration)? Or do youwant calendar entries tosynchronize fromPracticeMaster to Outlookand from Outlook toPracticeMaster (i.e., twoway integration)?More Info – Outlook IntegrationHelp Topics – Press F1 in the Outlook Synchronization windowKB Article R11400 – Outlook Integration Guidelsupport.tabs3.com/main/R11400.htmKB Article R11366 – Configuring PracticeMaster/Microsoft Outlook Calendar & tmKB Article R11402 – PracticeMaster & Microsoft Outlook Calendar & ContactIntegration FAQDo you want contacts tolsupport.tabs3.com/main/R11402.htmsynchronize only fromPracticeMaster to Outlook(i.e., one-way integration)? Or, do you want contacts to synchronize from PracticeMaster to Outlook andfrom Outlook to PracticeMaster (i.e., two-way integration)? Do you only want certain contacts tosynchronize? If so, you can set up advanced filters for each user to designate which contacts tosynchronize.Do you want synchronization to be automatic or manual? Most firms prefer automatic.Do you want personal calendar entries from Outlook in PracticeMaster? If not, enter your personalcalendar entries in an Outlook folder other than the folder specified for integration.Do you want personal contacts from Outlook in PracticeMaster? All contacts can be seen by allPracticeMaster users. If not, select the Private check box in the Outlook record and clear the Includeprivate Outlook contacts check box on the Contacts tab of the Outlook Synchronization window.Additionally, it is important to review the differences in how information is treated. The Outlook IntegrationGuide includes information regarding these differences.Important Tips: Before you perform your first synchronization, keep in mind that calendar events that spanmultiple days must be entered in PracticeMaster as multiple single-day events. Additionally, recurring eventsentered in Outlook do not synchronize to PracticeMaster; therefore, recurring entries must be entered inPracticeMaster using the Recurring Date feature.After reviewing the Outlook Integration Guide, we recommend contacting your PracticeMaster consultant, orTechnical Support at (402) 419-2210, with any questions you have before proceeding.-7-
Step 3 – Outlook Calendar EntriesNow, let’s get your calendar entries from Outlook into PracticeMaster. PracticeMaster classifies calendar entriesas events and tasks, just like Outlook.Let’s configure the calendar integration. Configuring and Synchronizing Outlook Calendar Integration1. Start PracticeMaster.2. From the Maintenance menu, select Integration Outlook Synchronization.3. Click the Calendar tab.a. Select PracticeMaster to Outlook to add PracticeMaster calendar entries to Outlook, and selecteither Automatic or Manual.b. Select Outlook to PracticeMaster if you want calendar entries from Outlook added toPracticeMaster, and select either Automatic or Manual.Tip: Decide if you want calendar entries deleted in Outlook also deleted in PracticeMaster. Somefirms do not allow this because it is too easy for someone to accidentally delete a critical calendarentry in Outlook and then have it also deleted in PracticeMaster. Leave the Allow deletions inPracticeMaster check box cleared if you do not want Outlook deletions made in PracticeMaster.c. Under Record Type, select whether you want to synchronize events, tasks, or both. Then click thecorresponding Select Folder button to specify the calendar folder with which you want tosynchronize.Tip: PracticeMaster events typically integrate with the Outlook Calendar folder. However, you maywant to consider setting up a special folder in Outlook that is used solely for synchronizingPracticeMaster calendar entries. This makes it easy to keep the PracticeMaster calendar entriesseparate from personal calendar entries.d. Select any other desired options.4. Click the Synchronization Options tab.5. Under Manual Synchronization, click Sync Now to perform the initial calendar synchronization.a. You will be asked if you want to save the changes.b. Click Yes.Tip: After synchronizing calendar entries from Outlook, start PracticeMaster and add the client ID to the clientrelated calendar entries.Step 4 – Outlook ContactsNext, let’s get your contacts from Outlook. As with calendar entries, you need to decide how you want yourcontacts to integrate. Integration of contacts between PracticeMaster and Outlook is extremely flexible, allowingyou to use different criteria for each user that integrates with Outlook. PracticeMaster will include any clients andcontacts from Tabs3.Let’s configure the contact integration.-8-
Configuring and Synchronizing Outlook Contact Integration1. Start PracticeMaster.2. From the Maintenance menu, select Integration Outlook Synchronization.3. Click the Contacts tab.a. Select PracticeMaster to Outlook to add PracticeMaster contacts to Outlook, and select eitherAutomatic or Manual.b. Select Outlook to PracticeMaster if you want contacts from Outlook added to PracticeMaster, andselect either Automatic or Manual. If you’re not sure at this time, you can enable this feature later.c. In the Synchronization Options section, click the Select Folder button to specify the contactfolder with which you want to synchronize.Tip: When first starting to synchronize PracticeMaster and Outlook, consider setting up a separatefolder in Outlook that is used solely for synchronizing PracticeMaster contacts. This preventsPracticeMaster/Tabs3 contacts from being combined with your Outlook contacts. You may havehundreds or thousands of contacts in Tabs3 and PracticeMaster that you want kept separate fromyour other Outlook contacts.Tip: You can set up advanced filters for each user to designate which contacts to synchronize.d. Select any other desired options.4. Click the Synchronization Options tab.5. In the Manual Synchronization section, click Sync Now to perform the initial contact synchronization.a. You will be asked if you want to save the changes.b. Click Yes.Tip: Review your contacts. Open the Contact file in PracticeMaster by selecting File Open Contact.Tip: If synchronization requires user intervention, an “OutlookSynchronization Suspended” message will be displayed in red in the task bar at the bottom of thePracticeMaster window. Click the message to resolve the issue. Read more about suspension in the OutlookIntegration Guide.Wrapping Up Outlook IntegrationIn the previous steps, we started the initial synchronizations by clicking the Sync Now button. However,PracticeMaster can be configured to perform a periodic synchronization that occurs when you startPracticeMaster and at a set interval, thus eliminating the need to manually synchronize data. After performingthe initial synchronizations, go back into Outlook Synchronization.1.2.3.4.From the PracticeMaster Maintenance menu, select Integration Outlook Synchronization.Click the Synchronization Options tab.Verify that the Periodically run synchronization check box is selected.In the Require confirmation check box, change the number of records that require confirmation to areasonable number for which you would want to confirm the changes before they are committed, such as20 or 30, for example. Otherwise, leaving this number set to 1 will display the confirmation window each-9-
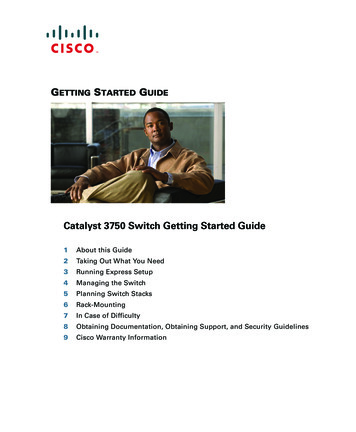
time a periodic synchronization is started when there are entries that need synchronized, thereby allowingyou to review all pending changes before the synchronization occurs.5. Click OK.Now that the initial setup is done, let’s take a look at the various PracticeMaster features that you will want touse right away.FeaturesAlthough PracticeMaster has many features, we will show you just a few to help you get started right away.Step 5 – CalendarThe PracticeMaster Calendar is probably one of the first features that firms will use. Unlike the calendar inOutlook, you can easily associate calendar entries with clients and contacts. Use the following to take a quicktour of the calendar. Calendar Quick Tour1. From the Calendar menu,select Daily Calendar toopen the calendar.2. In the toolbar at the top,clickto view a weeklycalendar. Clickto viewa monthly calendar. Click3.4.5.6.to return to the dailycalendar.In the User field at the topof the calendar, click thedrop-down arrow toselect whose calendar youwant to view.Using the Date Selector tothe right side of thecalendar, click a different day in a different month to easily change which day is shown.From the Calendar menu, select Calendar Properties. This window is where each user can configure hisor her properties. Click on each tab to see the various options.Read the Calendar Quick Guide, as listed in the following More Info table. The Calendar Quick Guideprovides an excellent introduction to the PracticeMaster calendar.Just like Outlook, calendar entries are classified as Events (i.e., appointments) or Tasks.- 10 -
More Info – CalendarHelp Topics – Press F1 in the Calendar window and Calendar Properties windowCalendar Quick Guide – KB Article tor Guide – Setting Up PracticeMaster sectionTabs3.com/docsStep 6 – Journaling Email MessagesYou can journal any email message to PracticeMaster while using Outlook. This is done using the OutlookToolbar Plug-in. Clicking the PM Journal button on the toolbar opens a journal record with the email messageand any attachments, allowing you to assign the matter. Once journaled, you can easily see all emailcommunications for a specific matter, regardless of who sent or received the email in Outlook.All users in your firm can easily install the Outlook Toolbar Plug-in. Installing the Outlook Toolbar Plug-in1. From the Maintenance menu, select Integration Toolbar Plug-ins.2. On the Outlook tab, click Install Outlook Plug-in.In addition to journaling email messages while in Outlook, you can also quickly create a calendar entry or feeentry from any email message using the PM Calendar and PM Fee buttons on the Outlook Toolbar.The Outlook Toolbar Plug-in makes it easy for PracticeMaster to be your central repository for all client emailcommunications.More Info – JournalHelp Topics – Press F1 in the Toolbar Plug-ins windowOutlook Plug-in Quick Guide – KB Article R11130lsupport.Tabs3.com/main/R11130.htm- 11 -
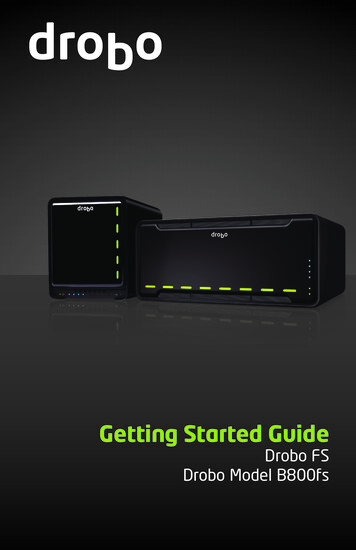
Step 7 – Conflict of Interest SearchConflict of Interest searching inPracticeMaster is lightning fast. Searchcontacts, appointments, email messages,documents, and meeting notes. In just oneclick, you can access the details of anyconflict. To open a Conflict of Interestsearch window, select Conflict of InterestSearch from the Search menu.More Info – Conflict of InterestHelp Topics – Press F1 in the Conflict of Interest Search windowKB Article R11091 – Comparing Tabs3 & PracticeMaster Conflict ofInterestlsupport.Tabs3.com/main/R11091.htmKB Article R10515 – Technical Info on PracticeMaster Conflict of Interestlsupport.Tabs3.com/main/R10515.htmStep 8 – FeesFees entered in PracticeMaster automatically integrate to Tabs3. Many attorneys will perform their data entry inPracticeMaster. To open the Fee window, do one of thefollowing:llFrom the File menu, select Open Fee.Press Ctrl Shift F.More Info – FeesHelp Topics – Press F1 in the Fee windowFee Entry Quick Guide – KB Article R11130lsupport.Tabs3.com/main/R11130.htmA list of fees is shown with a snapshot of thehighlighted fee. To view fees for a specific client:1. From the File menu, select Open Client.2. Click the Fee tab.Recap of HoursThe Recap of Hours window shows the cumulativebillable and non-billable hours and amounts for thespecified timekeeper on any given day, and canoptionally include Journal records with timers that havenot yet been converted to fees. This makes it easy fortimekeepers to see whether any time entries aremissing.lllMore Info – Recap of HoursHelp Topics – Press F1 in the Recap of Hours windowTraining VideolUsing the Recap of HoursOn the Dashboard tab of the Home page;From the File menu, select Recap of Hours; orOn the PracticeMaster Task Bar, click the Recap of Hours button.- 12 -
The first time you open the Recap of Hours window, you will be prompted to select the Timekeeper whose hoursyou want to view. You can select a different timekeeper by clicking theicon.Step 9 – Convert to FeePracticeMaster makes it easy to convert calendar entries, emails, timer records, and phone calls to fees. You cando all of this in the Matter Manager as well as other areas. To get started, open the Convert to Fee Settingsprogram.Convert to Fee SettingsBecause each user may want different defaults for the Fee window when converting to fees, you can configureyour own defaults. To access the Convert to Fee Settings program, select Maintenance Preferences Convertto Fee Settings.Each tab in the Convert to Fee Settings window lets you designate your own defaults for each type of record thatcan be converted to a fee entry (i.e., Calendar, Email, Note, Phone, Research, and Timer).More Info – Convert to FeeHelp Topics – Press F1 in the Convert to Fee Settings windowFee Entry Quick Guide – KB Article R11130lsupport.Tabs3.com/main/R11130.htm Converting to Fee Using Matter Manager1. From the File menu, select Matter Manager.2. Select All Activity in the toolbar drop-down list.3. Each billable transaction that has not yet been billed will have aicon in the Convert column. Clickingthe icon displays a Fee window allowing you to create a fee. Once created, the icon is removed from thecolumn, making it easy to see which items have and have not been converted to fee. Converting to Fee Using Calendar1. From the Calendar menu, select Weekly Calendar.2. Right-click any calendar item and select Convert to Fee. A Fee window will be displayed allowing you tocreate a fee. Converting Journal Records to FeeEmails, phone calls, notes, and research tasks are all stored in the Journal File.- 13 -
1. From the File menu, select Open Journal.2. Do one of the following:l Double-click or highlight any record in the List tab. In the Quick Clicks pane, under Take Action,select Convert to Fee.l Right-click any record in the List tab. Select Action and then Convert to Fee.Tip: You can also convert journal records to fees while in the Client file via the Journal tab using similarmethods.Tip: You can set up a filter to show only your journal records. Use the PracticeMaster Timer to Create Timer RecordsUse the PracticeMaster Timer to create timer records to track your activity throughout the day. The timer is easyto use and allows you to easily switch back and forth between tasks.1. From the File menu, select Timer.2. Click thebutton to add a new Time Task to the Timer window. The timer will be started and a newjournal record will be displayed, allowing you to specify the Client ID or Contact if desired, as well asrecord any notes. You can use Ctrl S to save the record now or later.3. In the Timer window, click thebutton to stop the timer; click thebutton to start the timer.Double-clicking the task itself will open the timer record and allow you to edit the Description and assigna Client ID.Tip: Right-click in the Timer window and select Preferences to change the default settings for the user. View Your Timer RecordsUse the Visual Timer Display to view your timer records.1. From the File menu, select Visual Timer Display.2. In the upper-left corner, specify your User ID in the User field. Converting Timer Records to FeesThe Process Timer Records program is used to convert timer records to fees, on a weekly basis for example. Theprogram can be accessed by clicking the File menu and selecting Process Timer Records.More Info – TimerHelp Topics – Press F1 in the Timer window, Visual Timer Display window, Process Timer Records windowTimer Window Quick Guide – KB Article R11130lsupport.Tabs3.com/main/R11130.htmAdvanced FeaturesThis section provides you with information regarding advanced features found in PracticeMaster.- 14 -
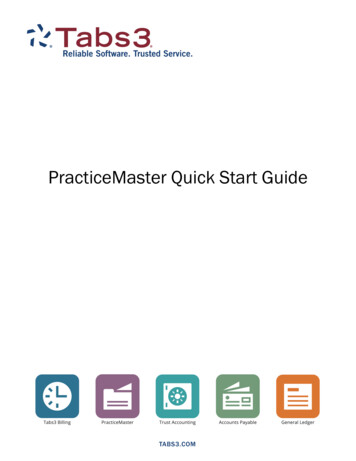
Areas of PracticeYou can set up separate Areas of Practice (AOP)for the various types of law practiced. Each Areaof Practice has separate files for tracking uniqueinformation. For example, you might have aFamily Law area of practice, a Business Law areaof practice, and a Criminal Law area of practice.lllMore Info – Areas of PracticeHelp Topics – Look up Area of Practice in the IndexCustomizing PracticeMaster GuideTabs3.com/docsThe Family Law area of practice might have separate files for Assets, Debts, Spouse Information, Income,Expenses, Children, etc.A Business Law area of practice might have separate files for Board of Directors, Shareholders, FinancialInstitutions, Signatories, etc.A Criminal Law area of practice might have files for Witnesses, Prior Convictions, Bonds, Plea Bargains, etc.Document ManagementWhen PracticeMaster organizes your firm’sMore Info – Document Managementdocuments, it’s easy to find them again.Help Topics – Look up Document Management in the IndexDocument management automatically namesDocument Management Guide – KB Article R11572your files, associates your documents to specificsupport.Tabs3.com/main/R11572.htmclients or matters, and automatically stores themin the appropriate place every time you save aKB Article R11571 – Document Management FAQsfile. You can easily see a list of documents for anysupport.Tabs3.com/main/R11571.htmclient or area of practice, or all versions of adocument that you have created for differentclients. You can check documents out so that no one else can edit it and then check it back in when you’re done.PracticeMaster also retains previous versions of each document so you can copy a paragraph from an oldversion if you need to.Document AssemblyPracticeMaster provides document assemblyMore Info – Document Assemblycapabilities using either the built-in WordHelp Topics – Look up Word Document Assembly in the IndexDocument Assembly feature or HotDocsKB Article R11015 – How to Start a New Word Document Templatedocument assembly software. r is implemented, using DocumentAssembly can greatly improve the efficiency withwhich your standard legal documents are created. Most firms implement document assembly by coding theirmost commonly used forms and documents first.- 15 -
WorkFlowsWorkFlows can have a huge impact on a firm’sdaily operation by automating specified tasks andmaking sure things do not fall between thecracks. For example, a WorkFlow could bedesigned to automatically generate a thank youletter, create a follow-up calendar entry, and sendan email to the billing clerk whenever a new clientis added to the system. WorkFlows are extremelypowerful and can be customized to match yourfirm’s workflow and way of doing things.More Info – WorkFlowsHelp Topics – Look up WorkFlows in the IndexKB Article R11307 – All About s GuideTabs3.com/docsResourcesThis Getting Started Guide provides you with the information you need to start using the software. There aremany other resources available to help you learn the software.Training VideosTabs3 Software include numerous training videos to help you learn the software. Training video libraries can beaccessed via the software from the Help Training Videos menu option.HelpHelp is installed with the software and is easily accessed by pressing F1, by clicking the button, or by selectingthe Help Help Topics menu option. Help includes detailed information regarding specific programs. Clickingthe button opens Help for the window you are currently using. Many times, reading the appropriate Help topicmay be the fastest way to find your answer.PracticeMaster Guides and Report PackThere are multiple PracticeMaster guides and a PracticeMaster Report Pack installed with the software in PDFformat. Shortcuts are created during installation. From PracticeMaster, select Help Documentation for a list ofall available Tabs3 Software Documentation. The guides include information on basic setup and use of thesoftware. PracticeMaster has dozens of reports and the PracticeMaster Report Pack makes it easy to seeexamples of each report. Many firms will print this Report Pack as a reference guide for the various reports tohelp familiarize them with what is available. The guides and Report Pack can also be accessed via our website atTabs3.com/support/docs.html.- 16 -
Knowledge BaseAn extensive Knowledge Base with advanced information is available for Tabs3 Software users. The KnowledgeBase contains information on Error Troubleshooting, Networking & Windows Issues, “How To” articles, andproduct-related articles. You can access the Knowledge Base via the software from the Help InternetResources Knowledge Base menu option or from your Internet browser at support.Tabs3.com.For example, as a new PracticeMaster user, you may find it necessary to add new fields to a file for trackinginformation unique to your firm. Knowledge Base Article R11001, “How to Add New Fields to PracticeMasterFiles and Form Layouts,” provides step-by-step instructions for these common procedures.Although the Helpprovided with the software also includes much of this information, you may find that the comprehensive focus ofmany Knowledge Base articles may be quite helpful for certain subjects.Technical SupportTabs3 Software provide some of the best technical support in the industry. Service to our customers is extremelyimportant to us—so much so that our motto is:Reliable software. Trusted service.Technical Support is provided at no charge with a maintenance plan and is available from 8:00 a.m. to 5:00 p.m.Central Time, Monday through Friday. If you have any questions, please feel free to call our Technical Supportstaff at (402) 419-2210. Email support can be requested via Tabs3.com/support.Tabs3 ConsultantsTabs3 Software is available through a national network of over 250 consultants. Those consultants are smallindepende
Software Technology, LLC Subject: PracticeMaster Getting Started Guide Created Date: 1/5/2022 2:57:34 PM .