Transcription
Getting Started GuideDrobo FSDrobo Model B800fs
Data Robotics, Inc. supports lawful use of technology and does not endorse or encouragethe use of its products for purposes other than those permitted by copyright law.Copyright 2011 Data Robotics, Inc. Data Robotics, Drobo, DroboShare, DroboPro,DroboElite and BeyondRAID are trademarks of Data Robotics, Inc., which may beregistered in some jurisdictions. All other trademarks used are the property of theirrespective owners.Information supplied by Data Robotics, Inc. is believed to be accurate and reliable atthe time of printing, but Data Robotics, Inc. assumes no responsibility for any errors thatmay appear in this document. Data Robotics, Inc. reserves the right, without notice,to make changes in product design or specifications. Information is subject to changewithout notice.Data Robotics, Inc., 1705 Wyatt Drive, Santa Clara, CA 95054, U.S.A.For more info, visit: http://www.drobo.comPart # 070-00035-002Rev 02drobo.com Getting Started Guide for Your Drobo FS/B800fs 1
Table of ContentsBEFORE YOU BEGINChecking Box ContentsDrobo FSDrobo B800fsChecking System RequirementsOperating Systems Supported for Drobo FS/B800fsCable Interfaces SupportedChecking the Hardware You NeedSelecting Hard DrivesDetermining How Much Hard Drive Space You NeedUsing a Router or SwitchUsing an Uninterruptible Power Supply (UPS) or Power Surge Protector333333444566SETTING UP IN JUST FOUR EASY STEPS!Installing Drobo DashboardInstalling Drobo Dashboard from the Resource CDInstalling Drobo Dashboard from the WebsiteInserting the Hard DrivesConnecting the Cables and Turning on the PowerConnecting to Your NetworkConnecting to a Power SourceTurning “On” Your Drobo DeviceSetting the Administrator Username and Password77710101213131315WHERE TO GO FROM HEREUsing Best PracticesKeeping Your Software Up to DateSafely Shutting Down Your Drobo FS/B800fsSafely Shutting Down your Drobo Device Using Drobo DashboardSafely Shutting Down your Drobo Device ManuallyUsing the Online End User GuideUsing Context-Sensitive HelpUsing the Knowledge BaseGetting Support17171819192021212121TROUBLESHOOTING YOUR SETUP22INDEX23drobo.com Getting Started Guide for Your Drobo FS/B800fs 2
Before You BeginCongratulations on your new Drobo FS/B800fs! This Getting Started Guide will help youget your Drobo FS/B800fs set up in just a few easy steps. Before you begin, it’s a goodidea to check your system and hardware requirements. In this chapter, you will:t IFDL CPY DPOUFOUTt IFDL TZTUFN SFRVJSFNFOUTt &OTVSF UIBU ZPV IBWF UIF IBSEXBSF ZPV OFFE GPS ZPVS %SPCP EFWJDF Checking Box ContentsCheck your product’s box to ensure it contains all the components listed below.Drobo FSt %SPCP CBZ 'JMF 4IBSJOH 4UPSBHFt &UIFSOFU DBCMF t QPXFS DPSEt 2VJDL 4UBSU BSEt (FUUJOH 4UBSUFE (VJEFt %SPCP 3FTPVSDF % XIJDI JODMVEFT the Drobo Dashboard applicationDrobo Model B800fst %SPCP CBZ 'JMF 4IBSJOH 4UPSBHF GPS Businesst 5XP &UIFSOFU DBCMFTt QPXFS DPSEt 2VJDL 4UBSU BSEt (FUUJOH 4UBSUFE (VJEFt %SPCP 3FTPVSDF % XIJDI JODMVEFT the Drobo Dashboard applicationChecking System RequirementsCheck to ensure your operating system and cable interface are supported.Operating Systems Supported for Drobo FS/B800fst 8JOEPXT 91 4FSWJDF 1BDL t 8JOEPXT 7JTUB 4FSWJDF 1BDL t 8JOEPXT t 8JOEPXT 4FSWFS 3 t 8JOEPXT 4FSWFSt .BD 04 9 PS HSFBUFS *OUFM 0OMZt .BD 04 9 4FSWFS PS HSFBUFS *OUFM 0OMZNotes:- For best performance, ensure you are running the latest service packs for theappropriate Windows operating systems.- For the most current list of supported operating systems, you can check thespecifications for your product online www.drobo.com/products/index.php.drobo.com Getting Started Guide for Your Drobo FS/B800fs 3
Cable Interfaces SupportedYour Drobo FS/B800fs connects to a network via a router or switch using an Ethernet port.Ethernet is the standard local area network (LAN) access method.Note: Although Drobo B800fs has two Ethernet ports, which you can later configurefor one of two purposes, you will use only one of them for the initial setup.Gigabit Ethernet PortDrobo FS/B800fs supports gigabit Ethernet connections (1000 Mbit/s) for optimalperformance. It will, however, auto-negotiate the highest connection speed availableto your router or switch.Checking the Hardware You NeedTo use your Drobo FS/B800fs, you’ll need at least two hard drives and a router or switch.If you plan to use Dual Disk Redundancy, which protects your data against two hard drivefailures, you will need at least three hard drives. This section helps you:t 4FMFDU UIF IBSE ESJWFT UP VTF t IPPTF UIF BNPVOU PG ESJWF TQBDF DBQBDJUZ UP IBWF BWBJMBCMF PO UIPTF ESJWFT UP ensure your data is protected.t 6OEFSTUBOE CBTJD SFRVJSFNFOUT GPS ZPVS SPVUFS PS TXJUDI Selecting Hard DrivesYou can use hard drives from any manufacturer and with any capacity (the spaceavailable on the hard drive) with your Drobo device. All Drobo devices support standard3.5” internal SATA drives. If you are unsure, ask your administrator or hard drive retaileror manufacturer to verify that your hard drives meet this standard. Drobo devices are notcompatible with SSD, IDE, SCSI or PATA hard drives.Warning: Any pre-existing data on the drives will be erased during installation.drobo.com Getting Started Guide for Your Drobo FS/B800fs 4
Determining How Much Hard Drive Space You NeedIn order to protect your data from hard drive failure, your Drobo device requires morespace than what you will use for your data, sometimes as much as double or more theamount of space.The best way to determine how much usable, protected storage space you will haveavailable for your data, based on the number and capacity of your drives, is to use ourCapacity Calculator at www.drobo.com/resources/calculator.php.A shortcut to estimating the capacity available for your data is to omit the largestdrive and then add the capacity of the remaining drives. If you plan to use Dual DiskRedundancy, omit the largest two drives. For example:Single Disk (Default) Redundancy# Drives344Drive Capacities3TB 3TB 3TB250GB 250GB 500GB 750GB250GB 500GB 1TB 2TBUsable Protected Capacity* 6TB 1TB 1TB, 750GBDual Disk Redundancy# Drives455Drive Capacities3TB 3TB 3TB 3TB250GB 250GB 500GB 500GB 750GB250GB 500GB 750GB 1TB 2TBUsable Protected Capacity* 6TB 1TB 1.5TBNotes:- Actual capacity is often less than what is shown in the examples above due tothe different systems used for rating capacity. This has nothing to do with Drobodevices.- Know that all Drobo devices enable you to easily increase storage capacity atany time by simply inserting additional drives or replacing smaller drives withlarger ones.drobo.com Getting Started Guide for Your Drobo FS/B800fs 5
Using a Router or SwitchYou will be plugging your Drobo FS/B800fs into a router or switch that must already beconfigured to work with your network. Your router or switch must have at least oneEthernet port open and available.Your router or switch must also support Dynamic Host Configuration Protocol (DHCP),which assigns IP addresses to devices on a network. If it does not, you will need todirectly connect your Drobo FS/B800fs to one of your computer’s Ethernet ports for theinitial setup. See the “Troubleshooting Your Setup” section on page 22 for steps.Tip: To check for DHCP support, refer to the documentation for your router or switch.You may also choose to proceed with installation and check for DHCP support only ifyou experience a problem.For optimal performance, it’s best if your router or switch supports gigabit Ethernetconnections (1000 Mbit/s). Your Drobo FS/B800fs, however, will auto-negotiate the highestconnection speed available to your router or switch.Using an Uninterruptible Power Supply (UPS) or Power Surge ProtectorWe highly recommend you plug your Drobo device into an uninterruptible power supply(UPS), which protects against sudden losses in power as well as power surges. We alsorecommend a power surge protector, although this only protects against power surges.drobo.com Getting Started Guide for Your Drobo FS/B800fs 6
Setting Up in Just Four Easy Steps!Once you have unpacked your Drobo device from its box and ensured you meet all systemand hardware requirements, it’s time to set up your Drobo FS/B800fs for use. This can bedone in just four easy steps!1. Install Drobo Dashboard.2. Insert the hard drives.3. Connect the cables and turn on the power.4. Set the administrator username and password.Once you have unpacked your Drobo device from its box and ensured you meet all systemand hardware requirements, it’s time to set up your Drobo FS/B800fs for use. This can bedone in just four easy steps!Installing Drobo DashboardDrobo Dashboard is the software companion to your Drobo device, enabling you to easily setup and manage your Drobo FS/B800fs. You install Drobo Dashboard from the Resource CDthat came with your product. During the installation process, you can set Drobo Dashboardto automatically install version updates, which we highly recommend. Drobo software andfirmware updates can also be installed from www.drobo.com/support/updates.php.Important Note: In some cases, the latest version may be released with newproducts (on a Resource CD) for a short period of time before being made availableon the website. Therefore it is best to install from the Resource CD.Note: The computer on which you install Drobo Dashboard needs to be connected toyour network and you need to have administrator rights on that computer.Installing Drobo Dashboard from the Resource CD1. 1MBDF UIF 3FTPVSDF % JO ZPVS DPNQVUFS T % %7% ESJWF Depending on your operating system, one of the following occurs:t 5IF %SPCP XJOEPX PS UIF *OTUBMM %SPCP %BTICPBSE XJOEPX BQQFBST t "O "VUP1MBZ EJBMPH CPY BQQFBST HJWJOH ZPV UIF PQUJPO UP SVO %8JOEPX FYF Select this option. The Drobo window appears.t :PV DBO PQFO UIF 3FTPVSDF % UP WJFX JUT DPOUFOUT BOE GSPN UIFSF EPVCMF click on CDWindow.exe. The Drobo window appears.drobo.com Getting Started Guide for Your Drobo FS/B800fs 7
2. Double-click the Drobo Dashboard icon.3. A dialog box may appear, asking you to select your language from the drop-downlist. After doing so, click the OK button.The Drobo Dashboard Installation Wizard appears, preparing to install.4. Click the Next (Windows) or the Continue button (Macintosh), as appropriate.Note: If the Microsoft iSCSI Initiator window appears, click the Cancel button. Youdo not need this utility for a Drobo FS/B800fs device. A message appears, askingif you’re sure you want to cancel. Click the Yes button, and in the confirmationmessage box, click the OK button. You are returned to the InstallShield Wizard tocontinue installation.5. Follow the directions of the Installation Wizard, clicking the Next or Continuebutton after each page, as appropriate.6. When you reach the ready to install page, click the Install button.drobo.com Getting Started Guide for Your Drobo FS/B800fs 8
Depending on your operating system, one of the following may result:t *O TPNF 8JOEPXT PQFSBUJOH TZTUFNT B 8JOEPXT "DDFTT POUSPM EJBMPH CPY appears, asking if you want to allow changes to your computer. Click the Allowor Yes button, as appropriate.t *O UIF .BDJOUPTI ZPV XJMM CF QSPNQUFE GPS ZPVS BENJOJTUSBUPS QBTTXPSE &OUFS JU and click the appropriate button.Drobo Dashboard installs on your computer.7. If you are on a Macintosh, you will be prompted to restart your computer in orderto complete installation. Do this.8. After installation is complete, leave the Launch Drobo Dashboard check boxselected and click the Finish button.The Drobo Dashboard application appears. When it launches for the first time,the Confirm dialog box appears, asking if you would like Drobo to automaticallycheck for software updates of your Drobo Dashboard and firmware for yourDrobo device.9. We strongly recommend that you click the Yes button.Afterwards, the All Devices page displays in Drobo Dashboard. Leave DroboDashboard open as you continue with the set up procedures.drobo.com Getting Started Guide for Your Drobo FS/B800fs 9
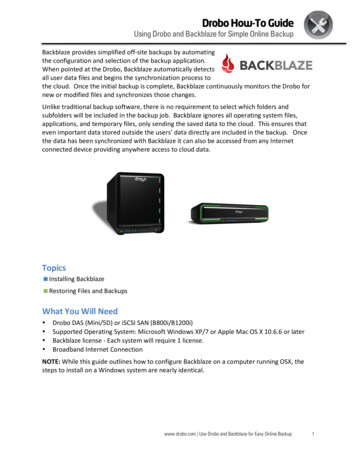
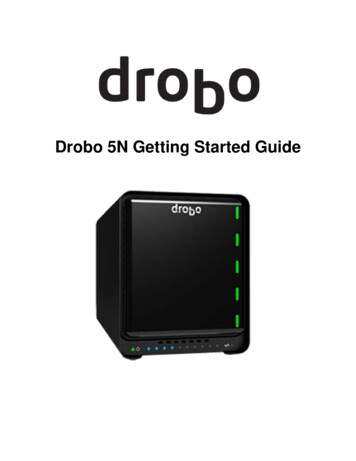
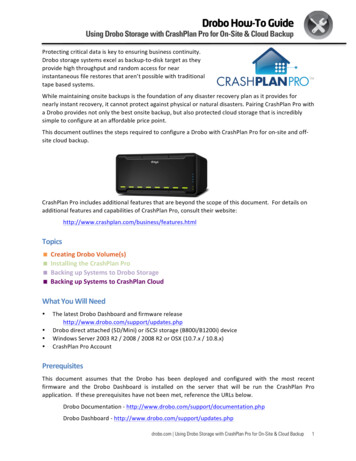
Installing Drobo Dashboard from the WebsiteYou can install Drobo Dashboard from www.drobo.com/support/updates.php. Note,however, that the latest version may be released with new products (on a Resource CD)for a short period of time before being made available on this website.1. Using your browser on an active Internet connection, navigate towww.drobo.com/support/updates.php.2. Locate the link for the latest Drobo Dashboard software and click on it.3. If you’re given a choice to install (or run) Drobo Dashboard or save the installation fileto your computer, choose to save the file to your computer. Locate the file and doubleclick on it to begin installation. (You can delete the installation file afterwards.)4. If warning messages appear, asking if you’re sure you want to open and/or install the fileor program, click the OK or Run button, as appropriate, to continue with the installation.5. A dialog box may appear, asking you to select your language from the drop-downlist. After doing so, click the OK button. The Drobo Dashboard Installlation Wizardappears, preparing to install.6. Continue with the installation process, following from step 4 in the “InstallingDrobo Dashboard from the Resource CD” section.Inserting the Hard DrivesAfter installing Drobo Dashboard, you are ready to insert hard drives. For more informationon hard drive requirements, see “Checking the Hardware You Need” on page 4.Warning: Any pre-existing data on the hard drives will be erased, as the drives willbe formatted. If you wish to keep the data, copy it to another drive or medium beforeusing with your Drobo device.Note: Once you insert the drives into your Drobo device, they function as a unit or“pack.” To access the data on them, you will need the entire pack.1. Remove the face plate from the front of your Drobo FS/B800fs by pulling it off.2. With one hand, hold the hard drive so that its connectors are positioned at thedevice and toward the bottom for the Drobo FS (see Figure 1), or positioned towardthe left, for the Drobo B800fs (see Figure 2).drobo.com Getting Started Guide for Your Drobo FS/B800fs 10
ConnectorsFigure 1: Installing hard drives on a Drobo FSConnectorsFigure 2: Installing hard drives on a Drobo B800fsWarning: For optimal performance, keep the Drobo B800fs in its normal horizontalposition. If placed on its side, hard drives may disconnect.3. With your other hand, use your thumb to depress and hold open one of the drivelocks to a selected data bay. Refer to the image below.Drive LockData BayData Bay Indicator4. Slide the hard drive into the data bay, release the drive lock and push the driveinto place until you feel it connect.The drive lock will snap behind the drive, securing it into place.5. Insert additional drives in the same manner, following steps 2 through 4.6. When finished, replace the faceplate right side up, so that when your Drobodevice is turned on, you will be able to see the indicator lights.You are now ready to connect cables and power on your Drobo device.drobo.com Getting Started Guide for Your Drobo FS/B800fs 11
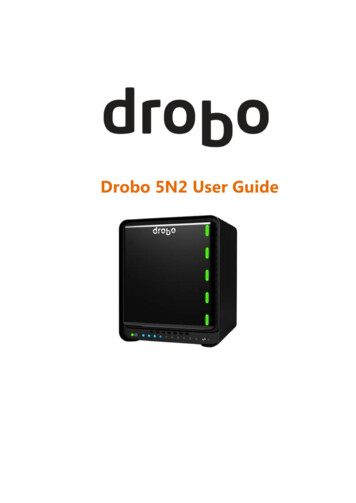
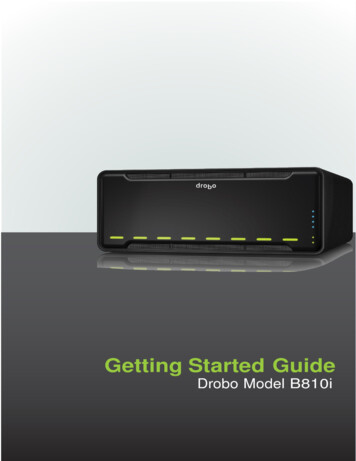
Connecting the Cables and Turning on the PowerAfter installing Drobo Dashboard and inserting the hard drives into your Drobo FS/B800fs,you are ready to connect the cables and power on your Drobo device.As you follow the steps, refer to Figure 3 for a Drobo FS or Figure 4 for a Drobo B800fs.PowerEthernetPower Toggle ButtonResetFigure 3: The back of your Drobo FS.EthernetPowerPower Toggle ButtonFigure 4: The back of your Drobo B800fs.Notes:- Your Drobo B800fs has two Ethernet ports, which you can later configure to usein one of two modes. For the initial setup, however, you will use only one of theEthernet ports.- Your Drobo FS/B800fs is set to automatically obtain an IP address once connectedto your network. After initial setup, you can set a static IP address if desired. Referto the Online User Guide for more information.- After you connect your Drobo device to your network, Drobo Dashboard will“discover” your Drobo device. If it does not, make sure your network supportsDynamic Host Configuration Protocol (DHCP), which assigns IP addresses todevices on a network. You can refer to the documentation for your router or switch.If it does not, you will have to directly connect your Drobo FS/B800fs to one ofyour computer’s Ethernet ports for the initial setup. See the “Troubleshooting YourSetup” section on page 22 for steps.drobo.com Getting Started Guide for Your Drobo FS/B800fs 12
Connecting to Your NetworkYour Drobo FS/B800fs connects to a network using an Ethernet port.1. Plug one end of the Ethernet cable into the back of your Drobo FS/B800fs.2. Plug the other end into your router or switch.Connecting to a Power Source1. Connect the power supply to the power connection at the back of your Drobodevice.2. Connect the other end of the power supply to a power source.Note: We recommend plugging into an uninterruptible power supply (UPS) orsurge protector. For more information, see “Using an Uninterruptible PowerSupply (UPS) or Power Surge Protector” on page 6.Turning On Your Drobo Device1. Press the power toggle button on the back of your Drobo device once.The following results:t :PVS %SPCP EFWJDF QPXFST PO t %SPCP %BTICPBSE BVUPNBUJDBMMZ EJTDPWFST ZPVS EFWJDF BOE GPSNBUT ZPVS ESJWFT drobo.com Getting Started Guide for Your Drobo FS/B800fs 13
t "GUFS TFUVQ JT DPNQMFUF ZPVS %SPCP EFWJDF EJTQMBZT JO %SPCP %BTICPBSE BT GPMMPXT Notes:- Drobo Dashboard automatically assigns “Drobo” as the default name for your Drobodevice, which you can rename later. 'PS %SPCP # GT %SPCP %BTICPBSE GPSNBUT UIF ESJWFT JOUP 7PMVNF BOE 7PMVNF - A drive bay indicator light displays green for each hard drive on your Drobo device.For details, see “Understanding Your Indicator Lights” in the Online User Guide.Tip: If you would like to see how your drive space is being used, double-clickyour Drobo FS/B800fs on the All Devices page, and then on the Capacity andTools page, click the View Usagebutton in the upper right corner.drobo.com Getting Started Guide for Your Drobo FS/B800fs 14
Setting the Administrator Username and PasswordTo complete the setup of your Drobo device, you will need to create an administratorusername and password.1. In Drobo Dashboard, double-click your Drobo FS/B800fs on the All Devices page.The Capacity and Tools page appears.2. Click the link that reads: Click here to password protect this Drobo.The Admin Settings page appears.3. In the Username text box, enter a username for the administrator. “Admin” is thedefault.4. In the Password text box, select the default text that appears there, press theDelete key and enter a password for the administrator.5. In the Confirm Password text box, select the default text that appears there, pressthe Delete key and re-enter the password you just typed.6. Click the OK button.drobo.com Getting Started Guide for Your Drobo FS/B800fs 15
Where to Go from HereAfter you’ve set up your Drobo FS/B800fs, you’re ready to share, store and back up filesover your network. Next steps include:t *NQMFNFOUJOH CFTU QSBDUJDFT UP NBYJNJ[F UIF TBGFUZ PG ZPVS EBUBt &OTVSJOH PQUJNBM QFSGPSNBODF CZ LFFQJOH ZPVS TPGUXBSF %SPCP %BTICPBSE BOE your Drobo device’s firmware) up to datet ,OPXJOH IPX UP TBGFMZ TIVU EPXO ZPVS %SPCP EFWJDFt 6TJOH UIF 0OMJOF 6TFS (VJEF BOE DPOUFYU TFOTJUJWF )FMQ UP MFBSO NPSF BCPVU IPX UP manage and use your Drobo devicet 6TJOH PVS LOPXMFEHF CBTF UP BOTXFS BMNPTU BOZ BEEJUJPOBM RVFTUJPOt (FUUJOH UIF TVQQPSU ZPV NBZ OFFEUsing Best PracticesAlthough Your Drobo device provides redundancy and automatically protects yourdata against hard drive failure, it should only be one part of an overall, digital assetmanagement strategy.To better safeguard your valuable data, we strongly encourage you to review our guide onbest practices, which can be found at http://www.drobo.com/support/best practices.php.Our guide offers strategies to protect data beyond hard drive failures. Following bestpractices will help maximize the safety of your data.drobo.com Getting Started Guide for Your Drobo FS/B800fs 16
Keeping Your Software Up to DateTo ensure optimal performance, we highly recommend that you set your Drobo device toautomatically check for software updates. (You may have already done this during the initialsetup.) This feature keeps both Drobo Dashboard and your product’s firmware current.You can also install updates from www.drobo.com/support/updates.php.Important Note: In some cases, the latest version may be released with new products(on a Resource CD) or through Drobo Dashboard’s automatic updates feature for ashort period of time before being made available on the website. Therefore it is best toenable Drobo Dashboard to update your software automatically.1. Launch Drobo Dashboard and click your Drobo device on the All Devices page.2. From the Navigation menu, click Dashboard Preferences, and click DashboardSettings.The General Settings page appears.3. Ensure that the Enable Auto Updates check box is selected, and then click the OKbutton.When one or more software updates are available, a message appears, askingif you would like to install the update(s). If so, click the Yes button and follow theprompts to install them.drobo.com Getting Started Guide for Your Drobo FS/B800fs 17
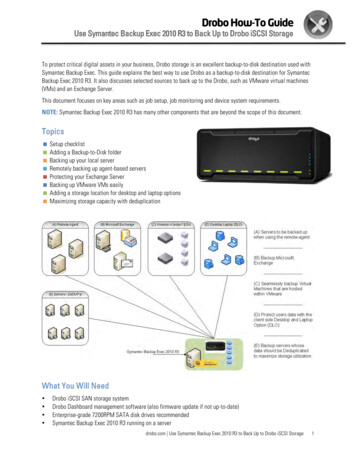
Safely Shutting Down Your Drobo FS/B800fsIf you plan to shut down your Drobo device for any reason, it is very important that you doso safely. Improper Drobo device shutdowns may cause file corruption and/or data loss.It is a good idea to shut down your Drobo device before any of the following situations:t :PV BSF OPU HPJOH UP CF VTJOH ZPVS %SPCP EFWJDF GPS BO FYUFOEFE QFSJPE t :PV BSF HPJOH UP EJTDPOOFDU UIF DBCMF T PS QPXFS DPSE t :PV XBOU UP NPWF ZPVS %SPCP UP BOPUIFS MPDBUJPO t :PV BSF HPJOH UP SFNPWF UIF FOUJSF EJTL QBDL Note: If you are concerned about saving power, know that your Drobo deviceautomatically shifts into power saving mode when it has not been accessed for15 minutes (the default setting). If you will not be using your Drobo device for anextended period of time, however, it is a good idea to safely shut it down.Safely Shutting Down Your Drobo Device Using Drobo DashboardThis is the recommended method for safely shutting down your Drobo device.1. Check that the activity light on your Drobo device is off, indicating that no data isactively being transferred to or from your Drobo device. Refer to Figure 5 or 6, below.Note: If data is actively being transferred, the activity light will be blinking green.Drive BayAction IndicatorsPowerCapacity GaugeActivityFigure 5: Indicator lights on a Drobo FSdrobo.com Getting Started Guide for Your Drobo FS/B800fs 18
Capacity GaugeActivityPowerDrive BayAction IndicatorsFigure 6: Indicator lights on a Drobo B800fs2. Also check to ensure the drive bay action indicator lights are not blinkingalternately between yellow and green. This indicates that your Drobo device isbusy working to protect your data. Wait until these lights are a solid green.3. In Drobo Dashboard, double-click the Drobo device that you would like to shutdown from the All Devices page.The Capacity and Tools page appears.4. Click the Tools drop-down list, and select the Shutdown icon.A message appears, asking you to confirm the shutdown.5. Click the Yes button.It can take up to two minutes for your Drobo device to power down.Safely Shutting Down your Drobo Device ManuallyAlthough Drobo Dashboard allows for a “cleaner” shut down, you can safely shut downyour Drobo device manually.1. Check that the activity light on your Drobo device is off, indicating that no data is activelybeing transferred to or from your Drobo device. Refer to Figure 5 or 6 in the previous steps.Note: If data is actively being transferred, the activity light will be blinking green.2. Also check to ensure the drive bay action indicator lights are not blinkingalternately between yellow and green. This indicates that your Drobo device isbusy working to protect your data. Wait until these lights are a solid green.3. Press the power toggle button on the back of your Drobo device once.It can take up to two minutes for your Drobo device to power down.drobo.com Getting Started Guide for Your Drobo FS/B800fs 19
Using the Online User GuideAfter you’ve set up your Drobo device, you’re ready to use it to share, store and back up filesover your network. To learn how to manage and use your Drobo device, refer to the OnlineUser Guide for your product, which can be found within your Drobo Dashboard softwareby clicking the Help option on the Navigation menu. The latest version can also be found atwww.drobo.com/support/documentation.php.Using Context-Sensitive HelpWhen using Drobo Dashboard, you can click the Help option on the Navigation menu todisplay context-sensitive help. The Help window appears, providing information particularto the screen from which you clicked for help.Using the Knowledge BaseOur searchable knowledge base provides answers to almost any question related to yourDrobo device that you can’t find in the Online User Guide.You can access our knowledge base at etting SupportTo get support, first be sure to register your product at www.drobo.com/registration, if youhaven’t already done so. You can then go to www.drobo.com/support for details on how tocontact support.You can also obtain additional hardware and phone support by purchasing DroboCare.The DroboCare support program extends your peace of mind beyond the standardwarranty term and phone support included with your Drobo product purchase. To learnmore about DroboCare visit: www.drobo.com/drobocare.drobo.com Getting Started Guide for Your Drobo FS/B800fs 20
Troubleshooting Your SetupIf Dynamic Host Configuration Protocol (DHCP), which assigns IP addresses to devices ona network, is not supported on your network Then You will need to connect your Drobo FS/B800fs directly to your computer for the initialsetup in order to assign a static IP address to your Drobo B800fs/FS. Make sure yourcomputer’s Ethernet port is set up to use DHCP.Steps1. Make sure you have installed Drobo Dashboard and inserted the hard drives into yourDrobo FS/B800fs.2. Plug one end of the Ethernet cable into the back of your Drobo FS/B800fs.3. Plug the other end into the Ethernet connection on your computer. (Your computer canbe on or off.)4. Connect the power supply to the power connection at the back of your Drobo device.5. Connect the other end of the power supply to a power source.6. Press the power toggle button on the back of your Drobo device once. Your Drobodevice powers on, and a message box appears while Drobo Dashboard automaticallydiscovers your device and formats your drives.7. Continue with your setup, including setting the administrator username and password.For steps, see “Turning On Your Drobo Device” on page 13.8. After setup is complete, you can assign a static IP address for your Drobo FS/B800fs foruse on your network. For steps on doing that, refer to the Online User Guide.drobo.com Getting Started Guide for Your Drobo FS/B800fs 21
Indexadministrator password, 15- SATA, 4administrator username, 15- selecting, 4best practices, 17- increasing capacity, 5cables, connecting, 12installing software updates, 7, 18capacity, 4, 5IP address, 6, 12, 22- increasing, 5knowledge base, 21Capacity Calculator, 5Online User Guide, 21connecting cables, 12operating systems, 3data bay, 11password, 15drive bay indicator light, 14, 19-20power surge protector, 6, 13drive lock, 11power toggle button, 12Drobo Dashboard, 7router, 6Dual Disk Redundancy, 5shutting down your Drobo device, 19, 20Dynamic Host Configuration ProtocolSingle Disk Redundancy, 5(DHCP), 6, 12, 22support, 21Ethernet, 4, 12-13switch, 6firmware, 7, 18system requirements, 3hard drivestroubleshooting, 22- capacity, 5uninterruptible power supply, 6, 13- inserting, 10username, 15drobo.com Getting Started Guide for Your Drobo FS/B800fs 22
Safety and Warranty
Safety and WarrantySafetyThis product was designed and manufactured to meet strict quality and safety standards. There are, however, some installation and operational precautions ofwhich you should be particularly aware.Please read these instructions before operating Drobo, DroboPro, DroboElite, DroboFS, ProFS, B800i or B800fs and save them for future reference.1. Read all instructions: All safety & operating instructions should be read and understood before operation.2. Retain instructions: The safety and operating instructions should be retained for future reference.3. Heed Warnings: All warnings on the appliance and in the operating instructions should be followed.4. Follow Instructions: All operating and usage instructions should be followed.5. Drobo, DroboPro, DroboElite, Drobo FS, Pro FS, B800i, and B800fs are to be used with UL Listed ITE Equipment only.6. Avoid Water and Moisture: Drobo, DroboPro, DroboElite, Drobo FS, Pro FS, B800i, and B800fs should not be used near water (for example, near a bathtub,washbowl, kitchen sink, laundry tub, in a wet basement, or near a swimming pool).7. Provide Adequate Ventilation: Drobo, DroboPro, DroboElite, Drobo FS, Pro FS, B800i, and B800fs should each be situated so that its location or position does notinterfere with its proper ventilation. For example, Drobo should not be situated against a surface that may block the ventilation openings or placed in a built-ininstallation such as a bookcase or cabinet that may impede the flow of air through the ventilation openings. Additionally, no other device other than a Droboshould be placed on top of DroboShare.8. Protect from Heat: Drobo, DroboPro, DroboElite, Drobo FS,
drobo.com Getting Started Guide for Your Drobo FS/B800fs 4 drobo.com Getting Started Guide for Your Drobo FS/B800fs Cable Interfaces Supported Your Drobo FS/B800fs connects to a network via a router or switch using an Ethernet port. Ethernet is the standard local area network (LAN) access method.