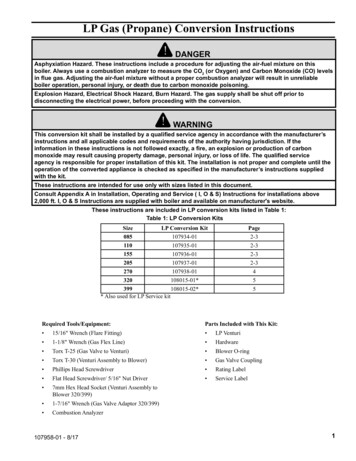
Transcription
Version 16 Conversion Instructions for ConvertingTabs3 & PracticeMaster Version 15 SoftwareThis document provides instructions for converting Tabs3 and PracticeMaster software to Version 16. Please call your localreseller or consultant, or call Technical Support at (402) 419-2210 if you have any questions regarding this update.Important NotesScheduling the Conversion: Users updating from Version 15 need to allow adequate time to perform the conversion. Runningthe conversion program is just one part of the conversion process. Additional time will need to be allotted for preparation,installation, and Outlook synchronization. For example, the Data File Integrity Check needs to be run twice for all programs,backups need to be made, PracticeMaster users will need to rebuild their conflict of interest files, etc.Running on a Network: If running on a network, we strongly recommend running the conversion at the server for performancereasons. When installing, you must have Administrator rights.Previous Versions: Previous versions of the programs will no longer be accessible once the conversion has been completed.Furthermore, once your data has been converted, it cannot be reverted to the previous version.Client Server Version Note: Tabs3 Platinum and PracticeMaster Platinum are the new names for the Client Server Versions(CSV) of the software. There are multiple “CSV Notes” interspersed throughout the conversion instructions. These “CSV Notes”do not apply to firms with single user and multi-user licenses. During the update, CSV/Platinum firms will be prompted to enterthe new Platinum Server Serial Number and Activation Key provided on the back of the CD case.Outlook Integration: If your firm integrates Outlook with PracticeMaster, make sure each user that integrates PracticeMasterwith Outlook has a current backup of their Outlook data before continuing. Also, we recommend copying page 6 of thisdocument and distributing it to each user who integrates calendar and contacts with Outlook. Alternatively, this sameinformation is available in Knowledge Base Article R11433 (www.support.tabs3.com/main/R11433.htm).Time Matters Integration: Time Matters does not integrate with Version 16 at this time.Amicus Integration: There are no known issues with Amicus Small Firm Edition integration with Tabs3 Version 16.Palm Conduit Integration: Starting with Version 16, the PracticeMaster Palm Conduits will no longer be included inPracticeMaster. Users still using handheld devices with the discontinued Palm Operating System can take advantage of theimproved synchronization between PracticeMaster and Outlook by using Outlook to synchronize to their legacy Palm OS handheld devices. Any information you want to transfer to PracticeMaster via the Palm Conduits must be synchronized prior toinstalling Version 16. Moving forward, you can synchronize data from Palm OS devices to PracticeMaster via Outlook.Windows 2000, Novell, and GroupWise Sunset Information: Starting with Version 16, Windows 2000 and Novell are no longersupported. Integration with GroupWise is no longer available. Review which third-party software versions are supported forVersion 16 in our Knowledge Base at www.support.Tabs3.com in Article R11300, “Third Party Integration Requirements.”Converting Older Versions: If you are converting software from a version older than Version 14, you will need to first convert toVersion 14 using the Version 14 CD and a separate set of conversion instructions for older versions. Instructions on how to dothis can be found in our Knowledge Base at www.support.Tabs3.com. After converting to Version 14, you can then install thesoftware from the Version 15 CD, or download and install the update from nce the conversion to Version 15 is complete, you can begin the Version 16 installation process as follows.
Step1. TaskDetailed InstructionsNotesVersion 16 must be installed to the same location asVersion 15. Start any Tabs3 or PracticeMaster softwareprogram. From the Help menu, select the About menuoption. Write down the Current Working Directory inthe space below:Note: Perform this step onthe computer from whichyou will be installing.The Tabs3 Palm App willneed to be uninstalled andreinstalled for eachhandheld as directed laterin these instructions.Preparation for Conversiona. Determine CurrentWorking DirectoryCSV Note: Perform thisstep at the server.Current Working Directory: b. Tabs3 Palm Software1. If you use Tabs3 Palm Software, make sure youHotSync all data from handheld devices beforeinstalling the update.2. Make sure the handheld device users do notperform data entry until the software has beenupdated to Version 16. c. Tabs3 RemoteIf using Tabs3 Remote, do the following for allworkstations using Tabs3 Remote.1. Merge any data files created by Tabs3 Remote.2. Print and delete remote entry verification lists.3. After deleting the verification lists from within theTabs3 Remote software, manually delete thefollowing files from the remote workstation usingWindows Explorer: R3FEEVER.DAT, R3FEEVER.IDX,R3CSTVER.DAT, and R3CSTVER.IDX.4. Make sure the remote site does not perform dataentry until it has been updated to Version 16. d. PracticeMasterBriefcaseIf using PracticeMaster Briefcase, do the following forallPracticeMastercomputers usingBriefcasePracticeMaster Briefcase.1. Check in any data files created by PracticeMasterBriefcase before proceeding with the conversion.2. Make sure the Briefcase users do not perform dataentry until the software has been updated toVersion 16. e. Tabs3 DeviceInterface &WCNVASCV CostRecovery ProgramsIf you use either the Tabs3 Device Interface orWCNVASCV cost recovery programs, merge all datafrom these programs before proceeding with theconversion.Tabs3 Device Interface (TBDEVICE) & WCNVASCV Cost Recovery programs f. Run Data FileIntegrity Checks Tabs3Run the Data File Integrity Check for all programs(Utilities Data File Integrity Check):1. Run the Data File Integrity Check program for allprograms on the left with the Read Only check boxcleared (i.e., Tabs3, PracticeMaster, GLS, APS, TAS).2. If converting Tabs3, also run the Tabs3 ArchiveData Integrity Check.3. If converting GLS, run the Data File Integrity Checkfor all GLS clients.Proceed only when there are no errors. Tabs3 Archive CheckPracticeMasterAPSTASGLSGLS - Other ClientsPage 2The Data File IntegrityCheck ensures that thedata being converted iserror-free beforeproceeding.Tip: Use the check boxeson the left to track yourprogress.
StepTaskDetailed InstructionsNotes g. Close ProgramsClose the following programs before starting theconversion: System Configuration, Tabs3,PracticeMaster, GLS, APS, TAS, and Taskbill. If you arerunning a multi-user version, be sure to close all of theabove programs on the server and all workstations.1. Make sure the above programs are closed on allworkstations by viewing an Active User List for Allusers (View Active User List).2. Close the program used to view the Active User Listas directed in the previous step.Important: Make sure thatnone of these programsare started on the serveror any workstation untilafter the conversion iscomplete. h. Back Up the CurrentWorking Directory1. Using Windows Explorer, browse to the CurrentWorking Directory (step 1a). Select the directoryand all subfolders, and copy it to another location.Alternatively, you may use a third-party backupprogram of your choice.2. CSV users will need to shut down the STI Server andSTI Director service before making the backup. TheSTI Server and STI Director services can be stoppedusing the Services program, which is found in theControl Panel under Administrative Tools.Do NOT skip this step. Bybacking up this folder, allprogram files and data filesare included, providing amore efficient restorepoint than the data-onlybackup performed duringthe conversion.2.Install and Convert a. Install ProgramsInsert the Version 16 CD and follow the instructions toinstall the program files to the Version 15 CurrentWorking Directory.CSV Notes: You mustperform this installation atthe server. Additionally,you will need to shut downthe STI Server beforeinstalling the update. b. Begin DataConversionThe Data Conversion will be started automatically oncethe Tabs3/PracticeMaster program installer iscompleted. Follow the directions given in eachconversion screen to begin the process.The Data Conversionprogram is namedSTCONV16.EXE.New Feature: The conversion program uses the Internet to check if you have themost current conversion program available. If an active firewall is running on thecomputer, a message may be displayed asking if network access is allowed. c. Conversion CompleteIf using PracticeMaster, a message will be displayedindicating that the search indexes have been clearedand need to be rebuilt. Procedures to rebuild indexesare provided later in this document (step #4a).Links to this document aswell as the Version 16download page will also bedisplayed. d. Download NewestProgram Files1. Start Tabs3 (or any other Version 16 software).2. From the Help menu, select About Tabs3 andwrite down the Release Date.3. From the Help menu, point to Internet Resourcesand select Software Update.4. Compare the Release Date you wrote down earlierwith the Last Modified Date shown on the Webpage. If the Release Date is earlier than the dateshown on the Web page, download the file fromthe Internet and run it on the server.If you already downloadedthe newest version usingthe link provided by theconversion program, it isnot necessary to performthis step.Page 3
Step 3. Taske. Run Data FileIntegrity ChecksDetailed InstructionsWhile still at the server, run the Data File IntegrityCheck program for all systems with the Read Onlycheck box cleared. If you converted Tabs3, also runthe Tabs3 Archive Data Integrity Check. If youconverted GLS, run the Data File Integrity Check for allGLS clients.NotesIf the Data File IntegrityCheck has errors, pleasecall Technical Support.Tip: Use the list in step #1fto track your progress.Workstation Installationa. WorkstationInstallationNow that Version 16 is installed on the server, anyworkstations with Version 15 installed willautomatically update to Version 16 when aTabs3/PracticeMaster application is launched.For any new workstations that will access the Tabs3/PracticeMaster applications,you will need to perform the following.1. Browse to the Current Working Directory on the server and run SETUP.EXE.2. SETUP.EXE will launch a local setup wizard. Follow the directions to completethe workstation installation.Important: When running SETUP.EXE, you must have Administrator rights. b. Tabs3 Remote1. To update Tabs3 Remote to Version 16, insert theinstall CD into each workstation that uses thisprogram. Browse to the Begin Installation pageon the CD Browser and select Install Version 16Software.2. Once the installation is complete and before youstart Tabs3 Remote, create new Tabs3 Remotevalidation files using the main Tabs3 computerand transfer the validation files (R3*.*) to eachcomputer that uses Tabs3 Remote.3. Make sure Tabs3 Remote Version 15 data files aremerged before adding Tabs3 Remote Version 16transactions. Also make sure new validation filesare present before starting Tabs3 Remote Version16. Otherwise, errors will occur. c. Tabs3 PalmApplication1. You must uninstall the Version 15 Tabs3 PalmApp from each handheld as follows:a. From the handheld, on the Applicationscreen, tap the time in the upper-left corner.b. Once the App menu is displayed, tap theDelete menu option.c. Tap Tabs3 and then tap Delete.d. Tap Yes to confirm you want to delete theprogram and data.e. Repeat steps c and d to delete Sat.FormsRDKand SFE LSListBox.2. Install the Version 16 Tabs3 Palm App byselecting Start All Programs Tabs3 &PracticeMaster Palm Software Install Tabs3Palm App.3. Create validation files by starting Tabs3 andselecting Maintenance Integration HandheldIntegration from the menu. Select the Type tab,and in the Handheld Type field select Tabs3 PalmApp Data Files.4. HotSync the Validation Files to each handheld.Page 4Note: If installing from aCD labeled “Version 16Software” (as opposedto “Version 16 Update”),you will instead need tobrowse to the MoreOptions page on the CDBrowser and selectInstall Tabs3 Remote.
Step 4. Taskd. PracticeMasterBriefcaseDetailed InstructionsTo update PracticeMaster Briefcase to Version 16,insert the CD into each workstation that uses thisprogram. Browse to the Begin Installation page onthe CD Browser and select Install Version 16Software.NotesNote: If installing from aCD labeled “Version 16Software” (as opposedto “Version 16 Update”),you will instead need tobrowse to the MoreOptions page on the CDBrowser and selectInstall PracticeMasterBriefcase.Finishing Touchesa. PracticeMaster SearchSettingsRebuilding the PracticeMaster search indexes can take a long time. You can do thisstep later; however, conflict of interest searching capabilities will not be availableuntil the indexes have been rebuilt.To rebuild search indexes1. Open PracticeMaster and select Search Search Settings.2. Select the Rebuild Index tab.a. Select all indexes that the firm uses.b. Click the Rebuild Now button. b. Post ConversionInformationThe following Knowledge Base article includes PostConversion information: R11363 – Version 16 Post Conversion Information R11490 – Version 16.2 Update Procedures c. Duplicate ContactsDuring the conversion, we converted your clients tocontacts. In some situations, duplicate contactrecords may have been created in order to retainunique address and contact information. Additionalinformation can be found in the following KnowledgeBase Articles: R11350 – Contact Management Overview R11396 – Merge Contacts Program SimplifiesContact Cleanup R11364 – Working with Duplicate Contacts d. More InformationYou can find a comprehensive list of Knowledge Basearticles that include information regarding Version16 features in the following article: R11355 – Version 16 Information & Resources(continued )Page 5If you are the IT personperforming the conversion,please make sure theappropriate personnel aremade aware of theseresources.We recommend youreview this informationbefore using the software.
Initial Outlook Integration Informationwhen Converting to Version 16PracticeMaster now has automatic two-way synchronization of contacts and calendar entries with Outlook. As a result, all users that integratePracticeMaster with Outlook contacts and calendar entries need to be aware of the following:Before Converting: Make sure each user that integrates Outlook with PracticeMaster has a current backup of their Outlook data beforeconverting. This is a precaution in the event you synchronize items unintentionally, thereby making it easier to recover.During Conversion: If Outlook integration is enabled before converting, it will be enabled after converting. Each user’s integration settings willbe converted based on their current settings with one exception; the threshold for displaying the Outlook Confirmation window will be set to“1”. This means that the Outlook Confirmation window will be displayed when one or more records need to be synchronized.Initial Startup: Each user that integrates PracticeMaster with Outlook will be asked to perform a synchronization upon launchingPracticeMaster Version 16 for the first time. You do not have to perform this synchronization at this time. If desired, you can cancel out andwork with the synchronization later. However, no other Outlook synchronization will occur until this initial synchronization has beenperformed, as described in the following.Initial Synchronization: After launching PracticeMaster for the first time, “Outlook Synchronization Suspended” will be shown in the status bar.Clicking the message in the status bar will display a window indicating why the synchronization is suspended. Once you proceed with the initialsynchronization, any contact or calendar entry that is currently not synchronized will need to be confirmed via the Outlook SynchronizationConfirmation window. In this window, you can use the pane on the left to filter the list by groups of entries that you want to synchronize orexclude from the synchronization. You can highlight a record and use the Compare Records button to view which fields in the record aredifferent in Outlook and PracticeMaster. (Note: Depending on the status of your data, you may see the Outlook Synchronization Confirmationwindow twice. A first pass checks all previously synchronized items to make sure they are in synchronization, regardless of date range or othercriteria. A second pass synchronizes any entries that are not in both systems based on the criteria specified.)Note: Taking the time to review the synchronization information in the Outlook Confirmation window is critical to ensure a smooth conversion.Considerations: Each client, contact, and Bill To address is now stored as a contact record in PracticeMaster. If you previously entered clients intoOutlook, you may need to determine which record to keep. The Merge Contacts utility in PracticeMaster can be used afterconverting to easily combine duplicate contact records, allowing you to see the fields that are different. You may want to consider synchronizing to a new Contact folder in order to prevent duplicate contacts in your Outlook folder. If information in Outlook is not critical, consider clearing information in Outlook and then synchronizing.New Options: To take advantage of the new synchronization features in Version 16, you will need to manually turn them on in your OutlookSynchronization settings (Maintenance Integration Outlook Synchronization). We recommend considering the following configurationchanges: Change Outlook to PracticeMaster synchronization to Automatic on both the Calendar and Contact tabs. By default, Outlook toPracticeMaster synchronization is set to Manual. In order for records entered in Outlook to synchronize to PracticeMasterimmediately as they are entered, this option must be set to Automatic. Enable periodic synchronization on the Synchronization Options tab. This feature allows you to automatically synchronize recordsentered in PracticeMaster for you by other users to Outlook at a specified interval. Increase your confirmation threshold to 5 or 10 on the Synchronization Options tab. After the conversion, your confirmationthreshold is set to 1. This means that anytime there are records to be included in a manual or periodic synchronization you will berequired to review the records before synchronization can proceed. We recommend setting your confirmation threshold between 5and 10 to begin with, and then adjusting it later as needed to ensure that a normal quantity of records will synchronize withoutinterruption, whereas an unusually high number of records will still be brought to your attention.Additional Resources: KB Article R11366, Configuring PracticeMaster/Microsoft Outlook Calendar & Contact Integration, contains screenshots andsummary information regarding the new integration. KB Article R11400, Outlook Integration Guide, includes detailed information regarding this new integration.Appendix A and the Best Practices sections of this document are particularly helpful. Our Technical Support staff will be happy to help you with any questions you may have regarding synchronization.Note: The information on this page of the Version 16 Conversion instructions is also available in our Knowledge Base atwww.support.Tabs3.com in Article R11433, “Initial Outlook Integration Information when Converting to Version 16”.20120907Page 6
Amicus Integration: There are no known issues with Amicus Small Firm Edition integration with Tabs3 Version 16. Palm Conduit Integration: Starting with Version 16, the PracticeMaster Palm Conduits will no longer be included in PracticeMaster. Users still using handheld devices with the dis