Transcription
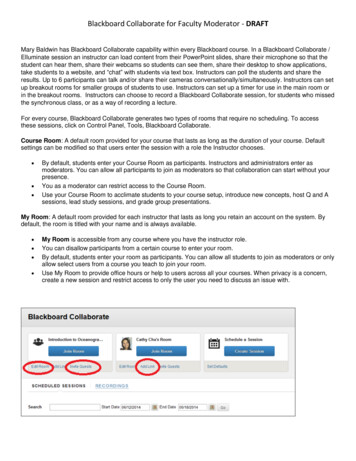
Blackboard Collaborate for Faculty Moderator - DRAFTMary Baldwin has Blackboard Collaborate capability within every Blackboard course. In a Blackboard Collaborate /Elluminate session an instructor can load content from their PowerPoint slides, share their microphone so that thestudent can hear them, share their webcams so students can see them, share their desktop to show applications,take students to a website, and “chat” with students via text box. Instructors can poll the students and share theresults. Up to 6 participants can talk and/or share their cameras conversationally/simultaneously. Instructors can setup breakout rooms for smaller groups of students to use. Instructors can set up a timer for use in the main room orin the breakout rooms. Instructors can choose to record a Blackboard Collaborate session, for students who missedthe synchronous class, or as a way of recording a lecture.For every course, Blackboard Collaborate generates two types of rooms that require no scheduling. To accessthese sessions, click on Control Panel, Tools, Blackboard Collaborate.Course Room: A default room provided for your course that lasts as long as the duration of your course. Defaultsettings can be modified so that users enter the session with a role the Instructor chooses. By default, students enter your Course Room as participants. Instructors and administrators enter asmoderators. You can allow all participants to join as moderators so that collaboration can start without yourpresence.You as a moderator can restrict access to the Course Room.Use your Course Room to acclimate students to your course setup, introduce new concepts, host Q and Asessions, lead study sessions, and grade group presentations.My Room: A default room provided for each instructor that lasts as long you retain an account on the system. Bydefault, the room is titled with your name and is always available. My Room is accessible from any course where you have the instructor role.You can disallow participants from a certain course to enter your room.By default, students enter your room as participants. You can allow all students to join as moderators or onlyallow select users from a course you teach to join your room.Use My Room to provide office hours or help to users across all your courses. When privacy is a concern,create a new session and restrict access to only the user you need to discuss an issue with.
Edit RoomYou can customize any of your rooms. Click Edit Room to adjust settings for simultaneous speakers, privatemessages, the recording options, and more. The default number of simultaneous speakers is set to 3, but you canchange this to any number up to 6. Remember you are one of the six! The default “All Permissions” is set to Off.This means when your students enter the room, by default they cannot chat or talk. By default, everyone in thecourse has access to the Course Room, and all students are Participants. You can change these defaults if youwish.Add a Course LinkClick Add Link to create a course link to the room in one of your course areas, such as a content area or folder.When you add a course link, students can access the room at a designated time alongside the relevant content inyour course.
Invite GuestsYou can send guests a URL to access your Blackboard Collaborate session. In the pop-up window, add yourguests' email addresses and click Send Invitations. In the email from you, your guests will be able to view thesession details such as when the session starts and ends. After clicking the URL, they can access thesame Join Room link as your students to initiate Blackboard Collaborate.Schedule a SessionYou can create individual sessions for test reviews, specific group activity, and for touring and discussing content inyour course. When privacy is a concern, create a new session and restrict access to only the user you need todiscuss an issue with. Click the Set Defaults link to create settings you can use whenever you create new sessions.For example, you always want six simultaneous speakers and want recordings of the sessions to start automatically.Session Information SettingsProvide a descriptive name to help students easily select which session to enter. Session names must begin with aletter or a digit.You can set the session to start and stop at designated times, and repeat at regular intervals. For example, youmight host a session every Monday at a set time where you introduce a new chapter and objectives for the week.The start time you provide must fall in 15 minute increments, such as 0, 15, 30, and 45.You can allow students to enter a session before the start time.
OptionsClick the quick tip icon to learn more about your selections.For Type, you can create a session that is shared with one or more additional courses that you teach. Select thecourses you want to include.RecordingsTo put links into your Course Modules for Blackboard Collaborate recorded sessions, follow the instructions here:1. Click on Tools, then Blackboard Collaborate.2. Click on Recordings.3. When you find the correct recording, hover over it and from the little down arrows choose Add Link. Choose theCourse Module (content area) where you want to put the link to the recording.You can also convert recordings to MP3 and/or MP4 files for use outside your Blackboard course.BEFORE THE SESSION:Before you start a Blackboard Collaborate session, make sure of the following:1. Ensure you are using a device that can successfully join a Blackboard Collaborate session. Blackboard hasdocumented the System Requirements here:2. Test your speakers/earbuds/earphones. Connect to youtube.com or another site and make sure the volumeis adjusted for your comfort.3. Test your microphone. On a PC, you can use Sound Recorder. Record a short test and then play it back tomake sure your microphone is working successfully. On a MAC, you can use Quicktime Player (click on Fileand New Audio Recording).
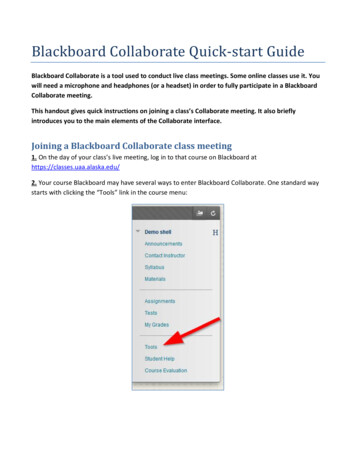
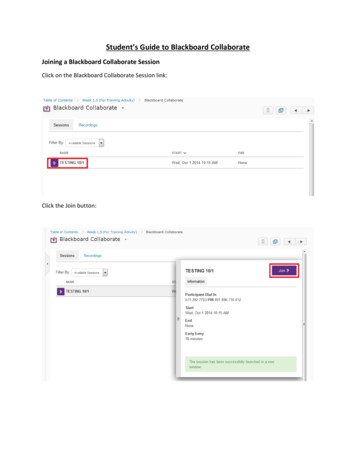
ACCESSING BLACKBOARD COLLABORATE:From the Blackboard Collaborate Course Tool, click Join Room twice. If you have used Blackboard Collaboratebefore, and already have installed the Launcher, then open the meeting.collab file. This may be presented to you asshown below, or it may be in your downloads folder.If you have not previously installed the Blackboard Collaborate Launcher, do so now following the instructions atAppendix A: Installing the Blackboard Collaborate Launcher.ENTERING THE BLACKBOARD COLLABORATE SESSIONIf you see this message, click on RunClick on Keep if you get a message that looks like this:Java will start and you’ll see a message that looks like this:
Choose your connection speed and click on OK. :If you are working with a MAC and get a security error, contact OIT for the work around. When it has finishedloading, you may get another message, asking you about your network connection. Whatever your networkconnection, LAN or WIRELESS or DSL, click on that speed. Now you are in Blackboard Collaborate!To get back to the Blackboard Collaborate session, click on the little purple BbCicon:In order to make sure you can hear and be heard, run the Audio Setup Wizard.USING THE AUDIO SETUP WIZARD ON A PCThe Audio Setup Wizard is accessible from the Audio menu which is located in the Audio & Video panel.Steps for Configuring Your Audio1.2.3.4.5.6.7.8.9.Open the Audio Setup Wizard by clicking the Audio & Video menu and clicking Audio Setup Wizard.From the Select Audio Output Device dialog, choose the device that will play the session audio e.g. speakers.Click OKClick the Play button and adjust the volume slider so that you can clearly hear the pre-recorded message.ClickStop and then Yes to confirm you were able to hear the audio. If you were not able to hear the audio,click No and repeat the previous step.Select the device you will use to send your audio during the session e.g. microphone.Click OKIf you are using a headset or microphone just for you, select Single Talker. If you are using a single microphoneto pick up multiple talkers in the same physical space, select Multiple Talkers.Click Record and speak into the microphone using your normal speaking voice. Adjust the microphone slide barso that it displays green bars with an occasional yellow bar. Red indicates that your audio is too loud or youmicrophone is too close to your mouth.Click Play and confirm you can hear your recorded voice. You are now ready to participate in the audio portion ofthe session, but you must click on TALK to turn the microphone on.USING THE AUDIO SETUP WIZARD ON A MACThe Audio Setup Wizard on a Mac computer is slightly different than that of a PC.1. Open the Audio Setup Wizard in the same manner by clicking the Audio & Video Options menu located in theAudio & Video panel.2. Proceed as described above if you wish to use the default microphone and speakers on your Mac.3. If you want to use a different device, click the Open the Sound Preferences panel.The Sound preferences panel has a screen for audio output or how you will hear the session audio and a screen forinput or microphone for sending audio. Select the desired device for both Output and Input. Then close Soundpreferences.
AFTER AUDIO SETUP WIZARD IS COMPLETE:When you are sure you can hear and be heard, click on the Talk button at the left to make your microphoneLIVE. Click on the Video button at the left to make your camera live.Note: To run Blackboard Collaborate / Elluminate you may need to have the latest Java: If you get a Java Errormessage, then follow these instructions: Go to Control Panel, Java and Open. Then under General, About, if youare NOT running Java 7, click on Close, then click on the Update tab, then click on Update Now. This will install thelatest version of Java.If you wish to record this session, choose “Yes” when asked or click on the Record button at the upper right of the screen atany time during the session.A good tutorial on how to moderate a Blackboard Collaborate Session is available etect/playback.jnlp?psid r&sid 7MODERATING THE SESSION:
Options for the Main Screen:Loading Content: If you have PowerPoint slides you can preload them into your Session and then control the slideprogress while still being able to see the chat window and other Blackboard Collaborate Controls. Click on LoadContent and Browse for your PowerPoint slides. A Page Explorer Pane will pop up. You will need to move this pane,or minimize it (click on minimize icon at upper right) so it will not block your slideshow. The left and right arrows atthe top left of the Page Explorer Pane will move the slideshow backwards and forwards. If you want to skip ahead orlook back without your students seeing the in between slides, temporarily unclick Follow.Application Sharing: You can share your entire desktop, or specific applications. For example, if you want todemonstrate putting a formula into an excel spreadsheet, you can do this with Application Sharing. ApplicationSharing your PowerPoint is slower than if you used Load Content, but you may want to use Application Sharing foryour PowerPoint slideshow if you have are presenting “live” to an audience and using a clicker. If you areApplication Sharing PowerPoint on one monitor, you may find it easier to navigate if you present the slide show inWindowed Mode:
Web Tour: You can direct your students to a website, using web tour. Fill in the entire url. Once your students havebeen directed to the website, they can click on anything. This might be useful, for example, if you want them to viewa youtube video. You can tell your students to watch the video, then re-assemble in the Blackboard Collaboratesession after they have finished viewing it.Setting Global Permissions: All participants when initially entering the Session will have the Global Permissions thathave been set for the session. The default is that they will have no permissions and will only be able to see and hearwhat you are displaying in the room when they first arrive. To change the permissions for all Participants at once,click on Global Permissions (at the upper right of the Participant Pane) and make sure there is a little light bluesquare around each permission you are granting.Chat: If you enable chat, your students can use the chat pane to talk to the entire room. If you do not enable chat,they can only chat privately to the Moderator.Polling: You can poll your students with Yes/No or Multiple Choice Polls. You can choose to hide the students’responses from each other, and you can choose to publish the results to the Whiteboard.Conversational Mode: If you enable your students’ microphones and cameras, you can enable a moreconversational session. There is a limit of six simultaneous microphones and cameras. To change the defaultsettings, click on Tools, Audio, Maximum Simultaneous Talkers and Tools, Video, Maximum SimultaneousCameras.Breakout Rooms: You can create Breakout rooms, direct your students there, and force a return to the main roomfrom Tools, Breakout Rooms.Timer: From Tools, Timer you can start a timer that counts down and is visible at the top of the Session. This maybe useful if you are asking your students to perform a task for a certain amount of time.Recording a Session: To record the session, click on Record. A little red button will show when the session isrecording. To stop or pause the recording click on Recording and confirm with Yes. The session recording will notbe created until all the participants have left the room. So make sure all of your students are out of the room beforeyou exit the session. If you have a tardy student, you can kick them out of the session with Tools, Moderator,Remove Participant.
APPENDIX A: BLACKBOARD COLLABORATE LAUNCHERBlackboard Collaborate LauncherThe Blackboard Collaborate Launcher is a utility for Windows and Mac that provides a convenient and reliable wayfor you to launch your Blackboard Collaborate web conferencing sessions and recordings. The launcher uses a.collab file to launch Blackboard Collaborate, using a known and stable version of Java. Because the launcherincludes the required Java, you do not need to install and maintain the system version of Java.When you click on Join Room, a .collab file will be put in your Downloads folder, where you can double click on it, ora popup will invite you to start a session. How it works for you will vary depending upon your Browser and settings. Ifyou cannot start the .collab file then download the Blackboard Collaborate Launcher and after it is installed, find the.collab file and try again.If you have not previously used Blackboard Collaborate, you will need to download the Blackboard CollaborateLauncher, and double click on the downloaded file to install the Launcher, using the Launcher Setup Wizard.Blackboard’s more extensive documentation is here.Download the launcher and double click on it if it is in the lower left of your browser, or search for it in yourDownloads Folder. If you get the security message, click on Run.
After the Setup Wizard has completed, you will double click on the meeting.collab file that was downloaded initially.This may show in the lower left of your browser, or you may have to look for it in your Downloads folder.If you are working with a MAC and get a security error, look at directions here for the work around. When it hasfinished loading, you may get another message, asking you about your network connection. Whatever your networkconnection, LAN or WIRELESS or DSL, click on that speed. Now you are in Blackboard Collaborate!To get to the Blackboard Collaborate session, click on the little purple BbC icon:In order to make sure you can be heard, run the Audio Setup Wizard.APPENDIX B: USING THE AUDIO SETUP WIZARD ON A MACThe Audio Setup Wizard on a Mac computer is slightly different than that of a PC.4. Open the Audio Setup Wizard in the same manner by clicking the Audio & Video Options menu located in theAudio & Video panel.5. Proceed as described above if you wish to use the default microphone and speakers on your Mac.6. If you want to use a different device, click the Open the Sound Preferences panel. The Sound preferences panelhas a screen for audio output or how you will hear the session audio and a screen for input or microphone forsending audio. Select the desired device for both Output and Input. Then close Sound preferences.APPENDIX C: BLACKBOARD COLLABORATE OUTSIDE OFBLACKBOARDOIT Administration can also set up Blackboard Collaborate sessions outside the Blackboard Learning ManagementSystem, for staff who which to hold synchronous online meetings. To request an Online Meeting Session, emailsupport@mbc.edu and specify the purpose, number of attendees, start date and time and end date and time. OITAdministration will send you the link.
ACCESSING BLACKBOARD COLLABORATE: From the Blackboard Collaborate Course Tool, click Join Room twice. If you have used Blackboard Collaborate before, and already have installed the Launcher, then open the meeting.collab file. This may be presented to you as shown below, or it may be in your downloads folder.