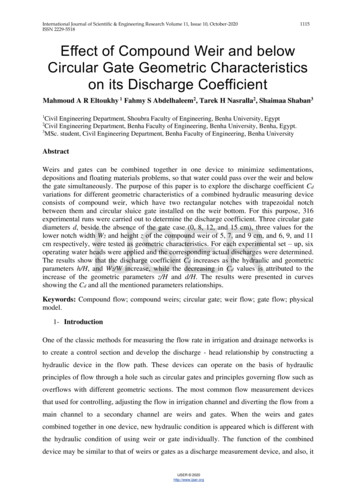
Transcription
CIRCULARSAWMILLSANDTHEIREFFICIENTOPERATIONby Stanford J. LunstrumU.S. DEPARTMENT OF AGRICULTUREFOREST SERVICESTATE & PRIVATE FORESTRY
CIRCULAR SAWMILLSAND THEIREFFICIENT OPERATIONbyStanford J. LunstrumSawmill SpecialistUSDA Forest ServiceState and Private ForestryReprinted1993
ABOUT THE AUTHORStanford J. Lunstrum received his B.S. degree in forestryfrom Iowa State University in 1962 and worked for alumber company in Iowa from 1962 to 1964. From 1964 to1967 he served as an instructor in sawmilling at theUniversity of Kentucky Robinson Substation, Quicksand,Kentucky. From 1967 to 1972 he was a sawmill specialistfor the Southeastern Area of State and Private Forestry,USDA Forest Service. He is currently with State & PrivateForestry, stationed at the Forest Products Laboratory,Madison, Wisconsin.
ACKNOWLEDGEMENTSThe author wishes to express special appreciation for the highly competent and constructive assistance of Mr. Hiram Hallock, technologist forthe quality and yield improvement sector of timber utilization researchat the U.S. Forest Products Laboratory, Madison, Wisconsin. Mr. Hallockgave freely of his time and expert advice to assure the highest possibleaccuracy of the manual, and also made helpful suggestions to make thetechnical explanations more readily understood. Others who renderedvaluable assistance were:Thomas P. BroganExecutive Vice PresidentNorthern Hardwood &Pine Manufacturers AssociationGreen Bay, WisconsinWilliam James KiddExecutive SecretaryNortheastern Lumber ManufacturersAssociationGlens Falls, New YorkWilliam (Andy) CloerSaw Filer InstructorHaywood Technical InstituteClyde, North CarolinaJ.E. McKenzieChairman of the NHLA RulesCommitteeKimberly Clark CorporationNeenah, WisconsinEdgar (Cliff) CookSawyer InstructorHaywood Technical InstituteClyde, North CarolinaWilbur Doyle, OwnerDoyle Lumber CompanyMartinsville, VirginiaA.G. FeglesGeneral SuperintendentWest Coast Lumber InspectionBureauPortland, OregonM.B. Pendleton, Secretary-ManagerNational Hardwood LumberAssociationChicago, IllinoisEugene J. Porter, AdvertisingManagerSimonds Saw & Steel DivisionWallace-Murray CorporationFitchburg, MassachusettsJ. Hefferon, ManagerR. Hoe & Company, Inc.New York, New YorkJames R. PynesChief Quality SupervisorWestern Wood Products AssociationPortland, OregonE.E. JonesDirector of Field StaffSouthern Pine Inspection BureauPensacola, FloridaW.W. RowlandSawyer InstructorHaywood Technical InstituteClyde, North Carolinai
E.A. Scott, PresidentSouthern Cypress ManufacturersAssociationJacksonville, FloridaH.V. Shown, Regional SupervisorDivision of Reliance Electric Co.Dodge Manufacturing CorporationMishawaka, IndianaGeorge A. ThompsonBuilding Standards ManagerRedwood Inspection ServiceSan Francisco, CaliforniaC.A. WollmerIndustrial Product ManagerDisston DivisionH.K. Porter Company, Inc.Pittsburgh, PennsylvaniaGeorge B. WrightSawyer & Millright InstructorHaywood Technical InstituteClyde, North CarolinaRollin H. Yale, ManagerLumber ProcessingThomasville Furniture IndustriesThomasville, North CarolinaThe author is also indebted to the HaywoodTechnical Institute for making its sawmill facilitiesavailable for the photography necessary to illustrate this manual.The use of trade, firm, or corporation names inthis publication is for the information and convenience of the reader. Such does not constitute anofficial endorsement or approval of any productor service by United States Department of Agriculture to the exclusion of others which may besuitable.ii
CONTENTSPageINTRODUCTION. . . . . . . . . . . . . . . . . . . . . . . . . . . . . .iv. . . . . . . . . . . . . . . . . . . . . 1ACCURATE SAWING OF LUMBEREQUIPMENT SELECTION . . . . . . . . . . . . . . . . . . . . . . . . . . 11Headsaw . . . . . .SawArbor . . . . .Saw Collars . . . . .Pulleys and V-Belts .Power . . . . . . .Carriage and Tracks.121719202632EQUIPMENT SET UP . . . . . . . . . . . . . . . . . . . . . . . . . . . . .37Mill Foundation . . . . . . . . . . . . . . . . . . . . . . . . . . . . . . .Tracks . . . . . . . . . . . . . . . . . . . . . . . . . . . . . . . . . . . .Husk . . . . . . . . . . . . . . . . . . . . . . . . . . . . . . . . . . . . .383942.EQUIPMENT OPERATION AND MAINTENANCE . . . . . . . . . . . . . 4 7Carriage and Saw Speed . . . . . . . . . . . . . . . . . . . . . . . . . . .Mill Foundation . . . . . . . . . . . . . . . . . . . . . . . . . . . . . . .Headsaw . . . . . . . . . . . . . . . . . . . . . . . . . . . . . . . . . . .Pulleys and V-Belts . . . . . . . . . . . . . . . . . . . . . . . . . . . . . .Saw Arbor . . . . . . . . . . . . . . . . . . . . . . . . . . . . . . . . . .Saw Collars . . . . . . . . . . . . . . . . . . . . . . . . . . . . . . . . . .Carriage and Tracks . . . . . . . . . . . . . . . . . . . . . . . . . . . . .Guide for Troubleshooting . . . . . . . . . . . . . . . . . . . . . . . . . .Checklist for Periodic Maintenance . . . . . . . . . . . . . . . . . . . . .485152616364667176BIBLIOGRAPHY77. . . . . . . . . . . . . . . . . . . . . . . . . . . . . .SPECIFIC GRAVITY VALUES . . . . . . . . . . . . . . . . . . . . . . . 81STANDARD SAW GAGES. . . . . . . . . . . . . . . . . . . . . . . . . 85iii
INTRODUCTIONThis manual was written for circular sawmill operators whorecognize the need for producing the maximum yield of well manufactured lumber in the shortest possible time. It does not attemptto cover all aspects of sawmill operation; it is concerned only withthe first and most important step - primary sawing - and all themechanical components that affect the primary sawing function.Through the use of this manual, many circular sawmill operatorscan increase the efficiency of their sawing operation. Many operatorscould realize an increase of 10 percent or more in lumber output byimproving the accuracy of their cutting. For example, an operatorwith a log input of 5 million board feet per year could realize anadditional 500,000 board feet through improved efficiency. Thismeans not only substantial savings in timber resources but also alowering of per-unit cost and consequently higher profits for theoperation.But no quick cure-alls or shortcuts will bring about an efficientsawmill - it doesn’t “just happen”. Rather, it is brought about bythe determination to correct deficiencies and insure that everypiece of equipment related to sawing operates properly and functionssmoothly together as a unit.iv
ACCURATE SAWINGOFLUMBER1
Figure 1. – Excessively thick or thin lumber reflects inefficient mill operationand is a waste of sawtimber resources.One way to gage a mill’s efficiency is to measure its ability to cut lumberconsistently within specified thickness standards (fig. 1).Two basic factors affect lumber sizing accuracy: (1) the mechanical capability of sawing within given tolerances and (2) the human capability ofdetermining the correct setting.SAWING LUMBER WlTHlN GlVEN TOLERANCESA sawmill must be in A-1 condition to cut lumber within close specifiedtolerances; a rundown mill is not likely to produce lumber to accepted standardsof quality. Seldom understood is the fact that producing lumber within specified tolerances results in more footage from a given log input.Reineke1 outlines three ways in which lumber volume may be increased bycutting to narrower tolerances. The first is by adding to the thickness of a finalboard that may be somewhat scant in thickness. Scant lumber is usually rejectedand, therefore, is lost to the size class for which it was cut. If, for example, aboard is 1/4-inch scant, a saving of 1/16 inch on each of four boards is sufficientto make the last board a full-sized one instead of a reject.1Reineke, L.H. 1966. Volume loss from inaccurate sawing. Forest Prod. Lab.,U.S. Forest Serv. Res. Note 0111.2
Secondly, in the second half of a log being sawed through and through, theaccumulated reduction in thickness brings the last half of the boards nearer thecenter, thus increasing their widths (fig. 2). Some boards, especially in softwoods,may be scant in width, and the increase in width of the slightly thinner boardsmay be sufficient to place them in the next width class.The third source of increased yield is the occasional increase in trimmedlength of short outside boards. Such boards may be slightly scant in length, sothat nearly 2 feet of length for softwoods, or nearly 1 foot for hardwoods, mustbe trimmed off. Any increase in width of the last board may not be sufficientto increase the edged width by one increment, but it may increase the lengthenough to place it in the next longer length class.Certain log diameters will yield an additional board. For example, a log 12inches in diameter may lack 1/2 inch of producing an extra board. A gain of1/32 inch in six cuts, a total of 3/16 inch, will not provide enough additionalthickness for another board and might fail to increase the edged width ortrimmed length. However, for a log diameter of 12.4 inches, the 3/16-inch gainin thickness will provide the additional board and might also add enough woodto gain an extra inch in edged width or an extra 2 feet in trimmed length. Itmust be remembered that in no case is scale reduced by making improvements inthe sizing of lumber. On the contrary, any such effort always results in someincrease overall by any one or combinations of ways mentioned by Reineke.Lumber must be sawn at a certain minimum green thickness that, whendry, will dress out to the thickness required. Lumber that does not dress outto the required dry thickness is rejected as scant. Such lumber must then beremanufactured into other products and because of these added costs scantlumber often becomes an unprofitable item.No sawmill produces lumber consistently at a specified target set withoutsome variation between boards. All mills must Include a plus or minus tolerancearound their target set to allow for this variation in lumber thickness. Theamount of tolerance required for a given sawmill depends upon stress in the logs,condition of mill equipment, and the manner in which the mill is operated.Table 1 lists thickness standards for lumber produced by circular headrigsunder various grading rules. It is possible for a mill to cut at a lower target setthan that recommended in this table but, in any case, it is important that lumbernot be below the stipulated minimum green thickness. All possible size classesare not necessarily listed for each association.It should be noted that associations dealing with softwood lumber permitone out of five boards in a shipment to be 1/32 inch thinner than the specifiedminimum rough dry thickness. The Southern Cypress Manufacturers Association allows one out of five boards in a shipment of standard yard boards to be28/32 inch, minimum rough dry thickness; standard industrial boards must notbe less than 30/32 inch but the association will allow 1 out of 10 boards to be29/32 inch, minimum rough dry thickness.But because an association allows a specified percentage of the boards to becut under-thickness does not mean that a mill should strive to produce that manyboards under-size. It should acquire the control to produce its lumber within asnarrow tolerances as possible, with few or no boards falling below the stipulatedminimum green thickness. This not only assures a well manufactured productthat is highly saleable but also allows the maximum yield to be realized fromthe log input.3
Table 1. – Thickness standards for lumber produced by circular headrigs undervarious grading rulesGreenDryMinimum Stipulated Recommended Recommendedmaximumtarget setNominal Dressed r o u g h m i n i m u m– – – – – – – – – – 32nd inches – – – – – – – – – /410/4NATIONAL HARDWOOD LUMBER 356647268SOUTHERN PINE INSPECTION 7276314049576776354453596480SOUTHERN CYPRESS MANUFACTURERS 359566763528476806872REDWOOD INSPECTION T COAST LUMBER INSPECTION ERN WOOD24 (24) 28 (28)37 (32) 41 (36)45 (40) 49 (44)51 (44) 55 (48)58 (48) 62 (52)716776 (64) 80 (68)PRODUCTS ASSOCIATION130 (29)32 (32)46 (41)43 38)51 (46)54 (49)58 (51)61 (55)65 (55)68 (59)747886 (75)83 (71)354452637934 (35)49 (44)57 (52)64 (59)71 (63)8289 (79)Table continued on following page4
NORTHEASTERN LUMBER MANUFACTURERS 83644526832414959753544526379NORTHERN HARDWOOD AND PINE MANUFACTURERS ASSOCIATION24 (24)37 (32)45 (40)51 (44)58 (48)6776 (64)4/45/46/47/48/49/410/4130 (29)43 (38)51 (46)58 (51)65 (55)7483 (71)28 (28)41 (36)49 (44)55 (48)62 (52)7180 (68)33 (32)46 (41)54 (49)62 (55)69 (59)7887 (75)1 236 (35)49 (44)57 (52)66 (59)73 (63)8291 (79)The first set of numbers is for cutting dry shop, selects, and common grades;the numbers in parentheses are for cutting dry finish boards and dry dimension.2Four-quarter shop lumber must be dressed at 25/32 inch, which necessitatescutting it 1/32 inch thicker than recommended in the table.BOARD NO.12346678812345678WIDTH (inches)610121414141310761113141413105ABDrawn to ScaleFigure 2. – In this 15-inch log, a difference in lumber yield is realized by cuttingfor a given thickness class at two different target sets, 40/32 inches in A and48/32 inches in B. Saw kerf 1/4 inch in each case. Boards 6, 7, and 8 in A aresawn nearer the center of the cant increasing their widths and thus their footagesover corresponding boards in B. Also, an extra board is realized in A. The totaladditional footage gained in A over B is about 16 percent.5
When cut under rules of the National Hardwood Lumber Association (NHLA),lumber produced from such high-shrinkage species as cottonwood, pecan, hickory,hard maple, beech, gum, and the oaks will generally dress out to the requireddry, dressed thickness if cut at or above the stipulated minimum thicknessrecommended in table 1. However, 5/4 pecan, hickory, hard maple, beech,gum, and white oak should be cut with the stipulated minimum thickness1/32 inch greater than that recommended in table 1. Eight-quarter pecan,hickory, beech, and white oak should be cut with the stipulated minimumthickness 1/16 inch greater than that recommended.Low-shrinkage species such as yellow-poplar, cherry, soft maple, and butternutwill generally dress out to the required dry dressed thickness if cut no more than1/32 inch below the stipulated minimum thickness recommended in table 1.Eight-quarter cherry can be cut with the stipulated minimun thickness 1/16 inchless than that recommended.The dry dressed and minimum rough dry figures in table 1 comply with thevarious lumber association grading specifications. The “green” figures are recommendations and therefore are subject to adjustment to suit specific needsHowever, good results can generally be obtained by cutting lumber within therecommendations given. If possible, the operator and buyer should agree tominimum and maximum acceptable thicknesses.The dry dressed thickness applies to lumber after it is dressed on both sides.The minimum rough dry thickness is that required after lumber has dried andbefore it has been planed. Green lumber, direct from the saw, must be no lessthan the stipulated minimum thickness so that when it shrinks it will not bebelow the minimum rough dry thickness. Lumber that is thinner than thestipulated minimum thickness will not dress out to the specified dry, dressedthickness. The recommended target set is the board thickness a sawyer shouldattempt to cut when sawing for a given thickness class and includes a sawingtolerance that allows for inherent thickness variation when producing lumber.The recommended maximum thickness is the upper limit on the plus side of thetolerance; the stipulated minimum thickness is the lower limit on the minus sideof the tolerance. In general, boards that fall above the recommended maximumthickness represent a certain amount of wasted wood. Lumber produced betweenthe stipulated minimum thickness and the recommended maximum thickness isacceptable.Applying intensive quality control can mean taking numerous measurementson boards and making time-consuming calculations. While this may be requiredfor research or other use, the average mill operator does not have the time nor isit necessary to make such detailed analyses. One of the simplest and quickestways of checking thickness standards for lumber is to use a set of go-no-gogages. Their use for lumber quality control in the sawmill has been advocatedfor years.A go-no-go gage can be constructed from any hard, durable metal, as shownin figure 3. The inner, narrower notch of the gage is determined by the stipulatedminimum thickness for the size class desired, minus .005 inch. The outer, largernotch is determined by the recommended maximum thickness. Lumber thatdoes not tit into the gage at all is too thick; lumber that fits into the inner notchis too thin. Only lumber that tits into the first notch is considered within acceptable limits. Dimensions for the notches can be determined from table 1 accordingto the species and the association rules under which the lumber is to bemanufactured.6
Au efficient mill should produce at least 95 percent of itslumber within acceptable limits.To test a mill’s capability of producing lumber within these limits,saw a sample of 100 boards andmeasure them for acceptabilitywith a go-no-go-gage. Measure allboards sawn including the firstboard next to the slab cut anddog boards. Check the edge ofeach board for fit into the firstnotch only. If any part of a boarddoes not comply, exclude it in Figure 3. – A go-no-go gage is simple tothe count of acceptable boards. construct. One-fourth-inch thick stainlessDo not take readings on waneysteel is ideal for making such a gage.edges.If more than 5 of the 100 boards fall outside the acceptable limits, you shouldtroubleshoot. Locate weak areas of mill maintenance or faulty operating practices and correct them as discussed in other sections of this manual.PRACTICING GOOD SETTING HABITSWood chips, bark, splinters, sawdust, or other material lodging between theknees or headblocks and cant can result in inaccurately sized lumber and shouldbe kept from accumulating in these places. The problem may be that excessiveamounts of this material are allowed to escape the intended point of collection.Shielding vulnerable areas from flying bark, sawdust, and other material mayhelp to alleviate this problem. In persistent cases, a system of forced air may benecessary to keep troublesome spots free from such debris.Mathematical miscalculation of settings and carelessness in making the setcan lead to the same results as operating faulty equipment. Weekly checks ofthe scaleboard indicator should be made to determine the accuracy of the actualset. Temperature variations and equipment wear, as well as other causes, canaffect setting accuracy.The thickness of boards coming off the headsaw should be as near therecommended target set as possible. Precalculating settings helps to insure thatall boards, including the dog board, are at the intended thickness. A sawyer needsto know the exact setting required for beginning his run to avoid taking a shimcut which wastes wood as well as time. This is particularly important when a flatface is against the knees and a sawyer intends to make his finish run from thatsetting. A sawyer eventually learns the settings to use at the beginning of his runs.But while he is learning he must figure these settings to fit the situation at handand he may post them on the wall or on a card for quick reference.Setting guides are generally tailormade for each mill operation. Constructinga setting guide depends cm the thickness class cut and the saw kerf used. Withthe exception of the dog board, scaleboard setting are derived by cumulativelyadding the target set and the saw kerf of boards to be sawn. The dug board settingis simply the desired thickness of the dog board. Add to this the target set forthe next board and the saw kerf to arrive at the next setting and so on for each7
successive setting. Table 2 shows a setting guide for a mill sawing a single thickness class, and table 3 shows the same guide expanded for sawing two thicknessclasses from the same log.Table 2. – Sample scaleboard settings for a mill sawing a single size class1No. of 4/4 piecesleft in 28-11/169-31/321 (Dogboard)23456781Mill sawing 4/4 lumber at a desired thickness of 32/32 inches (target set) andusing a 9/32-inch saw kerfTable 3. – Sample scaleboard setting for a mill sawing two thickness classes1No. of 4/4pieces leftin cant10No. of 8/4 pieces left in 9/3210-1/211-25/32Mill sawing 4/4 lumber at a desired thickness of 32/32 inches (target set) and8/4 lumber at a desired thickness of 60/32 inches and using a 9/32-inch sawkerf.Dogboard
The following example shows how a setting guide works while sawing twothickness classes from the same log. A sawyer as he sets for his finish run judgesfrom the log and his setting guide that he can get two 8/4 pieces and four 4/4pieces from his cant. He notes from his setting guide that he must begin his runon 9-5/32 inches to come out right on the dogboard. He now has the option ofworking in either direction in the guide to get his pieces in any way he desires. Ifhe decides to cut two boards first, he goes up the scale, first to 7-7/8 inches thento 6-19/32 inches. Next, he decides to cut one dimension piece and, therefore,moves across the scale to a setting of 4-7/16 inches. He then decides on anotherboard and moves up the scale to 3-5/32 inches; and finally moves up to 1-7/8inches, which results in the last board and the second dimension piece, whichalso becomes the dog board in this case.9
10
EQUIPMENTSELECTION11
HEADSAWSelection of the headsaw should be based primarily on the hardest species andthe average largest logs to be saw”. Several factors must be considered in selecting a headsaw: (1) diameter, (2) gage, (3) style of teeth, (4) hand of mill, (5)number of sawteeth, and (6) width of cutting edge. Because almost all circularmill operators today use inserted tooth saws, the selection and use of solid toothsaws is not covered.DIAMETERThe diameter of the headsaw should be the smallest possible that can sawthe largest logs expected. Using a saw larger than required increases difficulty inmaintaining proper tension and adds to the number of teeth to keep in repair.On the other hand, time and money are often wasted in trying to cut logslarger than a saw can effectively handle. Slabs must be chopped free, oftendegrading potentially high-grade lumber. It is necessary to recognize the upperdiameter limit that a saw can cut and make sure that logs above this limit arekept out of the mill. The following tabulation shows the recommended sawdiameters for the corresponding average largest logs that a saw can handleeffectively. If a saw larger than 60 inches is needed, a top saw is recommendedrather than a larger headsaw.Diameter of averagelargest logsSaw Diameter– – – – – – – – Inches – – – – – – – –202240444826303452566018GAGESaw gage should be selected according to the load the saw will encounterunder were conditions. Large logs, hard logs, fast saw speeds, and a fast carriagespeed all demand, in general, a heavier gage saw to withstand the increased stress.Table 4 shows the recommended saw gages for various tooth and shank styles,saw diameters, and load conditions.12
Table 4. – Recommended saw gages for various tooth styles, saw sizes, and loaddemandsToothstyleLightloadSaw diameter40” to 54”56” to 62”LightMediumMedium HeavyloadloadloadloadHeavyload– – – – – – – – – – – –Gages – – – – – – – – – – – –2-1/2, F9/108/9B, 33-1/2D, 6/75/65/65/6STYLE OF TEETHAny tooth style can be made to work in most any sawing application. Efficientsaw operation, however, requires using a tooth style that has been carefullyselected for a specific job. For sawing large logs, a tooth style with large gulletcapacity is recommended. This large gullet allows the carriage to be fed at thespeed required for the saw teeth to maintain the proper bite, provided the poweris adequate. Using large gullet capacity on large logs also results in efficientutilization of power. Sawing smaller logs, where large gullet capacity is notrequired, demands more saw teeth to help prevent the saw from dodging in thecut, especially in knotty logs. A saw with the maximum number of teeth permitsthe fastest possible carriage speed, resulting in maximum production from thesaw.Figure 4. – The bit of a double-circle F-style tooth (A) has a wider body thanthat of a single-circle 3-style tooth (B).13
Figure 4 shows the two basic styles of saw teeth – single circle (designated bynumbers) and double circle (designated by letters). Double-circle saw teeth arelonger and stouter than single-circle saw teeth. Therefore, a saw of given diameterwill hold fewer teeth if equipped with double-circle style rather than single circle.The sockets of double-circle teeth absorb shock in such a way as to minimizespreading, which the sockets of single-circle teeth are more prone to do. Spreading sockets upset saw tension and therefore saw performance.Using a special chip-breaker bit is often helpful while sawing frozen logs (fig. 5).These teeth have a nub projecting into the gullet area that breaks up the swirlingaction of the sawdust as it chambers. Heat generated by the cutting action ofthe sawing process and from friction of the fast-moving sawdust causes a partialmelting of the ice in the wood. As the sawdust comes to rest the water quicklyrefreezes causing the sawdust to stick to the board and cant which forces the sawoff line. In sawing unfrozen logs, this swirling action of the sawdust normallycauses no problem.Figure 5. – Special sawteeth are made with a nub that projects into the gulletarea to deflect sawdust away from the flange of the shank. This type of sawtoothworks especially well for sawing frozen timber.A tooth must cut through a given thickness of wood before the gullet becomesfilled. Wood as sawdust in the gullet occupies approximately 43 percent morespace than it does as solid wood. Since the gullet capacities of various tooth stylesvary considerably, it is important to use the proper style for the size of logs to besawed. Inefficient headsaw operation results if tooth style is not selected accord-14
ing to the average largest logs sawn. For example, using a 2-1/2 style toothon 22-inch diameter logs will not allow a carriage speed that results in theproduction of coarse sawdust. Using a D style tooth on 12-inch diameterlogs restricts carriage speed because the saw contains fewer teeth. See table 5for recommended tooth styles for various types and sizes of logs.Table 5. – Recommended tooth styles1 for circular headsaws for various typesand sizes of logs.Type of logsKnottyFrozenHard-hardwoods; bard softwoodsSoft-hardwoods; softwoods1Diameter range of logs, inches10-1913-21F, 2-1/2F, 2-1/2F2-1/2BB, 3-1/2B3,3-1/220-33D, 4-1/2D4-1/2Bits in F, B, and D tooth styles are interchangeable, but shanks are not.HAND OF MILLMost saws are thicker at the center than at the rim and must be hammered forright-hand or left-hand mill operation. The extra thickness of the saw plate at itscenter is all hammered through to one face – the other face then becomes flat.The flat face must run on the log side and the crowned face on the board side. Todetermine the hand of a saw, stand in the sawyer’s box facing the saw and noteon which hand the log passes while being sawed. If it passes from your right –the saw is right hand; if it passes from your left – the saw is left hand (fig. 6).Figure 6. – To determine the hand of a mill, position yourself in the sawyer’sbox facing the saw and note on which hand the log passes you while it is sawed.Reproduction courtesy of R. Hoe & Co., Inc.15
NUMBER OF SAW TEETHAt a given rim speed, a saw with the maximum number of teeth can do morework per unit of time than one with fewer teeth. But keep in mind that horsepower needs Increase with an increase in number of sawteeth. If available powerat the headsaw is insufficient for the saw to maintain the proper bite, either asaw with fewer teeth should be used or the power should be increased. Table 6shows the maximum number of inserted teeth for standard saws of given diameter.Table 6. – Maximum number of inserted teeth in standard headsaws1Toothstyle2-112FB33-1/2D4-1/240 42 44–––––––44 46 4842344038Saw diameter, inches46 48 50 52 54– – – Number – – – – – –50 54 5644 46 48 50 5238 42 42 44 4442 46 48 50 5040 42 44 46 4836 36 36 4038 40 40 445660–––––5448505040445244441The table indicates the maximum available in saws which manufacturers willguarantee. Saws with a larger number of teeth are obtainable on special orderbut are not generally recommended because of excessive shoulder breakage.WIDTH OF CUTTING EDGEThe cutting edge of saw teeth must provide a path (saw kerf) wide enoughfor the saw plate to clear without making excessive contact with the wood. Ifexcessive contact is made during the cut, resulting friction usually causes thesaw plate to heat and expand. This, of course, leads to sawing problems and makesit impossible to saw accurate lumber.In general, softwoods require a wider saw kerf than hardwoods because s
ABOUT THE AUTHOR Stanford J. Lunstrum received his B.S. degree in forestry from Iowa State University in 1962 and worked for a lumber company in Iowa from 1962 to 1964.
