Transcription
INSTRUCTIONAL, ASSESSMENT DELIVERYAND DATA COLLECTION SOLUTIONSQuick Start Guide255 West Federal Street Youngstown, Ohio 44503
TurningPoint Quick Start GuideThank you for your purchase of Turning Technologies products. Please be aware that this product maybe subject to United States Export Control Laws, including, without limitation, the Export AdministrationRegulations. As a result, you may not use, export, or re-export any Turning products except asauthorized by United States law and the laws of the jurisdiction in which the Turning product wasobtained. Please review Turning Technologies current End-User License Agreement, available athttp://www.TurningTechnologies.com/EULA for a full understanding of your obligations.Online Resources:Many other online resources are also available to assist you.Downloads: TurningTechnologies.com/DownloadsProduct Training and Tutorials: TurningTechnologies.com/TrainingKnowledgeBase: KnowledgeBase.TurningTechnologies.comTechnical Support:7 a.m. - 9 p.m. ESTToll-Free (within the U.S.) : . . . . . . . . . . . . . . . . . . . . . . . . . . . . . . . . . . . . . . .866.746.3015International: . . . . . . . . . . . . . . . . . . . . . . . . . . . . . . . . . . . . . . . . . . . . . . . . . . 1. 330.746.3015Support: . . . . . . . . . . . . . . . . . . . . . . . . . . . . . . . . . . . . . . . . . . . . . . . . . . . . . . . .866.746.3015Support: . . . . . . . . . . . . . . . . . . . . . . . . . . . . . . . . . . . . . . . .support@turningtechnologies.comTraining: . . . . . . . . . . . . . . . . . . . . . . . . . . . . . . . . . . . . . . . .training@turningtechnologies.comThe following regulatory statements apply to radio frequency and infrared transmitters and receivers mentioned in this manual, including the ResponseCard RF, ResponseCard RF LCD, ResponseCard IR,ResponseCard XR, ResponseCard NXT and their respective receivers.resourcesFCC StatementThis device complies with part 15 of the FCC Rules. Operationis subject to the following two conditions: (1) This device maynot cause harmful interference, and (2) this device must acceptany interference received, including interference that maycause undesired operation.IC StatementThis device complies with Industry Canada licence-exempt RSSstandard(s). Operation is subject to the following two conditions:(1) this device may not cause interference, and (2) this devicemust accept any interference, including interference that maycause undesired operation of the device.Le présent appareil est conforme aux CNR d’Industrie Canadaapplicables aux appareils radio exempts de licence. L’exploitationest autorisée aux deux conditions suivantes: (1) l’appareil ne doitpas produire de brouillage, et (2) l’utilisateur de l’appareil doitaccepter tout brouillage radioélectrique subi, même si le brouillageest susceptible d’en compromettre le fonctionnement.
Setting Up TurningPoint SoftwareRun TurningPoint in one of three ways:1. Download TurningPoint from TurningTechnologies.com/Downloads.2. Insert your TurningPoint CD into your computer’s CD-ROM drive.3. Plug in the RF Receiver into your computer’s USB port.How to Open TurningPoint PCHow to Install TurningPoint PC(EXE File)How to Open TurningPoint Mac1. Double-click the downloaded zip file.1. Double-click the downloaded setup file.1. Double-click the DMG file.2. Select the desired folder location and click Unzip.2. Click Next. A window opens and displays the2. Drag and drop the TurningPoint icon to theTurningPoint.exe.license agreement. Read the license agreement onApplications folder.the screen or click the Print button to send the textTIP: Create a shortcut by dragging the iconto a printer.TIP: Create a shortcut for TurningPoint.exe on thedesktop for quicker access to the application. DO3. Select the radio button labeled I accept the termsin the license agreement if you accept the terms.NOT remove any files from the Application folder.4. Click Next.If files are removed, the application will not5. Enter the name and organization in the fieldsfunction properly.from the Applications folder into the dock.3. Double-click TurningPoint.provided and click Next. A window opens anddisplays a message that the computer is ready toinstall TurningPoint.6. Click Install. The computer installs TurningPointand displays the Finish button on the page whenthe process is complete.7. Click Finish. Select the Launch TurningPointcheckbox to immediately open the application,or double-click the TurningPoint shortcut on thedesktop to open the application.How to Run TurningPoint fromthe RF ReceiverIf you have an RF Receiver, you have the additionaloption to run the TurningPoint software directlyfrom the receiver.1. Plug in the receiver.2. Open Computer (PC) or Devices (Mac).3. Double-click the Turning TechnologiesRemovable Drive.4. Double-click the PC or Mac folder.5. Double-click the EXE (PC) or DMG (Mac).setting up turningpoint software3. Open the unzipped folder and double-click
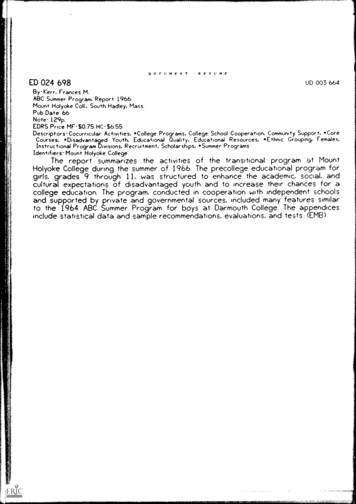
TurningPoint DashboardLaunchPollingCreateContentManage Participant Listand Polling DataSelectParticipantListListProvide UserFeedbackThe TurningPointDashboard offers one,ConnectionInformationsimple user interface forpolling in PowerPoint, polling in any applicationand self-paced polling.SelectContentThe Dashboard providesinstant management ofListpolling, participants, content,sessions and reports.turningpoint dashboardChoose PollingEnvironmentAbout TurningPoint
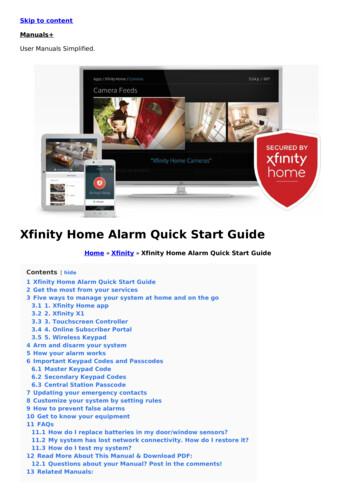
Receiver Connection SetupHow to Change the Channelon the Receiver1. Plug in the receiver and open TurningPoint.2. Click the channel number below Receiver. ThePreferences window opens.3. Select the channel number from the drop-downmenu under ResponseCard Channels. Once thereceiver has been set up, it is now possible tobegin testing the polling connections.Setting Up a ReceiverWhen the receiver is plugged in,it is automatically recognized bythe computer. The default channelon the RF receiver is set to 41. IRreceivers do not work on channelsand require no adjustments.RF ReceiverIR Receiverreceiver connection setupRF Receiver
Connecting to ResponseWareConnecting to ResponseWare is an optional step and only applicable to users that have purchased aResponseWare license.How to Set Up ResponseWare1. Click to Connect below ResponseWare. The ResponseWare window opens.2. Enter the ResponseWare Username and Password in the fields provided.3. Select one of the following options:presenter@youremail.coma) Allow Guests - allows participants to attend the session who do nothave a Participant ResponseWare account.b) Require Login - participants must login to the session with theirParticipant ResponseWare account.4. Optionally, select Do not prompt participants to enter user information. Ifchecked, participants will not be prompted to enter their user informationprior to joining the session.5. Click Login.a) The first time ResponseWare is enabled on a computer the LicenseAgreement window will open. Accept License Agreement to proceed.b) The ResponseWare window will open. The session ID and connectionconnecting to responsewareinformation is displayed.6. Click Close. The ResponseWare window does not need to be open forResponseWare to be enabled. ResponseWare will remain enabled untilTurningPoint is closed. The next time the application is opened these stepswill need to be repeated to enable ResponseWare.
PowerPoint PollingThe polling function in PowerPoint allows you to poll an audience with questions embedded directlyinto your PowerPoint presentation. A ribbon/toolbar is directly integrated into PowerPoint.ImportContentSelectedParticipant ListReal-TimeRegistrationPollingModeResetSessionPC PowerPoint RibbonSelectedParticipant ListImport ContentLoadParticipant ListSaveConnectionInformation tMonitorConnectionInformationSaveSessionStartSlide ShowMac PowerPoint Toolbarpowerpoint pollingLoadParticipant List
PowerPoint Polling PCBefore You BeginPolling in PowerPoint: PC arShow/HideResponseGridRepollQuestionTo poll in PowerPoint, you need aSetAnonymousInsert essagingWindowpresentation with questions slides or a questionlist. To track results based on participants, aparticipant list is also recommended.ResponseCounterPollingStatusHow to Poll in PowerPoint for PCpowerpoint polling continued1. Plug in the receiver.6.Start the Slide Show.2. Open TurningPoint and select a participant list and content, if applicable.7.Depending on the Polling Options that were selected during slide creation,3. Click PowerPoint Polling. The TurningPoint window closes andwhen you come to a polling slide you may need to advance the slide toPowerPoint opens. If a question list was selected, TurningPoint willopen polling.automatically parse the content into slides. If there are a large number of8.Continue until the Slide Show is finished.questions in the question list, this may take a few moments.9.Close the presentation when you have finished polling.4. Open the PowerPoint presentation that contains the question slides ifcontent was not selected before PowerPoint was opened.5. Verify the correct participant list has been loaded and Live Polling isselected in the Polling drop-down box from the TurningPoint ribbon.10. Click Yes to save the session. TIP: To save the session before closing theapplication, click Save on the TurningPoint ribbon, name the session andclick Save.11. TurningPoint opens to the Manage tab to view reports.
PowerPoint Polling MacPolling in PowerPoint: Mac ShowbarMinimizeShowbarToggleResponseCountStart PollingShow/HideResponseGridRepollQuestionBefore You BeginViewOriginalChartSetAnonymousInsert DisplayParticipantMonitorTo poll in PowerPoint, you need a presentation with questions slidesor a question list. To track results based on participants, a participantlist is also ollingStatus6.Start the Slide Show from the TurningPoint toolbar. Starting the Slide7.Click Start to open polling.8.Click Stop to close polling.2. Open TurningPoint and select a participant list and a question list, or aShow from the PowerPoint toolbar will result in the Slide Show runningPowerPoint presentation, if applicable.3. Click PowerPoint Polling. The TurningPoint Dashboard closes andPowerPoint opens. If a question list was selected, TurningPoint willas non-interactive.automatically parse the content into polling slides. This may take a fewmoments if there are a large number of questions in the question list.4. Open the PowerPoint presentation that contains the question slides ifcontent was not selected before PowerPoint was opened.5. Verify the correct participant list is loaded.a) Press the spacebar, enter/return key or down arrow to advance the slide.If using a mouse, a mouse click also advances the slide. Alternatively, aPresenterCard may be used to advance slides and control polling.9.Continue until the Slide Show is finished.powerpoint polling continuedHow to Poll in PowerPoint for Mac1. Plug in the receiver or establish a ResponseWare session.
Anywhere PollingThe Anywhere Polling option opens a floating showbar that allows you to poll on top of any CounterHow to Poll with Any Application1. Plug in the receiver.2. Open TurningPoint and select a participant listand a question list, if applicable.3. Click Anywhere Polling. The TurningPointwindow closes and the polling application opens.4. Click the Start Polling button. Participants maynow respond.5. Click the Stop Polling button. Polling is closedand the chart is displayed.6. Close the application when you have finishedpolling.7. Click Yes to save the session. TIP: To save thesession before closing the application, click theOptions button, mouse over Session and selectanywhere ownMessagingOptions Show/HideShow/Hide Timer Show/Hide Window ionSave Session.8. Name the session and click Save.9. TurningPoint opens to the Manage tab to viewreports.
Self-Paced PollingThe Self-Paced Polling application allows participants to take a paper-basedtest on a ResponseCard NXT (or legacy product ResponseCard XR).Accept Logins,Start Polling,Stop Polling,Live ResultsSave indowHow to Poll with Self-Paced PollingTurningPoint1.Plug in the receiver.2.Open TurningPoint and select a participant list3.Click Self-Paced Polling. The TurningPoint4.Click Accept Logins and set login options as5.Click OK. At this time the participants may login6.Click Start Polling. Participants may now beginand a question list.window closes and the polling application opens.ChannelInformationdesired.to the test.the test. Once they have finished the test theycan submit their results from the responsedevice.7.Click Stop Polling once all the results have been8.Close the application to return to the9.Click Save to save the session results.received.TurningPoint Dashboard.# of ParticipantsLogged In# of CompletedTests10. Name the session and click Save.11. TurningPoint opens to the Manage tab to viewreports.self-paced mation
Creating ContentFor Anywhere Polling and Self-Paced Polling, content is created through question lists. PowerPoint Polling can utilize thequestion lists, but question slides can also be made directly through the TurningPoint ribbon embedded in PowerPoint.Creating a New Question ListA question list is a file that contains questions and answers. The question list can be used for PowerPoint Polling, Anywhere Polling and Self-Paced Polling. Whencreating the question list, the preferences can be saved and used as a template for other question lists.How to Create a New Question ListManageVersion1.Select the Content tab.2.Click Content, select New and choose Question List.3.Enter the Name and a brief Description for the4.Click the arrow next to Preferences to expand the windowThe Question List Wizard opens.question list.Add,Remove,ImportQuestionsand adjust the options as necessary in the Content andPolling sections.5.Click Create List. The Question List Editor opens.6.Click the pencil icon to the far right of the question if youwish to enter question or answer text. The HTML editoropens.7.Select the question or answer text and enter the new text.8.Select a question from the drop-down menu at the top ofthe window to edit another question. You may also clickthe back or forward icons at the bottom right-hand sidecreating contentof the window.9.Click the collapse button to the far right of thequestion to return to the list of questions.ApplyStandards10. When finished, click Save and Close to save the changesthat were made to the question list.QuestionTypeQuestionPropertiesSet ces
Creating Content in PowerPointContent is created directly from the ribbon/toolbar.InsertInteractive SlideInsert Slide Objects(i.e. CountdownTimer)Refresh SlidesInsert InteractiveSlideInsertCompetitionInteractive ToolsSlides (i.e. Demographic Comparison)Insert Slide Objects(i.e. Countdown Timer)Interactive Tools(i.e. Standards,Import Question List)PC PowerPoint RibbonPreferences UserGuideMac PowerPoint ToolbarPreferencesHelpcreating content in powerpointSavePowerPoint Presentation
Creating Content in PowerPointBefore You BeginOpen PowerPoint throughTurningPoint. Select the Polling taband click PowerPoint Polling.PC PowerPoint RibbonHow to Create Content in PowerPointMac PowerPoint Toolbar1. Select the TurningPoint ribbon or toolbar.creating content in powerpoint2. Click New and select the question type.TIP: On PC, you can specify a default chart type in the Preferences. The TurningPoint PowerPoint Preferences are accessed through thePreferences button on the TurningPoint ribbon. You can also insert a new chart onto a slide using the Objects button on the ribbon.3. Enter the question text and answer text. On Mac, click the Refresh button to update your chart to reflect your slide changes.4. Optionally, set the Question Options in the Slide Preferences pane. On Mac, verify the slide number on the Slide Preferences panebefore making option adjustments.5. Optionally, set the Scoring Options, such as point values or speed scoring in the Slide Preferences pane.6. Optionally, adjust the Polling Options in the Slide Preferences pane.7. Optionally, click on the chart and adjust the Chart Options in the Slide Preferences pane. (Only available on PC.)8. When finished, save the PowerPoint presentation.
Managing DataParticipant ListTurningPoint sessions are grouped based on the participant list with which they are associated. Participant listscreated in TurningPoint can be used for PowerPoint Polling, Anywhere Polling and Self-Paced Polling.How to Create a New Participant ListAdd CustomColumnApplyDemographics1. Select the Manage tab.2. Click Participant List and select New.3. Enter a name for the participant list.Add/Remove/ImportParticipants4. Select Create Manually and click Create List.5. Enter the participant information.TIP: If you have a CSV or TXT file that alreadycontains the participant information, you candrag and drop the file into this window.6. Press Enter on the keyboard to add anotherbeen created, it can be selected before polling,or sessions run on Auto can be associated to itafter polling is complete.managing dataparticipant list. After the participant list has participant listparticipant.7. When finished, click Save and Close to save the
Managing DataReports and Results ManagerThere are six types of session reports (Results by Question, Results by Participant, Results Detail, Results by Demographic,Comparative Results and Session Log Report), each of which can be customized by selecting the data options on theright-hand side of the Reports window.Export toCSV, XLS, HTMLHow to Generate a Single Session Report1. Select the session from the panel on the left.2. Click Reports on the Session Overview window.3. Select the desired report type from the drop-down menu inPrint Reportthe upper right corner.Select ReportType4. Optionally, select the Data options you want to display inthe report.managing data5. Click Print to print a hard copy or to view a preview ofthe report.How to View Results Manager(Multi-Session Data)1. Select a participant list from the Manage tab and click reports and results managerCustomizationOptionsResults Manager. The Session Management Overviewdisplays.2. Click Overview. The available options display in the rightpanel.3. Select a session column. The available options display inthe right panel.4. Select a participant. The available options display in theright panel.
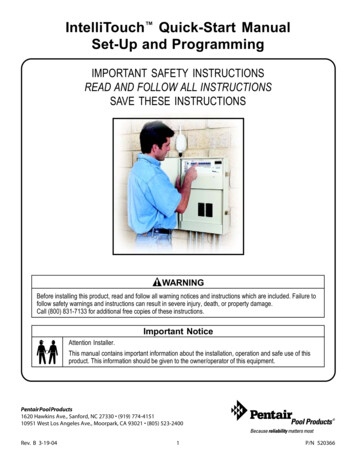
ResponseCard NXTQuick Start GuideThe Toolbox411Battery LifeRequires 2AAA Batteries2BackToolboxLeft, Rightand Enter KeysLeft FunctionKeyRight Function KeyEnterChannelInput ModeDelete KeyNumber PadFind Channels - Automatically detects the receivers within range of theResponseCard NXT. Scroll through the available receivers using the left or rightarrow keys to find your channel. Press the Enter button to set the channel.Send Message - Send a message to the leader/presenter. The leader is unableto respond back via the same method. The leader/presenter may also have thisfeature disabled in the software. If this is the case, you will see a “Not Open”message when trying to send a note.Device Info - Device Info displays the Device ID of the ResponseCard NXT.Contrast - Use the left or right arrows to adjust the contrast of the objects. Pressthe Enter button to save.Your I.D. - Assigns an alphanumeric identification to the ResponseCard.Brightness* - Use the left or right arrows to adjust the backlight luminosity ofthe LCD screen. Press the Enter button to save. Brighter settings will decreasebattery life.Test Info - Displays the test name, version number (if applicable) and questioncount. This option is only available while in Test Mode.SymbolInputDecimal/Space KeyResponseCard NXTDelete Test - Deletes the current test from the ResponseCard. This option is onlyavailable while in Test Mode.Send Test - Sends the current test to the host computer. This option is onlyavailable while in Test Mode.*Only Available on ResponseCard NXT.responsecard nxt quick startChannelIndicator
ResponseCard NXTQuick Start Guide Presentation ModeChanging the ChannelThere are two ways to set the channel on theResponseCard NXT. One way is to use the FindChannels tool in the toolbox, as described inthe previous section “The Toolbox,” or you canmanually set the channel. The steps below describehow to manually set the channel.1.2.3.Press the Channel button.Use the number pad to enter the new channelnumber.Once the channel number has been entered,press the Enter button.When sending a response or when a response is successfullyreceived, an icon appears at the bottom of the screen inthe middle. The following are graphic representations ofthese icons:41The response is being sent.The response was sent successfully.4141responsecard nxt quick start presentation mode123.Numeric Response question3,1,2.Multiple Response question withnumeric answer valuesC,A,B.Multiple Response question with alphaanswer valuestxtFill in the Blank questiontxtEssay questionPress the abc button to toggle between 123 , ABC ,Abc or abc input. These icons are located in the topof the right-hand side of the screen.41Single Response - Single Responsequestions are multiple choicequestions where only one answeris selected. Once the selection hasbeen made, the response is sent tothe presenter.1/AtxtabcABCDEFGHSDKQMNOP41123.Fill in the Blank - Fill in the Blankquestions require a text response.Once the text has been entered, pressOK to transmit your answer choice.Numeric Response - NumericResponse questions require more than1234567890123456 one number to be entered. Once theanswer has been entered, press OK totransmit your answer choice.Essay - Essay questions require astring of text. Once the answer hasbeen entered, press OK to transmityour answer choice.Multiple Response - MultipleResponse questions have more thanone possible answer. Enter youranswer choices and then press OKto transmit your answer choice.5,3,2,8,1,6,7,10,4,9Your response may be alpha ornumeric.C,A,B.C,A,B,E,J,H,G,I,D,FBelow are some examples of how the available question typesand various screens appear on the ResponseCard NXT.During the presentation, as questions appear onthe presenter’s screen, the ResponseCard NXTprompts you to enter the proper response type.An indicator appears in the top left-hand side of thescreen for special question types.abc16041Example ScreensRespondingtxt3,1,2.41Not an Option.Please Retry.41!No Linkupon Channel41Not OpenInvalid Response - If you see thisscreen after sending a response, itmeans that the response was invalid.For example, answer options areA - D, and you submitted E as youranswer choice.Incorrect Channel - This screen is toalert you that the ResponseCard NXTis not on the correct channel or thatthe device is unable to communicatewith the receiver.Polling Closed - This screen indicatesthat polling is closed and answers arenot being accepted.
ResponseCard NXTQuick Start Guide Test ModeBefore logging into a test, the ResponseCard NXT needs tobe on the same radio frequency channel as the receiver.For further instructions, see “Changing the Channel.” Thehost computer must be set up with polling open beforeyou can begin the login process.1. Press a button on the ResponseCard to “wake up”the device.2. The Welcome Screen is displayed followed by theBattery Indicator Screen.3. You may be prompted for Your ID.a) Press the left function key to clear the informationdisplayed.b) Enter Your ID.c) Press OK.4. You may be prompted for Test Version.a) Locate the Test Version number on the paper test.b) Use the number pad to enter the Test Version.c) Press OK.5. The test name, version number (if applicable) and thequestion count are displayed.6. If the information displayed in the previous step iscorrect, press OK (right function key). If theinformation is incorrect, press the back button (leftfunction key), verify that the ResponseCard is on thecorrect channel and begin the process from step 1.7. You are now in Test Mode.Taking a gating Through QuestionsSingle Response - Press the buttonthat corresponds to the answer choice.Answer choices can be alpha or numeric.5Go To411.2.Fill in the Blank - Enter the text usingthe number pad, similar to cell phonetexting. Press OK once you have madeyour selection.Numeric Response - Enter theresponse using the number pad, pressOK once you have made your selection.Essay - Enter the text using thenumber pad, similar to cell phonetexting. Press OK once you have madeyour selection.Multiple Response - Enter your answerchoices and then press OK once youhave made your selection. Answerchoices can be alpha or numeric.C,A,B,E,J,H,G,I,D,F41T/F200.1.TrueGo To2.True or False - Press 1/A for True or2/B for False.Scrolling Through Questions1. Use the Left and Right arrows to scroll back orforward through the questions.Go To a Specific Question1. Press the left function key.2. Use the number pad to enter the question number.3. Press the Enter button to be taken to the question.Sending a TestWhen answering the last question of the test, youwill receive a message that the test is complete orincomplete.Completed Test1. Press the right function key to send the test.TIP: Press the left function key to return to the testand review your answers.2. The ResponseCard NXT will save the test and send itto the host computer.Incomplete Test1. The ResponseCard NXT displays a list of theincomplete questions and then prompts you tosend the test.2. Press the left function key twice to return to thetest.3. You are automatically taken to the unansweredquestions.4. Once all the questions have been answered, youwill receive a message that the test is complete.responsecard nxt quick start test modeLogging into a Test
ResponseCard NXTUnit ID Programming (Optional)Modifying Unit ID ManuallyUnit ID as displayed on the reverse side of the device.1. Press the Toolbox(right function key).412. Press the right arrow key until “Device Info” is displayed.123. Press the Enter button.Note: The next 3 steps must be completed within 3 seconds.4. Press the5. Press the abcbutton twice.button.6. Press the Enter button.Did you know unit IDs may alsobe modified via ResponseCardProgrammer? Please contact yoursales representative for more detailsor visit TurningTechnologies.com.7. Enter the new Unit ID (up to 6 digits).8. Press the Enter button to save the new Unit ID.Enterresponsecard nxt unit id programmingReverting to Factory Default Unit ID1. Press the Toolbox(right function key).2. Press right arrow key until “Device Info” is displayed.3. Press the Enter button.Note: The next 3 steps must be completed within 3 seconds.4. Press thebutton twice.5. Press the abc button.6. Press the Enter button.7. Enter 000000.8. Press the Enter button to reset to the factory default Unit ID.ResponseCard NXT
ResponseCard RF and ResponseCard RF LCDUnit ID Programming (Optional)Modifying Unit ID Manuallybutton. The LED will flash red and green.2. Pressbutton. The LED will flash red and green at a slower rate.3. Enter your preferred six digit Unit ID using keys ‘0’ to ‘9’ (valid unit IDs are000001 to 999999). Each time a button is pressed, the LED will flash yellow.RF LCD: Confirmation of the numbers entered will appear on the bottomof the LCD screen.4. After entering the new unit ID number, pressturn yellow.button. The LED will5. Pressbutton. The LED will turn green to indicate Unit ID has beenset successfully.Reverting to Factory Default Unit IDUnit ID as displayed on the reverse side of the device.Did you know unit IDs may alsobe modified via ResponseCardProgrammer? Please contactyour sales representativefor more details or visitTurningTechnologies.com.1. Pressbutton. The LED will flash red and green.2. Pressbutton. The LED will flash red and green at a slower rate.3. Presssix times to revert back to Factory Default Unit ID. Each time a buttonis pressed, the LED will flash yellow.RF LCD: Confirmation of the numbers entered will appear on the bottomof the LCD.4. After entering the default ID code, pressbutton. The LED will turn yellow.5. Pressbutton. The LED will turn green to indicate unit ID has been setsuccessfully.responsecard rf and responsecard rf lcd unit id programmingSet and identify ResponseCardDevice IDs. IdentifyResponseCards in a logicalnumeric order - record themin Participant Lists for morecustomized data management.1. Press
ResponseCard RF and ResponseCard RF LCDChannel Setting (Optional)Changing the Channel1. Press and release theLED Color Descriptionbutton.Red - Response was not receivedresponsecard rf and responsecard rf lcd channel setting2. While the light is flashing red andgreen, enter 2 digit code.(i.e. channel 1 01, channel 21 21).Green - Response was received3. After the second digit is entered,press and release thebutton.Yellow (Single Flash) - Polling not openYellow (Multiple Flash) - SendingResponseCards are set to Channel #41 by default.
PresenterCardQuick Start GuideButton ActionStart/Stop Button: Open and close polling.Changing PresenterCard Channel1.Press thebutton.2.Press theorbutton to increase ordecrease channel numbers.Back Button: Go backward through a presentation slide deck.3.Once the desired channel is shown on the display,press thebutton to set the channel.Forward Button: Advance through a presentation slide deck
Open TurningPoint and select a participant list and content, if applicable. 3. Click PowerPoint Polling. The TurningPoint window closes and PowerPoint opens. If a question list was selected, TurningPoint will automatically parse the content into slides. If there are a large number of questions in the question list, this may take a few moments. 4.