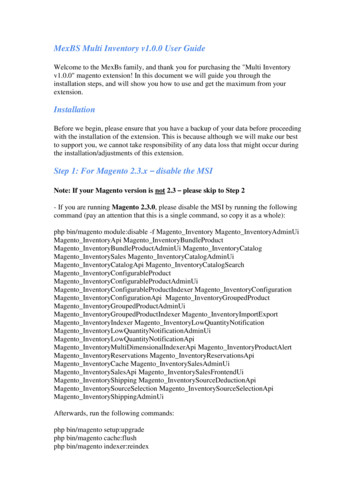
Transcription
Authorize.Net Magento 2.x PaymentModuleUser GuideVersion 1.1.0July 24, 2019Jul 24 2019Authorize.Net Global Payment Management for Magento 2.x1
ContentsRecent Changes . Error! Bookmark not defined.1. Introduction .52. Authorize.Net Installation .53. Authorize.Net Configuration .63.1. Configuration Wizard .63.1.1. Merchant Keys .63.1.2. Store Base Currency .73.1.3. Accept.js Public Client Key .73.1.4. Credit Card Payments .73.1.5. Visa Checkout .73.1.6. Webhooks Signature Key .73.1.7. PayPal Express .83.1.8. eCheck .83.2. Manual Configuration .83.2.1. General .83.2.2. Visa Checkout .93.2.3. PayPal Express . 113.2.4. Credit Card . 123.2.5. eCheck . 133.2.6. Centinel 3D Secure by Cardinal . 133.2.7. Webhooks . 143.2.8. Save Configuration . 164. Advanced Fraud Detection Suite . 165. Activating Centinel 3D Secure by Cardinal . 186. Webhooks . 197. Order Management . 207.1. Overview. 20Jul 24 2019Authorize.Net Global Payment Management for Magento 2.x2
7.2. Capture Payment . 227.3. Void Authorization . 247.4. Refunds . 247.5. Partial Refunds and Captures . 257.5.1 Refunds offline (Credit Memo). 257.5.2 Capture offline (Capture Offline) . 26Jul 24 2019Authorize.Net Global Payment Management for Magento 2.x3
Document Version HistoryVersion1.1.0ReleaseJul 24, 20191.0.1Sep 17, 20181.0.0Jun 27, 2018Jul 24 2019ChangesUpdate for new version of extension.Removed obsolete steps from 2. Authorize.NetInstallation StepsUpdated 2. Authorize.Net Installation stepsAdded Minor details to 3.1.1 Merchant Keys, 3.1.6Webhooks Signature Key, and 7 Order Managementfields tableInitial ReleaseAuthorize.Net Global Payment Management for Magento 2.x4
1. IntroductionThe purpose of this manual is to guide a user through the installation and configurationsettings and the general use of the Authorize.Net Payment Module Extension for the Magento2.x ecommerce platform.Following are the features offered by this extension: Visa CheckoutPayPal ExpressCredit CardeCheckCentinel 3D Secure by CardinalFraud Detection2. Authorize.Net InstallationAuthorize.Net Magento modules installation requires composer.Important! Before you begin installation, create a backup of your current installationfiles and database.Before you can install the extension, you must add it to your cart and check out viathe Magento Extension Marketplace. Though the extension is free, this is required toproperly link it to your Magento account.Install the module in your Magento root directory:composer require authorizenet/magento-module-authorizenetAfter the Composer installation process is finished, upgrade your database structure:bin/magento setup:upgradeJul 24 2019Authorize.Net Global Payment Management for Magento 2.x5
3. Authorize.Net ConfigurationBefore configuring the payment module, log into your account and navigate to thePayment Methods section, by following these steps:1. Log into your Magento Admin Panel.2. Navigate to Stores Configuration.3. Identify the Sales section in left navigation.4. Identify the Payment Methods in Sales and select Authorize.Net.3.1. Configuration WizardInstead of manually setting up the Authorize.Net extension, you can run the Authorize.NetConfiguration Wizard, which will take you through a step-by-step configuration.Authorize.Net Configuration Wizard3.1.1. Merchant KeysThe wizard requires your Authorize.Net merchant account Login ID and Transaction Key. This willJul 24 2019Authorize.Net Global Payment Management for Magento 2.x6
sync necessary data from the merchant account that allows most setup configuration details to beautomatically set. The wizard will ask you to confirm this configuration.You can register for a free Authorize.Net sandbox account to use for testing during development ofthe website before going to the production stage. To open a sandbox account, follow this link -https://developer.authorize.net/hello world/sandbox/3.1.2. Store Base CurrencyThis step will check if your Magento Base Currency matches the currency of your Authorize.Netaccount.3.1.3. Accept.js Public Client KeyThis step configures an Accept.js client key automatically, using an API, and allows you to verify thekey. If you have not done this previously, you may be required to log into your Authorize.Netaccount and configure this key.3.1.4. Credit Card PaymentsIn this step, you can enable credit card payments for your store and select accepted credit cardtypes.3.1.5. Visa CheckoutVisa Checkout is a quick and secure PCI DSS-compliant payment method. In this step, you canenable it and input your Visa Checkout API Key. You can setup Visa Checkout API Key within yourAuthorize.Net account merchant interface.3.1.6. Webhooks Signature KeyThe Signature Key verifies the integrity of webhook messages. Webhooks are “push notifications”.Any action or change performed on your Authorize.Net account will synchronize to your store. Itallows you to keep your orders up to date with Authorize.Net transactions.Your signature key can be obtained from the Authorize.Net merchant interface. If you havepreviously entered a signature key, you can enter that value here. If you lost your existing signaturekey or you have never established one, you can generate a new key by following the steps below.1. Log in to the Authorize.Net merchant interface and navigateto Account Settings Security Settings General Settings API Credentials & Keys2. Make sure to select the box for “Signature Key”. It is not necessary to check the box todisable the existing key immediately unless your existing key has been compromised.3. Answer your security question and click submit.4. Your new signature key will be displayed on the screen. This value should be entered intothe module configuration and stored securely, as it is not possible to view it again.Jul 24 2019Authorize.Net Global Payment Management for Magento 2.x7
Note: If you are already using your signature key in another application, it is important to updatethat existing application with your newly generated key.3.1.7. PayPal ExpressEnable or disable PayPal Express checkout with Authorize.Net.3.1.8. eCheckEnable or disable acceptance of eCheck ACH payments in your store.3.2. Manual Configuration3.2.1. GeneralStores Configurations Sales Payment Methods Authorize.Net GeneralGeneral section allows you to configure general parameters related to your Authorize.Netaccount. For example, login ID and transaction key. In addition, you can enable debug loggingand sandbox mode.GeneralConfigurationInput FieldDescriptionDebugSelect Yes from the drop-down menu to enable Authorize.Net APIrequest logging. Log file is stored in%MAGENTO ROOT%/var/log/anet.log.Sandbox ModeSelect Yes from the drop-down menu to indicate that you are using anAuthorize.Net developer sandbox account.Login IDEnter your Login ID from your Authorize.Net merchant account.Jul 24 2019Authorize.Net Global Payment Management for Magento 2.x8
GeneralConfigurationInput FieldTransactionKeyDescriptionYour transaction key is obtained from within the Authorize.Net interface. Ifyou have previously generated a transaction key, you can enter that valuehere. If you have lost your existing transaction key or you have neverestablished one, you can generate a new key by following the steps below.1. Log in to the Authorize.Net merchant interface and navigateto Account Settings Security Settings General Settings APICredentials & Keys2. Make sure to select the box for “Transaction Key”. It is not necessaryto check the box to disable the existing key immediately unless yourexisting key has been compromised.3. Answer your security question and click submit.4. Your new transaction key will display on the screen. This valueshould be entered into the module configuration and storedsecurely as it is not possible to view it again.Note: If you are already using your transaction key in another application, itis important to update that existing application with your newly generatedkey.Client KeyEnter your Accept.js client key here.To generate the Client Key:1. Log in to the Authorize.Net merchant interface and navigate toAccount Settings Security Settings General Security Settings Manage Public Client Key.Signature KeyEnter your signature key here. You can obtain signature key perinstructions given in Configuration Wizard Signature Key section.3.2.2. Visa CheckoutStores Configurations Sales Payment Methods Authorize.Net Visa Checkout.Visa Checkout section allows you to configure parameters related to accepting Visa Checkoutpayments through your Authorize.Net account. For example, enable, title, action, and API key.Jul 24 2019Authorize.Net Global Payment Management for Magento 2.x9
Visa CheckoutConfiguration Input FieldDescriptionEnabledChoose Yes from the drop-down menu to enable VisaCheckout for this account.TitleEnter the title that will display when you show VisaCheckout as a payment option.Visa Checkout API KeyEnter your Visa Checkout API key.To obtain your API Key:1. Log in to the Merchant Interface and navigate toAccount Digital Payment Solutions.2. In the Visa Checkout section, click Sign Up.3. The next page contains personal and businessinformation. Click the Edit button to edit thisinformation.4. In the “Additional Business Information”, enterinformation directly in the text fields.5. Check the box to confirm that you have read andaccept the Additional Services Addendum.6. Click I Agree.7. You will receive a Visa Checkout API key, whichyou can use when placing the Visa Checkoutbutton on your website.Payment ActionClick the drop-down menu to choose the order in whichyou would like to authorize or authorize and captureyour payments.See Authore.Net Payment Transaction for a detailedexplanation about the transaction types.Payment From ApplicableCountriesClick the drop-down menu to select countries for whichyou will make this payment type available.Enable Visa Checkout buttonon Product PageSelect Yes from the drop-down menu to enable a VisaCheckout button on the product page.Enable Visa Checkout buttonin CartSelect Yes from the drop-down menu to enable a VisaCheckout button on the shopping cart.Jul 24 2019Authorize.Net Global Payment Management for Magento 2.x10
Visa CheckoutConfiguration Input FieldDescriptionRemove Requirement forPhone Numbers on VisaCheckout OrdersSelect Yes from the drop-down menu to remove thephone number requirement from Visa Checkout orders.Sort OrderEnter a number to indicate the order in which you wouldlike Visa Checkout to appear.3.2.3. PayPal ExpressStores Configurations Sales Payment Methods Authorize.Net PayPal Express.PayPal Express enables you to configure parameters related to accepting Paypal payments throughyour Authorize.Net account. For example, enable, title, action, and API key.PayPal ExpressDescriptionConfiguration InputFieldEnabledSelect Yes from the drop-down menu to enableTitleEnter the title to display when presenting PayPalPayment ActionChoose the order you would like for authorize orPayPal Express.Express as an option.authorize and capture your payments. SeeTransaction Types for detailed explanation about thedifference.Payment FromSelect from the drop-down menu the countries fromSort OrderEnter a number to indicate the order in which youApplicable CountriesJul 24 2019which you will accept payment using PayPal Express.would like PayPal Express to appear.Authorize.Net Global Payment Management for Magento 2.x11
3.2.4. Credit CardStores Configurations Sales Payment Methods Authorize.Net Credit Card.The Credit Card section allows configuring parameters related to accepting Credit Card paymentsthrough your Authorize.Net account. For example, enable, title, action, API key, vault, and CVV.Credit CardConfigurationInput FieldDescriptionEnabledSelect Yes from the drop-down menu to enable credit cardprocessing.TitleEnter the title to display when presenting credit card as anoption.Payment ActionChoose the order you would like for authorize or authorizeand capture your payments. See Transaction Types fordetailed explanation about the difference.Payment FromApplicableCountriesSelect from the drop-down menu the countries from whichyou will accept payment using credit card.Credit Cards TypesChoose the card brands you support from the menu.Enable VaultSelect Yes from the drop-down menu to enable thispayment method for Vault, which enables your customersto securely store their payment information for later use.Require CVV forVault on FrontendSelect Yes from the drop-down menu to enable CVV forVault on the front end.Require CVV forVault on BackendSelect Yes from the drop-down menu to enable CVV forVault on the back end.Enable 3D SecureCard ValidationSelect Yes to enable strong customer validation throughCardinal Commerce.Sort OrderEnter a number to indicate the order in which you wouldlike credit card to appear in the payment methods list.Jul 24 2019Authorize.Net Global Payment Management for Magento 2.x12
3.2.5. eCheckStores Configurations Sales Payment Methods Authorize.Net eCheckThe eCheck section allows you to configure parameters related to accepting ACH/eCheckpayments through your Authorize.Net account. For example, enable, title, action, and vault.eCheckConfiguration InputFieldDescriptionEnabledSelect Yes from the drop-down menu to enable eCheck forthis account.TitleEnter the title that will display when eCheck is presented asan option.Payment FromApplicable CountriesSelect from the menu the countries from which you willaccept eCheck payments.Order AgreementEnter a customized message that will be displayed to yourcustomers who place eCheck orders.Enable VaultSelect Yes from the drop-down menu to enable this paymentmethod for Vault, which enables your customers to securelystore their payment information for later use.Sort OrderEnter a number to indicate the order in which you would likeeCheck to appear in the payment methods list.3.2.6. Centinel 3D Secure by CardinalStores Configurations Sales Payment Methods Authorize.Net Centinel 3D Secure byCardinalThe Authorize.Net extension includes the ability to enable Centinel 3D Secure by Cardinal. Inorder to make use of this feature, you must have an established account with CardinalCommerce in addition to your Authorize.Net account.Jul 24 2019Authorize.Net Global Payment Management for Magento 2.x13
Centinel 3D Secure by CardinalConfiguration Input FieldDescriptionTest ModeChoose No for production environment.API IDObtain from Cardinal Commerce.Org Unit IDObtain from Cardinal Commerce.API KeyObtain from Cardinal Commerce.You can obtain the test credentials from this URL.3.2.7. WebhooksWebhooks are “push notifications”, any action or change performed with the order inMerchant Portal will be synced with your store. It allows you to keep your orders up to datewith Authorize.Net transactions.Webhooks Configuration1. Webhooks Status - lists registered Webhooks.2. Webhooks Payloads - lists pending and processed Webhooks with their payloads.To setup Webhooks for your store:1. Obtain Signature Key as described in Webhooks Signature Key section.2. Click Webhooks Status button, then Register Webhooks:Register/Delete WebhooksJul 24 2019Authorize.Net Global Payment Management for Magento 2.x14
A success message with the list of registered Webhooks will be shown:Registered WebhooksTo delete your store’s Webhooks:1.2.Click Webhooks Status button.Select and Delete Webhooks.Success message with the list of unregistered Webhooks will be shown:Deleted WebhooksConfigure webhooks notification email at Stores System Configuration General Store EmailWebhooks Notification EmailJul 24 2019Authorize.Net Global Payment Management for Magento 2.x15
Addresses Authorize.Net Notification Email.The webhooks notification email notifies the administrator of unresolved webhook events. SeeWebhooks Notification Email for details.3.2.8. Save ConfigurationClick Save Config to save your changes.Save Config Button4. Advanced Fraud Detection SuiteAuthorize.Net provides you with an ability to detect suspicious transactions in automatic modeand manage flagged transactions via the extension.The first step is to define fraud filters and actions in Authorize.Net merchant interface. Defaultsettings include the most common fraud rules. For more information about the Advanced FraudDetection Suite, log into the merchant interface, navigate to Advanced Fraud Detection Suite,and click the Help link.Jul 24 2019Authorize.Net Global Payment Management for Magento 2.x16
Fraud Detection Suite SettingsWhen a suspicious transaction is detected, one of the following actions is applied depending onthe configuration:1. Accept2. Authorize and Hold3. Do not Authorize and Hold4. DeclineWhen either Authorize and Hold or Do not Authorize and Hold is triggered, only the followingactions are allowed on Order View page. The status of order is “Suspected Fraud”:Available Actions for Suspicious OrdersJul 24 2019Authorize.Net Global Payment Management for Magento 2.x17
If you accept the payment, then the transaction is released from hold and authorized (if not yetauthorized). Denying payment will immediately close the order and notify Authorize.Netgateway that you declined the transaction. Transactions held with the status “Do not Authorizeand Hold” are not checked against the processing network until you approve the transaction, soit is possible that they can still decline when you choose to Accept the Payment.5. Activating Centinel 3D Secure by CardinalAuthorize.Net supports Cardholder Authentication (CA) for Visa and MasterCard.Follow the next steps to enable 3D Secure in your store:1. Enable CA in the Authorize.Net Merchant Portal.2. Configure Centinel 3D Secure as described here.3. Enable 3D Secure Card Validation as described here.3D Secure Verification Popup WindowA cardholder who is enrolled into 3D Secure may be prompted for additionalverification prior to order placement.After verification, the order will proceed as usual.For more information on Centinel 3D Secure by Cardinal, you can visithttps://www.cardinalcommerce.com/Jul 24 2019Authorize.Net Global Payment Management for Magento 2.x18
6. WebhooksWebhooks are “push notifications”: any action or change performed with the order inMerchant Portal will be synced with your store. It allows you to keep your orders up to datewith Authorize.Net transactions. See Webhooks section for configuration details.Webhooks module provides detailed log of all registered payloads fortroubleshooting/debug purposes.Webhooks Payload Processing LogNOTES:Magento system cron must be configured for proper Webhooks queue processing. Pleaserefer to Magento documentation in order to get cron setup instructions.Webhook status is changed from “pending” to “processed” or “failed” after processing.Failed status does not always mean that something is wrong.If your Authorize.Net account has multiple magento/other ecommerce software instancesconnected to it, your current setup will receive webhook events for all of them. The modulewill try to find transactions matching only the current instance. All other webhook payloadswill have “failed” status.Jul 24 2019Authorize.Net Global Payment Management for Magento 2.x19
7. Order Management7.1. OverviewOrders placed with any of Authorize.Net’s payment methods have an additional informationblock, containing gateway transaction details. These details vary from method to method. Belowis the example of transaction details submitted with credit card enrolled to 3D Secure:Gateway Transaction DetailsThe below table defines each fields:PaymentInformation FieldDescriptionTransaction IDThe ID of the Authorize.Net transaction.Credit Card TypeThe type of credit card.Jul 24 2019Authorize.Net Global Payment Management for Magento 2.x20
PaymentInformation FieldDescriptionCredit Card NumberMasked PAN of credit card.AVS Response CodeA code and description that indicate the Address Verification Service(AVS) results returned by the processor for a transaction.Some AVS Response Codes are:N Does NOT MatchP Is NOT ProcessedS Should be on card, but is not indicatedU Issuer is not certified or has not provided encryption keyAuth Response CodeA code assigned to the transaction by the card issuing bank indicatingits authorization status.cvvResultCodeThe result code of Address Verification System for transaction.cavvResultCodeCardholder authentication verification response code. One of thefollowing:Blank or not present -- CAVV not validated.0 -- CAVV was not validated because erroneous data was submitted.1 -- CAVV failed validation.2 -- CAVV passed validation.3 -- CAVV validation could not be performed; issuer attemptincomplete.4 -- CAVV validation could not be performed; issuer system error.5 -- Reserved for future use.6 -- Reserved for future use.7 -- CAVV failed validation, but the issuer is available. Valid for U.S.issued card submitted to non-U.S acquirer.8 -- CAVV passed validation and the issuer is available. Valid for U.S.issued card submitted to non-U.S. acquirer.9 -- CAVV failed validation and the issuer is unavailable. Valid for U.S.issued card submitted to non-U.S acquirer.A -- CAVV passed validation but the issuer unavailable. Valid for U.S.issued card submitted to non-U.S acquirer.B -- CAVV passed validation, information only, no liability shiftEnrolledIndicates whether 3DS was used for this transaction.CAVVCardholder Authentication Verification ValueECIFlagElectronic Commerce Indicator (ECI). The ECI value is part of the 2 dataelements that indicate the transaction was processed electronically.PAResStatusJul 24 2019Payer Auth response status code.Y: the password is correct.N: the password is incorrect.U: it is not possible to validate the password. For example, failure of anACS system component such as the cardholder database.A: Proof of authentication attempt was generated.Authorize.Net Global Payment Management for Magento 2.x21
PaymentInformation FieldDescriptionSignatureVerificationVerified by Visa and MasterCard SecureCode.XID3-D Secure transaction ID.FSDFilterActionAction of triggered AFDS filter.FDSFiltersList of triggered AFDS filters with actions.Order View page shows available actions for current order. These actions depend on status andtransaction type. Below is an example of Authorize Only order actions:Available Order Actions7.2. Capture PaymentAuthorize-only orders are only paid when capture the authorized amount is completed. To doso, identify the invoice action at the top of Order View page and click on it. It is important tochoose Capture Online to actually capture authorized amount:New Invoice PageThe extension supports capture once. The extension will get all items to create invoice.Jul 24 2019Authorize.Net Global Payment Management for Magento 2.x22
Order TotalsThe extension also supports partial payment captures. You can adjust item quantities and createpartial invoices. Once you have created partial invoice, pay attention to order totals. You will seeTotal Due field indicating the amount not captured yet:Partially Captured Order TotalsJul 24 2019Authorize.Net Global Payment Management for Magento 2.x23
7.3. Void AuthorizationAuthorize-only orders have Void and Cancel, along with other available actions at the top of OrderView page.Void will void authorization, but you will still be able to invoice the order offline and ship. The orderwill not display the void function when the order has been settled.Cancel will close the order after voiding such that you will not be able to do anything with it later.7.4. RefundsTo create a refund, go to invoices:Order Invoices ListSelect the appropriate invoice and then click Credit Memo at the top of Invoice View page. Theextension supports partial refunds, you can adjust amount by Adjustment Fee and AdjustmentRefund fields. See Magento documentation for further details.Jul 24 2019Authorize.Net Global Payment Management for Magento 2.x24
New Credit MemoClick Refund after all adjustments. A credit Memo will be created, and the amount will be refunded.NOTE: Clicking Credit Memo at the top of Order View page will create an offline refund.NOTE: Refunds are possible only for already settled transactions, Authorize.Net settles transactionsonce every 24 hours. All attempts to refund unsettled transaction will lead to a gateway error.7.5. Partial Refunds and CapturesIf Webhooks have been configured, transactions modified directly within Authorize.Net (not fromwithin Magento) will be detected by this extension. However, external partial captures andrefunds will not automatically update a transaction status within Magento because there is noway to determine which items were captured or refunded to create an invoice or credit memo inMagento.In such cases, you need to create a partial refund and capture using offline mode magento.7.5.1 Refunds offline (Credit Memo)Credit Memo (refunds)Jul 24 2019Authorize.Net Global Payment Management for Magento 2.x25
7.5.2 Capture offline (Capture Offline)Creating invoiceThe module sends notification emails to the address configured in General section when they aresuccessfully created.Jul 24 2019Authorize.Net Global Payment Management for Magento 2.x26
Removed obsolete steps from 2. Authorize.Net Installation Steps 1.0.1 Sep 17, 2018 Updated 2. Authorize.Net Installation steps Added Minor details to 3.1.1 Merchant Keys, 3.1.6 Webhooks Signature Key, and 7 Order Management fields table 1.0.0 Jun 27, 2018 Initial Release


