Transcription
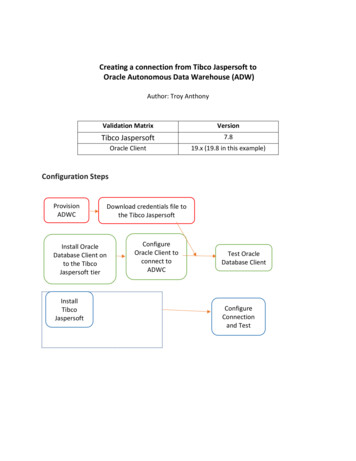
Creating a connection from Tibco Jaspersoft toOracle Autonomous Data Warehouse (ADW)Author: Troy AnthonyValidation MatrixVersionTibco Jaspersoft7.8Oracle Client19.x (19.8 in this example)Configuration StepsProvisionADWCADownload credentials file tothe Tibco JaspersoftInstall OracleDatabase Client onto the TibcoJaspersoft tierInstallTibcoJaspersoftConfigureOracle Client toconnect toADWCTest OracleDatabase ClientConfigureConnectionand Test
Step 1: Provision ADWC plus Install and Configure Oracle Client1. Provision Autonomous Data Warehouse Cloud (ADWC) and download the correspondingcredentials.zip file to the system that will have the Tibco Jaspersoft installation. For theOracle documentation to provision ADWC click here. Also check Downloading ClientCredentials (Wallets)1.2. All connections to Autonomous Data Warehouse Cloud use certificate-based authenticationand Secure Sockets Layer (SSL). Uncompress credentials.zip file into a secure folder.3. Download the Oracle Database Client2 to the system where Tibco Jaspersoft is installed.Validate that the Oracle Database Client can communicate with ADWC, and since it isinstalled on the same system as Tibco Jaspersoft, it ensures that Tibco Jaspersoft is alsoconfigured correctly.4. Edit the sqlnet.ora file, replacing “?/network/admin” with the name of the foldercontaining the client credentials.For example, on Linux:WALLET LOCATION (SOURCE (METHOD file) (METHOD DATA (DIRECTORY "/home/adwc credentials")))SSL SERVER DN MATCH yesFor example, on Windows:WALLET LOCATION (SOURCE (METHOD file) (METHOD DATA (DIRECTORY "C:\Work files\Workdata\wallets")))SSL SERVER DN MATCH yes5. Create the TNS ADMIN environment variable and set it to the location of the secure foldercontaining the credentials file you saved in Step 3. The tnsnames.ora file provided withthe credentials zip file contains three database service names identifiable as high, mediumand low. The predefined service names provide different levels of performance andconcurrency for Autonomous Data Warehouse Cloud. Use one of these service names inyour ConnectString.6. Test the Oracle Client with Oracle SQL*Plussqlplus nstant-client/overview/index.html
sqlplus /nologsql set define offsql connect username/password@connectStringIf the connection is successful you are ready to move to the next step.Step 2. Install a JDK and the JDBC DriversThe JDBC drivers are certified with a JDK version. ojdbc8.jar is certified with JDK8, JDK9, JDK11 ojdbc10.jar is certified with JDK10, JDK11Install the appropriate JDKThe JDBC client driver can be downloaded from www.oracle.com. The 19.8 drivers can be foundat JDBC Driver and UCP Downloads3. Download either ojdbc8-full.tar.gz or ojdbc10full.jar.gzStep 3. Install Tibco JaspersoftIf there is a pre-existing Tibco Jaspersoft installed jump to Step 4 which describes the steps toconfigure ADWC as a target.To install Tibco Jaspersoft software please refer to the Install Documentation4.Step 3: Configuring Tibco Jaspersoft to connect with ADWC 34Tibco Jaspersoft recommends using the native Oracle Driver "Oracle Net Client" this iswhat's listed in the Tibco Jaspersoft manual and uses TNS based connection to connect toADWC securely using TCPS connection protocol. Since we have tested the validity ofconnection to ADWC using SQL*Plus, we can use the same connect string to connect toADWC.Force Tibco Jaspersoft to ignore the embedded (shipped) JDK and use the JDK installed inStep 2, aboveEdit the file “Jaspsersoft Studio Professional.ini” and remove the lineidentifying the VM. This will be similar to:-vmfeatures/jre.win32.win32.x86 64.feature https://www.jaspersoft.com/getting-started
In the Repository Explorer,1. right-click to “Create Data Adapter”2. Choose a Database JDBC Connection3. Enter the following details in to the create pane:
Name: Oracle ADW (choose a name)JDBC Driver: oracle.jdbc.driver.OracleDriverJDBC URL:jdbc.oracle.thin@:testy medium?TNS ADMIN C:\\Work files\\Work data\wallets\TESTYUsername: adminPassword: ************The entry for the JDBC Driver is oracle.jdbc.driver.OracleDriverUpdate components of the JDBC URL entry with values corresponding to your system. Inthe example:testy medium is a TNS alias (present in your tnsnames.ora file – see STEP 1, above)corresponding to DBName service where service is high, medium, or low.TNS ADMIN is the directory in STEP 1, above, into which the wallet file was expanded.Username is adminPassword was set when you created your Autonomous Database.For example:
4. Select the “Driver Classpath” taband “Add” the following jar files from the directory you unzipped the client driverinto in STEP 2, above.
Classpath must include:ojdbc8.jar (or ojdbc10.jar)oraclepki.jarosdt cert.jarosdt core.jarand can optionally rsimplefan.jarucp.jarNote that the names shown here, omit version numbers that may exist in laterdownloads.There is no harm in configuring all jars, this covers all potential needs.5. Complete classpath:
“Test” the connection:A message will indicate successful configuration:
Select “Finish” to save the adapter.
Force Tibco Jaspersoft to ignore the embedded (shipped) JDK and use the JDK installed in Step 2, above Edit the file "Jaspsersoft Studio Professional.ini" and remove the line identifying the VM. This will be similar to: -vm re