Transcription
WebNowUser GuideOffice of Graduate StudiesUniversity of GuelphProduct Version 6.5Prepared by: David HandsorLast Revised: 10/11/13Page 1 of 14
Table of ContentsOverview p.2Workflow p.2NavigateWebNow p.3Search p.4Filters p.5PrivateFilters p.5View Related Documents and Eforms p.7Email Link toApplication p.8Workflow p.8Recommendation and FundingForms p.10Exporting List ofFiles p.12Sign EnglishWaiver p.13Sign as FinancialSponsor p.13Print fromWebNow p.14Page 2 of 14
OverviewThis guide provides you with a description of the actions you can perform in WebNowusing your specific configuration.OGS Image Now WorkflowWebNowWebNow is a browser-based solution for use with ImageNow document imaging,management, and workflow software. WebNow works with ImageNow to instantlydeliver documents to your browser.Page 3 of 14
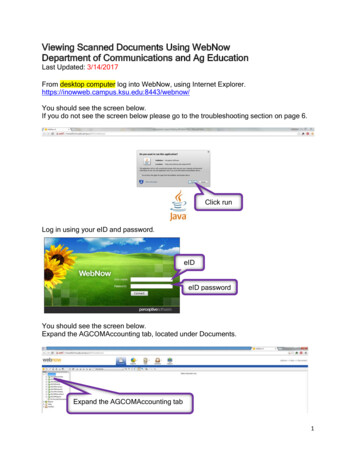
To log on WebNow ClientTo log on the WebNow Client from your desktop, perform these steps.1. Open an Internet browser. Type in https:\\ecm.ccs.uoguelph.ca\webnow andthen press ENTER.2. As your WebNow page opens, the Connect to WebNow dialog box displays.3. In the User name box, enter your user name.4. In the Password box, enter your password.5. Click Connect to initiate the connection to the WebNow Server. If you have properaccess privileges, you are taken to the documents grid. If you only have workflowprivileges, then the workflow grid displays.Navigate WebNowTo navigate WebNow, you access the WebNow toolbar, WebNow Explorer, andWebNow Viewer. From the WebNow toolbar, you can view, process, and search fordocuments. You use the WebNow Explorer to navigate documents and workflow itemsand the WebNow Viewer to view them.WebNow toolbarThe following figure shows the WebNow toolbar. The options available on the WebNowtoolbar are based on the security privileges assigned to you. Refer to the “Reference”section of this document for toolbar descriptions.WebNow ExplorerWebNow Explorer lets you navigate through all of the grids, such as Documents,Projects, and Workflow, from the same window. Using the Views pane, you can switchbetween all of the different areas of WebNow quickly and easily. You can also opendocuments and workflow items from this window into WebNow Viewer.WebNow ViewerFrom WebNow Viewer you can view all of your batches, documents, and workflowitems. You can customize the WebNow Viewer to meet your processing needs. Theviewer includes the following panes and may contain others, such as version control orforms, depending on the components installed on your ImageNow system.The Properties pane displays the document keys, custom properties, and notes for thecurrent document.Page 4 of 14
The Related documents pane displays documents that share same document keys orother properties with the current document.The Actions pane lets you perform tasks such as e-mailing, faxing, and printing thecurrent document.The Thumbnails pane displays a miniature view of each page of the current document.You can double-click a thumbnail to display its contents in WebNow Viewer.SearchTo perform a quick searchA quick search applies a single condition to the documents in the current view andreturns the documents that satisfy that condition. You define the condition in the QuickSearch tab, which includes the property list, operator list, and value box, and the Gobutton, shown below.1. In WebNow Explorer, in the Views pane, display a view of the documents you wantto search.2. On the Quick Search tab, define the search condition: In the property list, select the document key, such as Drawer, Folder, or Customproperty. This is the property of field in each document that is the basis of thecomparison. In the operator list, select an operator, such as “is equal to” or “is greater than,”that is used in the comparison. In the value box, select or type a value to be compared to the document’sproperty or field, using selected operator. Click the Gobutton.3. In the search grid, double-click the document you have found to open it in WebNowViewer.To search with multiple conditionsWhen you want to search on more than one condition, you can perform an advancedsearch.1. On the Search tab, click the Addbutton.2. In the Add Condition dialog box, in the Constrain By list, click the kind ofconstraint to show the lists you need in the Type, Field, and Operator boxes.3. In the Type list, click Normal, Variable, LearnMode, or Prompted.4. In the Field list, click the document field that is the basis of the comparisonPage 5 of 14
Note If you search on the Notes field, WebNow can search on only the first 50characters of the field.5. In the Operator list, select an operator, such as “is equal to” or “is greater than” thatis used in the comparison.6. In the Value box, enter or select the target value to be compared to the documentfield, using the selected operator.Note If you selected Prompted as the type, the Message box replaces the Valuebox.7. Click OK.8. Repeat the previous steps in this procedure for any additional condition rows.Note Each new row beings with AND by default. To change AND to OR, click AND.9. Click the Gobutton.FiltersA filter lets you save a predefined subset of documents or projects from its parentview and simplify the number of rows returned in a view. As soon as you click a filter,ImageNow applies the filter to the view and displays the results in the grid.Private FiltersPrivate filters allow you to save a search you run a view in ImageNow Explorer. Ifyou have the Filter privilege for the selected view, you can create as many privatefilters as you need. No other users can see your filters unless they have beengranted the Manage privilege for the same view. Private filters are created in theCurrent View toolbar in ImageNow Explorer.To Create a Filter1. Click on the filter icon to save your search.Page 6 of 14
2. Name the filter and give it a description3. Click OK.4. You must now log out of WebNow to save the filter. Click disconnect.5. Log back in to WebNow. The new filter will appear under the workflow ordocument grouping in which it was created.To Delete or Modify a Filter1. Click on the Edit Filters icon.2. Choose the filter(s) that that you wish to delete and click Delete.3. Click close.4. You must now log out of WebNow to save the deletion of the filter. Clickdisconnect.5. Log back in to WebNow. The filter should now be removed.View Related Documents and E-formsThe following steps describe how to view 'related documents' and e-forms associatedwith an application.View Related Documents1. Click on an application to display the OUAC Application Summary in the 'WebNowViewer'.2. On the 'WebNow Viewer' toolbar, select the 'View' tab, then select 'RelatedDocuments'.3. Once selected, A new window appears at the bottom of the 'WebNow Viewer'window.4. Next to the header 'Relationships' click on the drop down menu and select 'GARelated Student Documents'. A list of all documents related to that application isdisplayed. Click on a document to view it.Page 7 of 14
View E-forms (Recommendation Form and Funding Form)1. Click on an application to display the OUAC Application Summary in the 'WebNowViewer'.2. On the 'WebNow Viewer' toolbar, select the 'View' tab, then select 'Forms'.3. A new window appears displaying the e-forms.4. Click on the 'Select a form' drop down menu to select which form to view.Email Link to ApplicationAt any point in the process an email link may be sent to another user. This email linkprovides a direct login link to any specific application in WebNow.1. Click on any document in the documents or workflow folder. Drag and drop onyour desktop.2. Right click your mouse and click on properties.3. Highlight the URL field and copy.4. Open your email client. Create a new email and paste the url link.5. Send with any additional notes.WorkflowSimilar to an inbox, a queue holds documents so that one or more individuals canaccess them. From a queue, a user can process the document, enter data into abusiness application, and route it forward to the next queue in the departmentalprocess. To view the list of queues available in your department, refer to "GraduateStudies workflow queues" in this section.Page 8 of 14
The workflow tab allows users to view applications as they exist in workflow; edit andsign off on e-forms; and route applications to the next workflow queue.To access workflowSelect the workflow tab located on the WebNow toolbar.To edit and sign off on e-forms1. Click on an application to display the OUAC Application Summary in the 'WebNowViewer'.2. On the 'WebNow Viewer' toolbar, select 'View', then select 'Forms'. A new window willappear displaying the e-forms.3. Next to the header 'Select a Form' click on the drop down menu to select a form.4. To edit the form, click on a section and begin typing.5. To save edits made to the e-form, click the 'save' button located in the top left cornerof the 'WebNow Viewer'.Tip: Please remember to save the e-form prior to exiting the form.6. In the 'Recommendation Form' there are two sections which allow users to insert andsave comments to the form. To add a comment, type a comment into the text box, thenclick 'Add Comment'. User ID, date and comment is displayed.Note: Comments are perminant and cannot be remove once inserted.7. In the 'Funding Form' located at the bottom of the form, users can insert 'A Messagefrom the Department/Program'. to do this, click on the title to display the text box. amessage can be either typed or copy/pasted into the text box (Maximum characters8000).8. Once the e-form is complete, click the 'Validate Form' button to ensure all requiredfields are complete. Required fields that remain incomplete will be highlighted in red.9. To insert a signature on the form, click on the appropriate 'click to sign' button. Oncesigned, the ID and timestanp is displayed below the signature header.Tip: Once the graduate coordinator has signed off on the recommendation form, theform is locked from further editing. To edit the document, the graduate coordinator mustclick the 'click to sign' button to remove the signiture.Page 9 of 14
To route an application to the next workflow queueNote: please ensure you have selected the 'Workflow' tab.1. Click on the Workflow toolbar to display routing options2. Click the Route Forward buttonNote: Please allow for approximately 3-5 minutes for document to arrive in the nextqueue.Routing an application back to the graduate secretary queue (Graduate Coordinatorsonly).1. Click on the Workflow toolbar to display routing options2. Click the Route Forward button3. Once 'Route Forward' box is displayed, select 'Manual' then 'GA GraduateSecretary'4. Click 'Route' buttonTo route a document in workflowAfter you link a document, you route it to the next queue in your process.On the Workflow toolbar, select one of the following routing options: To send the document to the next queue in the workflow process flow, click theRoute Forwardbutton.Recommendation and Funding FormsTo enter form dataIn ImageNow Explorer, in the left pane under Workflow, select one of the Coordinatorsor Secretaries subqueues.1. In the workflow grid, double-click the document to open it.2. In the Forms pane after selecting the Rec Form, using the information that appearson the document you are viewing, perform the following substeps (Note StudentName, School/Dept, ID, Program, and Immigration Status will populate based off theIndex Values and Custom Properties):1. In the Referee section, fill in the Referees (from #1-3) as well as thecorresponding Rating. (note that if you wish to indicate that the rating is “upper”or “lower”, enter the appropriate word at the end of the field for the referee name.If a referee has not indicated a rating just leave that field blank).2. In the Transcript Evaluation section, type in the University Name. In accredited,select Yes or No.Page 10 of 14
a. Enter the Degree, Date Conferred, Attended from and to.b. Enter the Average Calculation and Guelph Rating.c. Any comments you may want to add, type in the New Comment box and clickAdd Comment (these comments cannot be deleted after entered).d. If more transcripts need to be added click on the button next toAdd/Remove Transcript and if one needs to be removed, click on the - button.3. In the Admission Recommendation for Program section, Select Definite,Conditional, Refuse, Defer, or Non-Standard.a. If Definite is selected, click Add Decision.b. If Conditional is selected, select one of the corresponding reasons thatappear upon click and then select Add Decision.c. If Refuse is selected, populate the corresponding appeared box with one ofthe following reasons: university requirements not met, departmentrequirements not met, no faculty available, no funding available, languagerequirements not met, or other reasons. Then click Add Decision.d. If Defer is selected, choose the new starting semester and click Add Decision.e. If Non-Standard is selected, click Add Decision.4. Upon adding a decision if Definite, Conditional, or Non-Standard are selected aCategory and Classification will need to be selecteda. For Category select Regular, Provisional or Special (Letter of PermissionOnly) (Note if Provisional is selected the conditions must be entered in thetext box below).b. For Classification select Full time or Part time.5. In the Recommendation to Waive English section, if the Waive English LanguageRequirement box is selected, choose associated reason and subreason (ifapplicable) and enter text to provide evidence of language capacity. GraduateCoordinator, Graduate Chair, and Associate Dean will need to click to sign.6. In the Non-Standard Admissions section it is optional to select Direct Entry Ph.D.or Alternate Admissions if applicable.7. With all necessary information recorded into the form, select Validate Form. Anycomments can then be added, being recorded by using the Add Commentbutton.8. Upon completion of the form and validation, Click the Graduate Coordinatorsignature (note the signature locks down all fields of the form except thecomments section and the second signature). If two programs are referenced,the form will route to the Collaborative Review queue where the other signaturewill be recorded.3. In the Forms pane after selecting the Funding Form, using the information thatappears on the document you are viewing, perform the following substeps:Page 11 of 14
1. Along the top portion of the form enter the students name in the box next to Dearand tab to the Date field (the date will auto-populate using the current date).Underneath the Date box, selecting the corresponding program for that student(Doctor of Philosophy, Doctor of Veterinary Science, Master’s, GraduateDiploma, or Non Diploma).2. Enter the amount they will receive, whether it will be per year for or total fornumber of semesters of: Full time study or Part time study.3. In Section A. select whether the student will be a GTA, GSA, and/or serve Oneappointment as a Sessional Lecturer. In the corresponding boxes, if selected, listby semester or academic year.4. Select the boxes that apply to the section including the number of assignments (ifapplicable) as either a GTA(s) or GSA(s) including filling in the correspondingbox by semester or academic year.5. In section B. select if they receive other sources of funding by following theoptions next to the checkbox.6. In section C. follow the same logic by selecting the applicable boxes.7. A letter can be generated by clicking on the text A Message from theDepartment/Program generating a Dear Student Name (Student Nameauto-populates from the name field at the top of the form) and a text box wherethe letter should be written.8. Upon completion of the form, sign the form by selecting the Click to Sign boxabove the Graduate Coordinator’s signature (Date) (note the signature locksdown any editing of the form except for the Financial Sponsor’s signature). TheFinancial Sponsor’s signature can be signed at any time during the process ofthe Funding Form.9. To route the document and completed form, click the Route Forwardbutton.Exporting List of FilesWebNow allows users the ability to export a list of files to be displayed in a grid. This filecan then be opened in Microsoft Excel. Follow the steps below to export a list of files togrid.1. In the documents view, highlight the file(s) you wish to export as a list.Tips:To select a consecutive group of files or folders, click the first item, hold down theSHIFT key, and then click the last item.Page 12 of 14
To select nonconsecutive files or folders, hold down CTRL, and then click each item youwant to select2. Right click over highlighted area and select 'Export Grid'3. In the 'Export Grid Data' box, click on the downward arrow next to the header 'Savein', then in the dropdown menu select a destination to save the file4. In the 'File Name' box, type a file name then click the 'save' button5. Locate destination to which file was saved, click on file to openSign English WaiverThe English waiver must be signed by the Graduate Coordinator, Chair and AssociateDean.To Access and sign the English Waiver, follow the steps below.1. View the admissions application for which the academic department is submitting thewaiver.2. On the top toolbar, select the 'View' tab then select 'Forms'.3. Once the forms window opens, click on the drop down menue then select select ' RecForm'.4. Scroll down to the 'Recommendation to Waive English' section to review completedwaiver.5. Click on the appropriate signature button at the bottom of the 'Recommendation toWaive English' section. User ID and date are displayed.6. Click the 'save' button on the 'WebNow File View Toolbar'.7. Log out of WebNow.Page 13 of 14
Sign as Financial SponsorThe 'Financial Sponsor' signature line on the Funding Form is accessible for allgraduate studies WebNow users.To sign off as the 'Financial Sponsor' on the Funding Form, follow the steps below.1. View the admissions application for which you are signing off as the financialsponsor.2. On the top toolbar, select the 'View' tab then select 'Forms'.3. Once the forms window opens, click on the drop down menu then select select 'Funding Form'.4. Review the completed funding form.5. Click on the 'Financial Sponsor' signature line located at the bottom right hand cornerof the Funding Form. User ID and date should be displayed.6. Click the 'save' button on the 'WebNow File View Toolbar'7. Log out of WebNow.Print from WebNowTo print a document from WebNow, follow the steps below.1. Open the document in WebNow viewer.2. Select the print button located on the WebNow viewer toolbar.3. In the print options window, select whether you would like to print the document withor without annotations. Click ok.4. Select a printer or to save as PDF.Page 14 of 14
WebNow is a browser-based solution for use with ImageNow document imaging, management, and workflow software. WebNow works with ImageNow to instantly deliver documents to your browser. Page 4 of 14 . WebNow Explorer lets you navigate through all of the grids, such as Documents, Projects, and Workflow, from the same window. Using the Views .