Transcription
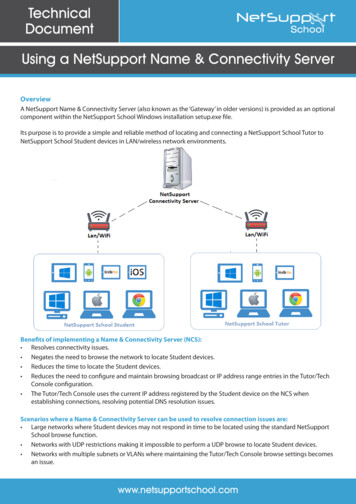
TechnicalDocumentUsing a NetSupport Name & Connectivity ServerOverviewA NetSupport Name & Connectivity Server (also known as the ‘Gateway’ in older versions) is provided as an optionalcomponent within the NetSupport School Windows installation setup.exe file.Its purpose is to provide a simple and reliable method of locating and connecting a NetSupport School Tutor toNetSupport School Student devices in LAN/wireless network environments.Benefits of implementing a Name & Connectivity Server (NCS): Resolves connectivity issues. Negates the need to browse the network to locate Student devices. Reduces the time to locate the Student devices. Reduces the need to configure and maintain browsing broadcast or IP address range entries in the Tutor/TechConsole configuration. The Tutor/Tech Console uses the current IP address registered by the Student device on the NCS whenestablishing connections, resolving potential DNS resolution issues.Scenarios where a Name & Connectivity Server can be used to resolve connection issues are: Large networks where Student devices may not respond in time to be located using the standard NetSupportSchool browse function. Networks with UDP restrictions making it impossible to perform a UDP browse to locate Student devices. Networks with multiple subnets or VLANs where maintaining the Tutor/Tech Console browse settings becomesan issue.www.netsupportschool.com
How it worksOnce implemented, the Student devices on start-up will register the machine name, IP address, MAC address,room name and logged on user name with the Name & Connectivity Server.In turn, the Tutor/Tech Console will request the Student device details from the Name & Connectivity Serverinstead of performing a browse across the network to find the Student devices to connect to.Installing a Name & Connectivity ServerThe Name & Connectivity Server (NCS) is designed to be installed and run on a physical or virtual machine runninga Windows Server operating system. The server must be accessible from all Tutor/Tech Console and Studentdevices on the network.The server the NCS is installed on should have a static IP address to prevent any server connection issues within aDHCP environment.The NCS can be installed as a standalone component (or along with other NetSupport School components). In theCustom Setup screen, select the Name & Connectivity Server option.At the end of the installation, the Name & Connectivity Server configuration window will launch.www.netsupportschool.com
Configuring the Name & Connectivity ServerGeneral tabListen on all IP interfacesBy default, the installed Connectivity Server component uses the local IP address(es) and communicates using port443 - this can be changed if required.Note: On a machine that also has the Web Server (IIS) Role added, the Connectivity Server port will need to be changedto the NetSupport registered port 3085.Listen on specified IP interfacesIf the Connectivity Server machine has multiple network cards installed, you can add the specific IP address to use.Click Add and enter the required IP address.CMPI (Communications Management Packet Interval)When configured for Connectivity Server connections, the Student device confirms its availability by periodicallypolling the Connectivity Server. By default, a network packet is sent every 60 seconds, but you can change this ifrequired.Note: Once the Connectivity Server is active, the CMPI value also controls how long it takes for the Student devices to beremoved from the list of available machines shown on the Clients tab of the ‘Connectivity Server Console’ after it is nolonger available on the network.www.netsupportschool.com
Event log filesConnectivity Server activity during an active session is recorded in a text file with a default file name ofGWxxx.log. Log files can be useful for checking which Student devices and Tutor/Tech Consoles have connectedto the Connectivity Server.Location:By default, the GWxxx.log files are stored in the C:\Program Files (x86)\Common Files\NSL\Connectivity Serverfolder. The Browse button can be used to specify an alternative folder path.Max file size (KB):To limit the size of the log file, you can specify a maximum file size. When the limit is reached, a new file will becreated, for example GW001.log, GW002.log, GW003.log etc.Note: For changes to the log file settings to take affect the Gateway32 service on the machine will need to be restarted.Keys tabAccess to a Connectivity Server is protected by use of a Connectivity Server key (security key). The ConnectivityServer will not accept connections from a NetSupport School Tutor, Tech Console or Student device unless thematching key is also configured on those devices.The key is therefore a pre-requisite when configuring the Name & Connectivity Server settings.1. Click Add and enter a suitable description for the key.2. Click Set and enter your chosen Connectivity Server key. An encrypted value will be displayed. For accuracy,enter the key twice. The key must be between 8 and 15 characters and can contain upper and lower caseletters, numbers and/or special characters. Click OK. (It may help to make a note of the key). As mentioned,the same key must also be used when configuring both the NetSupport School Tutor and Student devices tocommunicate with the Server.www.netsupportschool.com
3. The key description and creation date will now be displayed in the Connectivity Server Keys list.Licenses tabThe Licenses tab will show the details of the NetSupport School licence(s) that have been applied to the Name &Connectivity Server.When the Name & Connectivity Server starts on the machine, it will attempt to automatically activate theNetSupport School licence over the internet. If the automatic activation fails for any reason, the licence can bemanually activated using the Activate button.Multiple NetSupport School licences can be applied to the Name & Connectivity Server by renaming the additionalNSM.LIC files and placing them in the NetSupport School installation directory: C:\Program Files (x86)\NetSupport\NetSupport School.The NSM.LIC files will need to be renamed sequentially so that they are read by the Name & Connectivity Server –for example NSM.LIC, NSM-1.LIC, NSM-2.LIC, NSM-3.LIC etc.All applied NetSupport School licence files will be listed on the Licenses tab and will require activating on theName & Connectivity Server.www.netsupportschool.com
Security tabNo changes are required to be made on the Security tab.www.netsupportschool.com
Classes tabNote: This option is only applicable if you intend to use NetSupport’s SIS/MIS (Student/Management InformationSystem) connection mode.From version 12.60, NetSupport School allows you to import school timetable/roster data directly from a SIS/MIS system. This can be done by either linking directly to the SIS/MIS data using ClassLink OneRoster/GoogleClassroom or by importing the data from a zip file which has been extracted from the SIS/MIS.The NetSupport Name & Connectivity Server can be configured to provide direct integration with ClassLinkOneRoster or Google Classroom, allowing access to the school’s SIS classrooms and student accounts.Class datasourceClassLink OneRosterSelect this option to link to ClassLink OneRoster and enter your school/district’s Tenant ID. For added validation,enter the matching NetSupport School Security/API Key provided in your Roster Server Portal. (The key can befound in the OneRoster Server Portal by selecting, Applications NetSupport School API Key and Secret.)OneRoster zipped CSV filesAlternatively, you can import zipped CSV files. Click and browse to the required files.Notes: The CSV files must conform to the OneRoster standard. The first time you configure the Connectivity Server to use OneRoster zip files, you must do a bulk export of your SISdata.www.netsupportschool.com
Google ClassroomSelect this option to link to Google Classroom. Click and browse to one of the JSON files that you have copied tothe machine (both files must be present, but either file can be selected). Click here for information on how to set upa Google Classroom Project and create the required JSON files.Click Apply and you will be prompted to sign into Google G Suite with administrator credentials and grant accessto NetSupport School.Syncs per dayBy default, the Connectivity Server will sync with OneRoster or Google Classroom once a day. This can be amendedby entering a different value here, you can also specify the time the sync will take place.Click Sync now to synchronise the Connectivity Server. Clicking Reset Data will clear all previous data stored andif there is a lot of data to download, may take some time.Once you are happy that the Name & Connectivity Server is configured as required, click OK.The NetSupport Connectivity Server Console iconshould now appear in the system tray. If any of the settingsneed editing, right-click on the icon and select Configure Connectivity Server. Double-click the icon to open theConnectivity Server Console window. This details the activity during a NetSupport School-managed lesson, i.e.Tutor and Student devices communicating through the Server.You can now configure the required NetSupport School components to communicate with the NCS.www.netsupportschool.com
Configuring the NetSupport School Windows Tutor and Tech Console to use the NCSThe following instructions assume that the Tutor and Tech Console components are already installed on therequired Windows machines.1. Open the NetSupport School Tutor or Tech Console.2. To configure the Tutor, select {School}{Configuration - Network and Wireless Settings} from the drop-downmenu.OrTo configure the Tech Console, select {Admin}{Configuration - Network and Wireless Settings} from the dropdown menu.3. Select Use Name & Connectivity Server and click Settings. Enter the IP address of the machine wherethe Name & Connectivity Server was installed, the port number (if different from the default 443 port), andclick Set to enter the matching security key entered when installing the Server. An encrypted value will bedisplayed.Note: When Use Name & Connectivity Server is enabled please ensure Connect By Hostname (DHCP/WINS)is disabled to avoid conflicts.4. Click OK to apply the settings.By default, the Tutor and Tech Console settings are stored in the registry for each logged-on user in the followinglocations:HKEY CURRENT USER\Software\NetSupport Ltd\PCICTL\ConfigList\NetSupport SchoolHKEY CURRENT USER\Software\NetSupport Ltd\PCICTL\ConfigList\NetSupport Tech Consolewww.netsupportschool.com
Configuring NetSupport School Student devices to use the NCSThe following instructions explain how to configure the NetSupport School Student for Windows, and assumes theStudent component is already installed on the devices.1. In the NetSupport School program group, select the NetSupport School Student Configurator.OrLaunch the Student Configurator exe file, PCICFGUI, from the NetSupport School Program Files (x86) folder.2. In Network Settings, select Use Name & Connectivity Server and click Configure. Enter the IP address of themachine where the Name & Connectivity Server is installed, the port number (if different from the default 443port), and click Set to enter the matching security key entered when installing the Server. An encrypted valuewill be displayed. Click OK.3. Click OK to apply the settings. Student devices will need to be restarted for the changes to take effect.By default, the Student component settings are stored in the client32u.ini file located in the following folder:C:\Program Files (x86)\NetSupport\NetSupport Schoolwww.netsupportschool.com
Applying the NCS settings to NetSupport School components by Group PolicyThe Name & Connectivity Server settings can also be applied to the Tutor, Tech Console and StudentConfigurations via Group Policy.Machine and user-based NetSupport School ADMX/ADML files are provided with the software and are available ona machine that has the NetSupport School Tutor installed – in the folder:C:\Program Files (x86)\NetSupport\NetSupport School\ADM Templates\ADMXApplying the Name & Connectivity Server settings to the components using the machine-based ADMX files via aGroup Policy will ensure that the settings will be the same for all users that log on to the Tutor and Student devices.Additional information for creating and applying the NetSupport School configuration via a Group Policy can befound in the following Technical Document:Configuring the NetSupport Connectivity Server details for NetSupport School Students and Tutors by Group Policy(GPO)Note: When applying the NCS security key using a Group Policy, you must enter the encrypted value that was returnedwhen originally configuring the Tutor, Tech Console and Student components rather than the plain text version. Theencrypted value is different for each component so care must be taken to ensure that the correct encrypted value is usedin the Group Policies, as shown in the example below.www.netsupportschool.com
Troubleshooting connectivity issuesThe main cause of connection issues between the Name & Connectivity Server and NetSupport Schoolcomponents are that the IP address, port number and Connectivity Server key do not match on all devices. Thisshould be checked first by re-entering the details and restarting the Name & Connectivity Server process andStudent components.If the above does not resolve the connectivity issues, investigate the following:1. Is the Name & Connectivity Server running?In normal operation, a NetSupport Connectivity Server Console icon will be displayed in the system tray on themachine the Name & Connectivity Server is installed on.The Name & Connectivity Server runs as an Automatic Startup Type service called Gateway32, so check thatthis service is running.2. Is the Name & Connectivity Server listening?A GWxxx.log file is created on the Name & Connectivity Server that records the Gateway32 service start up andthe machine names of the Tutor/Tech Console and Student devices connecting to the server.The GWxxx.log files are located in the C:\Program Files (x86)\Common Files\NSL\Connectivity Server folder bydefault.If an entry such as “Failed to bind to listening port.” is seen in the log file, this is usually indicative that anotherapplication is already using the port number configured for the Name & Connectivity Server. As the defaultport for the Name & Connectivity Server is 443, this will normally be the Web Server (IIS) role that may also beinstalled on the server.Running “netstat –an more” from a command prompt will list the ports in use on the server.If a port conflict is the issue, either reconfigure the Name & Connectivity Server to use an alternative portnumber or reconfigure/disable the application that is causing the conflict.3. Are the Students connected to the Name & Connectivity Server?There are two ways to confirm if the Tutor/Tech Console and Student devices are connected to the Name &Connectivity Server.The first is to right-click the NetSupport Connectivity Server Console iconand select Open. This will open the Console window.in the system tray on the serverSelecting the Clients tab will display the information for all of the devices that are currently connected to theName & Connectivity Server.The second is to use the entries in the GWxxx.log file to see the machine names of the devices that haveconnected to the server.4. Has the maximum number of device connections been reached?The Name & Connectivity Server restricts the number of devices that are able to concurrently connect to theserver based on the number of Clients in the NSM.LIC file applied on the server.www.netsupportschool.com
A ‘License Limit Exceeded’ entry will be seen in the GWxxx.log file if more devices than are allowed in theNSM.LIC licence file attempt to connect to the Name & Connectivity Server.5. Is the student service running?With a default configuration applied, a NetSupport School Client icon will be seen in the system tray on theStudent devices.The Student component runs as an automatic startup type service called Client32, so check that this service isrunning on the device.6. Is the Name & Connectivity Server visible to the Tutor/Tech Console and Student devices?If no Tutor/Tech Console or Student devices are seen on the Clients tab on the Name & Connectivity Server, it ispossible to use two connection tests from the devices to confirm that the NCS is visible on the network:Using the Name and Connectivity Server test pageOn the Tutor/Tech Console or Student device, open a browser and enter the following (Where [ServerIPAddress] is the IP address of the Name & Connectivity Server, and [PortNo] is the port numberthat it is configured to use.)If the device can successfully reach the Name & Connectivity Server test page, a NetSupport Gateway Serverpage will be displayed in the browser.Using the Telnet connection testNote: if the Telnet Client is not installed on the device, it can be enabled in the Control Panel Programs and Features Turn Windows features on or off section.On the Tutor/Tech Console or Student device , open a command prompt and enter in the following commandand press Enter:telnet [ServerIPAddress] [PortNo](Where [ServerIPAddress] is the IP address of the Name & Connectivity Server, and [PortNo] is the port numberthat it is configured to use.)www.netsupportschool.com
If the device can successfully connect to the Name & Connectivity Server port, the command prompt windowwill go blank.If either of these two tests fails, the device is being prevented from connecting to the Name & ConnectivityServer on the network. This is usually due to firewall/endpoint or restrictions on the device or the network.www.netsupportschool.com
The following instructions assume that the Tutor and Tech Console components are already installed on the required Windows machines. 1. Open the NetSupport School Tutor or Tech Console. 2. To configure the Tutor, select {School}{Configuration - Network and Wireless Settings} from the drop-down menu. Or