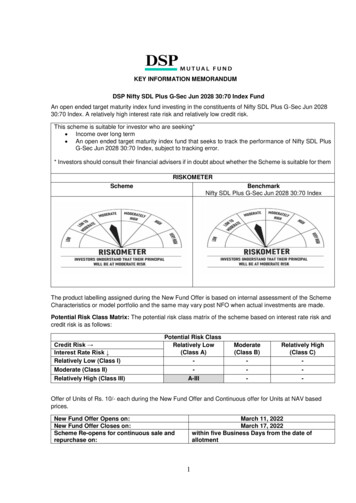
Transcription
Nifty Fifty WordPress Theme DocumentationUpdated on December 29, 2017Quick start guideInstallationImport sample dataImport sample data from xml fileImport sample data from sql fileCreate portfolios with photosSet up the front pageCustomize the front pageSite title and logoColor skinMenusSocial iconsPage templatesBlogQuick start guide1. Install and activate the Nifty Fifty theme.2. Configure Jetpack plugin: connect it to wordpress.com or use the Dev mode.3. Turn on all needed Jetpack features via Jetpack Settings.3. Add photos via Portfolio powered by Jetpack plugin (create projects).4. Add your Portfolio / individual projects to the front page / inner pages.5. Customize the site identity (logo, tagline), color skin and menus.
6. Set up the blog.InstallationTo instal the Nifty Fifty theme, follow these steps:1. In your WordPress admin panel, go to Appearance Themes and click the Add Newbutton.2. Click Upload Theme, Browse and Choose File; then select the theme's ZIP file. ClickInstall Now.3. Click Activate to use your new theme.Note: we strongly recommend using a niftyfifty-child child theme that comes in the themepackage (downloadable files) for your custom modifications. This will help you keep yourcontent despite main theme updates.4. Set up the Jetpack plugin. The image galleries in the theme are powered by the Jetpackplugin, so you’ll need to configure it. To get access to all free features of the Jetpackplugin, you should connect it to wordpress.com via your WordPress dashboard (create afree wordpress.com account). If you don't want to connect your site to wordpress.com forsome reason, the theme will still work well with the Developer mode enabled. To work inthe development mode, you need to add define( 'JETPACK DEV DEBUG', true); to yourconfig.php file. Alternatively, to use the Developer mode, you may install the JetpackDev Mode plugin.
Import sample dataChoose the most suitable option: import sample data from .sql file (if it’s a fresh installationwithout custom content and you just want to make your site look like our demo) or xml file (ifyou have custom content on you website that you do not want to lose and you only need to addsample data of the theme portfolio).You should be able to find manual-install zip archive that comes in the theme package(downloadable files). You'll be working with it in any of the following cases.Import sample data from xml file1. Install WordPress if you have not already done that.2. Add the theme via FTP or by uploading it via WordPress Dashboard.3. Activate the theme and install required plugins (Jetpack).4. Connect Jetpack to WordPress.com (it's free). Activate other Jetpack modules like 'ContactForm' following this URL your website url/wp-admin/admin.php?page jetpack modules(replace your website url with your domain name).6. Navigate to Dashboard Tools Import and click on the 'Run Importer' link.You may need to install WordPress importer first by pressing 'Install Now' under WordPresslabel.7. Click 'Browse' button and select niftyfifty.wordpress.theme.xml8. Click 'Upload file and import'.9. Select 'Download and import file attachments'.10. Click 'Submit'.
11. Wait until the import is complete.12. Navigate to Dashboard Settings Reading Settings.13. Proceed to other theme settings in the documentation.Import sample data from sql file1. First, you need to upload media files to your server. For this try to connect to your server(where WordPress is installed) using any FTP client (e.g. Filezilla, Cyberduck, Transmit) or FileManager - service on your hosting control panel. Then navigate to your site rootfolder/wp-content/ and upload directory from manual install that is called /uploads2. After that you should find niftyfifty.sql file in the package with sample data and open it with fileeditor like Notepad , Coda, Atom, etc. and use 'Search and Replace' option.Find: your website url hereReplace with: https://your-site.com (add your website URL address without a trailing slash)Click Replace all and save changes.Note: By default WordPress table prefix is wp . If there is custom table prefix in your database,you need to replace it in SQL file, too. You can find your WordPress table prefix in wp-config.phpfile at the site root folder on the server. In the example below you can see custom table prefixmpExample: table prefix 'mp ';So once you found your table prefix, copy it and open niftyfifty.sql file with file editor and use 'Findand Replace' option again:Find: wpReplace with: custom table prefix (note there is underscore at the end)Click Replace all
After that:Find: custom table prefix(note there is underscore at the beginning)Replace with: wpClick Replace allSave the changes and proceed to the next step.3. Connect to PhpMyAdmin tool - usually it can be found in your hosting account or cPanel.Once you are in PhpMyAdmin interface, you should click on the database name in the leftsidebar and find Import tab at the top. Click Import and upload the edited niftyfifty.sql file. Afterthe message about successful import you can go and check your site.Create portfolios with photosTo be able to showcase your photos on the front page or any other page, you should add themvia the Jetpack plugin. So, you should configure the plugin settings first: go to Jetpack Settings Writing tab scroll to Custom Content types switch on Portfolios.
You may also surf through other Jetpack settings like Sharing, Discussion, Traffic, Security andturn on the options you might need.For example, you might also want the site visitors to preview the images in the lightbox. Here isthe frontend example of the lightbox:
The lightbox opens the photo in a bigger size, allows visitors to preview the image in a full sizeand comment under the photo. To turn on the lightbox feature for Jetpack galleries, go to Writingtab scroll to Media Turn on Display images and galleries in a gorgeous experience:
Or, you may enable the Sharing buttons on Blog with Jetpack as well (Sharing tab in Jetpacksettings).Once the portfolios are enabled, the appropriate menu will appear on the WP dashboard andyou can start adding photos to individual projects:The process is simple - you’ll need to upload the images via the Media Library into the post (useAdd Media button).
There you can also create Project Types (categories like Nature, Portraits, etc.), add tags and afeatured image of the project.
When editing an individual image (to edit the image, left click on it Edit), try to follow thistechnique:-Use alignment “None”-Set “Large” size-Link to Attachment Page to let site visitors open the image in the lightbox.Once all your portfolios are created, you can showcase them on the needed pages.Set up the front pageTo create the front page with your portfolios, follow this way:1. Go to Pages Add New and add a page.
2. Label it appropriately, e.g. home page, front page.3. In the Page Attributes, select Full Width template.4. Add the Jetpack Portfolio shortcode with your custom settings: set what info to show andwhat to hide:Here are the shortcode attributes you can use for showcasing the portfolios: display types: display Project Types – displayed by default. (true/false) display tags: display Project Tag – displayed by default. (true/false) display content: display project content – displayed by default. (true/false)
display author: display project author name – hidden by default. (true/false) include type: display specific Project Types. Defaults to all. (comma-separated list ofProject Type slugs) include tag: display specific Project Tags. Defaults to all. (comma-separated list ofProject Tag slugs) columns: number of columns in shortcode. Defaults to 2. (number, 1-6) showposts: number of projects to display. Defaults to all. (number) order: display projects in ascending or descending order. Defaults to ASC for sorting inascending order, but you can reverse the order by using DESC to display projects indescending order instead. (ASC/DESC) orderby: sort projects by different criteria, including author name, project title, and evenrand to display in a random order. Defaults to sorting by date. (author, date, title, rand)In the default Nifty Fifty theme we use the following shortcode for the front page portfolios:[portfolio display types "false" display tags "false" display content "false"display author "false" columns 3 include tag "featured"]Pay attention to the tag "featured" - all the images presented on the front page are tagged withour custom tag ‘featured’ (you can include any other tag or type into your shortcode).5. Go to Settings Reading: set “Front page displays” to Static Page.6. In the same Reading screen set the Front Page to the one you created during the step #2:
If you want to create any inner page and showcase all portfolios of just one Portfolio type(category), simply include that category into the shortcode. For example, you want to showcasethe portfolio “Wedding” on the individual page, then use the following shortcode (with yourcustom parameters):[portfolio display types "false" display tags "false" display content "false"display author "false" columns 2 include type "wedding"]In result, your page “Wedding” will be displayed as follows (with the titles on hovers):
And inside any of these portfolios you’ll see a list of photos, each of them can be previewed inthe lightbox if you enable it in the Jetpack.
Remember, for the image to be opened in the lightbox, it should be linked to the Attachmentpage:
The navigation buttons inside the project category are pretty handy: scroll down to see all images buttons to switch between projectsCustomize the front pageTo customize other elements of the front page, you may go to the Visual WordPress Customizervia Appearance Customize.Site title and logoThere you are free to edit the site identity like logo, site title, tagline, and favicon (site icon):
Color skinIn the Colors menu in Customizer you may also choose a white or black color scheme for thetheme:
MenusIn the Menus, choose what menus to display and what info exactly to display in those menus:Footer, Primary and Social. By clicking “Add item” in any of those menus, you may choose whatitem to add to the menu.Generally, menus come with the primary one (your site pages), social media buttons and footer.By default, the theme contains all of them, but you should remember that menus are veryflexible, so you can change the content of each (for example, switch the default location ofsocial media icons and footer, add items to menus, etc.) or entirely delete any. However, thesocial media icons will be displayed as icons only if you put them into Social menu.
Social iconsTo add social icons to Footer or Header menu, navigate to WordPress Customizer Menus Add Menu Add Custom links with the appropriate names (e.g. Twitter) and links to your socialmedia accounts.In the Display Location menu choose the menu where the social icons should be displayed.
Page templatesThere are several page layouts you can work with:1. Full width2. Fixed width3. Default template (with sidebar)BlogFollow the steps below to display blog posts on your website instead of a static front page (theone with your custom content blocks):1. Create new page and name it accordingly (blog, news, etc.).2. In Settings Reading set "Posts page" to blog, news, etc. you just created.3. Scroll down and Save changes.4. If you want your front page to show latest posts instead of portfolios, Navigate toAppearance Customize Static Front page set to show "Your latest posts".
To instal the Nifty Fifty theme, follow these steps: 1. In your WordPress admin panel, go to Ap p e a r a n ce T h e m e s a nd click the Add New button. 2. Click Upl o a d T h e m e , B r o w se a n d C h o o se F i l e ; then select the theme's ZIP file. Click Install Now. 3. Click Act i va t e to use your new theme.