Transcription
572-2Infrared ThermometerUsers ManualMarch 2013, Rev. 1, 08/13 2013 Fluke Corporation. All rights reserved. Specifications are subject to change without notice.All product names are trademarks of their respective companies.
LIMITED WARRANTY AND LIMITATION OF LIABILITYEach Fluke product is warranted to be free from defects in material and workmanship under normal use andservice. The warranty period is two years and begins on the date of shipment. Parts, product repairs, andservices are warranted for 90 days. This warranty extends only to the original buyer or end-user customer ofa Fluke authorized reseller, and does not apply to fuses, disposable batteries, or to any product which, inFluke's opinion, has been misused, altered, neglected, contaminated, or damaged by accident or abnormalconditions of operation or handling. Fluke warrants that software will operate substantially in accordance withits functional specifications for 90 days and that it has been properly recorded on non-defective media. Flukedoes not warrant that software will be error free or operate without interruption.Fluke authorized resellers shall extend this warranty on new and unused products to end-user customersonly but have no authority to extend a greater or different warranty on behalf of Fluke. Warranty support isavailable only if product is purchased through a Fluke authorized sales outlet or Buyer has paid theapplicable international price. Fluke reserves the right to invoice Buyer for importation costs ofrepair/replacement parts when product purchased in one country is submitted for repair in another country.Fluke's warranty obligation is limited, at Fluke's option, to refund of the purchase price, free of charge repair,or replacement of a defective product which is returned to a Fluke authorized service center within thewarranty period.To obtain warranty service, contact your nearest Fluke authorized service center to obtain returnauthorization information, then send the product to that service center, with a description of the difficulty,postage and insurance prepaid (FOB Destination). Fluke assumes no risk for damage in transit. Followingwarranty repair, the product will be returned to Buyer, transportation prepaid (FOB Destination). If Flukedetermines that failure was caused by neglect, misuse, contamination, alteration, accident, or abnormalcondition of operation or handling, including overvoltage failures caused by use outside the product’sspecified rating, or normal wear and tear of mechanical components, Fluke will provide an estimate of repaircosts and obtain authorization before commencing the work. Following repair, the product will be returned tothe Buyer transportation prepaid and the Buyer will be billed for the repair and return transportation charges(FOB Shipping Point).THIS WARRANTY IS BUYER'S SOLE AND EXCLUSIVE REMEDY AND IS IN LIEU OF ALL OTHERWARRANTIES, EXPRESS OR IMPLIED, INCLUDING BUT NOT LIMITED TO ANY IMPLIED WARRANTYOF MERCHANTABILITY OR FITNESS FOR A PARTICULAR PURPOSE. FLUKE SHALL NOT BE LIABLEFOR ANY SPECIAL, INDIRECT, INCIDENTAL OR CONSEQUENTIAL DAMAGES OR LOSSES,INCLUDING LOSS OF DATA, ARISING FROM ANY CAUSE OR THEORY.Since some countries or states do not allow limitation of the term of an implied warranty, or exclusion orlimitation of incidental or consequential damages, the limitations and exclusions of this warranty may notapply to every buyer. If any provision of this Warranty is held invalid or unenforceable by a court or otherdecision-maker of competent jurisdiction, such holding will not affect the validity or enforceability of any otherprovision.Fluke CorporationP.O. Box 9090Everett, WA 98206-9090U.S.A.11/99Fluke Europe B.V.P.O. Box 11865602 BD EindhovenThe Netherlands
Table of ContentsTitlePageIntroduction.1Contact Fluke .1Safety Information .2Features .4Display .5Menu Overview .5Save .6Light .6Memory .6Emissivity Menu .6 C and F .7Min, Max, Avg, Differential.8Alarm .8Trigger Lock .8Laser .9Setup .9Language .9Backlight .9Time/Date .9Delete Data .10Delete All Data .10Delete Individual Data Records .10How the Product Works .11Product Operation .11Temperature Measurement .11Locate a Hot or Cold Spot .12Distance and Spot Size .12Field of View .13Emissivity .13HOLD .13Data Storage .14Data Download .14External Contact Probe .15Troubleshooting .15Maintenance .16Battery Charge .16i
572-2Users ManualBattery Replacement.16Clean the Lens .17Clean the Case .17User-Replaceable Parts and Accessories .17User-Replaceable Parts .17Accessories .18Recommended Temperature Probes .18Specifications .19K-Type Thermocouple Bead Probe Specifications .20ii
List of TablesTable1.2.3.4.5.6.TitleSymbols .Top-Level Menu Description .Nominal Surface Emissivity.Troubleshooting .Replaceable Parts .Recommended Temperature Probes .iiiPage357151718
572-2Users Manualiv
List of FiguresFigure1.2.3.4.5.6.7.8.TitleSafety Markings .Menu Navigation .How the Product Works .Locating a Hot or Cold Spot .Distance and Spot Size .Field of View.Thermocouple and USB Connections .Battery Replacement .vPage35111212131417
572-2Users Manualvi
IntroductionThe 572-2 Infrared Thermometer (the Product) is for non-contact temperaturemeasurement. The Product determines the surface temperature of an object bymeasuring the amount of infrared energy radiated by the object surface. TheProduct also uses a K-type thermocouple for contact temperature measurement.Contact FlukeTo contact Fluke, call one of the following telephone numbers: Technical Support USA: 1-800-44-FLUKE (1-800-443-5853) Calibration/Repair USA: 1-888-99-FLUKE (1-888-993-5853) Canada: 1-800-36-FLUKE (1-800-363-5853) Europe: 31 402-675-200 Japan: 81-03-6714-3114 Singapore: 65-738-5566 Anywhere in the world: 1-425-446-5500Or, visit Fluke's website at www.fluke.com.To register your product, visit http://register.fluke.com.To see, print, or download the latest manual supplement, visithttp://us.fluke.com/usen/support/manuals.1
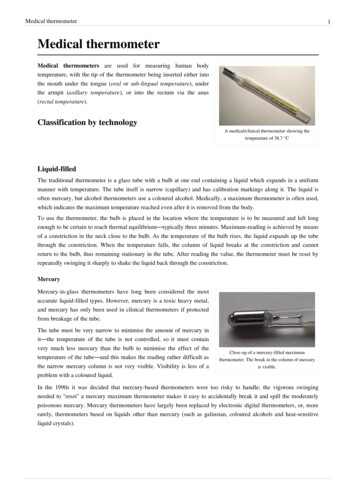
572-2Users ManualSafety InformationA Warning identifies conditions and procedures that are dangerous to the user. ACaution identifies conditions and procedures that can cause damage to the Productor the equipment under test.Symbols used on the Product and in this manual are explained in Table 1. Lasersafety markings are shown in Figure 1. WarningTo prevent possible electrical shock, fire, eye damage, andpersonal injury: Read all safety Information before you use the Product. Use the Product only as specified, or the protectionsupplied by the Product can be compromised. Do not use the Product around explosive gas, vapor, orin damp or wet environments. Do not use the Product if it operates incorrectly. See emissivity information for actual temperatures.Reflective objects result in lower than actualtemperature measurements. These objects pose a burnhazard. Do not look directly into the laser with optical tools (forexample, binoculars, telescopes, microscopes). Opticaltools can focus the laser and be dangerous to the eye. Do not look into the laser. Do not point laser directly atpersons or animals or indirectly off reflective surfaces. Use the product only as specified, or hazardous laserradiation exposure can occur. Do not use laser viewing glasses as laser protectionglasses. Laser viewing glasses are used only for bettervisibility of the laser in bright light. Do not open the Product. The laser beam is dangerousto eyes. Have the Product repaired only through anapproved technical site. Have an approved technician repair the product. CautionFor safe operation and maintenance of the Product: Remove the batteries if the Product is not used for anextended period of time, or if stored in temperaturesabove 50 C. If the batteries are not removed, batteryleakage can damage the Product. Replace the batteries when the low battery indicatorshows to prevent incorrect measurements. Have the Product repaired before use if the batteriesleak. Be sure that the battery polarity is correct to preventbattery leakage. Do not short the battery terminals together.2
Infrared ThermometerSafety Information Do not keep cells or batteries in a container where theterminals can be shorted.Do not put battery cells and battery packs near heat orfire. Do not put in sunlight. CautionTo avoid damage to the Product or the equipment undertest, protect them from: EMF (electro-magnetic fields) from arc welders,induction heaters, etc. Static electricity Thermal shock (caused by large or abrupt ambienttemperature changes. For highest accuracy, allow 30minutes for Thermometer to become stable beforeuse).Table 1. SymbolsSymbol C F ExplanationHazardous voltage. Risk of electrical shock.Risk of danger. Important information. See manual.Warning. Laser.Conforms to European Union directives.CelsiusFahrenheitBatteryThis product complies with the WEEE Directive (2002/96/EC) marking requirements.The affixed label indicates that you must not discard this electrical/electronic productin domestic household waste. Product Category: With reference to the equipmenttypes in the WEEE Directive Annex I, this product is classed as category 9"Monitoring and Control Instrumentation” product. Do not dispose of this product asunsorted municipal waste. Go to Fluke’s website for recycling information.BatteryConforms to relevant South Korean EMC Standards.Conforms to China Metrology Certification.3
572-2Users ManualLaserAperturehdp01.epsFigure 1. Safety MarkingsFeatures4 Dual laser sighting Backlit display Current Temperature plus MAX, MIN, DIF, AVG temperature displays Two AA batteries Hard case 80PK-1 K-type thermocouple probe Adjustable emissivity and predefined emissivity table Infrared and thermocouple temperature display Celsius or Fahrenheit temperature display Tripod mount Auto off Standard miniature K-type thermocouple connector input Printed 572-2 Getting Started 572-2 Manuals CD 12 or 24 hour clock Last reading Hold (20 seconds) Multi-language interface High and low temperature alarm Data storage and review Trigger lock USB 2.0 computer interface cable FlukeView Forms Documenting Software
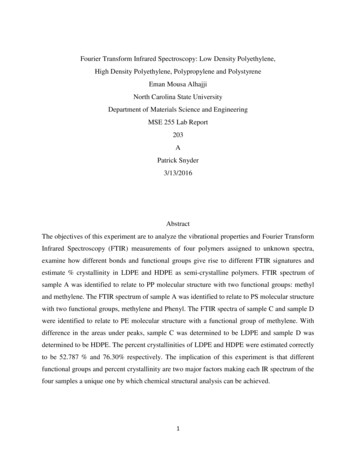
Infrared ThermometerDisplayDisplayThe Product display can show data in these languages: English Spanish French German Portuguese Simplified ChineseTo change the displayed language, refer to “Setup”.Menu OverviewThere are many settings that can be changed with the menu. Figure 2 shows theLCD and menu interface. Selecting the Menu softkey advances the menu to thenext level. Table 2 is a top-level description of the menu.hdp02.epsFigure 2. Menu NavigationTable 2. Top-Level Menu yRightSoftkeyDescription1SaveSave reading to memoryMenuLightAdjust backlightbrightness2MemReview/delete memoryentriesMenu Set emissivity3MnMxEnables Min/MaxMenuAvgEnable Avg/Diff4 C/ FToggle between C and FMenuAlarmSet and enable alarmsLock the Product onMenuLaserToggle the laser on/off- Turn off/on backlight- Change Time/Date- Change LanguageMenu56 (Lock)Setup--Each menu item and function is explained in greater detail in the following sections.5
572-2Users ManualSaveTo save readings:1. Pull the trigger to take a measurement.2. Release the trigger to stop taking the measurement.3. Push the Save softkey to enter the Save menu.4. Push the Yes softkey to save the reading.The reading is assigned a memory location and a time and date stamp.The reading includes: IR temperature Emissivity Date/TimeYou can also push the Cancel softkey to abort saving the reading.LightThe Product has a backlit display with two brightness levels. The Light softkey isused to adjust the backlight brightness. The backlight is on each time the trigger ispulled.To toggle the backlight brightness, push the Light softkey.The backlight can be disabled using the Setup menu. See “Setup” for moreinformation.MemoryThe Product can store measurement records including time, date, emissivity, andmeasurement record numbers (see “Save” for more information). The Product canstore 99 records.To access records stored in memory:1. Push the Menu softkey until Mem shows as the left softkey function.2. Push the Mem softkey to access the Memory menu. Saved readings can beread.Emissivity MenuThe Emissivity menu includes a list of pre-defined materials and lists their typicalemissivity values, see Table 3. For further information, see “Emissivity”.NoteDefault emissivity is 0.95.To access the Emissivity menu:1. Push the Menu softkey until (emissivity) shows as the right softkey function.2. Push the softkey.6
Infrared ThermometerDisplayYou can push the Table softkey to access the Emissivity list. You can also push theNo. softkey to manually enter the typical emissivity of a material. If the Emissivity table is accessed, a list of materials and their suggestedemissivity is shown.1. Use the down arrow to navigate through the list.2. Push the Enter softkey to choose the desired material. To enter an emissivity value manually:1. Push the No. softkey.2. Use the down or up arrow softkey to change the entry. Hold down the up ordown arrow softkey to increase the rate of change.3. Push the Done softkey when finished to return to the main menu.Table 3. Nominal Surface 5Glass nd0.90Food - Frozen0.90Steel*0.80Food - Hot0.93Water0.93Wood ***0.94* Oxidized** Opaque, over 20 mils*** Natural**** Factory SettingHighlighted items may also be found in the emissivity table built into the Product. C and FTo toggle between C (Celsius) and F (Fahrenheit) measurements, push the Menusoftkey until C or F shows as the left softkey function. Push the correspondingsoftkey to change between the measurements.7
572-2Users ManualMin, Max, Avg, DifferentialThe Product can measure minimum (MIN), maximum (MAX), average (AVG), ordifferential (Δ) temperatures each time a reading is taken. These values are notshown if a thermocouple is plugged into the Product.To turn on the Min Max mode:1. Push the Menu softkey until MnMx (Min Max) shows as the left softkey function.2. Push the MnMx softkey.The display shows the present reading, maximum and minimum readings, and theemissivity setting.To turn on the Avg/Dif mode:1. Push the Menu softkey until Avg shows as the right softkey function.2. Push the Avg softkey.The display shows the present reading, average reading, the differential readingbetween max and min (designated by Δ), and the emissivity setting.AlarmThe Product has a programmable high and low alarm to designate high or lowreadings, depending on the thresholds entered. When the alarm level is reached, analarm will sound and the display will flash orange and white. To set either the highor low alarm:1. Push the Menu softkey until Alarm shows as the right softkey function.2. Push the Alarm softkey to access the Alarm menu.3. Push either the Hi or Lo softkey, depending on which alarm will be set.4. Push the ON softkey to turn the alarm on.5. Push the OFF softkey to turn the alarm off.6. Use the Set softkey to access the Hi or Lo Alarm Set menu.7. Use the down or up softkeys to change the alarm setting.8. Once the necessary settings have been entered, push the Done softkey.Trigger LockThe Product trigger can be locked on for continuous measurement.To enable continuous measurement mode, hold down the trigger for a few secondsuntil the symbol shows.To lock the trigger:1. Push the Menu softkey until the lock symbol ( ) shows as the left softkeyfunction.2. Push the softkey to lock the trigger. The lock symbol shows on the display todesignate a locked trigger. When the trigger is locked, the softkey changes to . Push this softkey to unlock the trigger.8
Infrared ThermometerDisplayLaser WarningTo prevent eye damage and personal injury, do not lookinto the laser. Do not point laser directly at persons oranimals or indirectly off reflective surfaces.The laser of the Product is to be used for aiming purposes only. The laser turns offwhen the trigger is released.To enable or disable the laser:1. Push the Menu softkey until Laser shows as the right softkey function.2. Push the Laser softkey to enable or disable the laser. shows on the displaywhen the laser is enabled.SetupFrom the Setup menu, the backlight, time and date, and display language can bechanged.LanguageTo change the display language:1. From the main menu, push the Menu softkey until Setup shows as the leftsoftkey function.2. Push the Setup softkey.3. Use the down arrow softkey to move the indicator to Language.4. Push the Enter softkey.5. Use the down arrow to move the indicator to the desired language.6. Push the Enter softkey to complete the language selection or push the Backsoftkey to return to the Setup menu.BacklightIn normal use, the backlight is always on. Use this menu to change the backlightsetting from on to off. Turn the backlight off to conserve battery power.1. Push the Menu softkey until Setup shows as the left softkey function.2. Push the Setup softkey.3. Backlight has an indicator next to it. To enter the backlight menu, push theEnter softkey.4. Push the OFF softkey to turn the backlight off, push the ON softkey to turn it on.5. Push the Back softkey to return to the Setup menu.Time/DateTo change the time on the Product:1. Push the Menu softkey until Setup shows as the left softkey function.2. Push the Setup softkey to enter the Setup menu.3. Push the down arrow softkey to select Time/Date.4. Push the Enter softkey.5. Push the Time softkey.9
572-2Users Manual6. Push the necessary time format softkey (24hr or 12hr).7. Use the up and down softkeys to change the selected hour to the correct hour.8. Push the Next softkey to select the minutes.9. Use the up and down softkeys to change the selection to the desired minute.10. When in 12-hour mode, push the Next softkey to highlight the am/pmparameter.11. Use the up and down softkey to change to am or pm.12. Push the Done softkey when finished. The display reverts to the first page of theTime/Date menu.To change the date on the Product:1. From the main menu, push the Menu softkey until Setup shows as the leftsoftkey function.2. Push the Setup softkey.3. Push the down arrow softkey to select Time/Date.4. Push the Enter softkey.5. Push the Date softkey.6. Select the date format: Day/Month/Year (dmy) or Month/Day/Year (mdy).7. Use the up and down softkeys to change the selected parameter.8. Push the Next softkey and the arrow softkeys to select the month, date, or yearparameters.9. Use the up and down softkeys to change the selected parameter.10. Push the Next softkey to move through each parameter.11. Push the Done softkey when finished. The display reverts to the start of theTime/Date menu.Delete DataTo delete stored data from the Product, from the main menu, push the menusoftkey until Mem shows as the left softkey function. The last memory locationshows on the display. To access the Delete menu, push the Delete softkey. Fromhere, all of the Product memory or individual records can be deleted.Delete All DataTo delete all of the records:1. Push the All softkey.2. At the confirmation screen, push the Yes softkey.Delete Individual Data RecordsTo delete individual records:1. Push the View softkey.2. Use the down and up arrow softkeys to access the desired record.3. Once the desired record is shown, push the Yes softkey to delete the record.4. To cancel data deletion, pull the trigger.10
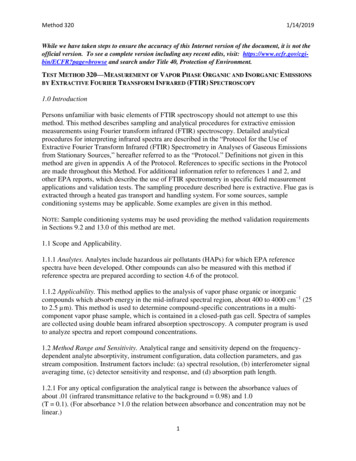
Infrared ThermometerHow the Product WorksHow the Product WorksInfrared thermometers measure the surface temperature of an object. The Productoptics sense emitted, reflected, and transmitted energy, which is collected andfocused onto a detector. The Product electronics translate the signal into atemperature measurement and shows the measurement on the display (seeFigure 3).Reflected sFigure 3. How the Product WorksProduct OperationTemperature MeasurementTo measure temperature, point the Product at an object and pull the trigger. Youcan use the laser pointer to aim the Product. You can also insert the K-typethermocouple probe for contact measurement. Be sure to consider distance-to-spotsize ratio and field of view (see “Distance and Spot Size” and “Field of View”). Thetemperature is shown on the display.NoteThe laser is used for aiming purposes only and is not related totemperature measurement.The Product features an auto off function that automatically powers down theProduct after 20 seconds of inactivity. To turn the Product on, pull the trigger.11
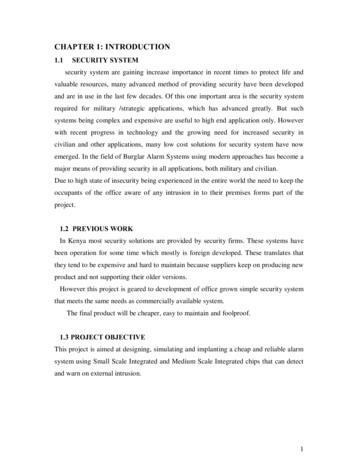
572-2Users ManualLocate a Hot or Cold SpotTo find a hot or cold spot, aim the Product outside the desired area. Then, slowlyscan across the area with an up and down motion until you locate the hot or coldspot (see Figure 4).hdp04.epsFigure 4. Locating a Hot or Cold SpotDistance and Spot SizeAs the distance (D) from the object being measured increases, the spot size (S) ofthe area measured by the Product becomes larger. The relationship betweendistance and spot size (D:S) for each Product is shown in Figure 5. The spot sizesindicate 90 % encircled energy.31.70 mm @ 1500 mm(1.25 ” @ 59.05 ”)D:S 60:119.17 mm @ 1150 mm(.75 ” @ 45.28 ”)S20.77 mm @ 500 mm(.82 ” @ 19.69 ”)21.38 mm @ 250 mm(.84 ” @ 9.84 ”)Dhdp05.epsFigure 5. Distance and Spot Size12
Infrared ThermometerProduct OperationField of ViewFor accurate measurements, make sure that the target is larger than the Productspot size. The smaller the target, the closer you should be to it (see Figure 6).YesNohdp06.epsFigure 6. Field of ViewEmissivityEmissivity describes the energy-emitting characteristics of materials. Most organicmaterials and painted or oxidized surfaces have an emissivity of approximately0.95, the default setting for the Product.To compensate for inaccurate readings that may result from measuring shiny metalsurfaces, you can cover the surface to be measured with electrical tape or flat blackpaint ( 148 C/300 F) with emissivity set to 0.95. Allow time for the tape or paint toreach the same temperature as the surface beneath it. Measure the temperature ofthe tape or painted surface.If you cannot paint or use tape, then you can improve the accuracy of yourmeasurements by either numerically adjusting emissivity or by using the EmissivityMenu to access a table of some common materials. The Product has numericallyadjustable emissivity from 0.10 to 1.00 that can be used in conjunction with theemissivity in Table 3. Also, the Product has a built-in table of the most commonmaterials that can be set from the Emissivity menu. The built-in values are indicatedin Table 3.HOLDThe display retains its last infrared measurement for twenty seconds when thetrigger is released, when HOLD is shown on the display. With the probe inserted,the contact thermometer remains on. To freeze the infrared temperature when aprobe is not inserted, release the trigger until HOLD shows on the display.13
572-2Users ManualData StorageThe Product can store up to 99 data records. The information below is stored ineach record: Record number IR and probe temperature in F or C Date/Time EmissivityFor more information, see “Save”.Data DownloadThe stored data can be downloaded to a personal computer (PC) with the includedUSB cable and the included FlukeView Forms Documenting Software. See theFlukeView Forms documentation for details. The USB input is located on the topof the Product next to the external probe input (see Figure 7).NoteTo prevent incorrect readings, do not do a temperaturemeasurement of an earthed conductor while the Product isconnected to a PC that is earthed by a three-phase groundingplug.12hdp07.epsFigure 7. Thermocouple and USB Connections14
Infrared ThermometerExternal Contact ProbeExternal Contact Probe WarningTo avoid electrical shock or personal injury, do not connectthe external contact probe to live electrical circuits.The Product comes with a bead K-type thermocouple probe. The probe attaches tothe Product via the probe input located on the top of the Product (see Figure 7).With the probe installed, the probe symbol ( ) shows on the display. The probecan be used simultaneously while the Product is taking non-contact measurements.The probe measurements are shown below the non-contact measurements. TheProduct will stay on when there is a probe inserted. When used with a personalcomputer and FlukeView Forms, the aut
tools can focus the laser and be dangerous to the eye. Do not look into the laser. Do not point laser directly at persons or animals or indirectly off reflective surfaces. Use the product only as specified, or hazardous laser radiation exposure can occur. Do not use laser viewing glasses as laser protection glasses.