Transcription
Guide to HRIS Import1
ContentsSpreadsheet Errors2
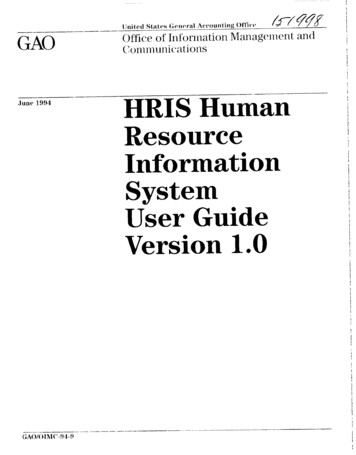
IntroductionTrakstar’s HRIS Import feature allows administrators to import Trakstar data with aspreadsheet exported from another HRIS system or with a spreadsheet of your own. It isa useful tool to make bulk changes to your employees.You can accomplish 3 main actions with an HRIS Import:1. Add users2. Update current user data3. Terminate usersAn import is done using a .CSV or .XLS file containing your employee information.Documents in Excel, Numbers or any other spreadsheet program can be easily savedin a .CSV or .XLS format. To begin, you’ll need either an export of your employee datafrom your HRIS system or you can export from Trakstar and make the necessarychanges to your spreadsheet. We’ll start with exporting existing employee data fromTrakstar but you may skip this step and export from your own HRIS system.3
Step 1: Export Employee DataExport from Trakstar:Log in as Administrator and select SettingsClick HRIS Sync from the drop down menuClick “Export Employees” from the HRIS Sync pageNOTE: If the HRIS Sync option is not available in the Settings tab, your organizationmay not opt into this feature. To discuss adding this to your Trakstar site, pleasecontact us at hello@trakstar.com.Export from your organization’s HRIS system:This step will vary depending on which HRIS system your organization uses. However,include the following employee fields when exporting if possible: Employee Number (Required to sync with Trakstar) Employee’s Manager Position Name4
Add Users:Add users by inserting new rows with necessary employee data. The following columnsare required fields for new users: EmployeeNumberFirst NameLast NameEmail AddressLogin IDPassword Manager Employee NumberPosition NameDate of HireNext Appraisal DateAppraisal ProcessEdit User Data:Make necessary changes to employee data fields including changes in manager,position, next appraisal date, process, etc.Terminate Users:Remove the row with that employee’s information. Later, we’ll ask if you want to“Terminate users not included in the spreadsheet” and those that have been removedwill be terminated.For more information on preparing your spreadsheet, see page 12 on“Spreadsheet Feld Rules”.5
Save your spreadsheet file as a .CSV or .XLS to your computer.Navigate to the HRIS Sync page in Trakstar (under the Settings tab) and choose whetheryou’d like to “Terminate employees not included in the spreadsheet” by checking the boxon this page.Upload the file by clicking “Choose a Spreadsheet” on the HRIS Sync page in Trakstar.6
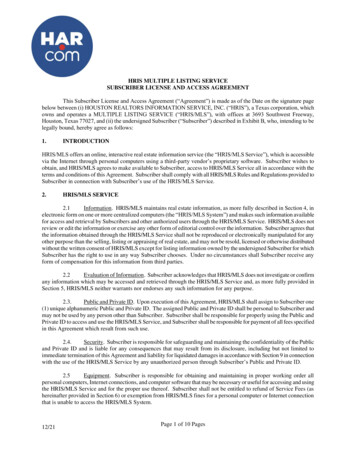
Once you’ve uploaded your spreadsheet, Trakstar will work on validating theinformation you’d like to import. If there are errors in the spreadsheet data, Trakstarwill give you the following message:In addition, Trakstar will provide you with the row number from your spreadsheet that theerror is located and a short explanation of what type of error was found.For more information on spreadsheet errors, see pages 14-15 on “CommonSpreadsheet Errors and Solutions”.7
Once you’ve adjusted your Spreadsheet errors and re-saved your spreadsheet,navigate to the HRIS Sync page in Trakstar and select “Choose a Spreadsheet” againto upload your newly saved document.NOTE: Remember to check the box for “Terminate employees” again if you’d likeTrakstar to terminate users that are not in the spreadsheet.8
Step #5: Accept and Apply ChangesIf your spreadsheet contains no errors after uploading, you are ready to get startedapplying changes to the areas in which your spreadsheet contained differentinformation than what is currently in your Trakstar site.Before moving forward with accepting and applying your spreadsheet changes, youmight consider checking the box to “Disable Emails”. This will temporarily disableTrakstar emails so your staff will not be notified of any of the large number of changesyou might be making.Terminate Employees:The first thing you might be asked to do is review the list of employees to terminate. If thelist looks correct, click “Terminate Employees”. If there are errors in the list, adjust yourspreadsheet by adding the employee(s) back in and re-upload.If the box for “Terminate employees not in the uploaded spreadsheet” was notclicked prior to uploading the spreadsheet, this step will be skipped.9
New PositionsTrakstar will present you a list of any new positions found in the spreadsheet that arewere not currently in your list of Positions in Trakstar. You can opt to:“Map this name to an existing position”: You will be asked which position from yourexisting list should be used in place of the new position name in your spreadsheet.The employee will be given the existing position name and the elements on thatposition will be what the employee is reviewed on.“Create a new position with this name”: Trakstar will add this position to your list. Itwill be a blank position in the Positions tab until you add elements to the form.“Create a new position by copying an existing position”: The new position name will becreated and you will be asked which position from the existing list should have itsappraisal elements copied to the new position. This way, the employee will have thenew position name but it will already be complete with appraisal elements.Make your selections for each new position and click “Apply position changes”:10
Add Employees:Review the list of employees to add. If the list looks correct, click “Create Employees”.If there are errors in the list, adjust your spreadsheet by adding the employee(s) andre- upload.Update Existing Employee Data:For Manager changes, choose whether to leave the current appraisal with the existingmanager, re-assign the appraisal to the new manager, or cancel (delete) the currentappraisal and give the employee a new one with the new manager.For Position changes, choose whether to leave the current appraisal for that employeewith the existing position or cancel (delete) the current appraisal and give the employee anew appraisal with the new position form.Once selections have been made, click “Update Employees”:11
All columns outlined below are required fields for new employees. Column titles shouldmatch these exactly in order for Trakstar to put the information in the correct place.1. Employee Number Must be unique to each employee No minimum character requirement, can include letters2. First Name3. Last Name4. Email Address Not required if the employee is not to receive automated email notifications5. Login ID Must be unique to each employee6. Password Required for new employees, cannot be blank Must be 4 characters For existing employees who you do not wish to change their password,input “DNE” (for “Do Not Edit”)7. Manager Employee Number Required if the employee has a manager This column must match the employee number of this employee’s manager Cannot result in a circular manage hierarchy (Example: Employee Acannot manage Employee B if Employee B also manages Employee A) Employees cannot manage themselves8. Position Name9. Hire Date10. Next Appraisal Date Refers to the Due Date of their next appraisal11. Process (Examples: Annual, Semi-Annual, etc.) Must match an existing Process already named in TrakstarIf you have additional columns of information you'd like to track in Trakstar, see “Groupsand Group Types” on page 13.12
Groups are essentially custom fields in Trakstar and are a great way to includeadditional employee information that you can use to run custom reports and organizeyour staff. Most often, groups are used for fields like Department, Location, Business Unit,etc. You can add Group Types with additional columns in your spreadsheet.Group Type Spreadsheet column header and the title of the information you’llbe trackingGroup The different options within a Group TypeIMPORTANT: Group Types must be added manually in your Trakstar system prior tosync. You’ll find them under Settings Groups. Use the blue plus sign on the left.13
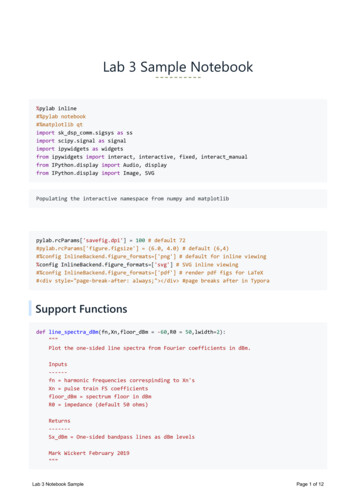
If there are errors in the data in your spreadsheet, Trakstar will not import the data thatwas uploaded. The following page shows possible error messages you might receive aftera spreadsheet upload as well as instructions on how to resolve the error in yourspreadsheet. Remember, if you get an error message the data in your spreadsheet willneed to be updated (or a Trakstar setting will need to be changed) and the spreadsheetwill need to be uploaded again to Trakstar to continue.Trakstar errors in HRIS Import might look like this:1. The row from the spreadsheet wherein the error was found will be on the left2. The column from the spreadsheet wherein the error was found3. The explanation of why the data cannot be uploaded14
ErrorSolutionColumn not recognizedA) Remove the Column from your spreadsheetB) Update the Column name to matchan existing field in TrakstarC) Add the column name as a Group Typeunder Settings GroupsManager causes circular hierarchyA) Locate the highest ranking employee inthe employee list and delete the ManagerEmployee Number in their row so theyhave no managerB) Resolve the error in the circularrelationship by editing the ManagerEmployee Number for at least oneemployee in the circular relationshipUsername has already been takenUsernames must be unique to each employee.Change the login ID in your spreadsheet forone of the employee listed in the errorCannot find Manager Employee NumberA) Edit this employee’s Manager EmployeeNumber column to match the employeenumber of another user in thespreadsheetB) Add this employee’s manager to yourspreadsheet with a matchingEmployee NumberProcess not foundA) Add the Process title to your Processes tabB) Change this employee’s Process in thespreadsheet to match a Process thatalready exists in your Trakstar sitePassword cannot be blankA) For existing employees, input “DNE” for“Do Not Edit” in the password columnB) For new employees, input a password thatis at least 4 characters in length15
Trakstar's HRIS Import feature allows administrators to import Trakstar data with a spreadsheet exported from another HRIS system or with a spreadsheet of your own. It is a useful tool to make bulk changes to your employees. You can accomplish 3 main actions with an HRIS Import: 1. Add users 2. Update current user data 3. Terminate users