Transcription
User’s manualTL7910DECT 6.0 cordless headset
Congratulationson your purchase of this AT&T product.Unify your everyday business communications with the AT&TTL7910 DECT 6.0 Cordless Headset. Whether you want toconnect directly to your phone line, deskset or computer, youcan with the TL7910 headset. Control costs and support yourmobile workforce with connectivity to Voice over IP (VoIP)services like SkypeTM and Microsoft Lync . A magnetic chargerin the cradle ensures the headset fits and charges securely—soyou’ll never run out of battery during long calls. With up to 12hours of hands-free talk time and a range of up to 500 feet,you’re free to work wherever your work is.Before using this AT&T product, please read the Importantsafety information section on pages 47-49 of this manual.Please thoroughly read this user’s manual for the featureoperations and troubleshooting information necessary to installand operate your new AT&T product. You can also visit ourwebsite at www.telephones.att.com or call1 (800) 222-3111. In Canada, dial 1 (866) 288-4268.Visit www.telephones.att.com/headsets for a completelist of AT&T phones that have been tested and found to becompatible with the TL7910.The Skype name is a trademark of Skype.Microsoft Lync is a registered trademark of Microsoft Corporation.
Model number: TL7910Type:DECT 6.0 cordless headsetSerial number:Purchase date:Place of purchase:Both the model and serial numbers of your AT&T product can befound on the bottom of the headset base.Save your sales receipt and original packaging in case it isnecessary to return this product for warranty service.Compatible withHearing Aid T-CoilTelephones identified with this logo have reduced noise andinterference when used with most T-coil equipped hearingaids and cochlear implants. The TIA-1083 Compliant Logo is atrademark of the Telecommunications Industry Association. Usedunder license.TTIA-1083 2012-2013 Advanced American Telephones. All Rights Reserved. AT&T andthe AT&T logo are trademarks of AT&T Intellectual Property licensed toAdvanced American Telephones, San Antonio, TX 78219. Printed in China.
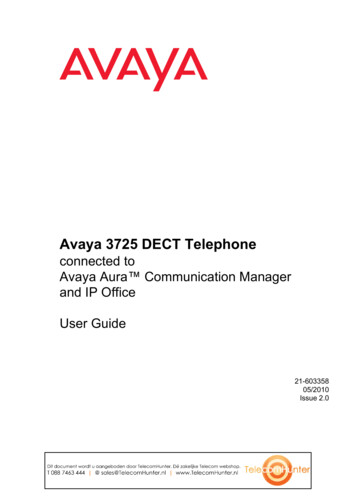
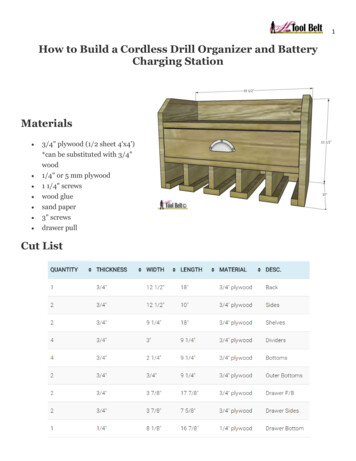
Parts checklistCheck to make sure the headset package includes the followingitems. Save your sales receipt and original packaging in theevent warranty service is necessary.User’s manualQuick start guideTL7910DECT 6.0 cordless headsetTL7910DECT 6.0 cordless headsetUser's manualBatterywith batterycompartmentcover attachedLine splitterTwo over the head bandsQuick start guideCordless headset withearbud attachedHeadset basepower adapterFive earbudsBehind the neck bandTelephoneline cordHeadset baseCorded phoneconnection cableThree over the ear hooksUSB cableCD-ROM
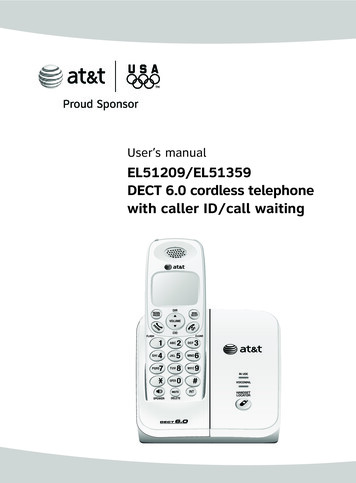
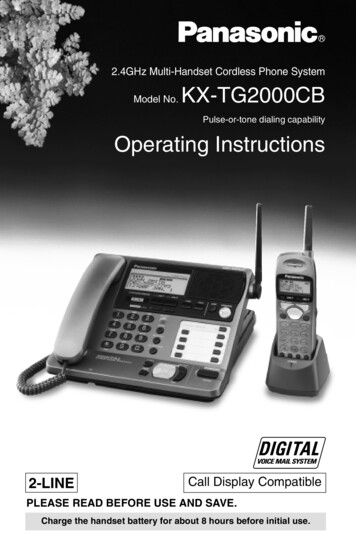
Optional accessoryThe TL7910 headset and base is also compatible with theTL7100 handset lifter.For more information about the handset lifter, visit our website atwww.telephones.att.com.TL7100
User’s manualTL7910DECT 6.0 cordless headsetTable of contentsGetting startedIntroduction. 1Quick reference guide headset. 2Headset lights. 2Headset alert tones. 4Quick reference guide headset base. 5Headset base lights. 5Installation. 8Colored labels. 8Digital subscriber line(DSL). 8Battery installation. 9Headset base installationand battery charging . 10Headset base installation. 11Installation options. 11Option 1: Connect theheadset to a telephonewall jack. 12Option 2: Connect theheadset to a cordedphone. 13Option 3: Connectthe headset to yourcomputer. 15Headset attachments. 18Earbud. 18Over the ear hook. 19Over the head band. 22Behind the neck band. 24OperationHeadset operation. 27Power on/off theheadset. 27PHONE mode andPC mode. 27PHONE mode. 28Make a call. 28Answer a call. 28End a call. 29Voice command. 29Headset ringer. 29Caller ID announce. 30Temporary ringersilencing. 30Call waiting. 30Options while on calls. 31Volume control. 31Mute. 32Switching between PHONEmode and PC mode. 33
AppendixAdding and registeringheadsets. 34Registration options. 34Register a headset to yourTL7910 headset base. 35Register a headset toan AT&T DECT cordlesstelephone base. 36Deregistering headsets. 38Deregister all headsetsfrom your TL7910 headsetbase. 38Troubleshooting. 39Maintenance. 46Important safetyinformation. 47Safety information. 47Especially about cordlessheadsets. 48Precautions for usersof implanted cardiacpacemakers. 49Pacemaker patients. 49FCC Part 68 and ACTA. 50FCC Part 15. 52Limited warranty. 53Technical specifications. 56DECT 6.0 digitaltechnology. 57Operating range. 57Extended range andclarity. 57Encrypted for addedsecurity. 57IndexIndex. 58
Getting startedIntroductionThe TL7910 is a cordless headset and base that allows you tohave handsfree phone conversations. It can be used in differentways depending on your needs. Choose from the following threeoptions. Connect your TL7910: To a telephone line only (page 12). Connect the headset to atelephone wall jack. Use the telephones on the same telephoneline to make or answer calls. The headset is a supplementarydevice that can join the calls. To a traditional corded telephone (pages 13-14). Connectthe headset to a corded telephone. If you also install alifter (AT&T TL7100, purchased separately) on your cordedtelephone, you can use the headset to remotely control thelifter for answering or hanging up a call. To both a PC and telephone line (pages 15-17). Connecta phone line to the headset base and the USB cable toyour PC. You can make and answer VoIP calls throughSkype or Microsoft Lync, or landline calls using theAT&T Softphone Call Manager. You can also use the voicecommand feature to make or answer calls after you haveinstalled the AT&T Softphone Call Manager.Install the AT&T Softphone Call Manager using theCD-ROM provided in the package.-ORVisit www.telephones.att.com/downloads todownload the software. Unzip and install the file afterdownload.For installation and operation instructions of the software,refer to the Installation and Operation Guide which canalso be found in the CD-ROM provided or the web site statedabove.
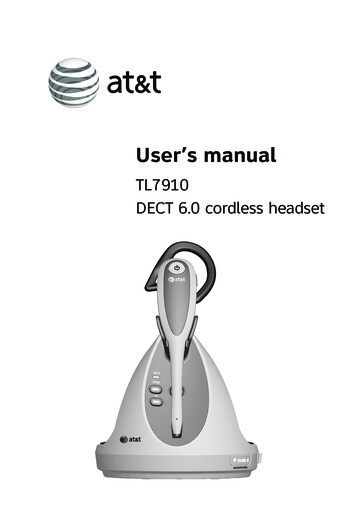
Getting startedQuick reference guide - headset(On/off button and light)Press to make, answer or end a call(pages 28-29).Headset lightslight statusRed On when the headset battery is low and the headsetis charging in the headset base. Flashes every 10 seconds to indicate the battery islow when the headset is not in the headset base. Flashes three times to indicate the headset ispowering off.Blue On when a registered headset is charging in theheadset base. Flashes three times to indicate the headset ispowering on. Flashes twice every three seconds when the headsetis in use. Flashes four times every four seconds when there isan incoming call in PHONE mode. Flashes every 10 seconds when a registered headsetin idle mode is out of the headset base.Red and blue Flashes slowly when the headset is not registered. Flashes quickly when the headset is trying toregister to a headset base.Off The battery is dead. No battery is installed. The headset is powered off.
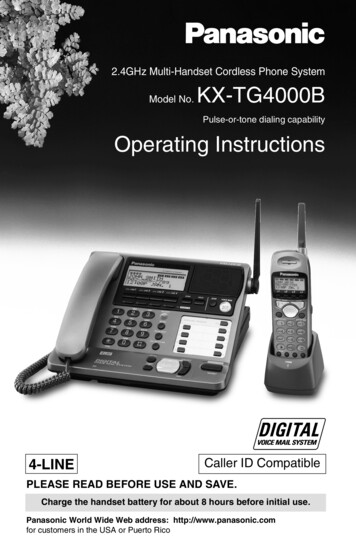
Getting startedQuick reference guide - headsetVOL /VOLSlide the volume switchto the right or left toadjust the headsetringer volume whilein idle mode (page 29),or the listening volumewhile on a call(page 31).EarpieceFLASHBattery with coverattachedPress to answer anincoming call whenyou receive a callwaiting alert during acall (page 30).Remove to replace thebattery.MicrophoneThe microphoneincorporates noisecanceling technologyfor clearer calls.MUTE/VOICEPress to mute the microphoneduring a call (page 32).Press to mute the ringer inthe earpiece when there is anincoming call (page 30).Press to initiate the voicecommand feature (page 29).
Getting startedQuick reference guide - headsetHeadset alert tonesOne long beep The headset is ready to take your voicecommand. (You have to install the AT&TSoftphone Call Manager before using thevoice command feature. For installation andoperation instructions of the software, referto the Installation and Operation Guidewhich can be found in the CD-ROM in thepackage. You may also visitwww.telephones.att.com/downloads to download it.)One short beep every The microphone is muted.30 secondsTwo beeps Error alert tone. The speaking volume has reached its highestor lowest setting. Any key is pressed while the headset is outof range.Two low beeps Call waiting alert tone.Two rapid beepsevery 20 seconds Low battery warning.Three rising beeps A conference call has started.Three rapid beepsevery 20 seconds The headset is out of range. The headset is not yet registered.Three rapid beeps The headset is powering on or off.
Getting startedQuick reference guide - headset baseMagnetic charging mountPAIRPlace the headset here forcharging.Use to initiate headsetregistration orderegistration.MUTE (light)PC (mode buttonand light)PHONE (mode buttonand light)Headset base lightsMUTE(Red) On when you are registering a headset. Flashes when a call is muted. Flashes when you are deregistering headset(s) from theheadset base.PHONE(Blue) On when PHONE mode is selected as the default modeon the idle headset base. Flashes four times every four seconds when there is anincoming call. Flashes twice every three seconds when the headset is inuse in PHONE mode. Flashes slowly when a call is on hold in PHONE mode.PC(Blue) On when PC mode is selected as the default mode onthe idle headset base. Flashes twice every three seconds when the headset is inuse in PC mode. Flashes slowly when a call is on hold in PC mode.
Getting startedQuick reference guide - headset baseVOLUME/MICROPHONEPress the volume keys on the sideof the headset base to adjust thespeaking volume when on a call(page 31).(USB port)Open the port cover to plug in the USBcable for use with PC mode (page 15).LIFTERThis jack is only used to connect anAT&T handset lifter (model TL7100,purchased separately).CORDED HANDSET CONNECTED/YES/NOChoose the setting based on whetheryou have connected to a cordedhandset (page 12 or 13).
Getting startedQuick reference guide - headset baseCORDED PHONE CONNECTIONjack (blue dot)This jack is only used to connectthe corded phone connection cable(page 13).TEL WALL JACK (red dot)POWER jack (green dot)Corded handset audio adjust switchUse this switch to adjust the cordedhandset audio when you have connectedthe headset base to a corded telephone(page 14).
Getting startedInstallationYou must install andcharge the battery beforeusing the headset.STOP!See pages 9-10for easy instructions.Colored labelsThe cords provided with your headset are attached with coloredlabels to help you plug them into the correct jacks on theheadset base. Each jack on the headset base is labeled andmarked with a colored dot, allowing you to plug in the correctcords by matching the colors.Digital subscriber line (DSL)If you subscribe to high-speed Internet service (DSL - digitalsubscriber line) through your telephone line, you must install aDSL filter between the telephone line cord and telephone walljack (see page 12, 13 or 15). The filter prevents noise and callerID problems caused by DSL interference. Please contact your DSLservice provider for more information about DSL filters.For customer service or product information, visit our website atwww.telephones.att.com or call 1 (800) 222-3111.In Canada, dial 1 (866) 288-4268.Avoid placing the headset base too close to: Communication devices such as television sets, VCRs or othercordless telephones. Excessive heat sources. Noise sources such as a window with traffic outside, motors,microwave ovens, refrigerators or fluorescent lighting. Excessive dust sources such as a workshop or garage. Excessive moisture. Extremely low temperature. Mechanical vibration or shock such as on top of a washingmachine or work bench.
Getting startedBattery installationThe battery is permanently attached to the battery compartmentcover. Do not try to separate them from each other. Afterinstalling the battery pack, charge it for at least 15 minutes.You may be able to make and receive short calls. For optimalperformance, charge the headset battery for at least three hoursbefore use. When fully charged, the headset battery providesapproximately 12 hours of talk time or 5 days of standby time.When the headset is not in use, recharge it by returning it to theheadset base.1. Insert the battery into thebattery compartment.2. Press down on the battery until itclicks into place.NOTES: Remove any headset attachment, except the earbud, before battery replacement. To order a replacement battery (model BT191665), visit our website atwww.telephones.att.com or call 1 (800) 222-3111.In Canada, dial 1 (866) 288-4268.
Getting startedHeadset base installation and battery chargingAfter installing the battery, charge the headset by placing it inthe magnetic charging mount as shown below. The light turnson when the headset is charging.1. Plug the small end of the headset base power adapter intothe POWER jack (green dot) at the back of the headset base.Plug the large end into an electrical outlet not controlled by awall switch.2. Insert the headset into themagnetic charging mount.3. The magnet holds the topof the headset in place.The light turns on.MagneticchargingmountIMPORTANT INFORMATIONUse only the supplied rechargeable battery pack or replacementbattery pack (model BT191665). To order, visit our website atwww.telephones.att.com or call 1 (800) 222-3111.In Canada, dial 1 (866) 288-4268.10
Getting startedHeadset base installationInstallation optionsThere are three installation options as described below.Option 1: Connect the headset to a telephone wall jack throughthe line splitter provided (see page 12).Option 2: Connect the headset to a corded phone using thecorded phone connection cable provided (see pages 13-14).Option 3: Connect the headset to your computer using the USBcable provided for VoIP calls, and to the telephone wall jackusing a telephone line cord for landline calls (see pages 1517). Make sure you install the AT&T Softphone Call Manageron your computer using the CD-ROM provided in the package.You may also visit www.telephones.att.com/downloadsto download and install the software. For installation andoperation instructions of the software, refer to the Installationand Operation Guide which can also be found in the CD-ROMprovided or the web site stated above.11
Getting startedHeadset base installationOption 1: Connect the headset to a telephone wall jack1. Make sure the CORDED HANDSETCONNECTED switch on the right side of theheadset base is set to NO.2. Connect the line cords as shown below.Use the included line splitter to connect theheadset base and your telephone to thesame telephone wall jack. Plug one end of thetelephone line cord intothe TEL WALL JACK(red dot) at the back ofthe headset base.Telephone line cord Plug the other end of thetelephone line cord intothe line splitter. Use the attachedfastener to bundleall line cords neatly. Plug the line splitter intothe telephone wall jack(or a DSL filter if yousubscribe to DSL Internetservice).Line splitter Connect anothertelephone linecord between thetelephone and theline splitter.Corded orcordless phoneA DSL filter (not included) isrequired if you have DSLhigh-speed Internet service.The DSL filter must be pluggedinto a telephone wall jack.NOTE: The headset base and headset do not have external ringers. Whenyou receive calls, the headset earpiece rings. If you have telephonesconnected to the same telephone line as the headset base, you can rely onthe ringers of those telephones to alert you to incoming calls.12
Getting startedHeadset base installationOption 2: Connect the headset to a corded phone1. Make sure the CORDED HANDSETCONNECTED switch on the right side of theheadset base is set to YES.2. Connect the line cords as shown below.Use the included corded phone connectioncable to connect the headset base to yourcorded telephone. Plug one end of thecorded phone connectioncable into the CORDEDPHONE CONNECTIONjack (blue dot) at the backof the headset base. Use the attachedfastener to bundleall line cords neatly.A DSL filter (notincluded) is requiredif you have DSLhigh-speed Internetservice. The DSL filtermust be plugged intoa telephone wall jack. Plug the other endof the corded phoneconnection cable intothe handset jack onyour corded phone. Unplug the curlyhandset cord fromthe handset jackon the cordedphone and plugit into the jack onthe corded phoneconnection cable.Corded phone13
Getting startedHeadset base installationOption 2: Connect the headset to a corded phone (cont.)After you have connected the headset baseto your corded phone, you may need toadjust the corded handset audio switch atthe bottom of the headset base for optimalsound quality.To adjust the corded handset audio: Lift the corded handset and thenpress on the headset to check for adial tone. If there is no dial tone or thedial tone is unclear, slide the cordedhandset audio switch at the bottom ofthe headset base from A to F until thedial tone is clear.14
Getting startedHeadset base installationOption 3: Connect the headset to your computer1. Connect the headset base to your computer using theUSB cable provided for VoIP calls. Plug the USB cable asshown below. Wait for your computer to indicate that it hasrecognized the headset.2. Install the AT&T Softphone Call Manager using theCD-ROM provided in the package. You may also visitwww.telephones.att.com/downloads to downloadand install the software. For installation and operationinstructions of the software, refer to the Installation andOperation Guide which can also be found in the CD-ROMprovided or the web site stated above.A DSL filter (not included) is required if you haveDSL high-speed Internet service. The DSL filtermust be plugged into a telephone wall jack. Plug one end ofthe telephone linecord into the TELWALL JACK (reddot) at the back ofthe headset base.Telephoneline cord Plug theother endof thetelephoneline cordinto thetelephonewall jack ora DSL filter. Plug the large endof the USB cableinto a USB port onyour computer. Plug the small end of theUSB cable into the portlabeledon the rightside of the headset base.15 Use the attachedfastener tobundle all linecords neatly.
Getting startedHeadset base installationOption 3: Connect the headset to your computer (cont.)3. After you have installed the AT&T Softphone Call Manager,check to make sure the audio setting is properly configuredin your Windows system. If you have installed Skype and/orMicrosoft Lync and want to use them with your headset,make sure the audio settings are configured correctly in theprograms as well.a) Audio settings in Microsoft Windows system:For Windows XP users:i. Click Start menu and choose Control Panel.ii. Click Sounds, Speech, and Audio Devices and then clickSounds and Audio Devices.iii. Click the Audio tab.iv. Make sure AT&T DECT Headset is selected under theSound playback and Sound recording settings.For Windows 7 users:i. Click Start menu and choose Control Panel.ii. Click Hardware and Sound and then click Manageaudio devices under the Sound menu.iii. Click the Playback tab and make sure AT&T DECTHeadset is set as the default speaker.iv. Click the Recording tab and make sure AT&T DECTHeadset is set as the default microphone.Windows and Windows XP are registered trademarks of Microsoft Corporation.16
Getting startedHeadset base installationOption 3: Connect the headset to your computer (cont.)b) Audio settings in Skype:i. Launch the Skype program.ii. Click on Tools, then Options.iii. Click on Audio settings.iv. Make sure AT&T DECT Headset is selected under thespeakers and microphone settings.c) Audio settings in Microsoft Lync:i. Launch the Microsoft Lync program.ii. Click on Options, then Audio device.iii. Make sure AT&T DECT Headset is selected under theAudio device setting.IMPORTANTPeriodically check for software updates. Go to the ABOUT tab under theSettings panel in the AT&T Softphone Call Manager, then click CheckUpdate. For more details, refer to the Software updates section in theInstallation and Operation Guide, available in the CD-ROM which comeswith the package.17
Getting startedHeadset attachmentsEarbudThere are a total of six earbuds provided. One of them has beenattached to the headset. They come in three sizes of which thereare two types: one normal and one providing a deeper fit. Followthe steps below to change the earbud.To remove the earbud from the headset earpiece:Hold both sides of the earbud. Twist and pull the earbud until itseparates from the earpiece.To attach the earbud to the headset earpiece:1. Choose an appropriate earbud.2. Position the earbud on the earpiece as shown below.3. Press the earbud down on the earpiece until it clicks intoplace. Move the earbud around so that the protruding bumpon the earbud is pointing towards your mouth when placed onyour ear.Protrudingbump18
Getting startedHeadset attachmentsOver the ear hookThere are three ear hooks provided. Choose the size that best fitsyour need to attach to the headset. Follow the steps below toattach an ear hook to the headset.To position the headset to wear on the left or right ear: To wear on the left ear:1. Make sure the ear hook loopis positioned, as shown inFigure 1 on the right.2. Attach the ear hook to theheadset, as instructed on thenext page.Ear hook loopFigure 1 To wear on the right ear:1. Make sure the ear hook loopis positioned, as shown inFigure 2 on the right.2. Attach the ear hook to theheadset, as instructed on thenext page.Ear hook loopFigure 219
Getting startedHeadset attachmentsTo attach the ear hook to the headset:1. Make sure there is no headset attachment, except the earbud,connected to the headset.2. Insert the earpiece into the ear hook loop, as shown in Figure 3.3. Press the edge of the ear hook loop towards the earpiece untilit clicks into place, as shown in Figure 4.4. Hook the headset onto the desired ear. Adjust the angle of theheadset until the microphone is pointing towards your mouth,as shown in Figure 5.Figure 3Figure 4Figure 520
Getting startedHeadset attachmentsTo remove the ear hook from the headset:Hold the headset with one hand. Twist and pull the ear hook withthe other hand until it separates from the earpiece.21
Getting startedHeadset attachmentsOver the head bandThere are two over the head bands provided. Choose the one thatbest fits your need to attach to the headset.To attach the head band to the headset:1. Make sure there is no headset attachment, except the earbud,connected to the headset.2. Insert the earpiece into the loop of the ear pad, as shown inFigure 6.3. Push the earpiece into the ear pad until it clicks into place, asshown in Figure 7.4. Adjust the head band to fit your head. Adjust and rotate theangle of the headset until the microphone is pointing towardsyour mouth, as shown in Figure 8.Figure 6Figure 7Figure 8NOTES: To wear on the other ear, rotate the headset within the loop of the ear pad. Firmly grip the ear pad with one hand whenever adjusting the headsetmicrophone up or down.22
Getting startedHeadset attachmentsTo remove the head band from the headset:Hold the headset with one hand and the ear pad with theother hand. Twist and pull the headset until it separates from theear pad.23
Getting startedHeadset attachmentsBehind the neck bandBy default, the ear pad on the neck band is positioned to beworn on the right ear.To attach the headset to the neck band:1. Make sure there is no headset attachment, except the earbud,connected to the headset.2. Insert the earpiece into the loop of the ear pad, as shown inFigure 9.3. Gently press the earpiece inward until it clicks into place, asshown in Figure 10.4. Place the neck band around your neck and over your ears.5. Adjust and rotate the angle of the headset until the microphone ispointing towards your mouth, as shown in Figure 11.Figure 9Figure 10Figure 1124
Getting startedHeadset attachmentsTo wear the headset on your left ear:1. Remove the ear pad and supporting pad from the neck bandby carefully pulling them up through the stems at the end ofthe neck band, as shown in Figure 12.Ear padSupporting padFigure 122. Snap the socket of the ear pad into the stem at the left end of theneck band. Snap the socket of the supporting pad into the stem atright end of the neck band, as shown in Figure 13.Figure 133. Follow Steps 1-5 in To attach the headset to the neck band onpage 24.25
Getting startedHeadset attachmentsTo remove the neck band from the headset:Hold the headset with one hand and the ear pad with theother hand. Twist and pull the headset until it separates from theear pad .26
OperationHeadset operationPower on/off the headsetPower on the headset before use.To power on the headset: Place the headset in the headset base.-OR Press and hold for two seconds.The light flashes blue three times and you hear three beepswhen it is being powered on.Power off the headset if it will not be used for a long time.To power off the headset: Press and hold for four seconds.The light flashes red three times and you hear three beepswhen it is being powered off.Prolonged exposure to high volume levels using the headset may damageyour hearing.PHONE mode and PC modeBefore using the headset, you may change its default mode toPHONE mode or PC mode. When you press on the headsetwhile it is not in use, your headset automatically uses the defaultmode you selected. When the headset is not in use, you canchoose between PHONE mode and PC mode.To choose PHONE mode: Press the PHONE button on the headset base. The PHONElight turns on.To choose PC mode: Press the PC button on the headset base. The PC light turns on.27
OperationPHONE modeMake a callTo make calls on your home or office telephone line, pressPHONE on the headset base for PHONE mode.When the headset base is connected to a telephone wall jack(installation option 1):1. Follow the instructions in your telephone user’s manual formaking calls.2. Press on the headset at any time to join the call.3. After you join the call, you can hang up the telephone andcontinue the call on the headset.When the headset base is connected to your corded phone(installation option 2):1. Lift the corded handset from the telephone base, press onthe headset.2. Follow the instructions in your telephone user's manual formaking calls. Do not hang up the corded handset until you areready to end the call.NOTE: If you plug the headset into a telephone line without a telephoneconnected, you cannot make calls.Answer a callWhen the headset base is connected to a telephone wall jack(installation option 1): Press on the headset.When the headset base is connected to your corded phone(installation option 2):1. Lift the corded handset from the telephone base.2. Press on the headset at any time to join the call. Do not hangup the corded handset until you are ready to end the call.28
OperationPHONE modeEnd a callWhen the headset base is connected to a telephone wall jack(installation option 1): Press on the headset or place the headset in the headset base.When the headset base is connected to your corded phone(installation option 2): Hang up the corded handset, then press on the headset orplace the headset in the headset base.Voice commandThe voice command feature enables you to make or answer callsusing certain voice commands. You have to install the AT&TSoftphone Call Manager on your computer to use the voicecommand function. The software is available in the CD-ROMwhich comes with the package. You may also visitwww.telephones.att.com/downloads to download andinstall the software.For detailed instructions of the voice command feature, refer tothe Installation and Operation Guide, also available in theCD-ROM which comes with the package or the web site statedabove.Headset ringerThe headset base and headset do not have external ringers. Youcan only hear the ringer through the earpiece when you arewearing the headset. If you have telephones connected to thesame telephone line as the headset base, the ringers of thosetelephones can alert you to incoming calls.To change the volume of the earpiece ringer: Slide the volume switch at the top of the headset towardsVOL or VOL- when the headset is not in use.To turn off the earpiece ringer: Slide the volume switch at the top of
User's manual TL7910 DECT 6.0 cordless headset Table of contents Getting started Introduction.1 Quick reference guide -