Transcription
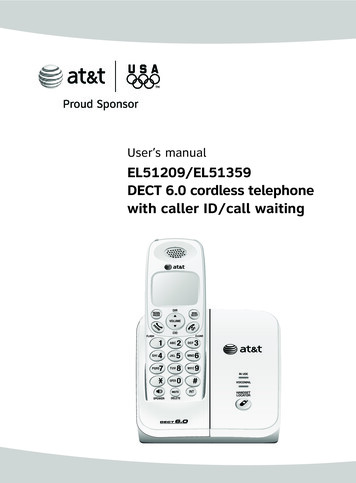
User’s manualEL51209/EL51359DECT 6.0 cordless telephonewith caller ID/call waiting
Congratulationson purchasing your new AT&T product. Before using this AT&T product, pleaseread the Important safety information on pages 49-50 of this manual.Please thoroughly read the user’s manual for all the feature operations andtroubleshooting information necessary to install and operate your new AT&Tproduct. You can also visit our website at www.telephones.att.com orcall 1 (800) 222-3111. In Canada, dial 1 (866) 288-4268.Model #:EL51209 (two handsets)EL51359 (three handsets)DECT 6.0 cordless telephoneType:Serial #:(found on the bottom of the telephone base)Purchase date:Place of purchase:Both the model and serial number of your AT&T product can be found on thebottom of the telephone base.Compatible withHearing Aid T-CoilTTelephones identified with this logo have reduced noise andinterference when used with most T-coil equipped hearing aidsand cochlear impacts. The TIA-1083 Compliant Logo is atrademark of the Telecommunications Industry Association. Usedunder license.TIA-1083The ENERGY STAR program (www.energystar.gov) recognizes andencourages the use of products that save energy and help protectour environment. We are proud to mark this product with theENERGY STAR label indicating it meets the latest energyefficiency guidelines. 2009 Advanced American Telephones. All Rights Reserved. AT&T andthe AT&T logo are trademarks of AT&T Intellectual Property licensed toAdvanced American Telephones, San Antonio, TX 78219. Printed in China.
Parts checklistSave your sales receipt and original packaging in the event warranty service isnecessary.Your telephone package contains the following items:User’s manualQuick start guideEL51209/EL51359DECT 6.0 cordless telephonewith caller ID/call waitingEL51209/EL51359DECT 6.0 cordless telephonewith caller ID/call waitingUser’s manualTelephone baseBattery forcordless handset(2 for EL51209)(3 for EL51359)Quick start guideCharger for cordlesshandset with poweradapter installed(1 for EL51209)(2 for EL51359)Batterycompartment covers AC poweradapter for(2 for EL51209)telephone(3 for EL51359)Cordless handsets(2 for EL51209)(3 for EL51359)Wall mount bracketTelephone linecord
User’s manualEL51209/EL51359DECT 6.0 cordless telephonewith caller ID/call waitingTable of contentsGetting startedQuick reference guide - handset.1Quick reference guide - handset &telephone base .2Installation .3Telephone base & chargerinstallation.4Battery installation & charging.5Wall installation.7Tabletop to wall installation .7Wall to tabletop installation .8Handset settingsTelephone settings.9Menu settings .9Ringer volume .9Ringer tone .10Key tone .10LCD language.11Set date/time.11Voicemail (visual messagewaiting) indicator .12Clear voicemail indication .13Home area code .14Telephone operationMaking, answering, and endingcalls .15Making a call .15On-hook dialing (predialing) .15Answering a call . 15Temporary ringer silencing. 15Ending a call . 15Handset operation . 16Auto off . 16Speakerphone information . 16Last number redial. 16Options while on calls. 17Volume control . 17Call waiting. 17Mute . 17Chain dialing . 18Multiple handset useHandset locator. 19Join a call in progress. 19Intercom. 20Answer an incoming call duringan intercom call . 20Call transfer using intercom . 21DirectoryAbout the directory. 23Shared directory. 23Capacity. 23Exiting the directory. 23Create directory entries. 24To create a new directoryentry. 24Review directory . 26
To review directory entries .26Search directory .27To search by name.27To dial, delete or edit entries.28Display dial.28To delete an entry.28To edit an entry .28Caller IDAbout caller ID.29Information about caller IDwith call waiting .29Caller ID operation.30Memory match .30Missed (new) calls indicator .30Caller ID history.31How the caller ID history (call log)works.31To review the caller IDhistory.32Make a call log entry ready todial.33Dial a call log entry .33Delete entries .33Save a call log entry to thedirectory .34Reasons for missing caller IDinformation.35Appendix AAlert tones and lights.36Handset screen icons.36Handset alert tones .36Lights.36Appendix BHandset display screenmessages . 37Appendix CTroubleshooting.39Appendix DMaintenance .48Appendix EImportant safety information.49Safety information . 49Especially about cordlesstelephones . 49Precautions for users of implantedcardiac pacemakers . 50Pacemaker patients. 50Appendix FFCC part 68 and ACTA . 51Appendix GFCC part 15. 53Appendix HLimited warranty. 54Appendix ITechnical specifications . 57DECT 6.0 digital technology. 57Telephone operating range. 57Extended range and clarity . 57Index . 58
Getting startedQuick reference guide - handsetTCID/VOLUMEPress TCID to show caller IDinformation (page 32) when thephone is not in use.CHARGE lightThe charge light is on when thehandset is charging (page 6).Press to scroll down while inmenus (page 9). PressTVOLUME to decrease thevolume level during a call(page 17).SDIR/VOLUMEPress DIRS to show directoryentries (page 26) when thephone is not in use.MENU/SELECTPress to scroll up while inmenus (page 9). PressSVOLUME to increase thevolume level during a call(page 17).Press to display the menu (page9). Once in the menu, press toselect an item or save an entryor setting.OFF/CLEARREDIAL/PAUSEPress and hold while thetelephone is not in use to erasethe missed calls indicator.Press repeatedly to view the lastfive numbers dialed (page 16).While entering numbers, pressand hold to insert a dialingpause (page 24).During a call, press to hang up(page 15).While using menus, press tocancel an operation, back up tothe previous menu, or exit themenu display (page 9).PHONE/FLASHPress to make or answer a call(page 15).During a call, press to answer anincoming call when you receivea call waiting alert (page 17).1MUTE/DELETEDuring a call, press to mutemicrophone (page 17).While reviewing the caller IDhistory (page 33), or thedirectory (page 28) or the redialmemory (page 16), press todelete an individual entryWhile reviewing a call log entry,press repeatedly to add orremove 1 in front of thetelephone number before dialingor saving it in the directory(page 33).While predialing, press to deletedigits (page 15).SPEAKERPress to turn on the handsetspeakerphone, press again toresume normal handset use(page 16).#Press repeatedly to displayother dialing options whenreviewing a call log entry(page 33).INTPress to initiate an intercomconversation or transfer a call(pages 20-22).1
Getting startedQuick reference guide - handset & telephone baseMain menu Highlights a menu item?EJSFDUPSZDBMM!MPHMenuMain menuUsing menusDIRECTORY (page 24)CALL LOG (page 32)RINGER VOLUME (page 9)RINGER TONE (page 10)KEY TONE (page 10)LCD LANGUAGE (page 11)SET DATE/TIME (page 11)CLR VOICEMAIL (page 13)HOME AREA CODE (page 14)Press SDIR or TCID to scrollthrough menu items.Press MENU/SELECT to select ormodify a highlighted item.OFF/CLEAR to cancelPressan operation, back up to theprevious menu, or exit the menudisplay.VOICEMAIL indicatorIN USE indicatorFlashes when you havenew voicemail.Voicemail service isoffered by your localtelephone company(page 12).On when the handset isin use.Flashes when anothertelephone is in use onthe same line.Flashes quickly whenthere is an incoming call.HANDSET LOCATORPress to make handsetsbeep so you can locatethem (page 19).2
Getting startedInstallationYou must install and charge thehandset battery before using thecordless handset.STOP!See pages 5-6 for easy instructions.Install the telephone base close to a telephone jack and a power outlet notcontrolled by a wall switch. The telephone base can be placed on a flatsurface or vertically mounted on the wall (see page 7). For optimum rangeand better reception, place the telephone base in a central and openlocation.If you subscribe to high-speed Internet service (digital subscriber line - DSL)through your telephone line, you must install a DSL filter between thetelephone line cord and the telephone wall jack (see the following page). Thefilter prevents noise and caller ID problems caused by DSL interference.Please contact your DSL service provider for more information about DSLfilters.Your product may be shipped with a protective sticker covering the handset ortelephone base display - remove it before use.For customer service or product information, visit our website atwww.telephones.att.com or call 1 (800) 222-3111. In Canada, dial1 (866) 288-4268.Avoid placing the telephone base too close to: Communication devices such as: television sets, VCRs, or other cordlesstelephones. Excessive heat sources. Noise sources such as a window with traffic outside, motors, microwaveovens, refrigerators, or fluorescent lighting. Excessive dust sources such as a workshop or garage. Excessive moisture. Extremely low temperature. Mechanical vibration or shock such as on top of the washing machine orworkbench.3
Getting startedTelephone base & charger installationInstall the telephone as shown below.The telephone base is ready for table use. If you want to change to wallmounting, see page 7 for details.5. Plug the other endof the telephoneline cord into atelephone jack or aDSL filter.If you have DSL high speedInternet service, a DSL filter(not included) is required.4. Plug the large endof the AC poweradapter into apower outlet notconnected to a wallswitch.Telephone line cord1. Plug one end ofthe telephoneline cord intothe telephonejack on thebottom of thetelephone base.2. Plug the smallend of the ACpower adapterinto the powerjack on thebottom of thetelephone base.3. Route the poweradapter cordthrough the slot.Charger installationPlug the AC poweradapter into a poweroutlet not controlledby a wall switch.IMPORTANT INFORMATION1. Use only the power adapter(s) supplied with this product. To order a replacement powerwww.telephones.att.com, or call 1 (800)222-3111. In Canada, dial 1 (866) 288-4268.adapter, visit our website at2. The power adapters are intended to be correctly oriented in a vertical or floor mount position.The prongs are not designed to hold the plug in place if it is plugged into a ceiling, underthe-table or cabinet outlet.4
Getting startedBattery installation & chargingInstall the battery as shown on the next page. Once you have installed thebattery, the screen indicates the battery status (see table below). If necessary,place the handset in the telephone base or charger to charge the battery. Forbest performance, keep the handset in the charger when not in use. Thebattery is fully charged after 16 hours of continuous charging. See the table onpage 57 for battery operating times.If the screen is blank, you need to charge the handset without interruption forat least 10 minutes to give the handset enough charge to use the telephonefor a short time. The screen shows LOW BATTERY and the backlight is off untilyou have charged the battery without interruption for at least one hour. Thefollowing table summarizes the battery charge indicators and actions to take.Battery indicatorsBattery statusActionThe screen is blank.Battery has no chargeand the handsetcannot be used.Charge withoutinterruption until thescreen shows LOWBATTERY (at least 10minutes).The screen showsPLACE IN CHARGERand flashesBattery has very littlecharge and thehandset cannot beused.Charge withoutinterruption until thescreen shows LOWBATTERY (at least fourminutes).The screen shows LOWBATTERY and flashes.Battery has enoughcharge to be used fora short time.Charge withoutinterruption until thescreen shows HANDSETX (at least one hour).The screen showsHANDSET X.Battery is charged.To keep the batterycharged, place it in thetelephone base orcharger when not in use.NOTE: If you are on a phone call in low battery mode, you hear four short beepsevery minute.5
Getting startedBattery installation & chargingCHARGE lightStep 1Plug the battery connectorsecurely into the socketinside the handset batterycompartment, matchingthe color-coded label.Insert the supplied batterywith the label THIS SIDEUP facing up as indicated.Step 2Align the cover flatagainst the batterycompartment, thenslide it upwardsuntil it clicks intoplace.Step 3Charge the handset byplacing it face up in thetelephone base orcharger. The CHARGElight at the top of thehandset is on whencharging.To replace the battery, press the tab and slide thebattery compartment cover downwards. Lift out theold battery and disconnect it from the handset.Follow the instructions above to install and chargethe new battery.IMPORTANT INFORMATIONUse only the supplied rechargeable battery or replacement battery (model BT8001).To order, visit our website at www.telephones.att.com, or call1 (800) 222-3111. In Canada, dial 1 (866) 288-4268.6
Getting startedWall installationYour telephone base is ready for tabletop use. If you want to mount yourtelephone on a wall, use the provided wall bracket to connect with astandard dual-stud telephone wall mounting plate. If you do not have thismounting plate, you can purchase one from many hardware or consumerelectronic retailers. You might need a professional to install the mountingplate.Tabletop to wall installation1. Position the telephone base as shown below. Insert the extended tabs(marked A) of the wall bracket into the slots on the back of the telephonebase (marked A). The extended tabs (marked B) should be inserted into thelower slots. Push the telephone base down until it is securely in place.2. If you are using a DSL filter, plug the line cord into the filter now. Routethe telephone line cord (or DSL filter) through the wall bracket hole. Routethe power cord out of the bottom of the telephone.3. Plug the telephone line cord (or DSL filter) into the wall jack. Plug thepower adapter into a power outlet not controlled by a wall switch.4. Align the holes on the bracket with the standard wall plate and slide thebracket down until it locks securely. Bundle the telephone line cord andpower adapter cord neatly with a twist tie.1.2.3.4.7
Getting startedWall installationWall to tabletop installation1. Remove the wall mount bracket from the wall. If the telephone line cordand power adapter cord are bundled, untie them first.2. Lift the telephone base up to detach it from the plastic wall bracket.Unplug the telephone line cord (or DSL filter) from the wall. Unplug thepower adapter from the power outlet.3. See Telephone base & charger installation on page 4.8
Handset settingsTelephone settingsUse the menus to change the telephone’s settings.Menu settings1. Press MENU/SELECT in idle mode (when the phone isnot in use) to enter the main menu.2. Use TCID or DIRS to scroll to the feature to bechanged. When scrolling through the menu, the topmenu item is always highlighted with a symbol.?EJSFDUPSZDBMM!MPH3. Press MENU/SELECT to select the highlighted item.NOTE: To cancel an operation, back up to the previous menu or exit the menudisplay, press OFF/CLEAR. Press and hold OFF/CLEAR to return to idle mode.Ringer volumeYou can set the ringer volume level (1-6), or turn theringer off. When the ringer is off,appears on thehandset screen.?SJOHFS!WPMVNFSJOHFS!UPOF1. Press MENU/SELECT in idle mode to enter the mainmenu.2. Use TCID or DIRS to scroll to RINGER VOLUME,then press MENU/SELECT.SJOHFS!WPMVNF3. Press TCID or DIRS to sample each volume level.4. Press MENU/SELECT to save your preference and returnto the main menu.NOTES:1. The ringer volume also determines the ringer levels of intercom calls(pages 20-22) and the paging tone when initiating the handset locator feature(page 19).2. If the handset ringer volume level is set to off, that handset is silenced for allincoming calls and paging.9
Handset settingsTelephone settingsRinger toneThis feature allows you to choose one of 10 ringer tones.1. Press MENU/SELECT in idle mode to enter the mainmenu.?SJOHFS!UPOFLFZ!UPOF2. Use TCID or DIRS to scroll to RINGER TONE, thenpress MENU/SELECT.3. Press TCID or DIRS to sample each ringer tone.4. Press MENU/SELECT to save your preference and returnto the main menu.SJOHFS!UPOF2NOTE: If you turn off the ringer volume, you will not hear ringer tone samples.Key toneThe handset is factory programmed to beep with each key press. If you turnoff the KEY TONE, there are no beeps when you presskeys.?LFZ!UPOF1. Press MENU/SELECT in idle mode to enter the mainmenu.MDE!MBOHVBHF2. Use TCID or DIRS to scroll to KEY TONE, then pressMENU/SELECT.3. Press TCID or DIRS to select ON or OFF.4. Press MENU/SELECT to save your preference and returnto the main menu.10LFZ!UPOFPO
Handset settingsTelephone settingsLCD languageYou can select the language used for all screen displays.1. Press MENU/SELECT in idle mode to enter the mainmenu.?MDE!MBOHVBHFTFU!EBUF0UJNF2. Use TCID or DIRS to scroll to LCD LANGUAGE, thenpressMENU/SELECT.3. Press TCID or DIRS to select ENGLISH, FRANÇAIS orESPAÑOL.MDE!MBOHVBHFFOHMJTI4. Press MENU/SELECT to save your preference and returnto the main menu.Set date/timeIf you subscribe to caller ID service, the day, month and time are setautomatically with each incoming call.Follow the steps below to set the month, day, year and time.1. When the handset is in idle mode, press MENU/SELECTto enter the main menu.?EJSFDUPSZDBMM!MPH2. Press TCID or DIRS to scroll to SET DATE/TIME, thenpress MENU/SELECT.3. Press TCID or DIRS to select the month, or enter thecorrect number using the dial pad, then pressMENU/SELECT to confirm.?TFU!EBUF0UJNFDMS!WPJDFNBJM4. Press TCID or DIRS to select the day, or enter thecorrect number using the dial pad, then pressMENU/SELECT to confirm.5. Press TCID or DIRS to select the year, or enter the correct number usingthe dial pad, then press MENU/SELECT to confirm.11
Handset settingsTelephone settings6. Press TCID or DIRS to select the hour, or enter thecorrect number using the dial pad, then pressMENU/SELECT to confirm.7. Press TCID or DIRS to select the minute, or enter thecorrect number using the dial pad, then pressMENU/SELECT to confirm.TFU!EBUF.0.0.TFU!UJNF.;.!.8. Press TCID or DIRS to select the AM or PM, then pressMENU/SELECT to confirm. There is a confirmation tone.Voicemail (visual message waiting) indicatorIf you subscribe to a voicemail service offered by your localtelephone company, this feature provides a visualindication when you have new voicemail messages. TheVOICEMAIL light on the telephone base flashes, and NEWVOICEMAIL and theicon appear on the handset screen.12IBOETFU!2OFX!WPJDFNBJM6;48 QN9017
Handset settingsTelephone settingsClear voicemail indicationUse this feature when the telephone indicates there is newvoicemail but there is none. For example, when you haveaccessed your voicemail while away from home. Thisfeature only turns off the displayed NEW VOICEMAILmessage,icon, and VOICEMAIL light; it does not deleteyour voicemail messages. As long as you have newvoicemail messages, your local telephone companycontinues to send the signal to turn on the DBUPS@To manually turn off the new voicemail indicator:1. Press MENU/SELECT when in idle mode to enter the mainmenu.2. Use TCID or DIRS to scroll to CLR VOICEMAIL, then pressMENU/SELECT. The screen shows TURN OFF INDICATOR?3. Press MENU/SELECT again to turn the voicemail indication off, or pressOFF/CLEAR to cancel the procedure.NOTES:1. Telephone company voicemail might alert you to new messages with a stutter(broken) dial tone. Contact your telephone company for more details.2. For information about using your voicemail service, contact your telephonecompany for assistance.13
Handset settingsTelephone settingsHome area codeIf you dial seven digits to make a local call (no area code required), enteryour area code into the telephone as the home area code. When you receivea call from within your home area code, the caller ID history only displays theseven digits of the telephone number.This feature makes it easy for you to place a call from the caller ID log. If youdial 10 digits to make a local phone call, do not use this home area codefeature. If you do, you will not be able to place calls from your caller ID log asthey have only seven digits.1. Press MENU/SELECT in the idle mode to enter the mainmenu.?IPNF!BSFB!DPEFEJSFDUPSZ2. Use TCID or DIRS to scroll to HOME AREA CODE,then press MENU/SELECT.3. Press the dial pad keys to enter a three-digit home areacode. Press DELETE/MUTE to delete digits whileentering.IPNF!BSFB!DPEF 4. Press MENU/SELECT to save and return to the mainmenu.NOTE: If, in the future, your telephone service provider requires you to dial 10 digitsto make a local call (area code phone number), you will need to delete your homearea code. With the home area code displayed, press and hold DELETE/MUTE. Thehome area code is now restored to its default setting of .14
Telephone operationMaking, answering, and ending callsMaking a callTo make a call, pressnumber.PHONE/FLASH orSPEAKER, then enter the telephoneElapsed timeThe screen displays the elapsed time as you talk (in hours,minutes and seconds).QIPOF!!!1;11;41NOTE: PressingPHONE/FLASH to access services fromyour local telephone service provider does not affect theelapsed time.On-hook dialing (predialing)Enter the telephone number, then pressPHONE/FLASH or SPEAKER to dial.Press MUTE/DELETE orOFF/CLEAR at any time to make corrections as you areentering number.Answering a callTo answer a call PressPHONE/FLASH orSPEAKER.-OR Press any dial pad key (0-9, * or #).Temporary ringer silencingPressOFF/CLEAR or DELETE/MUTE while the telephone is ringing to silence theringer temporarily on that handset only. This turn off the ringer withoutdisconnecting the call. The next incoming call rings normally at the presetvolume.NOTE: Each handset rings when there is an incoming call unless the ringer volume isturned off on that handset.Ending a callTo end a call, presscharger.OFF/CLEAR or return the handset to the telephone base or15
Telephone operationHandset operationAuto offPlacing the handset in the telephone base automatically ends the calls.Speakerphone informationDuring a call, pressSPEAKER to switch between hands-free speakerphoneand normal handset use. PressOFF/CLEAR to hang up.NOTES:1.If you use the speakerphone during LOW BATTERYmode, the handset is not lit except for theSPEAKERbutton.2.The speakerphone uses more power than the normalhandset. If the handset battery becomes very low whileyou are using the speakerphone, the call remains inspeakerphone mode until you hang up or the batterybecomes depleted. When the battery is very low, youcannot switch a call from normal handset use tospeakerphone mode.3.After installing the battery into the handset, the screenmay show LOW BATTERY. If you use speakerphone atthis time, the battery may become depleted. Follow theinstructions in the Battery installation & chargingsection on pages 5-6.Elapsed timeTQFBLFS!1;11;41Last number redialTo view the recently dialed numbers: To display the most recently called number (up to 30digits), press REDIAL/PAUSE.SFEJBM To view up to five recently called numbers, press999.994.3556REDIAL/PAUSE. Then press TCID or DIRS, or pressREDIAL/PAUSE repeatedly.The handset beeps twice at the beginning and at the end ofthe list.PressOFF/CLEAR to exit.To redial a number: To dial the displayed number, pressPHONE/FLASH or SPEAKER.-OR You can call the most recently called number by pressingPHONE/FLASH orSPEAKER, then pressing REDIAL/PAUSE.While reviewing the redial memory, press DELETE/MUTE to delete the displayednumber.16
Telephone operationOptions while on callsVolume controlWhile on a call, press TVOLUME/CID to decrease or press SVOLUME/DIR toincrease the listening volume.NOTES:1. Handset and speakerphone volume settings are independent.2. When the volume reaches the minimum or maximum setting,you hear two beeps.Call waitingIf you subscribe to call waiting service with your local telephone service provider,you hear a beep if someone calls while you are already on a call. PressPHONE/FLASH to put your current call on hold and take the new call. PressPHONE/FLASH at any time to switch back and forth between calls.MuteUse the mute function to turn off the microphone. You can hear the caller, butthe caller does not hear you.To mute a call: Press DELETE/MUTE. When mute is on, the handset screenshows MUTED for a few seconds and the MUTE iconappears until you turn off mute.To un-mute a call: Press DELETE/MUTE again. When mute is off,MICROPHONE ON appears temporarily on the handsetscreen.QIPOF!!!1;11;41NVUFEMUTE17
Telephone operationOptions while on callsChain dialingUse this feature to initiate a dialing sequence from numbers stored in thedirectory, caller ID history or redial while you are on a call.Chain dialing can be useful if you wish to access other numbers (such as bankaccount numbers or access codes) from the directory, caller ID history or rediallist.To get to the directory while on a call:1. Press MENU/SELECT.2. Press TCID or DIRS to scroll to DIRECTORY, then press MENU/SELECT.3. Press TCID or DIRS to scroll to the desired number.4. Press MENU/SELECT to dial the number shown.To get to the caller ID history (call log) while on a call:1. Press MENU/SELECT.2. Press TCID or DIRS to scroll to CALL LOG, then press MENU/SELECT.3. Press TCID or DIRS to scroll to the desired number.4. Press MENU/SELECT to dial the number shown.To get to the last number redial while on a call:Press PAUSE/REDIAL to show and dial the most recently dialed number. If youpress PAUSE/REDIAL again within two seconds, the number is not dialed.NOTES:1. You cannot edit a directory entry while on a call. For more details about thedirectory, see page 23.2. You cannot copy a caller ID entry into the directory while on a call. For moredetails about the caller ID history, see page 31.3. If you press REDIAL/PAUSE while on a call, you can only view the most recentcall, and you cannot erase the entry. For more details about the redial memory,see page 16.4. Press and hold OFF/CLEAR to exit redial, directory or caller ID history when youare on a call.18
Multiple handset useMultiple handset useHandset locatorThe handset locator feature is useful if you misplaceany handsets.To start the paging tone:PressHANDSET LOCATOR at the telephone baseto start the paging tone on all handsets for 60seconds.NOTE: If you pressOFF/CLEAR or MUTE/DELETE ona handset, the ringer of the handset is silenced butthe paging tone continues.To stop the paging tone: PressPHONE/FLASH,SPEAKER, or any dial padkey (0-9, *, or #) on the handset(s),-OR- Pressbase.HANDSET LOCATOR on the telephone QBHJOH NOTE: The handset ringer volume also determines thelevel of the paging tone. If the handset ringer volumelevel is set to off, that handset is silent for all calls andpaging (page 9).Join a call in progressYou can conference with another system handset while on a call. If a handset isalready on a call and you would like to join the call, press PHONE/FLASH orSPEAKER on another system handset.Press OFF/CLEAR or place the handset in the telephone base or charger to exitthe call. The call ends when all handsets hang up.NOTE: You can only use two system handsets at the same time on an outside call.19
Multiple handset useMultiple handset useIntercomUse the intercom feature for conversation between handsets.1. Press INT on your handset when not in use. If you have a two-
product. You can also visit our website at www.telephones.att.com or call 1 (800) 222-3111. In Canada, dial 1 (866) 288-4268. Model #: EL51209 (two handsets) EL51359 (three handsets) Type: DECT 6.0 cordless telephone Serial #: (found on the bottom of the telephone base) Purchase date: Place of purchase: