Transcription
Operating instructions and Log BookFire Control and Repeat panels(Conventional 2, 4 and 8 Zone panel range)This manual covers theOperating instructionsand Log book, and isintended for use by theEnd User.The manual should belocated in a secure butaccessible position closeto the panel.It is the responsibility ofthe End User to maintainthe Log Book.An Installation and Commissioningguide has been supplied for yourinstaller with this panel.4188-424 issue 8 Part 2 07-14 XenexOperating instructionsContentsPageUser responsibility2Testing a Manual Call Point3Control & Indications4Operating instructions5Operating instructions for AL27Log book9
Fire PanelsUser responsibilityYour fire alarm system shouldhave been designed, installed andcommissioned to your site specificrequirements and in accordancewith the requirements of BS5839Part 1. You should have receivedinstructions about your systemduring the handover stage andmust make arrangement to ensurethe system is regularly tested andmaintained.It is recommended that theperson responsible for the firealarm system should ensure thesystem is tested and maintained inaccordance with the requirementsof BS5839 Part 1 and becomefamiliar with:q how to operate the controls andinterpret the indications given atthe control panel andq keep up to date alldocumentation associated withthe system.CAUTION: Any servicingwork on the fire alarmsystem must be carried outby a suitably trained person,refer to your servicingorganisation.q That no unsafe practices thatcould lead to fire are beingundertaken.WeeklyWhen testing the system theremay be a need to isolate ancillaryoutputs and to contact the alarmreceiving centre before and afterthe weekly test.q A different manual call point ofthe system should be tested toensure the system is capable ofoperating under alarmconditions.q The operation of the alarmshould be checked to remindthose occupying the premisesthat there is a fire alarm systemwith a particular sound.NOTE: The test should beperformed at a regular time toavoid confusion between a testand a genuine fire alarm. Thealarm receiving centre must becontacted before and after thetest to check alarms arereceived and also to avoidunwanted alarms.QuarterlyDailyBS 5839:Part 1, states that thesystem should be inspected dailyto ensure:q that a normal indication is givenat the control and indicatingequipment.q that any previously indicatedfault condition has receivedappropriate attention.q all the system events areentered into the Log Book forfuture reference.q that the use of the area(s)inspected has not changedsince the system was designed.4188-424 issue 8 Part 2 07-14 XenexAt quarterly intervals the systemshould be inspected and any worknecessary should be performed bya trained maintenance engineer.NOTE: For help with serviceand maintenance please refer toyour servicing organisation, seecontact details entered in thelog book.Limitation of false alarmIt is recommended that the personresponsible for the fire alarmsystem should arrange for suitableinvestigation and appropriateaction on occasion of every falsealarm. For a system having lessthan 40 automatic fire detectors2installed, an in-depth investigationshould be instigated onoccurrence of two false alarms inany rolling 12 months. For asystem having more than40 automatic fire detectors aninvestigation should be instigatedif there has been:q one false alarm for every 20detectors installed in the systemin any rolling 12 months, orq two or more false alarmoccurrence from a singledevice.Battery ReplacementNOTE: Any servicing work onthe System must be carried outby a servicing organisation.Under normal operating conditionsthe maintenance free lead acidbatteries in the Control andRepeat panels can have a usefullife of up to 5 years from the dateof manufacture.NOTE: It is recommended thatthese batteries are replaced at4 Yearly intervals from the datethe System is firstcommissioned.CAUTION: The batteries shouldonly be replaced by trainedservice personal.
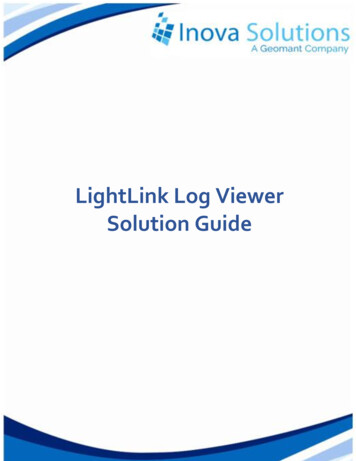
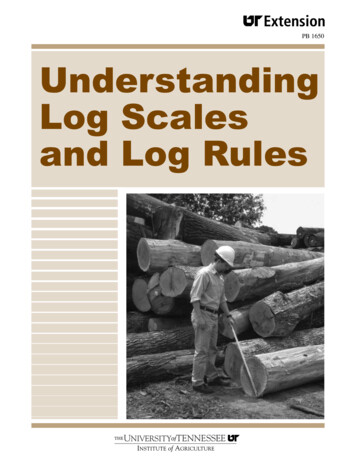
Fire PanelsTesting a Manual Call PointTesting a Manual call pointTo test a manual call point you will need a call point test key, see instructions supplied with the call pointas the procedures may vary dependent on the call point.q Push the test key through the hole in the underside of the call point and release the key to activate the callpoint.NOTE: The alarm sounders in the system will be activated by this test. To silence alarms and reset thesystem, see operating instructions.How to replace broken glass or reset the resettable element inside a Manual call pointWARNING: Take appropriate precautions when clearing broken glass to prevent injury.The following procedures show how to replace glass or reset the resettable element on one type of manual callpoint , the procedures may vary dependent on the type of call point, see the instructions supplied with themanual call point.34188-424 issue 8 Part 2 07-14 Xenex
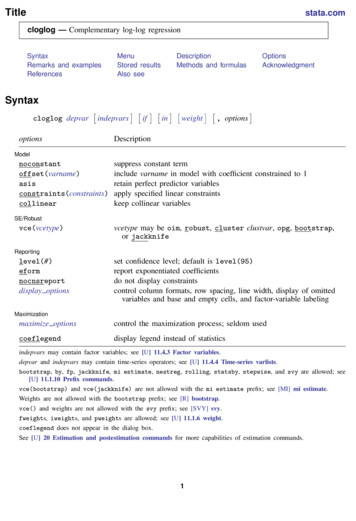
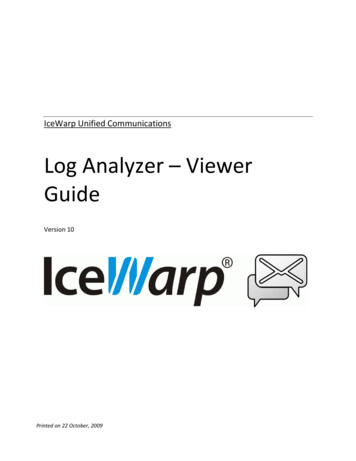
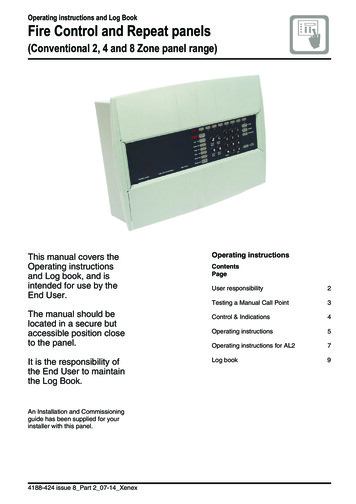
Fire PanelsControls and indicatorsZONE Fire, Fault or Disablement greenPowerFaultSystemyellowCancel SystemBuzzer ResetPower456789DelayEarthSounderSound SilenceAlarms Alarms DisplayDisabled0yellowvEssential controlsCONTROLS - are only availablewhen an access code is entered.The numeric keypad allows theentry of numeric data.q Shift key. The Shift/Functionkey gives access to the mainfunctions of the panel.q Display test key. Pressing theDisplay Test key after entry ofan access code#. This willinitiate a sequence whichilluminates all the indicators forchecking.# Coded entry is onlyrequired if Cancel Buzzer andDisplay Test functions areconfigured for operation atAccess level 2.q Cancel Buzzer. Pressing theCancel Buzzer button afterentry of an access code# willstop the internal buzzer sound.q System Reset. The systemreset key when pressed afterentry of an access code willreturn the system to its normaloperating state. If there areuncleared fires or faults thenthese conditions will re-occur.q Sound Alarms. Pressing theSound Alarms button after entryof an access code will sound all4188-424 issue 8 Part 2 07-14 XenexyellowAccess /FunctionShiftThe light is lit whenthe Function key is pressedor there is an entry to controlswith coded accessNumerickeypadOther FaultindicationsNormally litto indicatePower supplyhealthyDisplay testkeyShift or Functionkeyof the system alarms. Thebutton should only be pressedin an emergency or at otheragreed times, ie for soundertests etc. Pressing the soundalarms button does not actionthe auxiliary relay.q Silence Alarms. Pressing theSilence Alarms button afterentry of an access code willsilence the system alarms.Should only be pressed whenthe emergency is over.Indicatorsq Fire. When lit indicates that thesystem has detected a fire.q Fault. When lit or flashingindicates that there is a faultcondition on the system whichrequires rectification.q Zone Fire/Fault/Disablement.Red indicator illuminates whenthere is a zone fire, it can be asteady or flashing indication.For a zone fault the yellowindicator is flashing. A lit zoneyellow indicator along with theDisabled indicator is used toshow a disabled zone.q System Fault. This indicatorwhen lit indicates that there is afault in the panel’s processor.4q Power Fault. When lit orflashing indicates that there is apower supply fault present.q Earth Fault. This indicatorwhen lit or flashing indicatesthat there is an Earth Fault onthe system.q Sounder Fault. When flashingin conjunction with a flashingfault indicator indicates asounder fault. When lit inconjunction with the disabledindicator indicates that thesounders are disabled.q Disabled. Illuminates along withthe sounder or the zoneindicators to show a disabledcondition.q Test. When lit indicates that thepanel is in Test mode.q Power. When lit indicates thatthe panel is powered up.q Delay. When lit it indicates thata delay will be effective afterdetection of a fire beforeactivation of system alarms.q Access/Function. TheAccess/Function lamp will flashwhen the shift key is pressedand will be lit when the codedfunctions are accessed.
Normal indicationsFire PanelsOperating instructionsNormal indicationsUnder normal condition the panel should give a healthy indication, with only the greenPower light lit.The control panel provides system security by password entry to controls.Fire ConditionIn the event of an automatic fire detection the indications given are:q FIREq Zones-firelight is lit.light is lit.q buzzer sounds continuous tone.q system alarm sounders are activatedq if applicable, auxiliary equipment is actuatedq if applicable, automatic link to the Fire Brigade is initiated.After the emergency is overAfter the emergency is over silence the alarms and reset the system:a)Enter the 3 digit codennb) Press the Silence Alarmssounds a continuous tone.nto gain access to the controls.button. Notice the system alarm sounders are silenced and local buzzerc) After the cause of the alarm has been investigated, ensure smoke and excess heat have had time to clearfrom automatic detectors and broken manual call point glasses have been replaced where necessary andmanual call point resettable element is reset. Press the System Resetbutton. Notice the indicationsreturn to their pre fire status.To Sound Alarms or Resound AlarmsTo re-sound the alarm sounders during a fire condition:a)Enter the 3 digit codennb) Press the Sound Alarmsnto gain access to the controls.button. Notice the system alarm Sounders are activated.To Silence AlarmsTo silence system the alarm sounders after they have been activated:a)Enter the 3 digit codenb) Press the Silence Alarmsnnto gain access to the controls.button. Notice the system alarm Sounders are silenced.54188-424 issue 8 Part 2 07-14 Xenex
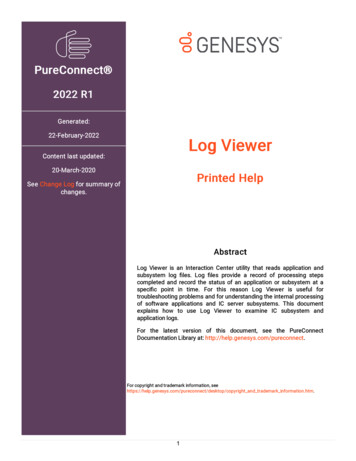
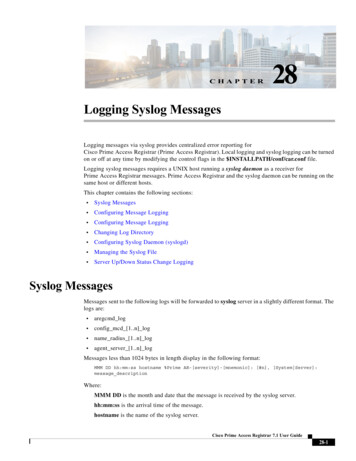
Fire PanelsIndications given of various conditionsIndications given of various conditionsCONDITIONSNormalVisualFireNew fire(differentzone)Zone Fire (1-8) - RedONONFire Common - RedONONONONAccesslevel 2, 3or 4FunctionkeypressedONONONFast pulseDisabled - YellowTest - YellowPower - GreenONAccess / Function - YellowAudibleONBuzzerSounder circuitsSignalOutONONONAux Relay contacts Normally de-energisednormalC/OC/OnormalnormalCommon fault - Normally activeactiveactiveactiveactiveactiveCommon fire- Normally deactivede activeactiveactivede activede activeC/O - Change OverFault ConditionsIn the event of an automatic fault detection the indications given are:q Common Fault light is lit and may be accompanied with other fault indicatorsq buzzer sounds intermittent, (except for system fault which is a continuous sound).To Cancel the fault buzzera)#Enter the 3 digit code nnnto gain access to the controls.# Coded entry is only required if Cancel Buzzer function is configured for operation at Access level 2.b) After investigating fault, press the Cancel Buzzerindications remain active.button. Notice the buzzer is silenced but otherThe fault indications are normally automatically extinguished once the fault condition has been rectified.Action to rectify faultNOTE: All fault rectification work must be done by suitably qualified personnel.q The fault indicators may be extinguished during a fire condition.q The mains failure condition overrides all other fault indications in order to preserve battery standby capacity.NOTE: A comprehensive fault finding guide is included in the Data Installation and Commissioning guide.4188-424 issue 8 Part 2 07-14 Xenex6
Fault ConditionsFire PanelsOther Access level 2 operationsTo carry out a display testq Enter the 3 digit codennnto gain access to the controls.- Coded entry is only required if Display test function is configured for operation at Access level 2.q Press the ‘shift‘vvbutton and then the displaybutton.- Ensure that all the LEDs light in sequence and the buzzer sounds.How to set the panel to operate in Test mode ASelecting Test mode A will cause triggered manual call point or fire detector in the test zone to give Fireindication for 10 seconds duration followed by a system reset.q Enter the 3 digit code nq Press thevvnnto gain access to the controls. Check that the Access/function lamp is lit.and 3 buttons followed by the number of the zone to be placed in test mode.- Check that the Test indicator is On and the respective zone fault indicator is lit.- The zone can now be tested without an alarm of fire.How to exit from Access level 2 to Access level 1vvq Press theand 0 buttons.- Check that the Access/function lamp is extinguished. The panel is now ataccess level AL1.How to set the panel to operate in Test mode BSelecting Test mode B will cause triggered manual call point or fire detector in the test zone to give Systemalarms for the first 2 seconds and at the same time a Fire indication for 10 seconds duration followed by asystem reset.q Enter the 3 digit code nq Press thevvnnto gain access to the controls. Check that the Access/function lamp is lit.and 4 buttons followed by the number of the zone to be placed in test mode.- Check that the Test indicator is On and the respective zone fault indicator is lit.- The zone can now be tested with 2 seconds alarm of fire.How to cancel Test mode A/B operationSelecting cancel Test mode A/B will cause the selected zone to operate normally.q Enter the 3 digit code nq Press thevvnnto gain access to the controls. Check that the Access/function lamp is lit.and 5 buttons followed by the number of the zone to have test mode cleared.- The test mode A or B is cancelled.74188-424 issue 8 Part 2 07-14 Xenex
Fire PanelsFault ConditionsHow to disable a zoneDisabling a zone will prevent fires being detected in the zone.q Enter the 3 digit code nq Press thevvnnto gain access to the controls. Check that the Access/function lamp is lit.and 1 buttons followed by the number of the zone to be disabled.- Check that the appropriate Zone fault indicator and the Disabled indicator are lit.- A detected fire in the disabled zone will not cause the panel to go into fire condition.How to enable a zoneEnabling a zone will cause the zone to operate normally.q Enter the 3 digit code nq Press thevvnnto gain access to the controls. Check that the Access/function lamp is lit.and 2 buttons followed by the number of the zone to be re-enabled.- The previously disabled zone is re-enabled.How to disable soundersDisabling alarm sounders will prevent sounders from operating.q Enter the 3 digit code nq Press thevvnnto gain access to the controls. Check that the Access/function lamp is lit.and 1 buttons followed by 0.- Check that the Sounder and Disabled indicators are lit.- The Sounder circuits are disabled.How to enable soundersEnabling alarm sounders will cause sounders to operate normally.q Enter the 3 digit code nq Press thevvnnto gain access to the controls. Check that the Access/function lamp is lit.and 2 buttons followed by 0, the previously disabled sounders are now re-enabled.How to set and unset the Delay modeWhen a Delay mode is active there is a delay between detecting a fire and sounding the alarms to allow thefire to be investigated.q Enter the 3 digit code nnnto gain access to the controls. Check that the Access/function lamp is lit.vvq Press theand 6 buttons, the Delay mode toggles between Delay and No Delay each time this operationis performed. When the Delay mode is selected the Delay lamp is lit.4188-424 issue 8 Part 2 07-14 Xenex8
Fire Alarm SystemFire PanelsLog BookFire Alarm SystemIn order to satisfy the recommendations of BS 5839 Part 1 there should be a log book to record system events,that is maintained by a responsible person. The following pages provide layout of a log book.Address of protected premisesResponsible person:System designer:System Installer:System commissioned by:System accepted by:Verification undertaken by:The system is maintained under contract by: Until:Telephone number: who should be contacted if maintenance is requiredList of component requiring periodic replacement:AL2 passwordRecord zone number and zonal description.Zone numberZonal description (usually name of the location)Zone 1Zone 2Zone 3Zone 4Zone 5Zone 6Zone 7Zone 894188-424 issue 8 Part 2 07-14 Xenex
Fire PanelsSystem configuration recordSystem configuration recordRecord of how the system is configured.Mark in the table below any deviation(s) from the standard factory settings .Detection and zone circuit configurationZone number12385678Normal zone operation (factory setting)Non latching zone operationFirst fire to be a pulsing indication (factory setting)First fire to be a steady indicationZone short circuit to give a fault (factorysetting)Zone short circuit to give a fireSounders and system reset configurationSilence alarms and reset to operate independently (factory setting)Silence alarms and reset to operate as per BS5839: Part 4Reset to also action the silence alarmsSound alarms to operate in fire condition only (factorysetting)Sound alarms to operate at any timeAuxiliary relay to energise with fire (factory setting)Auxiliary relay to energise with sound alarmsAccess levelAccess levelsAL1AL2Cancel buzzer (AL1 - factory setting)Test A & B mode, Cancel Test (AL2 - factory setting)N/ADisplay test (AL1 - factory setting)Repeat panel informationRepeat panelEEPROMlocationEEPROMData (address)1st Repeat panel2nd Repeat panel3rd Repeat panel4th Repeat panelDelay mode setting: minutes4188-424 issue 8 Part 2 07-14 Xenex10Name of the area where the panelis installed on site
Location of system devicesFire PanelsLocation of system devicesRecord of devices installed in the system, their locations and zone relationships for reference.ZonesLocationType of system device12345687Events LogIt is recommended that a Log book is created were a record of system events and work done is kept.Record events other than false alarms and maintenance work.DateTimeEvent (eg test, firealarm signal, Action required tials30/8/049amWeekly fire test15--PHMaintenance cable)Reason for workWork carried y maintenanceAs per schedulecustomeradvisedPMH114188-424 issue 8 Part 2 07-14 Xenex
False AlarmsDo not record other events and maintenance work details in this log, see respective sections.# Categories: Unwanted - unwanted false alarm, Equipment - equipment false alarm, Good intent - false alarmwith good intent, Malicious - malicious false alarm and Unknown - cause of alarm not se (ifknown)Briefcircumstances(where causeis unknown,recordactivities in thearea)Maintenancevisitrequired(Yes/No)Finding ofmaintenancetechnician 0412:30pm17firedetectedin room 2floor 1Bin contentset on fireYFire nt by Honeywell (Novar Systems Limited)Manufactured by: Honeywell Life Safety Systems,140 Waterside Road, Hamilton Industrial Park,Leicester, LE5 1TN, United 3-CPR-2013Product R-2013056-CPR-2013056-CPR-2013Product 2RS75585-04RS75585-08RSEN54-2: 1997 A1:2006, EN54-4 :1997 A1: 2002,A2 2 & 4)(EN54-2 & 4)(EN54-2 & 4)(EN54-2 & RS75585-04RS75585-08RS(EN54-2 & 4)(EN54-2 & 4)(EN54-2 & 4)(EN54-2 & 4)(EN54-2 & 4)(EN54-2 & 4)(EN54-2 & 4)Intended for use in fire detection and fire alarm systemsin and around buildingsRefer to 053-CPR-2013, 054-CPR-2013, 056-CPR-2013 for level or classof performance declared, for details see website www.gent.co.ukWEEE Directive:At the end of their useful life, the packaging,product and batteries should bedisposed of via a suitable recycling centre.Do not dispose of with your normal household waste.Do not burn.At the end of their useful life, the packaging,product and batteries should be disposed ofvia a suitable recycling centre and inaccordance with national or local legislation.Gent by Honeywell reserves the right to revise this publication from time to time and make changes to thecontent hereof without obligation to notify any person of such revisions of changes.Hamilton Industrial Park, Waterside Road, Leicester LE5 1TN, UKWebsite: www.gent.co.ukTelephone: 44 (0) 116 246 2000Fax (UK): 44 (0)116 246 2300by HoneywellTech. Support: www.gentexpert.co.uk4188-424 issue 8 Part 2 07-14 Xenex
Operating instructions Normal indications Under normal condition the panel should give a healthy indication, with only the green Power light lit. The control panel provides system security by password entry to controls. Fire Condition In the event of an automatic fire detection the indications given are: FIRE light is lit. Zones-fire light is lit.