Transcription
Sinus Floor ElevationTreatment Concepts
„Geistlich Family supports yourway to regeneration – together formore satisfied patients”Dr. Andreas GeistlichCONTENTS3Maxillary sinus floor augmentation4–5 lassical treatment options and importantCaspects in maxillary sinus at a glance6–13Clinical Cases: Lateral Sinus Floor ElevationAssoc. Prof. Stephen Wallace, USAProf. Angelo Menuci Neto, BrazilProf. Yong-Dae Kwon, South KoreaAssoc. Prof. Prisana Pripatnanont, Thailand14–1516–17Treatment Options Maxillary Sinus AreaClinical Case: Crestal Sinus Floor ElevationDr. Feng Bo, China18–23Clinical Cases: Sinus Floor Elevation and Bone AugmentationDr. Devorah Schwartz-Arad, IsraelDr Mehdi Merabet, FranceDr. Joao Batista César Neto, Brazil24–25Clinical Case: Prevention of Sinus Floor ElevationDr Ryan SB Lee, Australia26Recommended Material CombinationsReferences27Product RangeSee all clinicalcases online here
Maxillary sinus floor augmentationContinued bone loss following tooth extraction, bone atrophyand the proximity of the maxillary sinus to the site of implantplacement are major challenges in implant dentistry. To overcome this issue Hilt Tatum pioneered the surgical methodology for maxillary sinus augmentation, which was published byPhilip Boyne in 1980.1 Particulated cancellous bone andmarrow harvested from the lateral iliac crest was used as bonereplacement material and autogenous bone became the “goldstandard” bone replacement material. However, in 1996Wheeler et al. demonstrated that the use of hydroxyapatitealone or in combination with autogenous bone leads to similarmorphometric results (16.4% and 19.3% bone volume respectively).2 The elimination of a second surgical site for extraoral bone harvesting, allowed the surgical procedure to beperformed at the dental office, making it easier to tolerate forpatients.Sinus floor elevationBone resorption (with increasing age or after the loss of a premolar or molar) and secondary pneumatization of the sinus dueto the reduced functional forces on the bone after tooth extraction frequently leave insufficient residual bone height forsuccessful implant placement.3 Sinus floor elevation proceduresallow residual bone augmentation using bone replacementmaterial to increase bone volume and quality.By the transcrestral osteotome (Summers technique4) or lateralantrostomy (lateral window, pioneered by Tatum5) approach, amucoperiosteal pocket is formed over the maxillary floor, a bonyaccess to the Schneiderian membrane is achieved, beneath theSchneiderian membrane, which is subsequently filled withthe bone replacement material (e.g. Geistlich Bio-Oss ) andcovered with a native bilayer collagen membrane (e.g. GeistlichBio-Gide ). The most common complication during sinus floorelevation procedures is perforation of the Schneiderian membrane. Covering the perforation with a native bilayer collagenmembrane (e.g. Geistlich Bio-Gide ) serves as protection duringthe surgical procedure and post-operative healing.6The initially remaining residual bone height determines the surgical approach for sinus augmentation and the choice betweenimmediate or delayed implant placement. The recommendations issued by the Sinus Consensus Conference in 1996 arebased on the vertical dimension of the residual bone betweenthe alveolar crest and the maxillary sinus floor (Table 1).7Sinus elevation procedures can also be implemented for singleimplant-supported restorations. Using Geistlich Bio-Oss incombination with autogenous bone material covered withGeistlich Bio-Gide both lateral antrostomy (1- and 2-stage procedure) and the osteotome technique have been associatedwith 100 % implant survival after a follow-up of at least twoyears (44.5 22.7 months).6Residual bone heightRecommended procedure 10 mm (class A) Classical implant procedureExtraction SocketManagementMinor BoneAugmentationSee “TreatmentConcepts forExtraction Sockets”See “TreatmentConcepts for MinorBone Augmentation”7–9 mm (class B) Osteotome technique Immediate implant placement4–6 mm (class C) Lateral antrostomy Bone replacement material Immediate or delayed implant placement1–3 mm (class D) Lateral antrostomy Bone replacement material Delayed implant placementGeneral remarkImmediate implant placement is notrecommended with residual bone height 4mm or poor bone qualityTable 1: Recommended procedure depending on residual bone height. SinusConference Consensus 1996.7Sinus floor elevation vs. ridge preservationSinus floor elevation is a complex surgical procedure, whichcauses severe discomfort for the patient. As an alternative, ridgepreservation directly after tooth extraction is a minimally invasive approach, which allows preservation of 90 % of bone volume in the posterior region and bone regeneration within6 months.8 Following ridge preservation, standard implantplacement can usually be performed without the need for additional bone augmentation.9Short implantsAdequate bone quality and volume are prerequisites for successful implant placement and long-term stability.10,11 Implantlength needs to be carefully selected in relation to the anatomical situation. Even though long implants are considered thebest option, their use may not always be possible. In these cases, short implants ( 10 mm) are a valid alternative. Advances insurface geometry and texture have increased the bone-implantcontact area, leading to improved primary stability and longterm osseointegration.12However, short implants have certain limitations, such as an unfavorable crown-to-implant ratio, poor aesthetics in the anterioratrophic maxilla and difficult plaque control. In addition, in caseswith marginal bone loss, the risk of implant failure is increaseddue to reduced bone to implant contact.13TREATMENT CONCEPTS FOR SINUS FLOOR ELEVATION3
Classical treatment options and importantaspects in maxillary sinus at a glanceLateral antrostomy(lateral window) technique14 Well-documented and reliable procedure Implant survival rates of 61.2% –100% Perforation of the Schneiderian membrane occurs in 10 % –20% of cases Immediate or delayed implant placement depending on residual bone heightTranscrestral osteometechnique14 Can be used for wide ridge and relativelyflat anatomy Requires initial residual bone height 5 mm Immediate implant placement Perforation of the Schneiderian membrane canbe difficult to manageGeistlich Bio-Oss and Geistlich Bio-Gide –long-term success with the Dream-TeamGeistlich Bio-Oss and Geistlich Bio-Gide are the leading bone substitute and barriermembrane in regenerative dentistry.15,16,34–38Geistlich Bio-Oss in sinus floor augmentation: Allows effective and predictable bone regeneration.17–19 Contributes to long-term stability and maintenance of bonevolume (follow-up 10 years), due to its slow resorption.19 Use as only augmentation material, leads to a 98.2% implantsurvival rate (follow-up 3 years).20 Makes the inclusion of autologous bone unnecessary.20 Available in two granule sizes (0.25–1 mm and 1–2 mm),which both lead to excellent clinical and histomorphometricperformance.214TREATMENT CONCEPTS FOR SINUS FLOOR ELEVATIONGeistlich Bio-Gide as protection of the grafted area: Significantly increases newly formed bone comparedto procedures without membrane coverage(various graft materials).22 Increases implant survival rate by 5% to reach up to 98.6%(grafting material Geistlich Bio-Oss ).23 Serves as protection during the surgical procedure andpost-operative healing.6
Sinus pneumatizationPhysiological process ofcontinuous volume increaseduring growth, lastinguntil complete eruption ofthe third molars.Secondary pneumatizationOccurs after extraction of aposterior tooth in adults andleads to increased sinusvolume at the expense of thealveolar ridge.Loss of premolaror molarTooth loss causesa reduction ofresidual bone height.Sinus floor elevationIncrease of bone volume,providing the basisfor functional andpredictable implantsupported restoration.TREATMENT CONCEPTS FOR SINUS FLOOR ELEVATION5
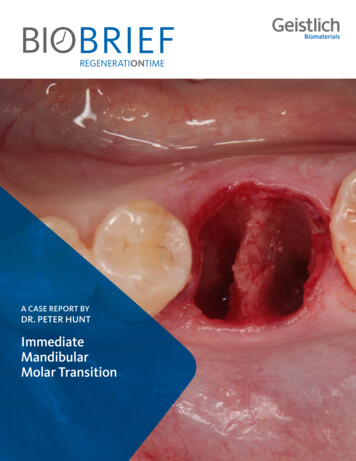
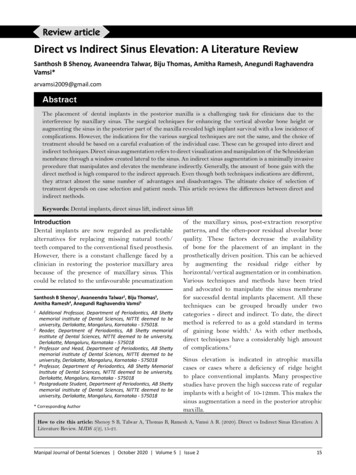
LATERAL SINUS FLOOR ELEVATIONLateral Sinus Elevation with 13-year follow-upAssoc. Prof. Stephen Wallace New York, USACLINICAL CHALLENGEA 63-year-old female patient presentswith hopeless maxillary teeth and adesire for a fixed reconstruction. Astaged case was planned with thecanines used as abutments for a fixedprovisional while sinus augmentationand delayed implant placement were being accomplished. The case presentedwith 1–2mm of crestal bone in the molarsites. During sinus augmentationsurgery the thin Schneiderian membrane on the right ride was extensivelytorn. A collagen membrane repairprocedure was performed and bilateralsinus augmentations were completedwith Geistlich Bio-Oss as the solegrafting material covering the lateralwindow with a Geistlich Bio-Gide membrane. After an extended delay(financial) implants were placed in thegrafted sinuses and a bone coreharvested through the lateral window.The anterior teeth were extracted andthe provisional was extended to the posterior implants. Implants were laterplaced in the canine sites and the finalprosthesis was fabricated. The finalfollow-up is 13 years on from the sinusaugmentation.AIM/APPROACHThere are 3 interesting challengesin this case:1. Sinus augmentations performed with100% Geistlich Bio-Oss when only1–2mm of crestal bone remains2. Achieving a successful result in theface of an extensive perforation3. Assuming some loss of the existingcrestal bone due to biologic widthformation, the molar implants haveexisted with Geistlich Bio-Oss likelyat the crest for close to 10 years.CONCLUSION›› Cases with severe pneumatizationcan be grafted with Geistlich Bio-Oss as the sole grafting material.›› Geistlich Bio-Oss alone, coveredwith a Geistlich Bio-Gide membranecan give successful results in compromised clinical situations. Histomorphometric evaluation showed 31%vital bone with all implants successfulby any guidelines.›› Having Geistlich Bio-Oss exposed atthe crest did not result in periimplantitis.Clinical outcome at a glanceOBJECTIVESCONCLUSIONS Staged sinus floor elevation with 100% Geistlich Bio-Oss andGeistlich Bio-Gide when only 1–2mm crestal bone remains. Fixed maxillary reconstruction on both sides. Successful implant placement 1-year after sinus floor elevation. BEFORE6TREATMENT CONCEPTS FOR SINUS FLOOR ELEVATION T wo-stage sinus floor elevation treatment. S uccessful sinus floor elevation of severe pneumatization withGeistlich Bio-Oss and Geistlich Bio-Gide shows stable bony volume after13-year follow-up.AFTER
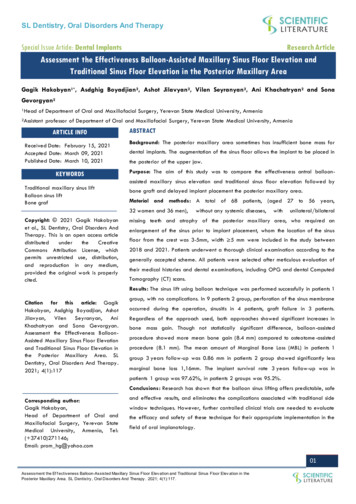
TREATMENT Geistlich Bio-Oss One-stage Crestal Geistlich Bio-Gide Two-stageLateral Sinus Floor ElevationAPPROACH LateralADDITIONAL MEANS Bone Regeneration1234567891011121 Preoperative panoramic radiological view afterposterior tooth extraction.2 Preoperative paraxial radiological view ofthe right sinus showing limited crestal bone of1–2 mm.3 Intraoperative view of the right sinus showingextensive perforation and the beginning of repairwith suture “struts”.4 Completion of repair with a collagen membraneand bone tacks.5 Sinus floor augmentation with Geistlich Bio-Oss prior to placing Geistlich Bio-Gide membrane tocover the lateral window.6 1 year postoperative panoramic radiologicalpicture showing both augmented areas.7 1 year paraxial radiological picture of the rightsinus showing excellent graft containment.8 Bone core was taken between the distal implantson the right side (red arrow) prior to theradiological picture of implant placement after1-year sinus floor elevation.9 Histological picture of the harvested bone coreshowing 31 % newly formed bone (dark orange).25 % Geistlich Bio-Oss particles (light orange)and 44 % bone marrow.10 Postoperative radiological situation after1.5 years. Anterior teeth removed, canine fixturesplaced and provisional is on sinus fixtures.11 Radiological picture showing final prosthesis inplace at 10 years.12 Clinical view of the final prosthesis after13 years – right side.TREATMENT CONCEPTS FOR SINUS FLOOR ELEVATION7
LATERAL SINUS FLOOR ELEVATIONLateral sinus floor elevation with a bonyfenestration of the sinus floorProf. Angelo Menuci Neto, MSC, DDS & Prof. Washington Santana, PHD. MSC Porto Alegre & Goiania, BrazilCLINICAL CHALLENGEAIM/APPROACHCONCLUSIONThe patient described here is a 56-yearold non-smoker and in good generalhealth. She reported a history of dentalextraction in right side of the posteriormaxillary region about 3 months earlier.The treatment plan envisages a fixedprosthetic restoration, and to achievethis goal, a surgical procedure ofsinus augmentation prior to implantplacement was performed.A full-thickness flap was raised toexpose the lateral wall of the sinus.After osteotomy was performed, thesinus membrane was carefully elevatedand space was created for the bonegraft under the sinus membrane. Then acut out part of Geistlich Bio-Gide wasused to obliterate the fenestration inthe lower osseous wall of the sinus.The grafting material Geistlich Bio-Oss was gently packed into the sinuscavity, followed by placement ofGeistlich Bio-Gide shaped and positioned to cover the antrostomy window.After 8 months, a dental implant wasinserted into the grafted site. Theprosthetic rehabilitation was performed4 months after installing the implant.This clinical case, with 12-monthfollow-up, showed the employmentof Geistlich Bio-Oss andGeistlich Bio-Gide in sinus floorelevation for the purpose ofrehabilitation with dental implants.The good prosthetic resultachieved confirms the excellentosteocondutive properties forosseointegration.Clinical outcome at a glanceOBJECTIVESCONCLUSIONS Sinus floor elevation with lateral window approach. Fixed prosthetic restoration in the posterior maxilla. Sinus floor elevation prior to implant placement. Two-stage sinus floor elevation treatment. This clinical case shows excellent osteoconductive behavior ofGeistlich Bio-Oss and uneventful healing of Geistlich Bio-Gide . Good prosthetic results due to excellent osseointegration ofthe implant in the augmented site.BEFORE8TREATMENT CONCEPTS FOR SINUS FLOOR ELEVATIONAFTER
TREATMENT Geistlich Bio-Oss One-stage Crestal Geistlich Bio-Gide Two-stageLateral Sinus Floor ElevationAPPROACH LateralADDITIONAL MEANS Bone Regeneration1234567891011121 Preoperative picture of the area intended tobe treated.2 Application of the Geistlich Bio-Gide to sealbone fenestration in sinus floor.3 Covering bony defect on the sinus floorwith Geistlich Bio-Gide .4 Closing bony defect on the sinus floorwith Geistlich Bio-Gide before filling thesinus floor cavity.5 Sinus floor augmentation usingGeistlich Bio-Oss .6 Lateral window to the sinus cavity is coveredwith Geistlich Bio-Gide .7 Panoramic radiography view after a follow-uptime of 8 months prior to reentry and implantplacement.8 Clinical situation and bone volume at theaugmented site after 8 months.9 Implant placement at the augmented sinus floor.10 4 months after implant placement the finalrestoration was performed with athree-unit bridge prosthesis (Dr. Álvaro Martins/Goiânia, Brazil).11 Final periapical radiography after 12 months.12 12-month follow-up panoramic radiography.TREATMENT CONCEPTS FOR SINUS FLOOR ELEVATION9
LATERAL SINUS FLOOR ELEVATIONLateral sinus floor elevation in the presence of an antralpseudocyst and simultaneous implant placementProf. Yong-Dae Kwon Seoul, South KoreaCLINICAL CHALLENGEAIM/APPROACHCONCLUSIONA middle-aged male came to the clinicfor dental implant placement. Thepanoramic radiography showed a hazyshadow in the right maxillary sinus. ACBCT scan was taken for furtherevaluation and revealed a dome-shapedradiopacity. The radiographic impression was an antral pseudocyst. In theregion of the 1st molar the residual boneheight was enough to avoid a lateralwindow approach. But the morphologyof the residual ridge in the 1st molararea and the presence of an antralpseudocyst were not favorableindicators for a transcrestral sinus floorelevation.In order to ensure that the radiopacitywould be nothing but a non-symptomatic antral pseduocyst, sinus floorelevation via the lateral windowtechnique was planned. After openingup a bony window, I was able to aspiratethe small cystic lesion with yellowishmucus. During the procedure, aperforation was found and successfullyrepaired with a Geistlich Bio-Gide .Geistlich Bio-Gide is because of itseasy manipulation and its goodadhesion to the Schneiderian membranea great product for the perforationrepair and should be properly trimmedand placed to ensure it spreadssufficiently to completely cover theperforation.Clinical outcome at a glanceOBJECTIVESCONCLUSIONS Lateral sinus floor elevation using Geistlich Bio-Oss Penand Geistlich Bio-Gide . Augmentation is simultaneous with implant placement in sites 16 and 17. Aspiration of a small systic lesion in the sinus cavity. BEFORE10TREATMENT CONCEPTS FOR SINUS FLOOR ELEVATION O ne-stage sinus floor elevation treatment. V ery promising clinical outcome with the use of Geistlich Bio-Oss Pen and Geistlich Bio-Gide . Geistlich Bio-Gide is very suitable for repairing a perforatedSchneiderian membrane.AFTER
TREATMENT Geistlich Bio-Oss Pen One-stage Crestal Geistlich Bio-Gide Two-stageLateral Sinus Floor ElevationAPPROACH LateralADDITIONAL MEANS Bone Regeneration1234567891011121 Preoperative intraoral view showing the clinicalsituation.2 In the preoperative CBCT scan, an antralpseudocyst was observed.3 After lateral window preparation, a perforatedSchneiderian Membrane was visible.4 Careful membrane elevation was performed fromthe opposite side of the perforation.5 The elevation around the perforation wasperformed without propagation of theperforation.6 The antral pseudocyst was aspirated with aneedle through the perforated membrane.7 Geistlich Bio-Gide was trimmed to repair theperforation. Two horizontal cuts were made at theupper ¼ of the part. This ¼ upper part was placedoutside the sinus cavity on the lateral wall.8 The trimmed Geistlich Bio-Gide was placed tocover the perforated Schneiderian membrane. Theupper ¼ of Geistlich Bio-Gide was outside of thecavity and the lower ¾ part was inserted inside.9 Easy and fast application of Geistlich Bio-Oss Pen into the cavity. Please note the upper¼ part of Geistlich Bio-Gide was kept in placeby the tip of the Geistlich Bio-Oss Pen .10 The bony window was relocated to its originalposition for covering the lateral window.11 Postoperative panoramic radiographic image.Site with augmented sinus floor and 2 dentalimplants placed simultaneously are visible.12 Clinical picture at the 1-year follow-up time afterthe final restoration. (mirror image).TREATMENT CONCEPTS FOR SINUS FLOOR ELEVATION11
LATERAL SINUS FLOOR ELEVATIONLateral sinus floor elevation with large sinusmembrane perforationAssoc. Prof. Prisana Pripatnanont, DDS Hatyai, ThailandCLINICAL CHALLENGEIn this case a long term follow-up of asinus floor augmentation was carriedout. A large Schneiderian membraneperforation was repaired using GeistlichBio-Gide and platelet-rich fibrin (PRF),and a sinus floor grafting was performedwith Geistlich Bio-Oss particles.A 61-year old woman came to the dentaloffice and asked for an implant-supportedprosthesis in the area of the left 2ndpremolar and 1st molar. The edentulousarea had a bone height of 4–5 mm.A sinus floor elevation was plannedfollowed after 7 months by implantplacement. During the opening of thelateral window to the sinus floor, aSchneiderian membrane perforationoccurred caused by the rotarybur due to a very thin Schneiderianmembrane. In order to repair thecomplete perforation siteGeistlich Bio-Gide and PRF wereused to cover the perforation. Afterwards the sinus floor was elevated with1 g of Geistlich Bio-Oss particles. Theimplant had been placed 7 months afteraugmentation with a good primarystability. Prosthesis construction wasdone 4 months after implant placement.After a 2-year follow-up period, theimplant showed no marginal boneresorption, the bone grafting areashowed minimal volume change andgood support to the implants.CONCLUSIONGeistlich Bio-Gide is effectively usedfor repairing major sinus membraneperforation and sinus augmentationwith Geistlich Bio-Oss granules iseffective in bone support and stablevolume.AIM/APPROACHTo demonstrate the efficiency ofGeistlich Bio-Gide for repairing a largeSchneiderian membrane perforationand good long term stability ofGeistlich Bio-Oss granules in sinusgraft procedures showed minimalvolume change.Clinical outcome at a glanceOBJECTIVESCONCLUSIONS Sinus floor elevation using Geistlich Bio-Oss and Geistlich Bio-Gide . Two-stage sinus floor elevation treatment. Repairing a large Schneiderian membrane perforation with Geistlich Bio-Gide . E ffective bone support and stable bone volume by using Geistlich Bio-Oss . E ffective application of a Geistlich Bio-Gide in a large Schneiderian membraneperforation. BEFORE12TREATMENT CONCEPTS FOR SINUS FLOOR ELEVATION AFTER
TREATMENT Geistlich Bio-Oss One-stage Crestal Geistlich Bio-Gide Two-stageLateral Sinus Floor ElevationAPPROACH LateralADDITIONAL MEANS Bone Regeneration1234567891011121 Areas 25, 26 planned for sinus augmentation vialateral approach and later implant placement.2 Intraoperative picture shows sinus windowand large perforation of sinus membrane size5 x 10 mm at the lower border of the window.3 Intraoperative picture after membrane liftingand covering sinus membrane perforation withplatelet-rich fibrin (PRF).4 Geistlich Bio-Gide covers the PRF beforefilling the grafting material.5 Geistlich Bio-Oss was used as a graftingmaterial which was mixed with serumfrom platelet-rich fibrin and filled in the sinuslifted space.6 Intra-oral view shows immediate post-operativewound.7 Periapical film immediately post-operativeshows Geistlich Bio-Oss grafting materialdistributed in the augmented area.8 Cone beam CT at seven months post-operativelyshows better density of augmented areaand Geistlich Bio-Oss granules were aggregatedtogether and confined to the repair zone.9 7 months after sinus augmentation the implantplacement was planned. The augmented area showsGeistlich Bio-Oss granules at a higher densitycompared to the immediate post-op situation.10 7 months after sinus augmentation, two implantswith primary stability were placed. The augmentedarea shows well integrated Geistlich Bio-Oss granules surrounded with newly formed bone.11 One year after sinus augmentation a completecrown restoration had been achieved.12 Two years and 3 months after sinusaugmentation shows the sinus graft to bein a stable condition with minimal volumechange.TREATMENT CONCEPTS FOR SINUS FLOOR ELEVATION13
Treatment Options Maxillary Sinus AreaTREATMENT OPTIONSLateral SinusFloor ElevationYesWhichapproach isperformed?Sinus FloorElevationand BoneAugmentationIs a sinusfloor elevationindicated?No14Crestal SinusFloor ElevationTREATMENT CONCEPTS FOR SINUS FLOOR ELEVATIONWhat otherapproach isperformed?Prevention ofSinus FloorElevationSCHEMATIC VIEW
RECOMMENDED MATERIALSee all clinicalcases “lateral sinusfloor elevation”online hereGeistlich Bio-Oss orGeistlich Bio-Oss Pen Geistlich Bio-Gide orGeistlich Bio-Gide Compressed See all clinical cases“crestal sinus floorelevation” onlinehereGeistlich Bio-Oss orGeistlich Bio-Oss CollagenGeistlich Bio-Gide orGeistlich Bio-Gide Compressed See all clinical cases“Sinus FloorElevation and BoneAugmentation”online hereSee all clinical cases“Prevention ofSinus FloorElevation” onlinehereGeistlich Bio-Oss ,Geistlich Bio-Oss Collagen orGeistlich Bio-Oss Pen Geistlich Bio-Gide orGeistlich Bio-Gide Compressed Geistlich Bio-Oss ,Geistlich Bio-Oss Collagen orGeistlich Bio-Oss Pen Geistlich Bio-Gide orGeistlich Bio-Gide Compressed TREATMENT CONCEPTS FOR SINUS FLOOR ELEVATION15
CRESTAL SINUS FLOOR ELEVATIONDouble crestal sinus floor elevationDr. Feng Bo Hunan, ChinaCLINICAL CHALLENGEAlveolar bone resorption in posteriormaxilla and maxillary sinus pneumatization always challenges the implantplacement. Maxillary sinus floorelevation and onlay bone grafting arethe regular methods for solving theseproblems. Two main approaches for themaxillary sinus floor elevation procedure are now widely used in dentalclinics. Lateral antrostomy is mostlyused in severe alveolar bone resorptionbut one of the drawbacks of the lateralantrostomy is that it requires the raisingof a large flap for surgical access. Thecrestal approach is considered to be amore conservative method. This casereport demonstrates a minimallyinvasive technique for the managementof vertical ridge defects (less than 1 mm)in the posterior maxilla. The doublecrestal-approach provides clinicians asimple, convenient and minimallyinvasive approach compared to theregular lateral antrostomy.AIM/APPROACHTreatment was carried out under localanaesthesia with local buccal andpalatal infiltrations. The proposedimplant site was marked with a trephinedrill. The depth was controlled withinthe alveolar bone to protect the sinusmembrane from perforation. Then theround bone block was gently tapped andpushed into the maxillary sinus usingthe sinus lift osteotome. By using thetrephine drill, the cut bone block can beused. While the bone block was gentlypushed into sinus, the sinus membranewas elevated at the same time. The boneblock provides the osteoblast while theconnected sinus membrane providesthe blood supply. The osteoblastand blood supply are the key factors forbone ossification. The Schneiderianmembrane near to the bone block wasslightly dissected using an antralcurette. Then the bone block waselevated again for about 4 mm.A space is created by the intrudedbone block. This space is then graftedwith Geistlich Bio-Oss .Geistlich Bio-Gide was adapted tooverlay the osteotomy site. The secondsinus floor elevation was performed sixmonths later with the same procedure.CONCLUSIONThe dual-crestal approach combinedwith the placement of a short implant isan efficient method for overcoming thesevere posterior maxilla bone resorption. Elevating the sinus floor by acrestal approach twice reduces the useof bone grafting material, saves surgicaltime and cost, and leads to fewerpostoperative complications.Clinical outcome at a glanceOBJECTIVES Dual sinus floor elevation with dual-crestal approach using Geistlich Bio-Ossand Geistlich Bio-Gide . Short implant placement due to severe bone resorption.BEFORE16TREATMENT CONCEPTS FOR SINUS FLOOR ELEVATIONCONCLUSIONS Dual-crestal sinus floor elevation using Geistlich Bio-Oss andGeistlich Bio-Gide in combination with short implant placementovercome severe bone resorption. Fewer postoperative complications using Geistlich Biomaterials incombination with dual-crestal sinus floor elevation.AFTER
APPROACHTREATMENT Lateral Geistlich Bio-Oss ADDITIONAL MEANS One-stage Crestal Geistlich Bio-Gide Two-stage 123456789101112Crestal Sinus Floor Elevation Bone Regeneration1 Preoperative CBCT of posterior maxillary areashows the alveolar bone’s height in region 27 isabout 1mm.2 Intraoperative picture showing the thin alveolarbone after full-thickness flap elevation.3 First crestal sinus floor elevation in region 27using the sinus lift osteotome to gently elevatethe sinus floor for about 4mm.4 Elevation of the Schneiderian Membrane fromthe sinus floor using an antral curette.5 Augmentation of the elevated sinus floor withGeistlich Bio-Oss .6 Covering the regions 26 and 27 withGeistlich Bio-Gide to protect the augmentationsite and prevent soft tissue ingrowth.7 Radiological picture showing the augmented sitein the maxillary cavity after the first crestal sinusfloor elevation.8 6 months postoperative radiological pictureshowing the second crestal sinus floor elevationusing Geistlich Bio-Oss and Geistlich Bio-Gide and implant placement.9 Postoperative clinical situation of the finalrestoration after 18 months.10 Postoperative radiological picture of the finalrestoration 18 months.11 Clinical picture at recall 2 years after thefinal restoration showing a stable periodontalsituation.12 Postoperative radiological picture after 2 yearswith stable bone augmentation.TREATMENT CONCEPTS FOR SINUS FLOOR ELEVATION17
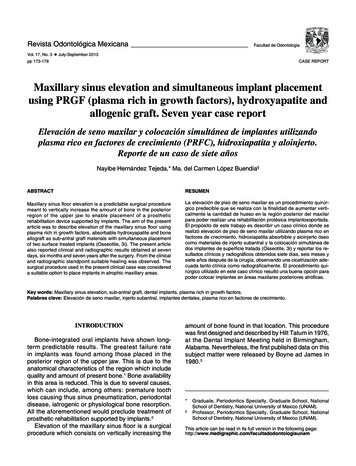
SINUS FLOOR ELEVATION AND BONE AUGMENTATIONLateral sinus floor elevation with 20-year follow-upDr. Devorah Schwartz-Arad, DMD, PhD Tel-Aviv, IsraelCLINICAL CHALLENGEA 62-old female healthy patient wasreferred to the Schwartz-Arad surgicalcenter for an extraction of the first rightmaxillary molar. This clinical case wasperformed in 1997 with a 20-yearfollow-up period. The region of interest isthe right maxillary molar. In this regionthe 1st right maxillary molar was untreatable due to a perio-endo defect. The firstand second right maxillary premolarswere missing as well. The existing bridgeincluded the right maxillary canine andthe first molar. The available alveolarridge was not sufficient for implantplacement due to the pneumatization ofthe right maxillary sinus and the endo-perio-lesion of the tooth. The patientcame for a treatment to obtain a fixedprosthetic restoration. The clinicalchallenge was to simultaneously reconstruct the ridge volume in the verticaldimension via a sinus augmentationprocedure, and ridge preservation atthe time of tooth extraction, for secondstage implants placement.AIM/APPROACHSinus augmentation procedure vialateral window approach24Prophylactic oral pre-medication ofamoxicillin (1 g) and dexamethasone(8 mg) an hour before the procedure anda local application of 0.5% chlorhexidinefor 2 min. An incision was made on thealveolar crest and a vertical incision distalto the tuberosity was made to allow boneharvesting from this area to be mixedwith the Geistlich Bio-Oss A windowwas cut through the lateral sinus wallcortex using a slow-speed round bonebur. At this point, the sinus membranewas carefully elevated from the sinusfloor and media
come this issue Hilt Tatum pioneered the surgical methodolo - gy for maxillary sinus augmentation, which was published by . cessful implant placement and long-term stability.10,11 Implant length needs to be carefully selected in relation to the anatom-ical situation. Even though long implants are considered the