Transcription
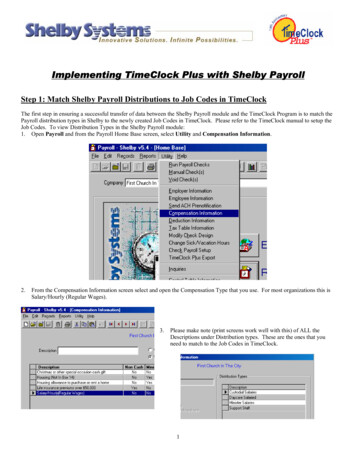
Implementing TimeClock Plus with Shelby PayrollStep 1: Match Shelby Payroll Distributions to Job Codes in TimeClockThe first step in ensuring a successful transfer of data between the Shelby Payroll module and the TimeClock Program is to match thePayroll distribution types in Shelby to the newly created Job Codes in TimeClock. Please refer to the TimeClock manual to setup theJob Codes. To view Distribution Types in the Shelby Payroll module:1. Open Payroll and from the Payroll Home Base screen, select Utility and Compensation Information.2.From the Compensation Information screen select and open the Compensation Type that you use. For most organizations this isSalary/Hourly (Regular Wages).3.Please make note (print screens work well with this) of ALL theDescriptions under Distribution types. These are the ones that youneed to match to the Job Codes in TimeClock.1
4.Next, open TimeClock Plus Manager, click Configuration and select Master Job Code List 5.Click Add to begin entering the Job Codes.6.Begin entering the Job Codes, please refer to your TimeClock Plus manual for specific instructions on entering new Job Codes.Note: When creating the jobcode in TimeClock, make surethat the “Exports as” field is thesame as the Job code number.Note: Job Defaults – IfJob Codes are notclockable (Holidays, JuryDuty, etc ) or will not beused to track hours youmay want to remove thedefaults.2
Step 2: Exporting Employee Data from Shelby v5.4The Shelby v5.4 Payroll Program will allow you to export employee information (employee names, phone number, social securitynumber, etc ) to a text file that can later be imported into TimeClock Plus. This will save you from having to re-key this informationinto the TimeClock Software. To export the information from Shelby’s Payroll Program:1.Open Payroll and from the Payroll Home Base select Utility, and TimeClock Plus Export.2.The program will then allow you to specify where you want to create the file. This Procedure will create an ASCII text filethat can be imported into TimeClock Plus.Note: If a new employee is added into Shelby v5.4, you will need to run this export feature again. When importing the fileinto TimeClock, you will be given options as to which employees you wish to import.3
Step 3: Importing Employee Data into TimeClock PlusOnce you have exported the information out of the Shelby v5.4 Payroll program, you can then import it into TimeClock Plus. To dothis:1. Open the TimeClock Plus Manager and select File, and Import employee Info The following Screen will appear:2.You may need to change the Filename to import field. It should point to the file that you created when exporting from theShelby Program (C:\Shelby\ssv5.dat\TimeClk.txt).3.You will also need to change the Default map file. The Map file is found on the Shelby v5.4 Installation CD. You will findthe SHELBYIMPORTV4.MAP file under X:\MISC\TIMECLOCK (X being your CD ROM drive). Keep the defaults forall other fields.4.Click Next, you will receive an import Mappings screen. This will allow you to view how the information from Shelby ismapped to the fields in TimeClock Plus.4
Note: The EmpCode field is a number that isauto assigned by the Shelby program when theemployee’s record is created. This number isnot viewable through the Shelby program andis used for internal purposes only. DO NOTmodify the EmpNu field or the EmpCode fieldonce you have imported data into TimeClock.Doing so will cause problems when you try toimport TimeClock information back intoShelby.5.Click Next on the Mappings screen, you will receive an Options screen, this will allow you to modify existing data with thedata being imported or add records if they currently do not exist.6.7.After selecting Finish you will receive a Summary screen and thenclick Finish to complete the process. You will receive an ImportResults screen that tells how many employees were imported and ifthere were any errors.Once you have imported your employee information into TimeClock Plus, you can now begin to set up the rest of theTimeClock Plus program. If you have further questions regarding the setup of the TimeClock Plus software, consult the UserReference Guide that accompanied your Time Clock Plus software, or contact the TimeClock Plus support desk.5
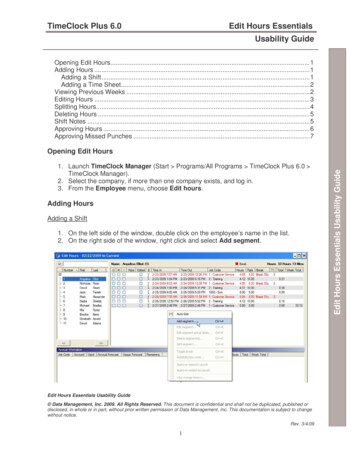
Step 4: Assigning Job Codes to EmployeesThe Job Codes have been setup and the employee information has been exported from Shelby and imported into TimeClock. Now it’stime to assign the Job Codes to the employees. To assign job codes within TimeClock:1.Select Employee, and click Add/Edit To edit an employee in the list either double click on the employee or type theTimeClock employee number in the Go to: field and press enter . Click on the Jobs tab and click Add.2.Begin entering Job Code(s) for the employee. The Job Code can be entered manually or selected from the drop down list.Click the Save button on the Jobs tab to complete the process. Repeat this step for all employees.Note: This procedure needs to be run when entering a new employee into the system.6
Step 5: Exporting Hours From TimeClock PlusAfter you have finished your pay period, you should now be ready to export the information from TimeClock Plus back into theShelby v5.4 Payroll Program. The file that is created is an ASCII file that contains the employee’s names and number of hours for thepay period. To create the file, from within the TimeClock Plus Software:1.Select File, and Close current week 2.Select Yes to continue with the close process.3.TimeClock will run a “check list” and when this completes click Close to continue.4.Select Export, and Pay Period.7
85.Select Shelby for the ExportFormat.6.Enter the date range for yourPayroll.7.In the Export filename: enterthe path and file name. Note:Make sure this file name isdifferent that the file namecreated when exporting theEmployee Information fromShelby v5.4. It is a good ideato change the name on aweekly basis so that you can goback and look at history.8.Make sure that all of the checkboxes under Module Settingsare checked except the Splitexport by rate of pay.9.Select Process. This will createthe ASCII text file that will beimported into Shelby Payroll.
Step 6: Importing TimeClock Plus Information into Shelby v5.4 PayrollOnce you have exported the information from TimeClock Plus you can import it into the Shelby v5.4 Payroll program. To do this:1.Open the Shelby v5.4 Payroll Program. From the Payroll Home Base, Select Run payroll checks.2.Select the option to “Import employee hours from TimeClock”.9
3.Specify the path and File name that you selected when exporting information from TimeClock and select OK.Note: Verify that the other options are correct before selecting OK.4.Once you select OK, the following Screen will appear. You will need to select the paycode for Sick, Vacation, and Holidaytime along with the default number of hours for Salary Employees. (Note: The program requires a Sick and VacationPaycode here). If you did not have an employee that claimed sick or vacation time, you can manually type the paycode. . IfUse Grid is not selected, the default is for the TimeClock Pay Code information to affect the Distribution type on theemployee's record that has the highest salary.5.If you select to Use Grid, you will be given the option to “map” distribution types to specific pay codes. Once selecting UseGrid, you will need to select the distribution for each paycode you wish to map. To do this, click in the Distribution field.You will then be able to select your distribution from a drop down menu.¾Pay Codes left blank will use the default. If "Don't Use Grid" is chosen, the default setting is again used.¾ If a pay code has a distribution set up, and an employee with that pay code does not have that distribution, Payroll will use¾¾¾¾the default distribution on the employee's record.Whatever pay codes are chosen for Sick and Vacation will not be available for assignment on the pay code Mapping Grid.The pay codes for Sick and Vacation will automatically affect the default Distribution for the employee.If a user changes from using the pay code grid to "Don't Use Grid," all distribution information assigned will be removed.The user is warned before this takes place and given option to not continue.Once you have imported the payroll time information into Shelby, you can then make any adjustments needed from theEmployees to Pay Screen.You are now ready to print your checks.10
Step 3: Importing Employee Data into TimeClock Plus Once you have exported the information out of the Shelby v5.4 Payroll program, you can then import it into TimeClock Plus. To do this: 1. Open the TimeClock Plus Manager and select File, and Import employee Info The following Screen will appear: 2.