Transcription
Troubleshooting guideHP OfficeJet 6900 Printers - Black or Color Ink Not Printing, Other PrintQuality IssuesThis document is for HP OfficeJet 6950, 6951, 6954, 6956, 6958, 6962, OfficeJet Pro 6960, 6968, 6970,6974, 6975, and 6978 All-in-One printers.The quality of a printed document or photo is not as expected. The procedures in this document shouldhelp with streaked or faded printouts, color or black ink not printing, documents with blurred or fuzzytext, ink streaks or smears, and other print quality problems.note:If you see an “0x6100004a” error, your printer must be serviced. See the step at the end of thisdocument to contact HP for service.note:Rough handling at the store or during installation can cause print quality problems with newly installedink cartridges. If you see print problems with newly installed ink cartridges, wait for a few hours for theautomatic servicing routine to complete, and then try to print again.Step 1: Reinstall the print driver (Windows only)If you cannot print color from a Windows computer, uninstall and reinstall the printer software. Skip thisstep if your printer is able to print in color.1. Remove the printer from the devices list.For steps on removing the printer from the devices list, go to Uninstalling the Printer Software(Windows).2. Go to HP Customer Support - Software and Driver Downloads, and then install the latestsoftware for your printer.Try to print. If these steps resolved the issue, you do not need to continue troubleshooting.Step 2: Clean the printhead
The printhead could be clogged, and you might need to clean the printhead several times to restoreprint quality. Use an automated tool from the printer control panel to clean the printhead.caution:Never turn off the printer when ink cartridges are not installed. To avoid issues that require cleaningthe printhead or that can damage the ink system, always replace ink cartridges as soon as possible, andalways turn off the printer using the Power button.1. From the printer control panel, open the Setupmenu.2. Open the Printer Maintenance menu.3. If necessary, open the Tools menu, and then touch Clean Printhead.A test page prints.4. Examine the test page.o If the print quality is unacceptable, touch Clean Again to continue the next level ofcleaning. If necessary, repeat these steps for the third cleaning cycle.note:If the printhead is badly clogged, it might require another cleaning cycle. If so, wait 30minutes before you perform all three levels of cleaning again.oIf the print quality is acceptable, touch Done.Try to print. If these steps resolved the issue, you do not need to continue troubleshooting.Step 3: Use genuine HP cartridges
HP recommends that you use genuine HP ink or toner supplies. HP cannot guarantee the quality orreliability of non-HP or refilled cartridges. If you do not use genuine HP cartridges, the steps in thisdocument might not resolve the issue. To check the authenticity of your cartridges, go to the HP anticounterfeit webpage (in English).Ink cartridgedescriptionUnited States andCanadaEurope, Middle East, and Latin AmericaAfricaAsia PacificBlack ink cartridgeHP 902 BlackHP 903 BlackHP 904 BlackHP 905 BlackHP 902XL BlackHP 903XL BlackHP 904XL Black HP 905XL BlackHP 906XL BlackHP 907XL BlackHP 908XL Black HP 909XL BlackHP 902 CyanHP 903 CyanHP 904 CyanHP 902XL CyanHP 903XL CyanHP 904XL Cyan HP 905XL CyanHP 902 MagentaHP 903 MagentaHP 902XL MagentaHP 903XL MagentaHP 904MagentaHP 905MagentaHP 904XLMagentaHP 905XLMagentaHP 903 YellowHP 904 YellowHP 905 YellowHP 903XL YellowHP 904XLYellowHP 905XLYellowCyan ink cartridgeMagenta inkcartridgeYellow ink cartridge HP 902 YellowHP 902XL YellowHP 905 Cyannote:HP 906XL, 907XL, 908XL, and 909XL ink cartridges are not compatible with the OfficeJet 6950 All-in-OnePrinter series.Purchase replacement cartridges and other supplies from the HP Store or local retailers.Step 4: Check for ink smears on the back of printoutsIf there are smears of ink on the back of your printouts, you can use an automated tool to resolve theissue.1. Load plain white paper in the input tray.2. From the printer control panel, open the Setup3. Open the Printer Maintenance or Tools menu.4. Touch Clean Page Smears or Clean Smear.menu.The printer might make some noise for approximately one minute.5. Wait until the page is out of the printer before you remove it.
Try to print. If these steps resolved the issue, you do not need to continue troubleshooting.Step 5: Make sure you are using the appropriate paper foryour print jobThe quality and type of paper can affect the print job. Follow these guidelines to make sure the paper isappropriate. If it is not, load an appropriate paper type. Load the paper print side down in the input tray. Many papers have printing and nonprintingsides, such as photo paper and envelopes. Usually, the smoother side is the "print side," andsometimes the non-print side has a logo of the paper manufacturer on it.Do not use wrinkled or curled paper. Use only clean, wrinkle-free paper.Use the correct paper type for your project.o For everyday text documents, plain paper with ColorLok technology works well. Paperwith ColorLok technology is industry-standard paper that works well with HP ink.o For documents with dense printing, such as high contrast graphics or photos, use HPAdvanced Photo Paper for best results.o Some paper might not absorb ink as well as others. If your prints smear easily, makesure you are using a recommended paper.Store photo paper in its original packaging inside a resealable plastic bag. Store the paper on aflat surface in a cool, dry place. Load 10-20 sheets of photo paper only when you are ready toprint, and then put the unused paper back in the packaging.Try using a different paper. This determines if the problem is related to the paper.
Step 6: Check the print settingsSometimes the print settings can affect the print quality. Select your operating system, and then checkthe print settings to make sure they are appropriate for your print job.Check print settings in WindowsCheck print settings in OS XStep 7: Check the estimated ink levelsCheck estimated ink levels to see if any ink cartridges are critically low or empty.note:Ink level warnings and indicators provide estimates for planning purposes only. When an indicatorshows low ink levels, consider having a replacement ink cartridge available to avoid possible printingdelays. You do not need to replace ink cartridges until print quality becomes unacceptable.On the printer control panel, touch the Ink Level Indicator iconink levels.Consider replacing cartridges markedor. The control panel displays estimatedwhen print quality becomes unacceptable.
If none of the ink cartridges are low on ink, you do not need to replace them yet. Skip to thestep to make sure the ink cartridges are vented and seated correctly.If any of the ink cartridges are low on ink, continue to the next step to replace them.Step 8: Replace any low or empty cartridgesReplace any critically low or empty ink cartridges, and then try to print again. Skip this step if all inkcartridges display full ink levels.1. Open the ink cartridge access door.The carriage moves to the ink cartridge access area.note:If the scanner lid is open, the ink cartridge access door does not open.2. Wait until the carriage stops moving before you continue.3. Press the tab inward on the front of the old ink cartridge to release it, and then pull up on theink cartridge to remove it from the slot.4. Remove a new ink cartridge from its package, and then pull the orange pull-tab straight back.
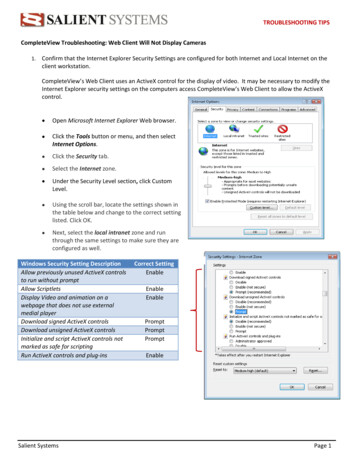
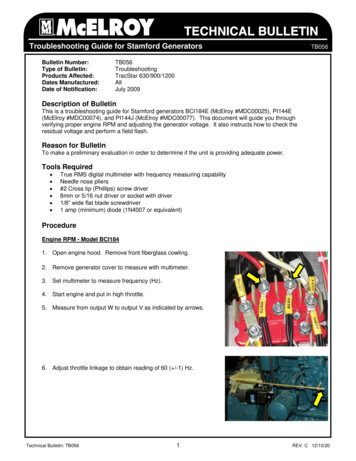
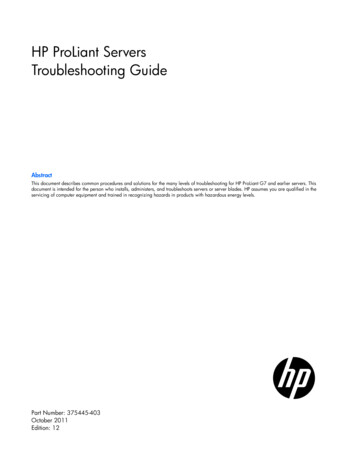
caution:Make sure you remove the orange pull-tab and plastic wrap completely before you remove theorange cap in the next step. Otherwise, ink might leak from the ink cartridge. When you removethe plastic wrap, the paper label on the top of the ink cartridge tears slightly, which is necessaryto properly vent the ink cartridge.5. Hold the ink cartridge by its sides, and then twist the protective orange cap counter-clockwise tosnap it off the ink cartridge.caution:Do not touch the copper-colored contacts or the ink nozzles. Touching these parts can result inclogs, ink failure, and bad electrical connections.6. Gently bend the tab away from the ink cartridge.caution:Be careful not to bend the tab out more than 1.27 cm (0.5 in). Moving the tab too far mightdamage the ink cartridge or cause the tab to break.
1. Bend the tab away from the ink cartridge2. Do not bend the tab more than 1.27 cm (0.5 in)7. Turn the ink cartridge so that the ink cartridge contacts face downward, and then match thelabel color with the color dot on the carriage.8. Slide the ink cartridge into its slot, and then gently press the ink cartridge down until it snapsinto place.9. Repeat these steps to install any new ink cartridges.10. Close the ink cartridge access door.
Try to print. If replacing any low or empty cartridges resolved the issue, you do not need to continuetroubleshooting.Step 9: Make sure the ink cartridges are properly ventedand seated correctlyCheck the vents on the top of the ink cartridges. If they are clogged or obstructed, the ink cartridgesmight not work properly, which can affect print quality.note:To avoid print quality issues and dried out ink cartridges, do not leave any ink cartridges outside theprinter for longer than 30 minutes.1. Turn on the printer, if it is not already turned on.2. Open the ink cartridge access door.The carriage moves to the center of the printer.
3. Wait until the carriage stops moving before you continue.4. Press the tab inward on the front of the old ink cartridge to release it, and then pull up on theink cartridge to remove it from the slot.5. Examine the vent area above the HP logo on the top of the ink cartridge.6. If the ink cartridge still has the orange pull-tab attached, pull to remove it.
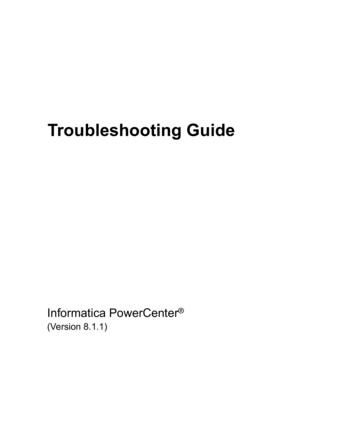
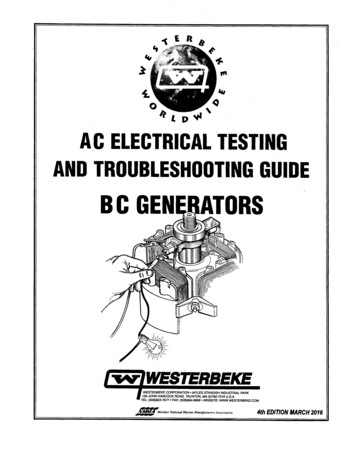
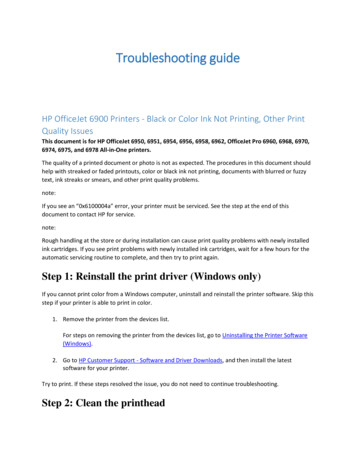
7. If the vent is clogged, use a straight pin to gently remove excess adhesive from the vent.1. Clogged vent2. With a straight pin, gently remove excess adhesive from the vent3. Unclogged vent8. Turn the ink cartridge so that the ink cartridge contacts face downward, and then match thelabel color with the color dot on the carriage.9. Slide the ink cartridge into its slot, and then gently press the ink cartridge down until it snapsinto place.10. Repeat these steps to inspect the vents on each of the ink cartridges.11. Make sure each ink cartridge is firmly installed in its slot. Run your finger along the top of the inkcartridges to feel for any that are protruding, and if any are, press down firmly until each inkcartridge snaps into place.12. Close the ink cartridge access door.
Try to print. If these steps resolved the issue, you do not need to continue troubleshooting.Step 10: Print a Print Quality Diagnostic PagePrint a Print Quality Diagnostic Page, and then evaluate the results.1. Load plain white paper in the input tray.2. From the printer control panel, open the Setup3. Open the Reports or Tools menu.4. Touch Print Quality Report.A Print Quality Diagnostic Page prints.menu.
Step 11: Examine Test Pattern 1Evaluate Test Pattern 1 on the Print Quality Diagnostic Page to make sure the lines are straight andconnected. If the lines in Test Pattern 1 are straight and connected, skip to the step to examine Test Pattern2.If the lines in Test Pattern 1 are not straight and connected, continue to the next step to alignthe printhead.Step 12: Align the printheadAligning the printhead can resolve errors with Test Pattern 1.1. Load plain white paper in the input tray.2. From the printer control panel, open the Setup3. Open the Printer Maintenance or Tools menu.menu.
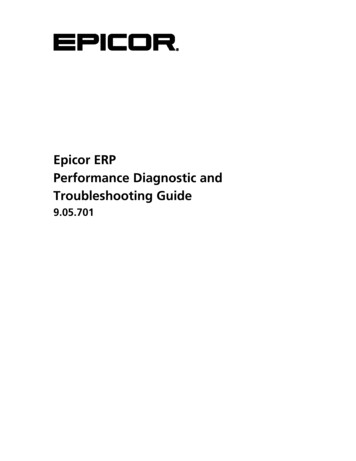
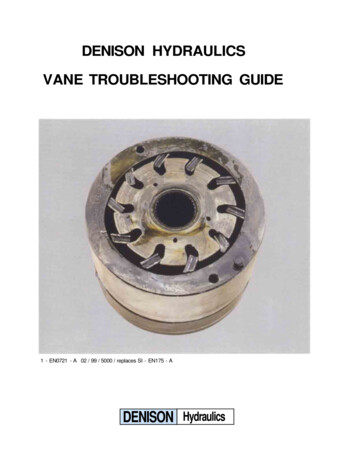
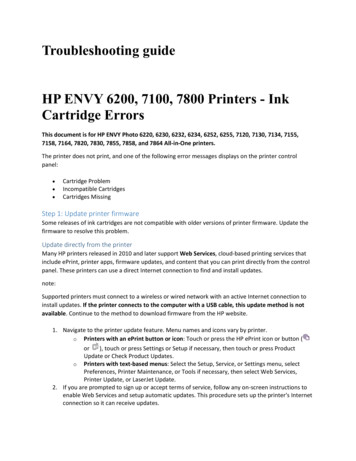
4. Touch Align Printhead.An alignment page prints.5. Wait until the page is out of the printer before you remove it.Continue to the next step.Step 13: Print another Print Quality Diagnostic PagePrint another Print Quality Diagnostic Page to examine the lines in Test Pattern 1 again. If the lines in Test Pattern 1 are straight and connected, continue to the next step to examineTest Pattern 2.If the lines in Test Pattern 1 are not straight and connected, skip to the step to service theprinter.Step 14: Examine Test Pattern 2Examine the color blocks in Test Pattern 2 on the Print Quality Diagnostic Page.Test Pattern 2 with white lines in a color bar
Test Pattern 2 with a missing color block If the color blocks in Test Pattern 2 do not show white lines, and are not faded or missing, skipto the step to examine Test Pattern 3.If any of the color blocks in Test Pattern 2 show white lines or are faded or missing completely,continue to the next step to clean the printhead.Step 15: Clean the printheadThe printhead could be clogged, and you might need to clean the printhead several times to restoreprint quality. Use an automated tool from the printer control panel to clean the printhead.caution:Never turn off the printer when ink cartridges are not installed. To avoid issues that require cleaningthe printhead or that can damage the ink system, always replace ink cartridges as soon as possible, andalways turn off the printer using the Power button.1. From the printer control panel, open the Setupmenu.2. Open the Printer Maintenance menu.3. If necessary, open the Tools menu, and then touch Clean Printhead.A test page prints.
4. Examine the test page.o If the print quality is unacceptable, touch Clean Again to continue the next level ofcleaning. If necessary, repeat these steps for the third cleaning cycle.note:If the printhead is badly clogged, it might require another cleaning cycle. If so, wait 30minutes before you perform all three levels of cleaning again.oIf the print quality is acceptable, touch Done.Continue to the next step.Step 16: Print another Print Quality Diagnostic PagePrint another Print Quality Diagnostic Page to examine the color blocks in Test Pattern 2 again. If there are no defects in Test Pattern 2, continue to the next step.If there are defects
HP OfficeJet 6900 Printers - Black or Color Ink Not Printing, Other Print Quality Issues This document is for HP OfficeJet 6950, 6951, 6954, 6956, 6958, 6962, OfficeJet Pro 6960, 6968, 6970, 6974, 6975, and 6978 All-in-One printers. The quality of a printed document or photo is not as expected. The procedures in this document should